Unity Connection Active Directory List Syncher
Connecting
to Unity Connection 7.x or Later
Task 2: Set
the Database Proxy Service Shutdown Time
Task 3:
Activate the Remote Database Proxy Service
Task 4:
Login to the Remote Server
Using
Connection Active Directory List Sycnher
Select
Source Active Directory List
Select
Target Connection Distribution List
Select User
Directory Lookup Options
Select
Membership Update Options
Updating
Membership Data For Selected List Associations
Editing
or Removing Managed List Associations.
Scheduling
List Membership Update Tasks
Schedule Sync for List Association Set
Overview
The Connection Active Directory List Syncher allows you to tie a public distribution list in Connection to all users associated with a public or security group in Active Directory. It will create the new public distribution list for you in Connection, add all the members from the Active Directory list that it can find as Connection users and also let you schedule updates for managed lists to keep that membership up to date on a regular basis (i.e. nightly or weekly or however often you feel necessary). You have the option of having the List Syncher only add users from Active Directory lists to Unity Connection lists (i.e. not remove missing users), both add and remove to keep the lists membership consistent or just report on users that need to be added and/or removed for review.
The tool will pull membership information from either public groups or security groups in Active Directory, however it will search only for lists that have a non empty “Display Name” property. Groups without display names defined are skipped in the search.
Requirements/Special Notes
This version of Connection Active Directory List Syncher runs on Windows XP/2000/2003/2008, Vista or Windows
7. When run on
This version of Connection Active Directory List Syncher requires .NET framework 4.0 or better. The install will detect if this needs to be installed and launch the setup automatically if it’s missing.
This version Connection Active Directory List Syncher only works with Unity Connection 8.0(1) or later.
Connection Active Directory List Syncher works only for stand alone installations of Connection, not CoRes (Business Edition) installs.
You must enable the ODBC proxy service on the Unity Connection server and attach to the database using an account enabled for the remote database access role. See the next section for details on this.
You must first install the Informix ODBC drivers before using this tool. Many off box tools for Connection 2.1(1) and later use these same drivers and you only need to install them once per client machine. You can download the installer for this on its home page here: http://ciscounitytools.com/App_InformixDrivers.htm
Connecting to Unity Connection 7.x or Later
For installations of 7.0(1) and later you need to use the database proxy service for access to the database from off box for any tool that uses database access.
Task 1: Configure a User without a mailbox with the Remote Administrator and System Administrator roles
1. Go to the Cisco Unity Connection Administration web interface for your installation.
2. You can leverage a user with or without a mailbox for off box data access purposes, but it’s strongly suggested that you create a new user without a mailbox that is used solely for the purpose of remote administration tasks for security reasons. This is also required if you want to export messages from a Connection 7.0(2) or later server – a user with a mailbox may not be allowed to extract messages from other mailboxes, whereas a user without a mailbox should have no problem.
3. Be sure the web administration password for this user is not configured to require a change at first login on the “Password Policy” page for that user.
4. If necessary, change the web administration password on the “Change Password” page. Note that only the web application password comes into play for remote data access.
5. Finally,
on the “Role” page for the user, add the “Remote
Task 2: Set the Database Proxy Service Shutdown Time
Out of the box the database proxy service is not running and if you try to start the service it will shut down right away. First you need to set the “Database Proxy: Service Shutdown Timer” value found in the System Settings -> Advanced -> Connection Administration section of the Cisco Unity Connection Administration page. By default this is 0. You can set it to as high as 999 days if you like. After the number of days configured here the remote database proxy service will shut down. This is useful if you want to do some migration work, for instance, and don’t want to forget to have the service disabled for security reasons.
NOTE: If you restart the server, the remote database proxy service will remain shut off. After a system restart you have to go in and manually turn on the service again (see step 3)
Task 3: Activate the Remote Database Proxy Service
1. Out of the box the service that listens to remote database requests is not active, you must turn it on. To do this, go to the “Cisco Unity Connection Serviceability” web admin page.
2. On the Tools menu, select the “Service Management” page.
3. The “Connection Database Proxy” item under the “Optional Services” section will be marked as “Deactivated” and stopped. Press the “Activate” button and it will be activated and started automatically.
Once you’ve started the proxy service you can connect with any tool that needs off box database access using the user name, web administration password and port “20532”.
NOTE: The service will automatically shut down after the number of days configured in step 2 above or if you restart the server.
Task 4: Login to the Remote Server
When you select to connect to a remote server from AD List Syncher, you will see a login dialog box that will be empty except for port 20532 filled in as the default for the port. You must provide the server name or IP address for the “Server” field and provide the login and password for the database connection account. Use the alias and web administration password of the database user created above for the login and password fields.
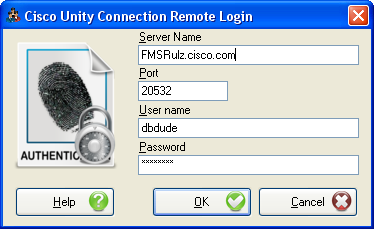
AD List Syncher will remember your entries including the password (which is stored in a secure hash). Each time you run the syncher it will load the settings of the last connection you made. Every server you’ve successfully connected to in the past will be listed in the drop down list in the order in which you connected to it last – most recent to least recent.
NOTE: The login and password information is stored along with the local Windows login name. Only those servers that have been attached to successfully using the current Windows login will be listed. If you are logging into the same Windows server with different users you will only see servers connected to with that particular Windows login.
NOTE: Providing the wrong password or login will fail quickly and give you a chance to try a different pair. Providing an incorrect server or port, however, results in a 60 second timeout while the tool waits for the Informix ODBC driver to return. Unfortunately this cannot be shorted. Type carefully.
Using Connection Active Directory List Syncher
The AD List Syncher is a simple wizard interface that offers 5 basic functions which you can choose from on the opening page:
You can:
1. Create a new synchronized list association using a new Connection distribution list. This allows you to create a new Connection list on the fly and then point it at a list in Active Directory and perform the user synchronization against it right away. This also adds the list as a known list association that you can choose to reference later for manual and scheduled updates.
2. Create a new synchronization list association using an existing Connection distribution list. This allows you to pick an existing Connection list and then point it at a list in Active Directory and perform the user synchronization against it right away. This also adds the list as a known list association that you can choose to reference later for manual and scheduled update.
3. Deleting an existing list association (created by using 1 or 2 above).
4. Synchronize membership for a list association created previously (using 1 or 2 above).
5. Schedule an automatic/periodic membership update to occur for one or more list associations created using items 1 or 2 above.
6. Manage list association set and scheduler. This will allow you to edit list association set name with respect to Cisco Unity Connection and also allow you to create scheduler for existing list association sets.
NOTE: You can only assign a system distribution list in Connection to one list in Active Directory. You cannot have the same Connection list homed on the same Connection server get membership updates from more than one Active Directory list – the List Syncher will not allow you to configure this.
Creating a New Managed List
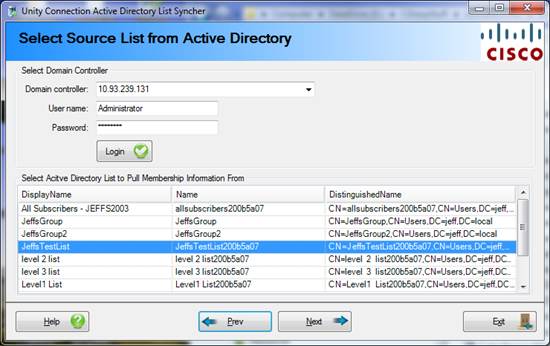
Select Source Active Directory List
If you are picking an Active Directory list to “point at” your Connection list (either new or existing) the next step is to connection to an Active Directory domain controller which the AD List Syncher will attach to for gathering distribution list information from AD.
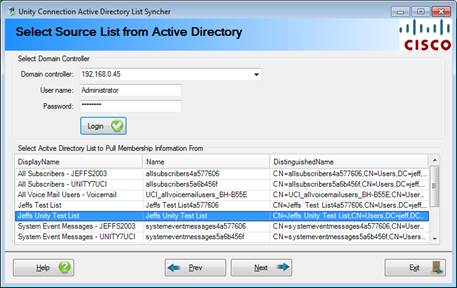
All the lists found in the root of the domain on that domain controller that have a non-blank display name will be presented in the lower grid for selection. If you double click on any entry the AD List Syncher will go out and get a count of the users found in that list – this can be useful to determine that you have rights to navigate any sub lists and that you’ve selected the correct list. Once you have the list you want to use, hit the “Next” button to proceed to the next page of the wizard.
The AD List Syncher will remember all the domain controllers you connected to from the local install – they are all available in the drop down list and it will remember the login name and password (which is stored as an encrypted string in a local database).
NOTE: This will only work reliably if you are running the tool on a server in the domain that contains the domain controller you wish to attach to. It is possible to attach to and get distribution list information from a domain controller in another domain in some cases however iterating over that list to get membership information will be unreliable using that mechanism and it’s not recommended.
Select Target Connection Distribution List
Once you’ve selected your source list from Active Directory you need to select a distribution list in Connection to act as your target for membership updates. Depending on which option you picked on the first page you will have the option of filling out information to create a new distribution list on the Connection server you’ve attached to or select an existing one that’s already there. Shown here is the page for creating a new list:
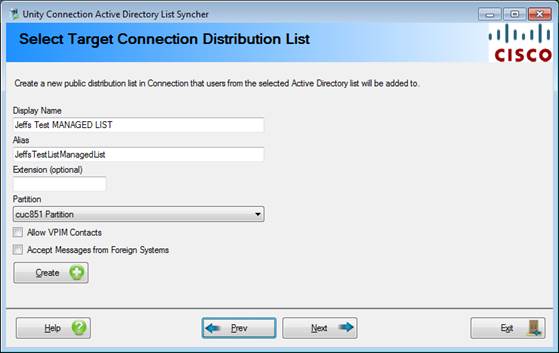
It is HIGHLY recommended that you use new, dedicated lists for this purpose if you plan to be automatically managing list membership details and that you name it in such a way that other administrators in Connection will not accidentally try and update the membership information in the Connection administration interface. The shot above uses the naming convention “MANAGED LIST” for that purpose. As a rule if you want these members to be included in another larger list (for instance “all users”) then create a custom, dedicated list that is synched with AD and then add THAT list to the existing “all users” list. This is much safer than having the AD List Syncher editing membership information directly on larger shared lists.
NOTE: The AD List Syncher DOES get fully flattened list of users from lists in Active Directory using a recursive search pattern. However those members are placed in the top level of the target Connection distribution list. In other word any sub lists in Active Directory are searched for users however those sub list structures are NOT recreated in the target Connection list.
Select User Directory Lookup Options
Once you’ve selected the source list in AD and the target list in Connection you need to tell the AD List Syncher how to find users with mailboxes in Connection with information about users found in the source Active Directory lists. This is done by pairing up the items from AD with corresponding properties in Connection’s database using the form here:
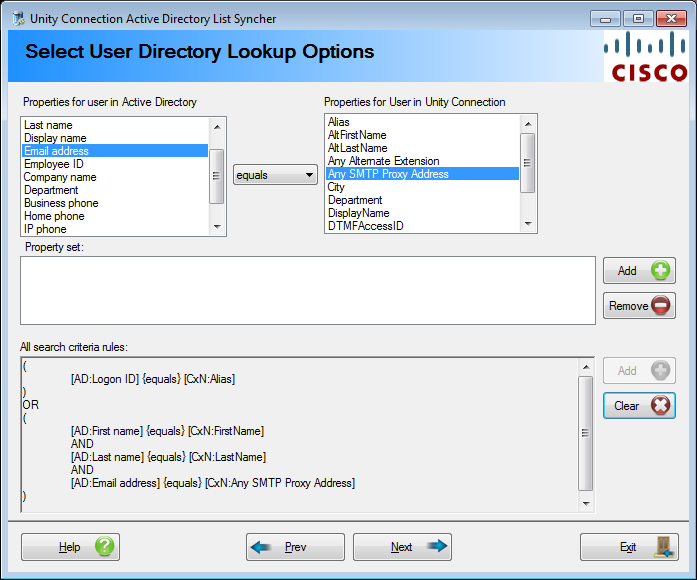
Select a single property from an Active Directory on the left, then choose an operator (equals, contains, starts with, ends with or does-not-equal) and finally choose a property in Connection’s user database to search against. Press the “Add” button next to the property set box. A Property set represents one or more pairings that ALL must be true for the AD List Syncher to consider a user found with the search to be a match. Once you have the property pairing(s) you want, press the ‘Add’ button next to the “All search criteria rules” box and it will add it with appropriate parenthesis blocks and AND/OR designations.
In the shot above the AD List Syncher will use the following rules to find a user:
1. Search for the alias of a user found in AD in Connection’s user database for a match. If one and only one user matches that string then the Connection user is considered a match for the AD user and the application moves on to the next user in Active Directory. If a single match is not found it moves on to the next property set.
2. It will then take the first name, last name and email address from Active Directory and search on the first name, last name and all proxy addresses in Connection for a single match. If one and only one Connection user is found using that search the Connection user is considered a match to the AD user and the tool adds that Connection user to the list. If not then the AD user is considered to have no match to a corresponding Connection user and the tool moves on to the next AD user.
You can add as many property pairings to a Property Set as you like and as many property sets to the search criteria set as you like.
NOTE: Searches for Connection users are done against the global user’s connection meaning that only properties that are replicated around a Connection network are included in the list of properties you can search on.
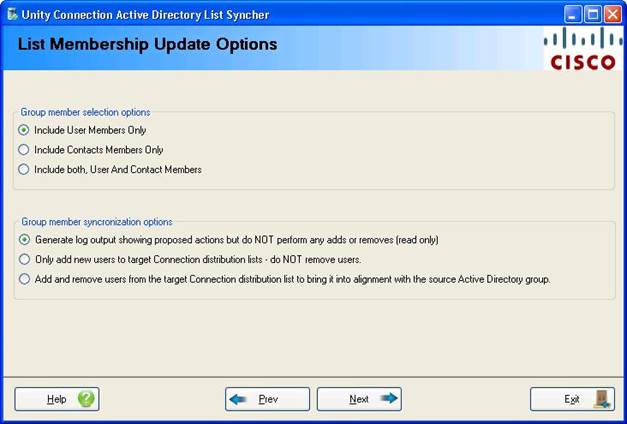
Select Membership Update Options
On this page you can select how you’d like the AD List Syncher to update
· Group member type on the target Connection distribution list. Currently there are three options presented on the page:
1.
Include User Members Only. This
option tell AD List Sync tool to add only global users of Connection to the
target Connection distribution list that matched the user membership data in
the source Active Directory group. This option will not allow adding of any
VPIM contacts on the Connection to the target Connection distribution list.
2.
Include Contacts Members Only. In
this option AD List Sync tool add only VIPM contacts of Connection that matched
with the users of the source Active Directory group into the target Connection
distribution list. Under this option no global user will be added to the target
Connection distribution list.
3.
Include both, User and Contact Members. This
is the “full sync” option which added both, global users as well as
VPIM contacts of Connection to the target Connection list which matched with
the user membership data in the source Active Directory group.
·
Group
membership on the target Connection distribution list. Currently there are
three options presented on the page:
1. Generate log output showing proposed actions but do NOT perform any adds or removes. This is a reporting output option that logs what the tool WOULD do if you let it do full updates including all the users that would be added to or removed from the target distribution list to bring it into agreement with the Active Directory group membership.
2. Only add new users to target Connection distribution lists. If you’re concerned that administrators may be manually adding users to a Connection distribution list you are using as a target with this tool you can instruct the AD List Syncher to not ever remove users from a list but only add users that are missing based in the Active Directory group listing. Note that this is not recommended – it’s much cleaner to have lists dedicated to synchronization and to do full syncs and not manage the membership for those lists “manually” via the SA.
3. Add and remove users from the target Connection distribution list. This is the “full sync” option which the tool is intended to use. The membership of the target Connection distribution list should match the user membership data in the source Active Directory group when it’s completed.
Perform Synchronization
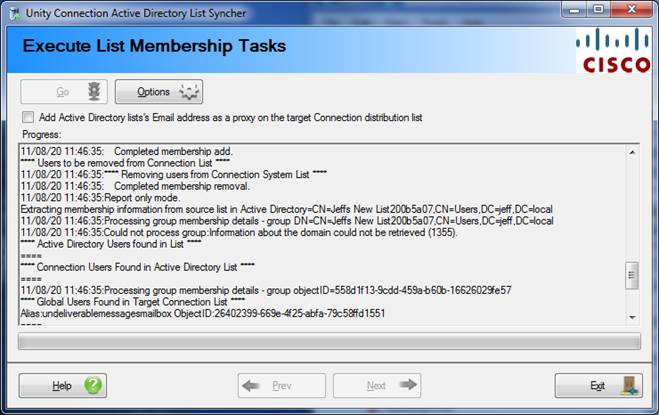
Once you’ve selected the source list from AD and the target list in Connection and the rules for user searches, you can execute the action you wish the Active Directory List Sycnher to perform. You have the option to just report on what the tool WOULD do but not perform any actions, having the tool ONLY add new users to the target Connection list as needed but not remove any users or have it do a full synchronization including both adding and removing users from the target Connection list to bring it’s membership into alignment with its corresponding Active Directory list source.
Once you complete the task you need to exit the application – you cannot “move back and forth” picking new actions and firing up the tool on the fly at this point.
The options menu allows you to schedule synchs to happen automatically (not currently implemented) or adjust the execution priority of the tool and/or set debug mode (which results in more detailed logging information). The execution priority simply adds additional CPU “naps” at the bottom of loops when adding/removing users from Connection lists to reduce the impact on Connection if you are running the tool during normal production hours and are concerned about impacting performance. It has no impact on the functions pulling details from the Active Directory domain controller.
The “Add Active Directory list’s Email address as proxy on the target Connection distribution list” checkbox can be selected to have the AD List Syncher attempt to add the Active Directory group’s email address (if it has one) as a proxy on the Connection distribution list configured as the membership target for that AD group. If the list already has that proxy assigned this option does nothing. Otherwise the proxy is attempted to be added and the log will include a note if it succeeded of failed. A common reason for failure is if the proxy address is already associated with a different object in the Connection directory.
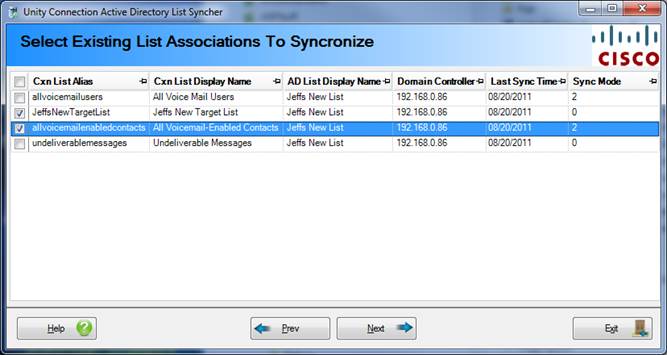
Updating Membership Data For Selected List Associations
Selecting this option will show you all the list associations defined for the Connection server you are currently attached to. You may select one or more of the lists and have the tool update their list membership information in batch for you.
Editing or Removing Managed List Associations
Selecting this option will show you all the lists associations defined in the local settings database for the Active Directory List Sycnher tool. You can delete one or more of these associations or change the membership synchronization mode using the drop down list at the bottom of the control and hitting the “Save Mode” button when it’s enabled. Each list association can have a separate membership synchronization mode setting.
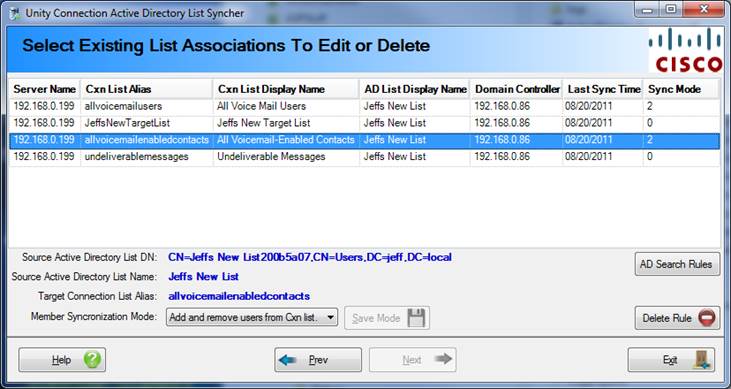
To see the list of rules configured for finding users found in the Active Directory group on the Connection database, press the AD Search Rules button with the list association you’re interested in selected.
Note that you cannot edit anything else other than the synchronization mode for a standing list association. If you wish to make other changes you will have to delete it and create it as new.
Scheduling List Membership Update Tasks
Manage List Association Set
AD List Sycher tool introduced new concept of “List Association Set” for scheduling in version 1.0.9. Using this a user can create sets of lists that are updated on separate schedules.. There is one default set named “DefaultSet” which includes all the list associations – by default when scheduling a synch this is the list used which means all list associations are updated when the application is run. If, instead, the user wishes to have a subset of lists synched on a particular schedule and a different set of lists synched on a different schedule, this can be done by creating new list associations and scheduling backups for them each.
To configure schedule sets and schedule backups for them, on the last page of the wizard press the Options button and select the “Scheduled Run Options”, select “Schedule Sync” and select “Manage List Association Set”.

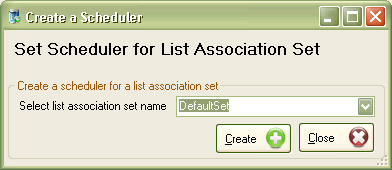
This page lets you create separate schedule sets and delete them – all but the “DefaultSet” can be removed.
Schedule Sync for List Association Set
This option is used to schedule backups for specific schedule sets created above. When a scheduler executed it will sync only those Cisco Unity Connection distribution lists that are associated with a list association sets for which a scheduler is created.
To configure this you need to do the following things:
1. Attach to the Connection server you wish to schedule exports against. AD List Syncher can handle multiple scheduled updates against different Connection servers with different options. For each server you attach to only specific lists that came under the list association set are updated for which scheduler is set.
2. Once you’ve selected all your options and lists to synch etc..., on the last page of the wizard press the Options button and select to save settings. This will save the lists and items selected into the database used by AD List Syncher when running scheduled updates.
3. Finally, advance to the last page of the wizard, press the Options button and select the “Scheduled Run Options”, select “Schedule Sync” and select “Schedule Sync for List Association Set”.
When user click on “Create” button this will launches the Windows scheduler task wizard – this will look a little different on Windows XP/2000/2003 than it will on Vista or Windows 7 or Windows 2008. But the same basic options are available in all interfaces. You need to provide an account to run under (preferably the same one you are running the syncher with currently if possible) and configure the schedule options (on the “Trigger” tab for the Windows 7 style schedule wizard below).
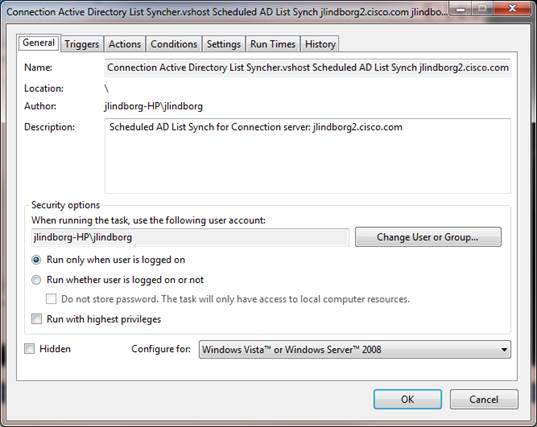
This gives you the option of scheduling it one time or to run daily, weekly, several times a week etc…
NOTE: A common mistake for scheduling exports is to forget to check the “enabled (scheduled task runs as specified time)” box on the task tab on the old style interface or selecting the “Run whether user is logged on or not” option on the new style interface above.
Obtaining Updates
To check for updates to this tool, visit http://www.CiscoUnityTools.com or you can use the “Check for updated versions” link found in the About dialog box of this application.
Revision History
Version 1.0.28 – 1/1/2016
· Updated setup to deploy on Windows 10 installs
Version 1.0.27 – 3/18/2015
· Updated Chilkat library to most recent and switched to NuGet deployment.
· Updated setup framework
· Fixed issue with 2012R2 and 8.1 x64 install flag checks
Version 1.0.26 – 12/23/2014
· Added more debug output in and around the ODBC connection reestablishement after a long delay fetching AD objects.
Version 1.0.25 – 7/22/2014
· Switched AD interface class to use the newer PrincipalAccount library and newer search/filter approach in an effort to simplify the logic for large AD directories.
· Added logic to force a destroy/recreate sequence for the ODBC link to Unity Connection when too much idle time has passed and the server may have closed the port.
Version 1.0.22 – 3/12/2014
· Added email address to list presentation grid for AD list selection
· Added option to include/exclude lists from AD fetch based on email address being empty or not.
Version 1.0.21 – 12/16/2013
· Upgraded grid controls to support dynamic “contains” filtering of lists by name fields on the selection screen
Version 1.0.20 – 11/9/2013
· Added forced garbage collection when iterating over very large numbers of groups returned from AD – every 1000 lists fetched results in a GC collection and waiting for compaction. Slows down parsing for lists however prevents heap fragmentation issues for large directories.
· Added additional debug output around list parsing and collection, updated duplicate list DN checks, added automatic debug output for UI events.
· Changed method of fetching and filtering list data from Active Directory.
Version 1.0.17 – 9/21/2013
· Fixed minor typo in message box text.
· Added CLI sub project for debugging groups being found in AD
Version 1.0.16 – 5/7/2013
· Added option for email notifications for secure SMTP server configuration.
· Fixed issue with zipping up log file for inclusion in email that could fail based on timing of when log file was closed.
· Updated about box to have proper version checking and launch home page options.
· Moved URL definition to application settings instead of hard coded string.
· Changed version format to standard 3 digit construction instead of 4.
Version 1.0.0.13 – 3/5/2013
· Built with updated ActiveDirectoryFunctions sub project to handle gathering more than 1000 lists in the directory using paging.
Version 1.0.0.12 – 2/16/2013
· Added option to get lists with empty display name properties – by default it continues to filter those out.
· Updated grid controls to build 10.1 from Infragistics.
Version 1.0.0.11 – 1/20/2013
· Updated for Windows 8 installations
Version 1.0.0.10 – 11/1/2012
· Added new item in the Options menu drop down on the last page to save the list configuration data without having to execute the list synch action first.
Version 1.0.0.9 – 10/15/2012
· Added new concept of ‘List Association Set’ for scheduling.
Version 1.0.0.8 – 6/28/2012
· Added note about security groups working.
· Updated comparison logic to use the more relaxed “starts with” instead of strict “equals” to avoid problems with some configurations.
Version 1.0.0.7 - 5/31/2012
· Added EmployeeNumber to the AD schema selection list.
· Updated help for scheduled synch runs.
Version 1.0.0.5 - 4/27/2012
· Moved back to older ODBC drivers for Informix due to issues on 2000/XP/2003 installs in the field with the IBM SDK setup for .NET drivers.
Version 1.0.0.4 – 4/9/2012
· Added support for VPIM contacts.
· Added option to set the group member type selection on a per list association basis.
· Added information to log file.
· Updated logging logic to correctly launch most recent log file at end of application run.
· Updated setup to include .NET Informix driver checks.
Version 1.0.0.2 – 8/20/2011
· Added list association management including viewing, editing and deleting.
· Added group list processing capabilities for batch mode and, for a future version, scheduled updates of one or more lists associated with a Connection server.
· Added option to set the membership synchronization mode on a per list association basis.
· Added option to attempt to apply AD List’s email address as a proxy address on its target Connection distribution list.
Version 1.0.0.1 – 8/2/2011
- First beta release
© 2014 Cisco Systems, Inc. -- Company Confidential