Connection
Alias and Extension Update
Connecting to Unity Connection 7.x or Later
Task
1: Configure a User with the Remote Administrator and System Administrator
roles
Task
2: Set the Database Proxy Service Shutdown Time
Task
3: Activate the Remote Database Proxy Service
Task
4: Login to the Remote Server
Troubleshooting Remote Login Issues
Double
Check Connection Server Settings
Disable
CSA and all Virus Scanning Applications
Make
sure the Informix .NET Driver is Installed and the PATH Points to it.
Using Alias and Extension Update
Remap
Alias and/or Primary Extension
Resolve
Conflicts and Apply Changes
Overview
The Unity
Connection Alias and Extension Update tool has a single simple mission and
that’s to allow easy and fast updating of standing Unity Connection user’s
alias (with accompanying SMTP address) and/or their primary extension
number. Since BAT does not allow for
updating the user alias this tool is provided to give administrators that
option.

The tool is a
simple wizard that allows exporting of user data from a target Unity Connection
server into a CSV file and then the ability to import a similarly constructed
CSV file that has updated alias strings and/or primary extension numbers to
apply.
Prerequisites
This tool works on any version of Unity Connection 7.0(2) or later.
This
tool will run on Windows Server 2000/2003/2008, XP,
You must install the 32 bit Informix Client SDK version 3.5 or later including the .NET drivers even if you are running on a 64 bit version of your operating system. See the Informix Driver Download Page for details.
You must enable the ODBC proxy service on the Unity Connection server and attach to the database using an account enabled for the remote database access role. See the next section for details on this.
This tool uses Microsoft’s full .NET 4.0 library (the limited “client” version of .NET 4.0 is not sufficient). The installation will check to see if you have that installed and if not will offer you the option to download and install it automatically.
Connecting to Unity Connection 7.x or Later
For installations of 7.0(2) and later you need to use the database proxy service for access to the database from off box for any database tool including this one.
Task 1: Configure a User with the Remote Administrator and System Administrator roles
1. Go to the Cisco Unity Connection Administration web interface for your installation.
2. You can leverage a user with or without a mailbox for off box data access purposes, but it’s suggested that you create a new user without a mailbox that is used solely for the purpose of remote administration tasks for security reasons.
3. Be sure the web administration password for this user is not configured to require a change at first login on the “Password Policy” page for that user.
4. If necessary, change the web administration password on the “Change Password” page. Note that only the web application password comes into play for remote data access.
5. Finally,
on the “Role” page for the user, add the “Remote
Task 2: Set the Database Proxy Service Shutdown Time
NOTE: For Unity Connection 10.0(1) and later this step is not necessary as there is no longer a shutdown timer for the Database Proxy Service.
Out of the box the database proxy service is not running and if you try to start the service it will shut down right away. First you need to set the “Database Proxy: Service Shutdown Timer” value found in the System Settings -> Advanced -> Connection Administration section of the Cisco Unity Connection Administration page. By default this is 0. You can set it to as high as 999 days if you like. After the number of days configured here the remote database proxy service will shut down. This is useful if you want to do some migration work, for instance, and don’t want to forget to have the service disabled for security reasons.
NOTE: If you restart the server on versions prior to Unity Connection 10.0(1), the remote database proxy service will remain shut off. After a system restart you have to go in and manually turn on the service again (see step 3)
Task 3: Activate the Remote Database Proxy Service
1. Out of the box the service that listens to remote database requests is not active, you must turn it on. To do this, go to the “Cisco Unity Connection Serviceability” web admin page.
2. On the Tools menu, select the “Service Management” page.
3. The “Connection Database Proxy” item under the “Optional Services” section will be marked as “Deactivated” and stopped. Press the “Activate” button and it will be activated and started automatically.
Once you’ve started the proxy service you can connect with any tool that needs off box database access using the user name, web administration password and port “20532”.
NOTE: For versions prior to Unity Connection 10.0(1) the service will automatically shut down after the number of days configured in step 2 above or if you restart the server.
Task 4: Login to the Remote Server
When you first start the tool, you will see a login dialog box that will be empty except for port 20532 filled in as the default for the port. You must provide the server name or IP address for the “Server” field and provide the login and password for the database connection account. Use the alias and web administration password of the database user created above for the login and password fields.
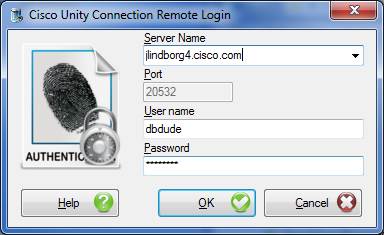
The tool will remember your entries including the password (which is stored in a secure hash). Each time you run the tool it will load the settings of the last connection you made. Every server you’ve successfully connected to in the past will be listed in the drop down list in the order in which you connected to it last – most recent to least recent.
NOTE: The login and password information is stored along with the local Windows login name. Only those servers that have been attached to successfully using the current Windows login will be listed. If you are logging into the same Windows server with different users you will only see servers connected to with that particular Windows login.
NOTE: Providing the wrong password or login will fail quickly and give you a chance to try a different pair. Providing an incorrect server or port, however, results in a 60 second timeout while the tool waits for the Informix driver to return. Unfortunately this cannot be shorted. Type carefully.
Troubleshooting Remote Login Issues
Double Check Connection Server Settings
Make sure the remote database proxy service is running. This service does shut itself off after a period of time and does not start itself automatically on a server reboot.
Make sure the user you are logged in as has the remote administrator role assigned to their account, that their password is not set to reset at the next login and that their account is not currently locked.
Make sure the server name or IP address you are using to connect with is reachable from your Windows client. DNS issues often come up in connection failures.
Disable CSA and all Virus Scanning Applications
It’s a good idea to disable CSA and all virus scanning applications if you are having problems connecting to be sure the ODBC port (20532) is not being blocked. Also check your firewall settings (assuming you are running one).
Make sure the Informix .NET Driver is Installed and the PATH Points to it.
For 32 bit OS installs, the IBM Informix driver is installed in C:\Program Files\IBM\Informix\Client-SDK. Make sure this path exists on your server and has not been removed or renamed.
The system PATH variable will also include a reference to the “\IBM\Informix\Client-SDK\bin” location where the driver is installed. Make sure this path is referenced in the PATH. Also, if the PATH is very long sometimes the Informix driver will not find it, try moving it to the beginning of the PATH statement.
If you had an older version of the IBM Informix Client SDK installed it's a good idea to uninstall all other versions and make sure you have a single instance of the SDK 3.5 or later. Mixing versions of Informix drivers is not a good idea as only one can be active at a time.
Using Alias and Extension Update
Use of the Alias and Extension
Update tool is very straight forward – it only has two basic functions to
choose from in a small 3 page wizard.
Selection of Function
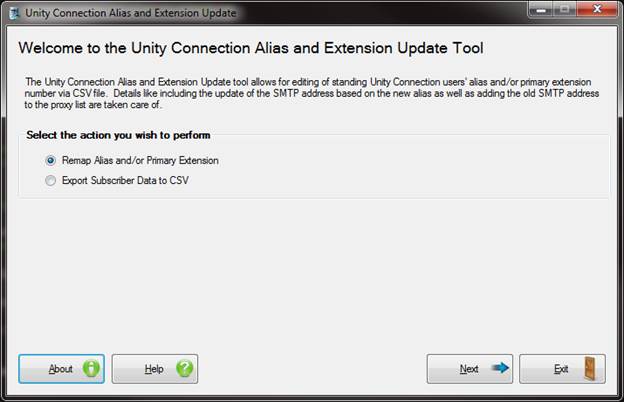
After logging into your target Unity Connection via ODBC you are presented with the first page of the wizard which lets you choose which of the two functions it provides:
· Export Subscriber Data to CSV – this lets you choose some or all voice mail users (users with mailboxes) to export to CSV. The CSV output (seen on the next page) includes the existing alias and existing primary extension number for users as well as empty columns for new alias and new extension values to map which makes it easy to make changes. It also shows the correct format of a CSV file to be imported if you want to make your own.
· Remap Alias and/or Primary Extension – this lets you select a CSV file in the format produced by the Export function and have those users’ aliases and/or primary extension strings updated.
NOTE: for extensions ONLY the primary extension number (the one that appears on the user’s profile page) can be edited – alternate extensions are not searched for or updated.
Export Subscriber Data to CSV
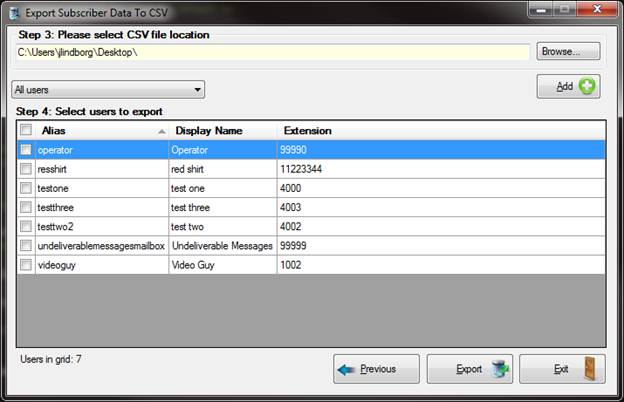
If you select to export subscriber data on the first page you are presented with this page which lets you select the output folder for the CSV file and which users you want to include. You can choose all users, users with a particular substring in their alias, a particular substring in their extension number or a range of extensions.
For substrings of extensions you can use the percent sign (“%”) as a wildcard and separate multiple search clauses by semicolon. For instance for all extensions that start with 95 and all extensions that start with 88 you could use “99%;88%” as your search string.
Use the checkbox in the upper left of the grid to select/de-select all users in the grid at once. Once you have your users selected and your folder for output determined you can press the “Export” button and a CSV file will be created in the folder indicated. Once done you will be given an opportunity to open it in notepad.exe directly. The CSV will look like this:
OLD_ALIAS,
NEW_ALIAS, OLD_EXTENSION, NEW_EXTENSION
"awhite","","1002",""
"jbaxter","","11223344",""
"plindborg","","4000",""
"ywhite","","4002",""
There are 4 columns included, these are all required by the update tool when editing user alias and extension values. Other column names can exist but they will simply be ignored by the update process.
The file created will be named “Users_<server name>_<year month day hour minute second>.CSV. So for instance:
Users_uCxn11a.lindborglabs.com_140113_08_07_28.CSV
NOTE: For Unity Connection 10.0(1) and later aliases can contain an “@” sign for sub domain login support. In this case the Alias and Extension Update tool will create the SMTP address using the alias string with the underscore character “_” replacing the “@” sign to keep the string legal.
Remap Alias and/or Primary Extension
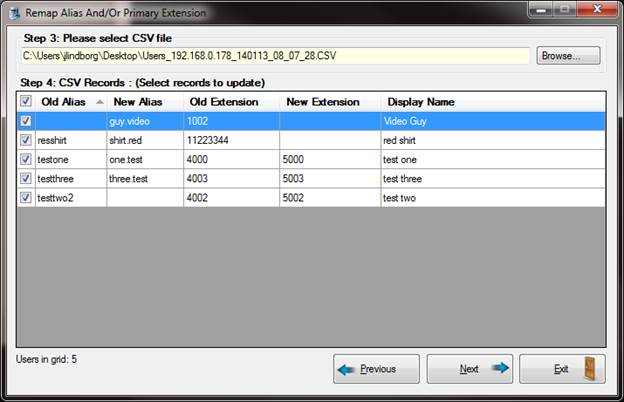
Once you have your CSV file edited with new alias strings and/or extension strings you can choose the “Remap Alias and/or Primary Extension” option on the opening page and you are presented with the remap page which lets you select a CSV file and load its contents for review.
If the file does not have all 4 columns defined in the last section it will be rejected. If no users in it are found by the existing (“old”) alias string and/or the existing primary extension (“old” extension), the grid will be empty – this is how users are found in the target directory. If both old alias and old extension are provided they must BOTH match to be considered a valid user. If just the extension is passed there must be only ONE of those extensions in the directory (multiple is possible using partitions).
As you can see in the above example it’s possible to change only the extension, only the alias or both depending on how the CSV file is filled in.
Once you’ve selected the users from the CSV file you will include in the update process, press the “Next” button to advance to the last page of the wizard.
Resolve Conflicts and Apply Changes
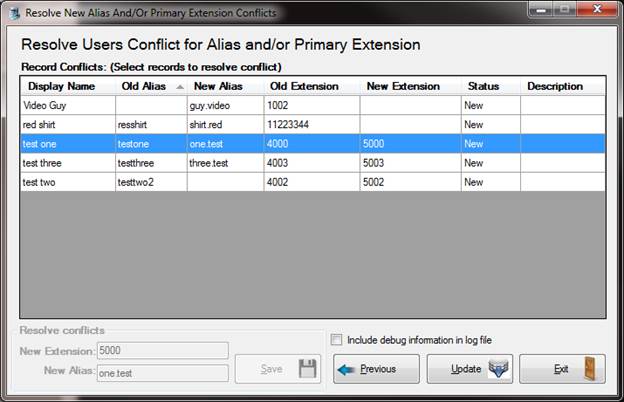
Once you’ve loaded your CSV file all valid users from the file that have an updated alias and/or extension are shown in the grid for review. If there are conflicts they will be shown with a conflict status and description and the grid row will be colored red – you will not be allowed to update the database until ALL conflicts are resolved.
A conflict can mean the new alias and/or extension conflicts with a user already in the Unity Connection directory or it can mean that it conflicts with the alias and/or extension for a user that WILL be changed in the directory (i.e. another user you have set to update).
To make it easier you can edit the extension or alias field directly on this form – the “Resolve Conflicts” box in the lower left will be enabled when you select a row that’s listed in conflict and you can change the alias and/or extension and press the “Save” button – it will again check that record for potential conflicts and if it passes the row’s conflict status will be cleared.
You can also press the Previous button and uncheck one or more rows from update if you would rather not edit “on the fly” to avoid conflicts.
Once you have all conflicts resolved you can press the “Update” button and changes will be applied. You can check the “Include debug information in log file” checkbox to include much more data in the output log including each and every query and stored procedure call to the database made by the tool. This greatly increases the size and “chattiness” of the log file and normally this is only needed when there’s a specific problem being diagnosed.
Any errors and warnings will be included in the log file output and a count of these is provided when the tool is finished – search the log file for “(error)” or “(warning)” to find these in the file for review.
Revision History
Version 1.0.6 – 8/17/2018
·
Updated project to use .NET 4.5.2 libraries instead
of the older 4.0
·
Updated all NuGet libraries
·
Updated logging output to include information on
each row processed from CSV file selected including info that the user wasn’t
found in the Connection database
Version 1.0.5 – 3/8/2017
·
Added option to override alias lower and preserve
case from CSV file import
Version 1.0.4 – 5/28/2014
·
Updated logic to force alias and SMTP address
constructions to be lower case before passing them to Connection’s back end
procedure calls.
Version 1.0.3 – 4/18/2014
·
Added ability to handle “@” sign in alias string
when constructing new SMTP addresses for Connection 10.0 and later versions.
Version 1.0.2 – 1/12/2014
·
First beta release of tool
© 2017 Cisco Systems, Inc. -- Company Confidential
|
|