Cisco Unity Connection Broadcast Message Tool
Using
the Broadcast Message Tool
Requirements
for User Sending Messages
Saving
and Loading Server Data
Overview
The Broadcast Message Tool allows you to schedule and send broadcast messages via a simple interface to multiple Unity Connection servers. In addition, the code for the tool makes use of the Cisco Unity Connection messaging API’s and the code is freely available for download. The tool does not, at present, allow for management of the broadcast message after sending; that functionality is still available only via the telephony user interface.
Requirements/Special Notes
A recent version of Windows is required to run the program and you may be prompted to install the .Net runtime. In addition, the tool writes to your Windows profile temp directory. Writing to the temp directory may require local administrative privileges.
The Broadcast Message tool requires a Cisco Unity Connection server version above 8.5(x) and a subscriber account with broadcast message send permissions. You cannot use an administrator without a mailbox for this application, you must authenticate as a user that has a mailbox and is also configured to send broadcast messages.
Using the Broadcast Message Tool: Sending Messages
The Broadcast Message Tool is easy to use for simply sending a broadcast message to one or more Unity Connection servers. Follow the instructions below to POST a message to a Cisco Unity Connection server.
1. Make sure a user with a mailbox that has the option to send broadcast messages turned on for their account in the “Send Message Settings” section is available on each server you want to send messages to. No special role needs to be assigned to them to just send messages, however if you want advanced options such as limiting which users get messages and reviewing/deleting messages you will need to grant the “Remote Administrator” role and configure the ODBC Proxy service (see below for details on those features and that setup process).
2. Install and run the Broadcast Message Manager tool. When it comes up it’ll look like the picture here (more advanced features seen on the form are discussed later):
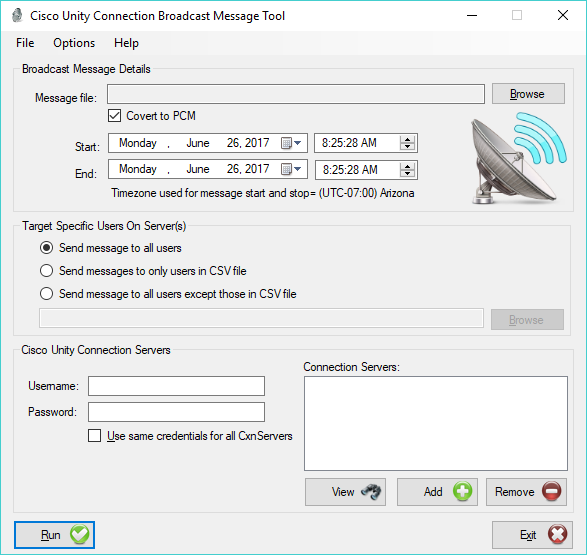
3. Click the browse button and select a WAV file to use for the broadcast message. The message file and path to the file will be displayed, but cannot be edited manually. Select browse to change the message file.
4. By default the tool converts the WAV file to PCM format (8 KHz, 16 bit and mono). Deselect or select the option depending on the codec your WAV file is encoded with.
5. Select the start date and time for the broadcast message. For example, if you want the broadcast message to become active on Monday, September 27, 2011 at 8:00:00 AM, select that date and time.
NOTE: The time zone of the local workstation you are running the Broadcast Message Tool on will be used for the start and stop times. If the workstation is not set for the time zone you want to use you will need to set the time zone of the Windows installation and launch the Broadcast Message Tool again.
6. Select the end date and time for the broadcast message. For example, if you want the broadcast message to expire on Friday, September 30, 2011 at 5:00:00 PM, select that date and time.
7. If multiple Cisco Unity Connection servers are selected, the tool allows the broadcast administrator to use the same credentials across all servers. If so, enter the common username and password for all servers and select the use same credentials for all servers check box. This is fairly unusual however since to send a message the user must have a mailbox and it’s unusual to have a user with a mailbox with the same login and password on multiple servers – but possible, so the option is there.
8. Select one or more servers to POST the broadcast message to by using the green ‘+’ and red ‘-‘ signs. If you have selected to use same credentials for all servers, you will not be presented to enter a username and password. However, if you have not, you will be required to enter a username and password for each server
9. After entering a server IP address or fully qualified domain name (FQDN) the tool will ping the server to ensure it is reachable. If not, an error will occur and you will be given the opportunity to correct the IP or server name and/or the login name and password.
10. After entering a server and successfully contacting the server, the server will be added to the list of servers. You may view the information provided by double clicking the item in the list to view its properties:

11. Finally, click Run. You’ll be presented with a “Continue?” message. If everything is correct, lick Yes and the message(s) will be POST to the Cisco Unity Connection Servers.
12. Upon successful completion you will be given the opportunity to view the log file for each successful (or unsuccessful) POST with detailed information regarding each POST.
Requirements for User Sending Messages
The user you choose to log in with for the server(s) you are sending messages to must meet only a couple basic requirements:
1. They must be a user with a mailbox. Because the broadcast message manager is sending a message on behalf of that user, they cannot be an admin user without a mailbox, it must be a user with a mailbox only.
2. The user must have the option “User Can Send Broadcast Message to Users on This Server” checked on the “Send Message Settings” page for the user. If this is not checked sending broadcast messages on behalf of this user will fail.
That’s it – they do not need to be an administrator or have any special role assigned to them at all. It’s fine if they also have role(s) assigned but they are not necessary.
If you are also wanting to use the new “limited send” broadcast message the user WILL need to have the “Remote Administrator” role assigned to them and the ODBC Proxy service will need to be enabled, however this is an optional feature and is not required unless you need to use it.
Saving and Loading Server Data
Once you have one or more servers configured to receive broadcast messages you can save some time for the next message session by saving that data off and loading all those servers up again in one shot. You can save all the servers using the “Save” option under the file menu. The next time you run the Broadcast Message Tool you can select “Open” from the file menu and those server will be loaded automatically.
If any of those servers changed names or the accounts you used to access them have changed since the time they were saved you will see login errors presented for those servers and you will need to configure them again.
Broadcast Message Tool Advanced Features
As of version 2.0.3 and later some new advanced functions are available for the BMT. These features require access to the Connection servers via ODBC which requires you install the IBM Informix Client SDK software which can be found on is home page here as well as configuring the user you access the server with for the “Remote Administrator” role. Details for
Sending Broadcast Messages to Limited User List
By default when you send a broadcast message to a server, all users with a mailbox on that server will be required to listen to the message when they log in via the phone after the message is active. The Broadcast Message Tool offers the option to limit which users the broadcast message is active for by providing a CSV file parsing mechanism that allows you to pass the alias and/or extension number of users you want to receive the broadcast message – all other users not found in that CSV list will be marked as having already heard the broadcast message so it’s not presented to them when they log into their voice mail account. Conversely you can decide a list of users is restricted from getting that message and all other users on the server will get it. Select the radio button you prefer for this.
Use of this feature requires ODBC access to the Connection server(s) to work and the user you are attaching to the servers must have BOTH the option to send broadcast messages to users on the server AND have the “Remote Administrator” role assigned to them. The ODBC proxy service must also be running on the Connection server and you must install the Informix SDK ODBC drivers on the client – instructions for those steps are in the following sections.
The CSV file format is very simple – there must be either a column named “ALIAS” and/or a column named “EXTENSION”. Having both is fine but if both have values only users that have a matching alias AND matching extension will be included. If only one value is provided that’s the only one that will be searched for. There can be any number of other columns in the file, they will simply be ignored.
The log file will include the full list of users found and who received the message on each server. A single CSV file is used for users on ALL servers selected – if you want separate CSV files for each server you will need to run the tool multiple times selecting each server and CSV file combination you want. It’s usually easier to simply create one large CSV file with aliases that is applied on all servers if you can manage it.
Reviewing Message and Recipient Status
The other advanced feature allows you to review all broadcast messages currently on a selected server. Again, this requires ODBC access (discussed below). On the main form you can select a single server from the list and press the “View” button which brings up the following form:
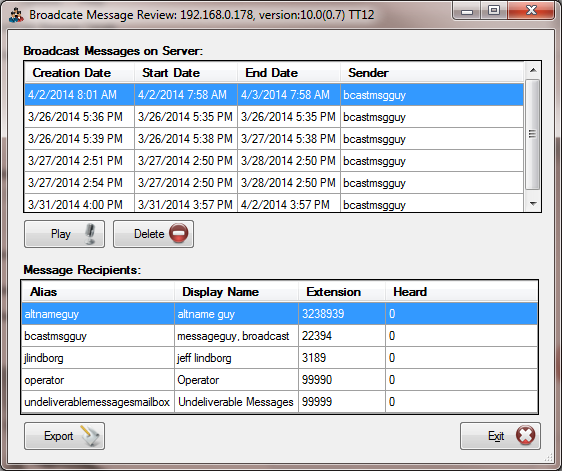
This shows all the broadcast messages (pending, current or past still on the server). The alias of the user that sent the message, the time it was created and the start/end times for the message are show. Further, the list of all local subscribers are shown and the “Heard” column will indicate which users have listened to the broadcast message (with a “1” value) or not heard it yet (with a “0” value) are shown.
You can play the WAV file for any selected broadcast message for review, delete the message entirely if you like using the “Play” and “Delete” buttons under the message list. Further, you can export the recipients status list for a selected message to a CSV file using the “Export” button at the bottom.
Connecting to Unity Connection 7.x or Later via ODBC
These steps are only necessary if you need ODBC access to the server to use the special Limited User List delivery function or review broadcast message statuses for selected servers – otherwise you do not need to do this.
Task 1: Configure a User with a mailbox with the Remote Administrator role
1. Go to the Cisco Unity Connection Administration web interface for your installation.
2. Be sure the web administration password for this user with a mailbox is not configured to require a change at first login on the “Password Policy” page for that user.
3. If necessary, change the web administration password on the “Change Password” page. Note that only the web application password comes into play for remote data access.
4. Finally, on the “Role” page for the user, add the “Remote Administrator” role to the “Assigned Roles” list and save. You can assign any or all other roles as well but for the purposes of remote access to the database this role is necessary.
Task 2: Set the Database Proxy Service Shutdown Time
NOTE: For Unit Connection 10.0(1) and later this step is not necessary as there is no longer a Database Proxy Service Shutdown Time.
Out of the box the database proxy service is not running and if you try to start the service it will shut down right away. First you need to set the “Database Proxy: Service Shutdown Timer” value found in the System Settings -> Advanced -> Connection Administration section of the Cisco Unity Connection Administration page. By default this is 0. You can set it to as high as 999 days if you like. After the number of days configured here the remote database proxy service will shut down. This is useful if you want to do some migration work, for instance, and don’t want to forget to have the service disabled for security reasons.
NOTE: If you restart the server on versions prior to Unity Connection 10.0(1), the remote database proxy service will remain shut off. After a system restart you have to go in and manually turn on the service again (see step 3)
Task 3: Activate the Remote Database Proxy Service
1. Out of the box the service that listens to remote database requests is not active, you must turn it on. To do this, go to the “Cisco Unity Connection Serviceability” web admin page.
2. On the Tools menu, select the “Service Management” page.
3. The “Connection Database Proxy” item under the “Optional Services” section will be marked as “Deactivated” and stopped. Press the “Activate” button and it will be activated and started automatically.
Once you’ve started the proxy service you can connect with any tool that needs off box database access using the user name, web administration password and port “20532”.
NOTE: For versions of Unity Connection prior to 10.0(1) the service will automatically shut down after the number of days configured in step 2 above or if you restart the server.
Obtaining Updates
To check for updates to this tool, visit http://www.CiscoUnityTools.com
Revision History
Version 2.0.6 – 3/8/2018
· Updated to support forcing SSL connections via HTTP when attaching to versions of Unity Connection older than 10.0 which did not support TLS
Version 2.0.5 – 6/26/2017
· Updated to .NET 4.5 library
· Updated NuGet libraries
· Added logic to handle Windows security changes to disallow SSH HTTP connections when TLS is available
· Added ability to reference list of aliases to restrict messages to from a CSV file
Version 2.0.4 – 6/11/2014
·
Added a longer timeout before fishing the ObjectId of the new Broadcast Message when flagging the
read status for users.
Version 2.0.3 – 4/2/2014
· Added ability to send broadcast messages to only selected users.
· Added ability to review, play and delete broadcast messages on selected servers.
· Added ability to show the recipients list for any broadcast message and export it to CSV for reviewing which users have and have not heard a particular broadcast message yet.
Version 2.0.1 - 5/8/2013
· Swapped out some back end library components for shared functionality for REST functionality and Sqlite database items.
· Changed save/load functions to write/read from SQLite tables instead of serializing to a file.
· Added debug output option
· Update help file format and content
· Updated logging to include more details for failures.
· Changed application icon.
Version 1.0.0.3 – 1/19/2013
· Updated for Windows 8 installations
Version 1.0.0.2 – 1/18/2012
· Added task threading for wav upload and login sections to keep the UI responsive.
· Updated logic for shared credentials – checks for empty credentials up front and shows disabled credential controls with shared values in them instead of blank.
· Added Connection server version checks at login to look for 8.5.1 or later.
· Added exception handling around HTTP and DNS sections to catch common failures.
· Added logic link to larger CUPI library project and added updated broadcast message upload capability to that library for future sharing.
· Added link to help from within application
· Added qSetup installation to the project
Version 1.0.0.1 – 01/08/2012
· First beta release
© 2014 Cisco Systems, Inc. -- Company Confidential