Connection
Bulk Call Handler Delete
Connecting to Unity Connection 7.x or Later
Task
2: Set the Database Proxy Service Shutdown Time
Task
3: Activate the Remote Database Proxy Service
Task
4: Login to the Remote Server
Troubleshooting Remote Login Issues
Double
Check Connection Server Settings
Disable
CSA and all Virus Scanning Applications
Make
sure the Informix .NET Driver is Installed and the PATH Points to it.
Using Bulk Call Handler Delete
Welcome
to Bulk Call Handler Delete.
Run
Call Handler Dependency Report
Select
a Call Handler as a Replacement
Overview
The Bulk Call Handler Delete tool is designed to allow administrators to delete call handlers on Unity Connection server in bulk. You can search call handlers onto Unity Connection server, based on all call handlers or display name string sub match or extension range. After call handler’s selection, you need to run a dependency check for the selected call handlers. Tool will show you complete information of the dependency check report for all the other objects like subscriber, directory handlers, interview handlers, routing rules etc that have references to one or more of the selected call handlers for deletion. After this you need to select a call handler as replacement call handler. At last you can delete all selected call handler with one hit.
NOTE: You cannot select same call handler that you selected to delete as a replacement call handler.
Requirements/Special
Notes
This version of Bulk Call Handler Delete runs on Windows XP/2000/2003/2008, Vista, Windows 7 or Windows 8.
You must install the 32 bit Informix Client SDK version 3.5 or later including the .NET drivers even if you are running on a 64 bit version of your operating system. See the Informix Driver Download Page for details.
You must enable the ODBC proxy service on the Unity Connection servers and attach to the database using an account enabled for the remote database access role. See the next section for details on this.
This tool uses Microsoft’s full .NET 4.0 library (the limited “client” version of .NET 4.0 is not sufficient). The installation will check to see if you have that installed and if not will offer you the option to download and install it automatically.
Connecting to Unity Connection 7.x or Later
For installations of 7.x and later you need to use the database proxy service for access to the database from off box for any DB tool including Message Hunter.
Task 1: Configure a User
without a mailbox with the Remote Administrator and System Administrator roles
1. Go to the Cisco Unity Connection Administration web interface for your installation.
2. You can leverage a user with or without a mailbox for off box data access purposes, but it’s suggested that you create a new user without a mailbox that is used solely for the purpose of remote administration tasks for security reasons.
3. Be sure the web administration password for this user is not configured to require a change at first login on the “Password Policy” page for that user.
4. If necessary, change the web administration password on the “Change Password” page. Note that only the web application password comes into play for remote data access.
5. Finally, on the “Role” page for the user, add the “Remote Administrator” and the “System Administrator” roles to the “Assigned Roles” list and save. You can assign any or all other roles as well but for the purposes of remote access to the database and making updates to users those two are necessary.
Task 2: Set the Database Proxy Service Shutdown Time
NOTE: For Unit Connection 10.0(1) and later this step is not necessary as there is no longer a Database Proxy Service Shutdown Time.
Out of the box the database proxy service is not running and if you try to start the service it will shut down right away. First you need to set the “Database Proxy: Service Shutdown Timer” value found in the System Settings -> Advanced -> Connection Administration section of the Cisco Unity Connection Administration page. By default this is 0. You can set it to as high as 999 days if you like. After the number of days configured here the remote database proxy service will shut down. This is useful if you want to do some migration work, for instance, and don’t want to forget to have the service disabled for security reasons.
NOTE: For versions of Unity Connection prior to 10.0(1), if you restart the server, the remote database proxy service will remain shut off. After a system restart you have to go in and manually turn on the service again (see step 3)
Task 3: Activate the Remote Database Proxy Service
1. Out of the box the service that listens to remote database requests is not active, you must turn it on. To do this, go to the “Cisco Unity Connection Serviceability” web admin page.
2. On the Tools menu, select the “Service Management” page.
3. The “Connection Database Proxy” item under the “Optional Services” section will be marked as “Deactivated” and stopped. Press the “Activate” button and it will be activated and started automatically.
Once you’ve started the proxy service you can connect with any tool that needs off box database access using the user name, web administration password and port “20532”.
NOTE: For versions of Connection prior to 10.0(1) the service will automatically shut down after the number of days configured in step 2 above or if you restart the server.
Task 4: Login to the Remote Server
When you first start Bulk Call Handler Delete, you will see a login dialog box that will be empty except for port 20532 filled in as the default for the port. You must provide the server name or IP address for the “Server” field and provide the login and password for the database connection account. Use the alias and web administration password of the database user created above for the login and password fields.
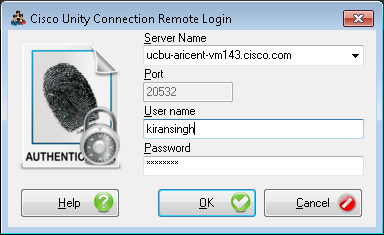
Bulk Call Handler Delete will remember your entries including the password (which is stored in a secure hash). Each time you run Bulk Call Handler Delete it will load the settings of the last connection you made. Every server you’ve successfully connected to in the past will be listed in the drop down list in the order in which you connected to it last – most recent to least recent.
NOTE: The login and password information is stored along with the local Windows login name. Only those servers that have been attached to successfully using the current Windows login will be listed. If you are logging into the same Windows server with different users you will only see servers connected to with that particular Windows login.
NOTE: Providing the wrong password or login will fail quickly and give you a chance to try a different pair. Providing an incorrect server or port, however, results in a 60 second timeout while Bulk Call Handler Delete waits for the Informix driver to return. Unfortunately this cannot be shorted. Type carefully.
Troubleshooting Remote Login Issues
Double Check Connection Server Settings
Make sure the remote database proxy service is running. This service does shut itself off after a period of time and does not start itself automatically on a server reboot.
Make sure the user you are logged in as has the remote administrator role assigned to their account, that their password is not set to reset at the next login and that their account is not currently locked.
Make sure the server name or IP address you are using to connect with is reachable from your Windows client. DNS issues often come up in connection failures.
Disable CSA and all
Virus Scanning Applications
It’s a good idea to disable CSA and all virus scanning applications if you are having problems connecting to be sure the ODBC port (20532) is not being blocked. Also check your firewall settings (assuming you are running one).
Make sure the Informix
.NET Driver is Installed and the PATH Points to it.
For 32 bit OS installs, the IBM Informix driver is installed in C:\Program Files\IBM\Informix\Client-SDK. Make sure this path exists on your server and has not been removed or renamed.
The system PATH variable will also include a reference to the “\IBM\Informix\Client-SDK\bin” location where the driver is installed. Make sure this path is referenced in the PATH. Also, if the PATH is very long sometimes the Informix driver will not find it, try moving it to the beginning of the PATH statement.
If you had an older version of the IBM Informix Client SDK installed it's a good idea to uninstall all other versions and make sure you have a single instance of the SDK 3.5 or later. Mixing versions of Informix drivers is not a good idea as only one can be active at a time.
Using
Bulk Call Handler Delete
Welcome to Bulk Call Handler Delete
The Bulk Call Handler Delete is a simple wizard interface. Once you log onto Unity Connection server you have to pull out call handlers homed on Unity Connection server via ODBC. You can search call handlers based on following filters:
· All Call Handlers: This will look for all deletable call handles homed on Unity Connection.
·
Call Handlers with this string in their
display name: You can enter any string and all deletable call handlers
that contain all or part of that string in their display name will be added to
the grid. The search is not case sensitive.
· Call Handler within this extension range: Enter a starting and ending extension range and hit the “Add” button.
After this you can pull out call handlers that are homed on Unity Connection by hitting on “Add” button. This will load the grid with deletable call handlers based on selected criteria.
NOTE: Non deletable call handlers will not filled into grid as you cannot delete them.
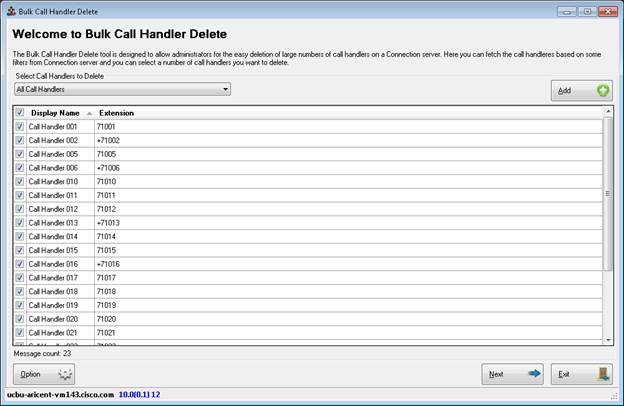
Now you have to select call handlers that you want to delete. You can select individual lines to apply or select/unselect all call handlers by clicking the checkbox in the upper left of the grid header. At least one row much be selected before you continue to next step. By clicking on ‘Next’ button you can processed to next step.
Run Call Handler Dependency Report
On next step, you need to run a dependency check for all selected call handler. For dependency check you need to hit on “Run Report” button. Here tool will check all the possible links that a call handler can refer to. This report will contain following details:
· Call Handler: Name of the call handler against which tool is running dependency check.
· Object Name: Name of the object to which a selected call handler is referring to. This will be a name of linked object like user, user template, call handler, call handler template, direct routing rule, forwarded routing rule, directory handler and interview handler.
· Object Type: This describes the type of the linked object. This should be among one of these USER, USER TEMPLATE, CALL HANDLER, CALL HANDLER TEMPLATE, DIRECT ROUTING RULE, FORWARDED ROUTING RULE, DIRECTORY HANDLER AND INTERVIEW HANDLER.
· Link Description: This describes about the linking type between the selected call handler and linked object. This will explain how a selected call handler linked with one or more objects on Unity Connection.
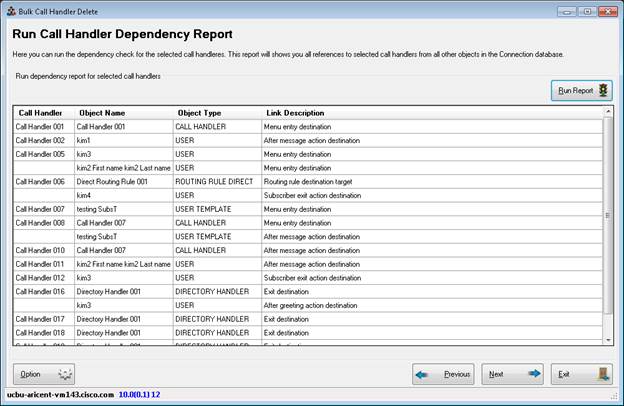
Once you run the dependency check report against selected call handlers, ‘Next’ button will become enable. By clicking on ‘Next’ button you can processed to next step.
Select a Call Handler as a Replacement
Here you need to select a call handler that will act as a replacement for the selected call handlers you intend to delete. Pressing the “Search” button just brings up the standard call handler search dialog that lets you find a call handler by display name or extension. You must select a call handler before being allowed to continue. If there is no dependency for the selected call handlers onto other objects on Unity Connection server in that case this wizard will not appear in front of you and you need not to select any replacement call handler.
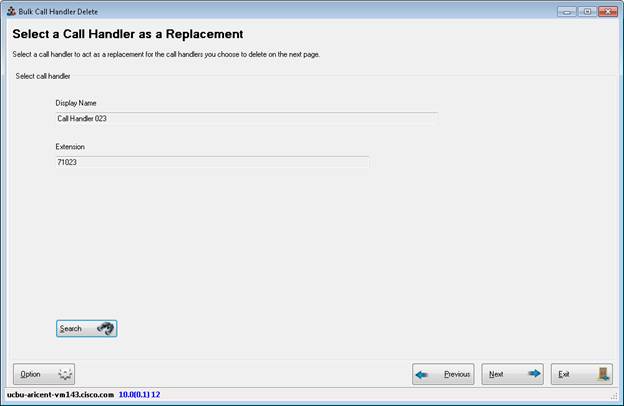
NOTE: Of course the call handler you select here will not be among one of the selected call handlers for deletion on the next wizard page
Select Call Handler
The select call handler dialog is pretty straight forward - you can choose a call handler based on their extension or display name using a "starts with", "contains" or "is exactly" type query. If you leave the text box blank it will fetch all call handlers homed on Unity Connection.
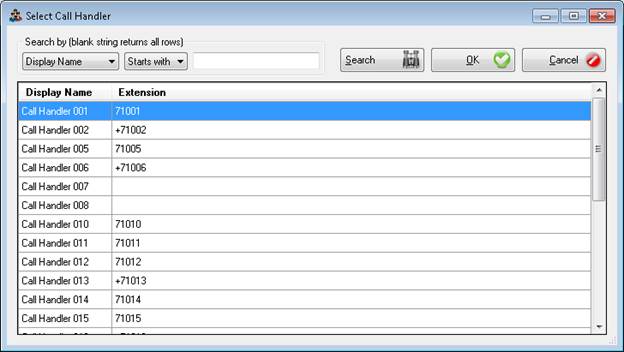
Once you've selected a replacement call handler you can hit the "Ok" button
Delete Call Handlers
Once
you’ve selected a replacement call handler in case of dependency you can
advanced to the last page of the wizard. This wizard will allow you to delete
all selected call handlers on Unity Connection. Once you hit the “delete” button you will be
asked to confirm that you want to permanently delete the selected call handlers
if you are in delete mode – once you do that the deletion process starts.
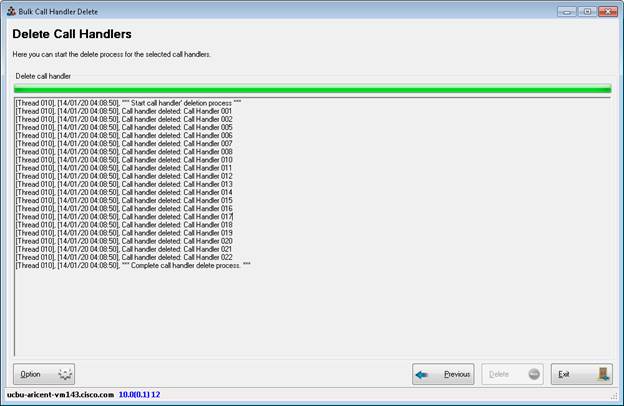
As the Bulk Call Handler Delete progresses, the progress bar proceeds to the right and logging information scrolls by. The information shown in the text box is also found in the log file created by the tool in the “Logs” folder where you installed it.
All errors start with the text “(error)” and show up in red in the output to draw attention to them. Please review these carefully and include the full log file generated by the tool when reporting a problem to TAC.
All warnings start with the text “(warning)” and show up as purple in the output text. These are usually not critical problems but a situation where a call handler could not be deleted. This is provided for informational purposes only and does not require action or an escalation to TAC for explanation.
You can press the “Cancel” button during the deletion process to abort if you like – you will be asked to confirm the abort command before it exits the process.
NOTE: When either the report or the deletion process is complete you can press the “Previous” button and go back and adjust your choices.
Obtaining Updates
To check for
updates to this tool, visit http://www.CiscoUnityTools.com
Revision History
Version 1.0.1 – 1/20/2014
· First drop of beta tool.
© 2014 Cisco Systems, Inc. -- Company Confidential