Unity Connection Bulk User Delete
Connecting
to Unity Connection 7.x or Later
Task
2: Set the Database Proxy Service Shutdown Time
Task
3: Activate the Remote Database Proxy Service
Task
4: Login to the Remote Server
Using
Bulk User Delete To Delete Users
Page
2: Choosing Replacement User
Page
3: Select Reporting Output Options
Page
4: Choosing Users To Delete
Using
Bulk User Delete To Reset Users
Page
2: Choosing User Reset Options
Page
3: Choosing Users To Reset
Overview
The Bulk User Delete tool allows for the easy deletion of large numbers of users on a Connection 2.1(1) or later server. It also provides a user “reset” option for resetting user mailboxes without removing them on Connection 7.0(1) and later installations. The tool also provides a way to generate a comprehensive user dependency report that shows all references to selected users from all other objects in the database that can run on all installations of Connection 2.1(1) or later for both CoRes or stand alone installs.
For deleting users It’s considerably faster than the web admin console, allows for much finer granularity in selecting which users to delete and allows for you to select a replacement user to substitute for references to users that are being removed which avoids deletion failures which can plague you in the web based administration interface. It also provides a fully dependency report showing which objects in Connection reference users you wish to delete. Currently only users with mailboxes can be removed from the system in bulk. This option is only allowed for stand alone installations of Connection – CoRes installations do not allow for the removal of Connection objects directly without going through the Call Manager interface to do so.
For resetting users you have the option of emptying the mailbox, resetting greetings, deleting voice names, resetting passwords, removing private lists and a number of other options you may choose. For installations where the user base “changes over” frequently such as schools this may be a nicer option. This option is also allowed for CoRes installations since it does not involve the removal of user objects from the Connection database.
Requirements/Special Notes
This version of Bulk User Delete runs on Windows
XP/2000/2003 or
This version of Bulk User Delete requires .NET framework 2.0 or better. The install will detect if this needs to be installed and launch the setup automatically if it’s missing.
This version of Bulk User Delete only works with Unity Connection 2.1(1) or later.
Bulk User Delete allows user deletions only for stand alone installations of Connection, not CoRes installs.
You must enable the ODBC proxy service on the Unity Connection server and attach to the database using an account enabled for the remote database access role. See the next section for details on this.
You must first install the Informix ODBC drivers before using this tool. Many off box tools for Connection 2.1(1) and later use these same drivers and you only need to install them once per client machine. You can download the installer for this on its home page here: http://ciscounitytools.com/App_InformixDrivers.htm
Connecting to Unity Connection 7.x or Later
For installations of 7.0(1) and later you need to use the database proxy service for access to the database from off box for any tool that uses database access.
Task 1: Configure a User without a mailbox with the Remote Administrator and System Administrator roles
1. Go to the Cisco Unity Connection Administration web interface for your installation.
2. You can leverage a user with or without a mailbox for off box data access purposes, but it’s strongly suggested that you create a new user without a mailbox that is used solely for the purpose of remote administration tasks for security reasons. This is also required if you want to export messages from a Connection 7.0(2) or later server – a user with a mailbox may not be allowed to extract messages from other mailboxes, whereas a user without a mailbox should have no problem.
3. Be sure the web administration password for this user is not configured to require a change at first login on the “Password Policy” page for that user.
4. If necessary, change the web administration password on the “Change Password” page. Note that only the web application password comes into play for remote data access.
5. Finally,
on the “Role” page for the user, add the “Remote
Task 2: Set the Database Proxy Service Shutdown Time
Out of the box the database proxy service is not running and if you try to start the service it will shut down right away. First you need to set the “Database Proxy: Service Shutdown Timer” value found in the System Settings -> Advanced -> Connection Administration section of the Cisco Unity Connection Administration page. By default this is 0. You can set it to as high as 999 days if you like. After the number of days configured here the remote database proxy service will shut down. This is useful if you want to do some migration work, for instance, and don’t want to forget to have the service disabled for security reasons.
NOTE: If you restart the server, the remote database proxy service will remain shut off. After a system restart you have to go in and manually turn on the service again (see step 3)
Task 3: Activate the Remote Database Proxy Service
1. Out of the box the service that listens to remote database requests is not active, you must turn it on. To do this, go to the “Cisco Unity Connection Serviceability” web admin page.
2. On the Tools menu, select the “Service Management” page.
3. The “Connection Database Proxy” item under the “Optional Services” section will be marked as “Deactivated” and stopped. Press the “Activate” button and it will be activated and started automatically.
Once you’ve started the proxy service you can connect with any tool that needs off box database access using the user name, web administration password and port “20532”.
NOTE: The service will automatically shut down after the number of days configured in step 2 above or if you restart the server.
Task 4: Login to the Remote Server
When you select to connect to a remote server from Bulk User Delete, you will see a login dialog box that will be empty except for port 20532 filled in as the default for the port. You must provide the server name or IP address for the “Server” field and provide the login and password for the database connection account. Use the alias and web administration password of the database user created above for the login and password fields.
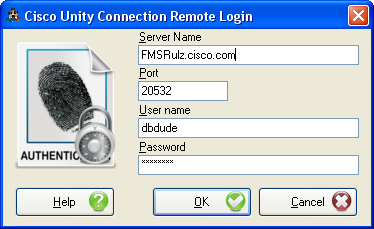
Bulk User Delete will remember your entries including the password (which is stored in a secure hash). Each time you run Bulk User Delete it will load the settings of the last connection you made. Every server you’ve successfully connected to in the past will be listed in the drop down list in the order in which you connected to it last – most recent to least recent.
NOTE: The login and password information is stored along with the local Windows login name. Only those servers that have been attached to successfully using the current Windows login will be listed. If you are logging into the same Windows server with different users you will only see servers connected to with that particular Windows login.
NOTE: Providing the wrong password or login will fail quickly and give you a chance to try a different pair. Providing an incorrect server or port, however, results in a 60 second timeout while Bulk User Delete waits for the Informix ODBC driver to return. Unfortunately this cannot be shorted. Type carefully.
Using Bulk User Delete To Delete Users
The Bulk User Delete is a simple 5 page wizard that walks you through the process of selecting users to be deleted and then removing them or selecting the reporting only option.
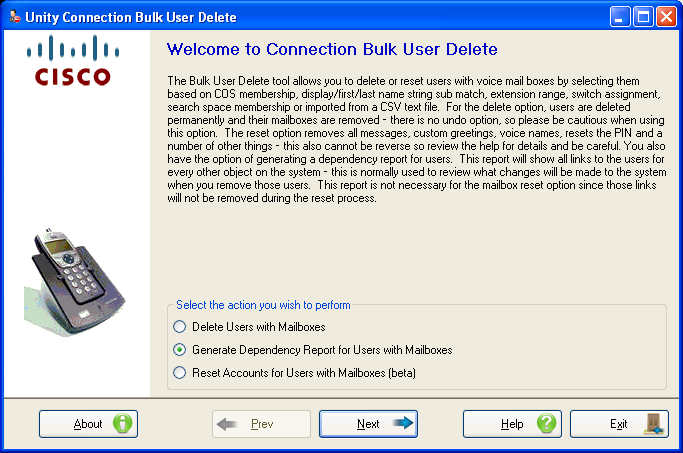
Page 1: Choosing an Action
Once you’ve attached to a Connection 2.1(1) or later Unity Connection server, the first page of the wizard will show allowing you to select which action you’d like to take. The current version of this tool allows for the removal of users with mailboxes, running dependency reports for those users or resetting those users (see below for more details).
NOTE: When running the delete option you are given the opportunity to also generate a dependency report or not for those users. This report is useful for seeing which objects were edited when removing users so you can change those objects afterwards if you’d like, however it does add processing time to the operation.
In this case you will select the option to delete users.
Page 2: Choosing Replacement User
The 2nd page of the wizard is to select the user with a mailbox to act as a replacement for references to the users you intend to delete. Pressing the “Search” button just brings up the standard user search dialog that lets you find a user by alias, first name, last name, display name or extension.
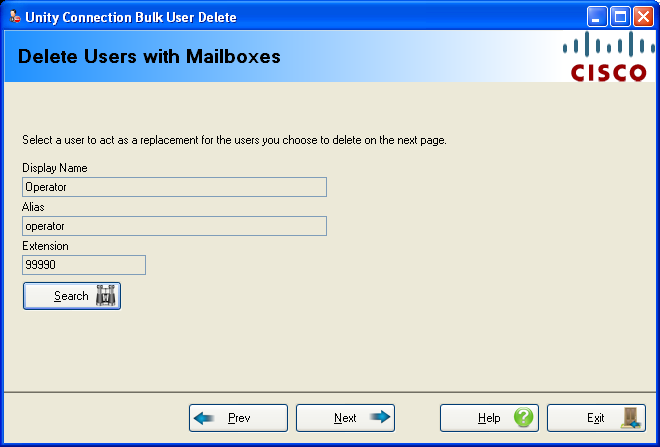
You must select a user with a mailbox before being allowed to continue even if you are just running a dependency report and not actually deleting users from the system. Of course the user you select here will not be allowed to be selected for deletion on the next wizard page.
This step is necessary to avoid situations where the Connection database rules will deny the removal of a user since they are being referenced by another object in the database (for instance as a message recipient for a call handler). By doing this the deletions will all be allowed to go through properly.
Page 3: Select Reporting Output Options
On page 3 you can select the report output you’d like to see, if any. If you selected the report option on page 1 of the wizard, the checkbox that allows you to skip the report is not available to you.
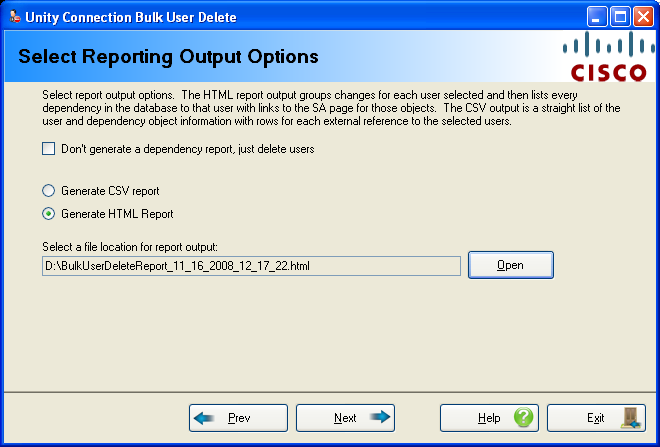
The report option generates a complete list of all objects that reference any of the users you are running the report against and/or deleting from the system. Running the report does add some time to the process, particularly for large systems where you’re removing large numbers of users. All references to the users you are removing in other objects (for instance user input key references from call handlers or message recipient links for interview handlers) are replaced with the user you selected on page 2 of the wizard. Having a dependency report will give you a quick and easy way of seeing all the references that were changed in the deletion process. However if you don’t need to worry about this and are just interested in deleting users quickly, you can check the “Don’t generate a dependency report…” option on the form and advanced to the next page in the wizard.
HTML Report output
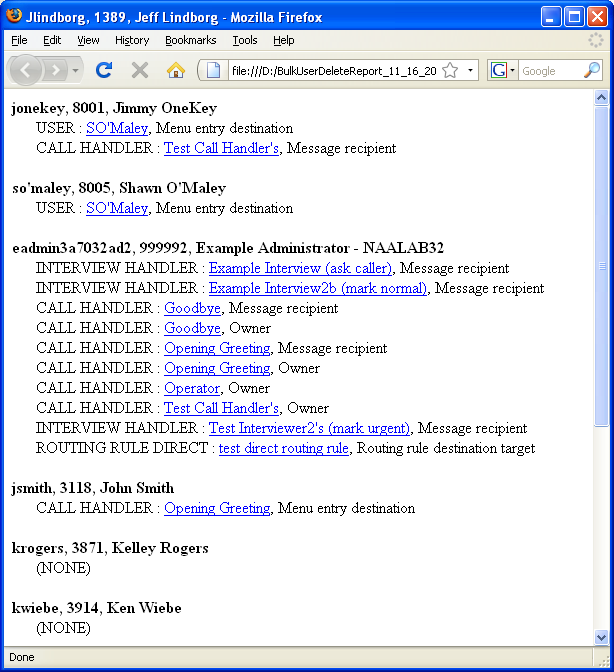
The HTML output includes links that will open the SA page directly to the objects in question which makes editing these objects quick and easy. The output is listed in the order in which users appear on the user selection page of the wizard (see next section). So if you wish users to be sorted by alias, be sure to click the “alias” column in the grid on the user selection page before advancing.
Each depdency include the object type (Call handlers, interview handler, routing rule, user etc…) followed by the display name of the object (which is also a link to open that object’s web page in the system administration interface) and then a short description of the type of reference this object makes to the user it’s listed under. A sample output looks like this:
CSV report output
The CSV report output has the same information displayed in a flat comma separated format. Every column is “quoted” and separated by commas. The CSV version of the same report shown in HTML above looks like this:
USER_ALIAS, USER_DISPLAY_NAME, USER_PRIMARY_EXTENSION, OBJECT_TYPE, OBJECT_NAME, LINK_DESCRIPTION
"jonekey","Jimmy OneKey","8001","USER","SO'Maley","Menu entry destination"
"jonekey","Jimmy OneKey","8001","CALL HANDLER","Test Call Handler's","Message recipient"
"so'maley","Shawn O'Maley","8005","USER","SO'Maley","Menu entry destination"
"eadmin3a7032ad2","Example Administrator - NAALAB32","999992","INTERVIEW HANDLER","Example Interview (ask caller)","Message recipient"
"eadmin3a7032ad2","Example Administrator - NAALAB32","999992","INTERVIEW HANDLER","Example Interview2b (mark normal)","Message recipient"
"eadmin3a7032ad2","Example Administrator - NAALAB32","999992","CALL HANDLER","Goodbye","Message recipient"
"eadmin3a7032ad2","Example Administrator - NAALAB32","999992","CALL HANDLER","Goodbye","Owner"
"eadmin3a7032ad2","Example Administrator - NAALAB32","999992","CALL HANDLER","Opening Greeting","Message recipient"
"eadmin3a7032ad2","Example Administrator - NAALAB32","999992","CALL HANDLER","Opening Greeting","Owner"
"eadmin3a7032ad2","Example Administrator - NAALAB32","999992","CALL HANDLER","Operator","Owner"
"eadmin3a7032ad2","Example Administrator - NAALAB32","999992","CALL HANDLER","Test Call Handler's","Owner"
"eadmin3a7032ad2","Example Administrator - NAALAB32","999992","INTERVIEW HANDLER","Test Interviewer2's (mark urgent)","Message recipient"
"eadmin3a7032ad2","Example Administrator - NAALAB32","999992","ROUTING RULE DIRECT","test direct routing rule","Routing rule destination target"
"jsmith","John Smith","3118","CALL HANDLER","Opening Greeting","Menu entry destination"
One thing to note about the CSV output is that users that do not have any dependency links from other objects are not listed in CSV – they show up in the HTLM report with a simple “(NONE)” note under them.
Page 4: Choosing Users To Delete
This page allows you to select users by a number of criteria and then sort/select them to your liking. Remember, the Bulk User Delete only allows for removing users with mailboxes currently.
NOTE: The report output uses the grid order when generated it’s content. Sort the grid using the column headers to adjust the output to your liking before pressing the “next” button and advancing.
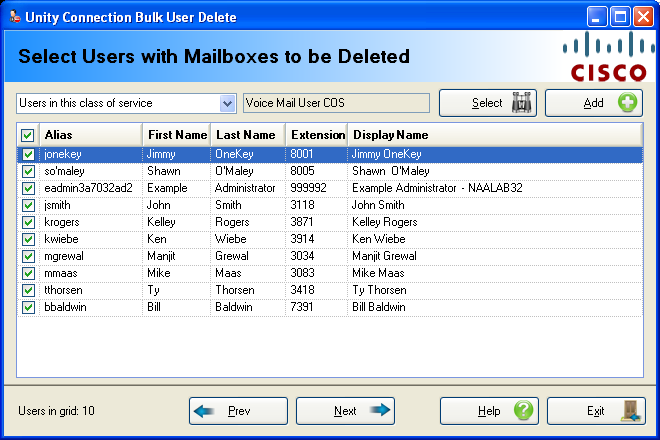
You can select/unselect individual users by either clicking the checkbox to the left of the grid or double clicking on the row the user is on.
You can select/unselect all users by checking or unchecking the checkbox in the upper left corner of the grid.
You can sort any of the named columns by clicking on the column header.
Select your user filter criteria and hit the “Add” button to populate the grid with user data. The filter options drop down list includes:
- All Users. All users on the Connection server will be loaded into the grid. For a very large system this may take a while.
- All Inactive LDAP Users. When a user that’s integrated via LDAP to a remote directory is removed in that remote directory they are not automatically deleted in Connection. They are, however, marked as being inactive (they can be reactivated again easily). This option allows an administrator to choose these users to clean them out of Connection’s directory easily if that’s what’s desired. Exercise caution, users can be marked inactive if the LDAP communication is interrupted for some reason – review the list of users to delete first!
- Users in this class of service. With this option selected, press the “Search” button and you can select any of the class of service objects on the attached Connection server. All the users currently associated with that class of service will be loaded into the grid.
- Users in this extension range. With this option selected you can fill in a lower and an upper extension range. All users with extension numbers that fall within that range will be loaded into the grid.
- Users in this CSV file. You can select a CSV file off the hard drive to use for searching for subscribers. The CSV file must contain a first line that identifies a column named “ALIAS” and/or a column named “EXTENSION”. If the file contains neither column it will be rejected as an invalid format. All other column name will be ignored. If both an ALIAS and EXTENSION column are present then the Alias column is searched for first followed by the extension column if no match is found. All users found are added to the grid.
- Users associated with this phone system. With this option selected you can press the “Search” button and you can select any of the phone system integrations defined on the Connection server. All users associated with that phone system will be loaded into the grid when you press the “Add” button.
- Users with this string in their display name. You can enter any string into the text box and all users that contain that string in their display name will be added to the grid. This is useful for sites that use “site tags” in their object display names to organize users and handlers.
- Users in this public distribution list. You can select a public distribution list and all users found in that distribution list are added to the user grid.
- Users in this search partition. With this option you can press the “Search” button and pick a search partition defined on the Connection server. All users assigned to that partition will be added to the grid when you hit the “Add” button.
NOTE: When you change the selection mechanism and press the “Add” button, the grid clears of existing users first and then new users are added. You cannot “merge” selections from multiple search types into one grid. You can run the wizard multiple times without exiting so you can move back and forth and select different users based on different filter criteria fairly easily.
Page 5: Execute
Once you’ve selected at least one user to delete you can advanced to the last page of the wizard. Once you hit the “delete” button you will be asked to confirm that you want to permanently delete the selected users if you are in delete mode – once you do that the deletion process starts.
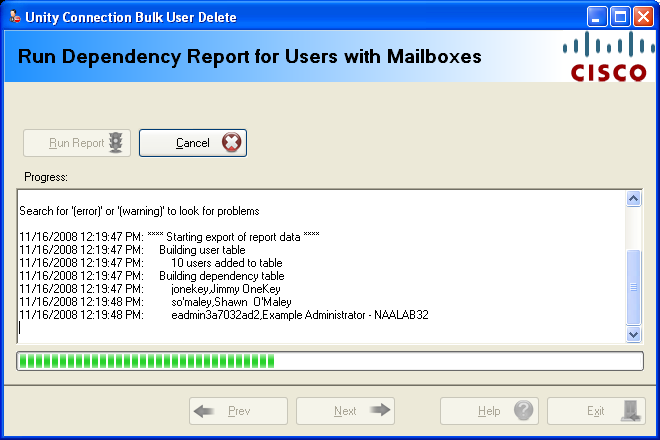
As the Bulk User Delete progresses, the progress bar proceeds to the right and logging information scrolls by. The information shown in the text box is also found in the log file created by the tool in the “Logs” folder where you installed it.
All errors start with the text “(error)” and show up in red in the output to draw attention to them. Please review these carefully and include the full log file generated by the tool when reporting a problem to TAC.
All warnings start with the text “(warning)” and show up as purple in the output text. These are usually not critical problems but a situation where a user could not be added to a distribution list. The most common warning you’ll see is a note that the user is already a member of the distribution list. This is provided for informational purposes only and does not require action or an escalation to TAC for explanation.
You can press the “Cancel” button during the deletion process to abort if you like – you will be asked to confirm the abort command before it exits the process.
NOTE: When either the report or the deletion process is complete you can press the “Previous” button and go back and adjust your choices. In the case of a report run the same users will be selected and ready for you to go back and actually delete them if you like. If you deleted users, the user selection grid will be blank.
Using Bulk User Delete To Reset Users
Page 1: Choosing an Action
On page 1 select the option to “Reset Accounts for Users with Mailboxes”. This is allowed for Connection 7.0 and later installs, however it will work for both stand alone and CoRes installations.
NOTE: At the time of this writing the reset option is still in BETA and is not TAC supported.
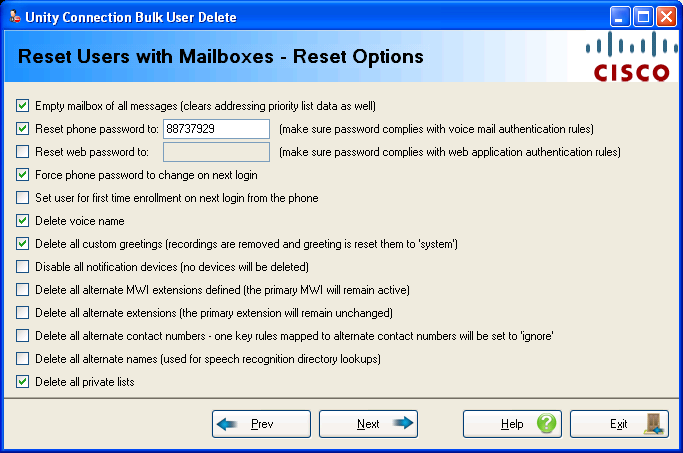
Page 2: Choosing User Reset Options
The 2nd page of the wizard when resetting gives you a number of selections you can choose from when resetting users. You can choose as many of these options as you like but you must pick at least one before you’re allowed to proceed to the next page of the wizard.
All settings selected on this page will be preserved and preloaded the next time you access the option to reset users.
NOTE: The passwords for the phone and web are NOT checked against the authentication rules that may apply to the users you are resetting. Make sure you’re authentication rules allow the passwords you are using or the password resets will fail. These will show up as warnings in the log output.
Page 3: Choosing Users To Reset
This page allows you to select users by a number of criteria and then sort/select them to your liking. Remember, the Bulk User Delete only allows for resetting users with mailboxes currently.
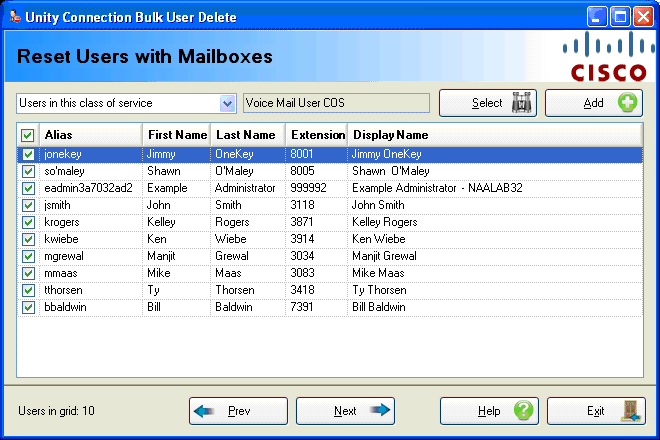
You can select/unselect individual users by either clicking the checkbox to the left of the grid or double clicking on the row the user is on.
You can select/unselect all users by checking or unchecking the checkbox in the upper left corner of the grid.
You can sort any of the named columns by clicking on the column header.
Select your user filter criteria and hit the “Add” button to populate the grid with user data. The filter options drop down list includes:
- All Users. All users on the Connection server will be loaded into the grid. For a very large system this may take a while.
- All Inactive LDAP Users. When a user that’s integrated via LDAP to a remote directory is removed in that remote directory they are not automatically deleted in Connection. They are, however, marked as being inactive (they can be reactivated again easily). This option allows an administrator to choose these users to clean them out of Connection’s directory easily if that’s what’s desired. Exercise caution, users can be marked inactive if the LDAP communication is interrupted for some reason – review the list of users to delete first!
- Users in this class of service. With this option selected, press the “Search” button and you can select any of the class of service objects on the attached Connection server. All the users currently associated with that class of service will be loaded into the grid.
- Users in this extension range. With this option selected you can fill in a lower and an upper extension range. All users with extension numbers that fall within that range will be loaded into the grid.
- Users in this CSV file. You can select a CSV file off the hard drive to use for searching for subscribers. The CSV file must contain a first line that identifies a column named “ALIAS” and/or a column named “EXTENSION”. If the file contains neither column it will be rejected as an invalid format. All other column name will be ignored. If both an ALIAS and EXTENSION column are present then the Alias column is searched for first followed by the extension column if no match is found. All users found are added to the grid.
- Users associated with this phone system. With this option selected you can press the “Search” button and you can select any of the phone system integrations defined on the Connection server. All users associated with that phone system will be loaded into the grid when you press the “Add” button.
- Users with this string in their display name. You can enter any string into the text box and all users that contain that string in their display name will be added to the grid. This is useful for sites that use “site tags” in their object display names to organize users and handlers.
- Users in this public distribution list. You can select a public distribution list and all users found in that distribution list are added to the user grid.
- Users in this search partition. With this option you can press the “Search” button and pick a search partition defined on the Connection server. All users assigned to that partition will be added to the grid when you hit the “Add” button.
NOTE: When you change the selection mechanism and press the “Add” button, the grid clears of existing users first and then new users are added. You cannot “merge” selections from multiple search types into one grid. You can run the wizard multiple times without exiting so you can move back and forth and select different users based on different filter criteria fairly easily.
Page 4: Execute
Once you’ve selected at least one user to reset you can advanced to the last page of the wizard. Once you hit the “Reset” button you will be asked to confirm that you want to take the chosen actions on the selected users – once you do that the reset process starts.

As the Bulk User Delete progresses, the progress bar proceeds to the right and logging information scrolls by. The information shown in the text box is also found in the log file created by the tool in the “Logs” folder where you installed it.
All errors start with the text “(error)” and show up in red in the output to draw attention to them. Please review these carefully and include the full log file generated by the tool when reporting a problem to TAC.
All warnings start with the text “(warning)” and show up as purple in the output text. These are usually not critical problems but a situation where a user could not be added to a distribution list. The most common warning you’ll see is a note that the user is already a member of the distribution list. This is provided for informational purposes only and does not require action or an escalation to TAC for explanation.
You can press the “Cancel” button during the reset process to abort if you like – you will be asked to confirm the abort command before it exits the process.
Obtaining Updates
To check for updates to this tool, visit http://www.CiscoUnityTools.com or you can use the “Check for updated versions” link found in the About dialog box of this application.
Revision History
Version 1.0.0.27 – 1/1/2016
· Updating for Windows 10 deployments
Version 1.0.0.26 – 3/28/2015
· Updated libraries and switched to NuGet deployment
· Updated setup to include all modern Windows derivatives as targets.
Version 1.0.0.25 – 5/19/2014
· Changed logic such that the reset path and delete paths use different filter logic when selecting users – the delete path doesn’t allow undeletable mailboxes to be selected, the reset path does.
Version 1.0.0.24 – 4/5/2013
· Fixed in install bundle issue where the dependency report MDB file was missing from the setup.
Version 1.0.0.23 – 1/17/2013
· Updated for Windows 8 installations
Version 1.0.0.22 - 11/16/2012
· Updated extension range query to include only primary extensions for users, not alternates to avoid issues with non numeric values.
Version 1.0.0.21 - 7/27/2012
· Updated version of Bulk User Delete done in .Net Framework with C#.
Version 1.0.0.20 - 5/29/2012
· Fixed a problem where MWI updates were not being sent after clearing a mailbox - some versions of Connection do not have logic in the flush mailbox stored proc to handle this so a manual update was added into the tool.
· Fixed a problem with the mailbox reset page not saving the last value for resetting the greetings.
Version 1.0.0.19 – 11/8/2011
· Added option for selecting inactive LDAP users to help automate the process of removing users that have been deleted in a remote LDAP integrated database easily.
Version 1.0.0.18 – 3/28/2011
· Changed the voice name removal function for user reset to use the csp_UserModify instead of the csp_SubscriberModify to get around this property not being set to NULL using csp_SubscriberModify in some versions of Connection.
Version 1.0.0.17 – 12/21/2009
· Updated connection string to force both DB and CLIENT locales to us_utf8 to avoid problems with multibyte characters
Version 1.0.0.16 – 11/18/2009
- Removed debug output that was including login PW information for connection string for message access.
Version 1.0.0.15 – 10/7/2009
- Added updated version check to the about box
Version 1.0.0.14 – 9/25/2009
- Updated for Connection 8.0 database changes.
Version 1.0.0.13 – 8/27/2009
- Changed the login/PW server memory logic to filter based on local Windows login name.
Version 1.0.0.12 – 8/18/2009
- Fixed a problem where the option to set for first time enrollment during the reset option was not working properly.
- Added option to disable all greetings other than the standard and error greetings during the reset option.
Version 1.0.0.11 – 6/4/2009
- Forced mailbox counts to zero manually to work around an issue with the stored proc used for emptying mailbox data.
- Added request to notifier queue after mailbox is emptied for each user processed to ensure the MWI status is properly synced after a mailbox empty event.
Version 1.0.0.10 – 5/30/2009
· Updated query logic to handle 2.x Connection versions – the optimizations made in earlier versions for 7.0 and later broke backwards compatibility with 2.x installs.
- Updated login to save server, login and
hashed PW information on a per server basis
- Added data to save the default
replacement user on a per server basis
- Updated grid control to version 9 of
the component.
Version 1.0.0.9 – 4/29/2009
- Added support for user reset functionality for system running CUC 7.0 or later
- Enabled support for resetting and running user dependency reports on CoRes installations.
- Fixed an audit alias parameter issue on delete user operations
Version 1.0.0.7 – 4/8/2009
- Fixed a problem with the subscriber selection grid sometimes getting unloaded when repeated user selections are used in the same session.
Version 1.0.0.6 – 4/3/2009
- Check for coRes installs and exit if that’s the case.
- Added framework for user reset support
- Fixed a problem with the selection dialogs unloading if multiple searches were performed with different search criteria in the same session.
Version 1.0.0.5 – 1/25/2009
- Fixed a problem with the progress bar going past its maximum value causing exceptions.
Version 1.0.0.4 – 11/19/2008
- Optimized database fetches to greatly increase performance when running against very large directories.
- Added a version check option to the about box dialog
Version 1.0.0.3 – 11/18/2008
- Added check for SMPP provider ownership to the dependency list.
- Added check for user template references on the dependency list.
- Added check for call handler template references on the dependency list.
- Added check for personal call transfer rule targets in the references on the dependency list.
Version 1.0.0.2 – 11/16/2008
- Added dependency report option for CSV and HTML output.
- Added version check option under about dialog
- Changed large queries to run on a background thread so the user can cancel out of them if they’re taking too long
- Changed wizard UI to free up more screen space
- Added support for Connection 2.1(1)
Version 1.0.0.1 – 10/24/2008
- First beta release
© 2014 Cisco Systems, Inc. -- Company Confidential