CDE Studio Linux Link Edition
Multiple
Language Conversations
Adding
a new language to an existing conversation
Overview
CDE Studio Linux Link is a rapid application development tool for scripted conversations in Unity Connection 2.0(1) and later. It includes typical editor functions as well as language specific highlighting, script compiler capabilities, conversation exploration as well as prompt recording and management features that speed the development of CDE based conversations.

While CDE Studio can
be used to edit any text based file such as JavaScript files, it’s
designed from the ground up as a tool for engineers that need to create, edit,
debug and explore Cisco Unity scripted conversation code. To find out more about the CDE scripted
conversation engine, read the “CDE Script Users Guide” document
which you’ll find under the help menu in CDE Studio. To find out more about the basic text
editing features, review the Menu Commands, Toolbar and Right Click Menu
sections that follow.
CDE Studio will show
a “conversation” as a combination of a single .CDE (conversation
script) and .PS (phrase server) file as a pair. The .CDE file is on the first tab in the
editing section on the right hand side of the form. The phrase server is always the 2nd
tab. A single conversation in Unity
can have numerous languages associated with it, each one as a separate phrase
server file. To keep the interface
manageable, only one phrase server file is shown. To show a different language phrase
server you can use the View | Phrase Languages menu option. See the Multiple Language Conversations
section below for more details on creating, editing and viewing multiple
language phrase server in CDE Studio.
When a conversation
is loaded through the File menu, CDE studio will automatically try to load a
corresponding phrase server file and compile the conversation. If the conversation compiles properly
(i.e. there are no errors in the script code) you will see the conversation navigation
tabs on the left hand side of the form.
See the Compiling Conversations
section below for more details on the conversation compilation and
error/warning handling features in CDE Studio. To find out how to use the navigation
tabs, see the Exploring a Conversation
section below.
CDE Studio also
comes with a full compliment of prompt playback, creation and editing tools
built into it. Review the Managing And Creating Prompts section in
this document for details on how to use those features.
Requirements/Special
Notes
This application runs on Windows and connects to a Linux server running Unity Connection 2.0(0.205) or later. It’s perfectly acceptable for this to all be one server with Linux running on VMWare.
CDE Studio installs the merge files from Microsoft to include MSXML 4 and SAPI 5.1 support on the box.
To connect to a remote Connection server properly, CDE Studio LL needs root access. There is no exception to this.
Registering
CDE Studio
This version of CDE Studio does not need to be registered – access to the Connection server is highly restricted in the field and CDE Studio will only run when SSH is active and port 22 is open – which is not the case for production server installs.
Menu
Commands
NOTE: All custom options selected in the menu commands and all editor options enabled are saved when you exit CDE Studio and will be reapplied the next time you start the application. You can move all these settings to a new server if you like – see the “Export registry settings” menu option in the Options section below for more details on how to do that.
File
- Open File. This launches the open file dialog. It will open to the directory where the current file being displayed is stored, if any file is currently loaded. If no file is loaded, the \commserver\localize\scripts\ directory will be shown. By default it looks for files with extension that match .CDE, .CDX, .CDH, .CS, .PS and .PSX, however you can select “all files” in the file type drop down to see everything. Remember, CDE Studio is designed to have you open a script file (.CDE) and will open the corresponding phrase server file for you automatically.
- Save. Saves the currently visible file – so if you have the .PS file showing, it will save that. NOTE: The save button on the toolbar will only be active if the currently visible file has been modified and has pending changes to save.
- Save As. Allows you to save the currently visible file with a new file name or path location.
- Save All. This option will save both the .CDE and .PS files if they are modified and have pending changes to be saved.
- Check script syntax. This option compiles the current conversation and reports and warnings or errors that were encountered. See the Compiling Conversations section below for more details on this process.
- Compile ABNF files to GRXML. This option compiles all open ABNF files into their corresponding GRXML format using the compiler provided by Nuance. The GRXML and ABNF files are assumed to have the same name (other than the extension) with the exception of the Common VUI ABNF file which is treated special.
- View archives for current file. Selecting this option will bring up a dialog for reviewing/comparing/restoring archived versions of the currently loaded file. You can learn more about this File Archive Features section.
- View file change history. Selecting this option will bring up the file change history dialog which lets you see what files have been changed and allow you to easily select some or all of them to copy locally for source control purposes. For more see the File Change History Feature section.
- Show raw XML for script. Selecting this option will show the XML representation of the currently loaded .CDE file. This option only works if the currently loaded conversation is successfully compiling.
- Export Tree View to File. This takes the current tree layout on the “Tree” tab and exports it to a text file – all the nodes expanded will be shown expanded, and all those closed will show closed.
- Print. This will bring up the standard Windows print dialog and allow you to print the currently visible document. If you have the .CDE file open, that’s what will print. If you have the .PS file visible then that’s what will print.
- Recent. This shows the recently opened files you’ve accessed with CDE Studio. Up to 10 files are included in the history, sorted from most recently accessed at the top to least recently at the bottom.
- Exit. Closes the CDE Studio application. If there are pending changes to any open file, you will be given an opportunity to save them or abort the exit command.
Edit
- Cut. Cuts the currently selected text and puts it on the Windows clipboard .
- Copy. Copies the currently selected text and puts it on the Windows clipboard.
- Paste. Takes the text on the Windows clipboard and inserts it into the open file where the cursor is located.
- Find. Launches the Find dialog seen here:
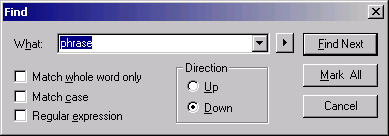
This is a pretty standard dialog you’ve seen in other applications, however the “Mark all” feature may be new. This option will bookmark every line that has an instance of the desired text in it. You can then use the bookmark options (see below) to jump between the marked lines. This can be handy for quickly finding multiple instances of a string in a file.
- Repeat find. This simply repeats the last find command you issued.
- Replace. Launches the replace text dialog that lets you replace one string with another in a file or currently selected text.
- Find across files. This allows you to search for a string across files and, optionally, subdirectories. See the Searching Across Files section for more details on this function.
- Indent. This command indents the currently selected line(s) by 5 spaces. You can select as many lines as you like.
- Unindent. This command moves the currently selected line(s) to the left 5 spaces if there is room to do that.
- Undo. This option is available only if there are one or more changes that have been made to a file that have not been saved. Up to 100 individual changes can be undone in CDE Studio. NOTE: Once you save a file or compile (which saves the file), the Undo buffer is flushed.
- Redo. This option is available only if there are one or more undo’s that have been executed against the open file. Up to 100 individual changes can be redone after they’ve been undone in CDE Studio.
- Comment block. This option puts a line comment indicator (“//”) at the beginning of each selected line in the currently open file. If there are already line comments at the beginning of the line, another set is inserted anyway. As many lines can be selected as you like.
- Uncomment block. This option removes a line comment indicator (“//”) at the beginning of each selected line. They are only removed if they are at the very beginning (far left) of the selected line, not otherwise. It’s designed to uncomment out sections that have been commented with the “Comment block” feature above.
- Search Prompt Text. Pulls up a dialog that allows you to search for full or partial string matches across the text for all prompts installed on the local server. This is useful for seeing if there is already a prompt somewhere in the system that you can use for a conversation instead of creating a new one and possibly a duplicate.
- Check Prompts. This pulls up a dialog that will help find bad prompt file name references, missing prompts or unused prompts for the currently loaded conversation.
View
- Toolbar. This option hides or shows the toolbar at the top of the main form.
- Status bar. This option hides or shows the status bar at the bottom of the main form. The status bar shows the full path to the currently visible file as well as the line and column number of the cursor within the current file.
- Bookmarks. This option shows or hides the four bookmark options in the toolbar. When the bookmarks are visible a 2 character wide column is added to the left of the code windows. This “trough” is used to show which lines are currently book marked. To mark a line, simply click on the line in question and then press the “toggle bookmark” button. You can cycle forwards and backwards through the bookmarked lines in a file using the “next bookmark” and “previous bookmark” buttons. You can clear all the bookmarks in a file using the “clear all bookmarks” button.
- Line numbers. This option shows or hides line numbers. With the option enabled, line numbers appear on the far left for each line on all open files. Selecting this option will case the corresponding button on the toolbar to be pushed in or popped out accordingly.
- Navigation tree. This option shows or hides the main navigation tree that shows the List and Tree view tabs on the left of the main form.
- Show macros in tool tip. This option has the full text of macros show up as floating “tool tip” windows when you move your mouse over them. Macros show up as blue and underlined in the code and can expand out to anything from simple key stroke assignments to large sections of code. This option also results in the full path and the full text of prompts showing up in tool tips when you move your mouse over the name of a prompt on a phrase server file.
- Show macro expansions in window. This option will allow the full text of macros to show up in a fixed window at the bottom of the main form when you click on a macro in the code. This option also results in the full path and full text of a prompt showing up in the same fixed window at the bottom of the form when you click on a prompt name in a phrase server file. This option can be enabled in addition to the tool tip option above if you like. This is useful for viewing very large macros or very long prompts that do not view well in the floating tool tip window.
- Show Macro expansions on separate form. This option will allow the full text of macros to show up in a floating window not attached to the form when you click on a macro in the code. This option also results in the full path and full text of a prompt showing up in the same floating window when you click on a prompt name in the phrase server file. Basically this has the effect of “un anchoring” the macro expansion window from the above option from the main window. This option can be enabled in addition to the tool tip option above if you like. This is useful for viewing very large macros or very long prompts that do not view well in the floating tool tip window. NOTE: This option is only available if you have the “Show macro expansions in window” option checked as well.
- Always show phrase code for PlayPhrase states. With this option checked, when you select a PlayPhrase state in either the List or Tree view windows in the navigation pane on the left of the form, the .PS file is always show with the selected phrase server moved into view. Since PlayPhrase states have sections in both the CDE and PS files, it’s sometimes useful to view one or the other. In most cases, however, you’ll want to view the PS file since this is where all the prompts are added that are played to the caller.
- Goto line number. This option results in a simple dialog appearing that lets you enter a line number which will move the code for the currently visible file to that line and select it for you. If you enter an invalid line number it will simply ding at you and not move the view.
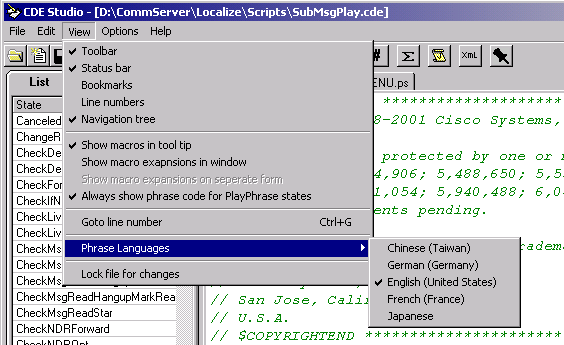
- Phrase Languages. This menu option shows all the languages for which PS files for the currently loaded conversation were found when the conversation was compiled. You can use this option to switch between different language PS files. See the Multiple Language Conversations section below for more details on this.
- Lock file for changes. Setting this option makes files read only. This is useful for folks that are “just looking” and navigating round the conversation scripts such that they don’t accidentally make a change.
Options
- Stay on top. Selecting this option will force the CDE Studio form to stay on top of all other forms on the Windows desktop. Selecting this menu option will result in the corresponding button on the tool bar pushed in or popped out accordingly.
- Record keyboard macro. Selecting this option results in CDE Studio popping up the record dialog (a big “stop” button) and it will start recording all keystrokes made on the current code window. Note that mouse movements and clicks are not recorded and the mouse functionality is disabled while the macro recording is active. Note also that only key pressed in the code window that was visible at the time you started the keyboard macro recording session will be saved. All key presses you make are recorded into the macro and can then be played back over and over again which can be handy for doing moderately complex but repetitive editing tasks on your files. You can record up to 10 macros which can be assigned to key or combination of ALT and CNTRL and another key.
- Manage code templates. Selecting this option will bring up the code templates management dialog. See the Using Code Templates section below for more on this.
- Show Full Path in Application Title. No surprises here – the current conversation file (main .CDE file) has it’s full path shown in the title of the application.
- Application Options. Brings up a form that lets you dictate some application options. Notably the behavior of loading the last file active at startup, running in debug mode, automatically compiling open ABNF files during script compiles and being able to dictate what Windows file types need to be run through DOS2Unix/Unix2DOS conversions when being moved back and forth between the remote Linux server and the local Windows box.
- Editor options. This brings up a dialog box that allows you to adjust how the code editor screens look including how text and the background are colored, and how keyboard editing options are mapped to specific keys. NOTE: Items such as the max undoable actions (100), forcing case to be enforced and converting tabs to spaces will be forced to set defaults when you load CDE Studio. So if you change these, those settings will not be preserved when you shut down the application and restart it. All other options in here as well as those on the main menu will be saved and preserved between runs. You can also port these settings to another server if you like. See the “Export registry settings” option below for more on that.
- Compiler options. (not implemented for Linux version at this point)
- File archive options. This brings up a dialog that allows you to customize CDE Studio’s file archiving and file comparison functionality. See the File Archive Features section for more details.
Favorites
- Add Current File as a Favorite. Adds the currently open file (the first file in the tab strip) to the list of favorites.
- Manage Favorites. Brings up a simple dialog that lets you delete favorites you no longer want included.
Windows
This drop down menu shows a numbered list of all the files open in the tab strip – this allows for easy keyboard navigation of open files using ALT-W# where # is a number of an open file. So hitting ALT-W3 will open the 3rd file in the tab strip and move the mouse cursor there.
Help
- CDE Studio Help. Shows the help file you’re looking at right now – hopefully this is not a surprising revelation to you…
- CDE Script Users Guide. Shows the developer’s guide for CDE Scripts. It includes a tutorial on creating your first conversation, how the different states are used, which sections are required for a conversation to compile and the details of the syntax for the conversation files themselves. If you’re doing any kind of conversation development or debugging, it’s a must read.
- JavaScript Guide. A general JavaScript 1.5 developers guide from Netscape.
- JavaScript Reference. Shows the JavaScript 1.5 reference document from Netscape. All supported JavaScript functions and syntax are covered in here, it’s a very good reference.
- Application Registration Info. This shows the dialog that generates a security key used for license file creation to open the full capabilities of CDE Studio. License files are generated only for internal Cisco employees.
- Check for Updated version. This option will check to see if you have the latest version of CDE Studio installed. If not it will offer to take you to the web page where you can download and install the latest version.
- About. Shows the about box for CDE Stuido.
Toolbar
The toolbar options correspond directly to existing menu items discussed above. When you hover the mouse over a button, it’s name will appear automatically. You can hide the toolbar if you wish using the “Toolbar” option under the View menu above.
NOTE: The bookmark options (items 15 through 18 on the toolbar) are only visible if you have the “Bookmarks” option checked in the View menu.
![]()
1. Open file
2. Save
3. Save All
4. Cut
5. Copy
6. Paste
7. Search
8. Replace
9. Search across files
10. Indent selection
11. Unindent selection
12. Undo
13. Redo
14. Comment selection
15. Uncomment selection
16. Toggle bookmark
17. Clear all bookmarks
18. Goto next bookmark
19. Goto previous bookmark
20. Show line numbers
21. Compile conversation
22. Compile open ABNF files into GRXML files
23. View raw XML for current conversation
24. Toggle “always on top” property
25. View Archives
26. View File Change History
Right
Click Menu
If you right click somewhere on a code editing window, you’ll see a popup menu with 9 options in it as shown in the following screen shot:

Jump
to this State
This option is only enabled if you right click on the name of a state in the CDE script file. If you select this option it jumps you to the definition of the state itself.
Play
Prompt File
This option is only enabled if you are right clicking on a phrase server file and the text you are clicking on is the name of a prompt. If you select this, CDE Studio will go find the actual WAV file referenced for that prompt and play it using whatever application you have registered to play WAV files on your server. See the Managing And Creating Prompts section for more on prompt management features in CDE Studio.
Edit
Prompt File
This option is only enabled if you are right clicking on a phrase server file and the text you are clicking on is the name of a prompt. If you select this, CDE Studio will go find the WAV file referenced for that prompt, fetch the full text for the prompt from the PROMPT.INI file for and load them both in the edit prompt dialog. You can rerecord the prompt, play it and/or edit the text associated with it in the PROMPT.INI file from there. See the Managing And Creating Prompts section for more on prompt management features in CDE Studio.
View
raw PROMPT.INI file
This option is only enabled if you are right clicking on a phrase server file and the text you are clicking on is the name of a prompt. If you select this, CDE Studio opens the PROMPT.INI file that contains the selected prompt’s text in Notepad. See the Managing And Creating Prompts section for more on prompt management features in CDE Studio.
Insert
Prompt File
This option is only enabled if you are right clicking on a phrase server file. It brings up the prompt selection dialog that allows you to search for prompts in the current phrase server by name or by their full text, play the prompts and select the one you want. It also inserts the “AddPrompt” code into the phrase server code at the point where the cursor was when you right clicked. See the Managing And Creating Prompts section for more on prompt management features in CDE Studio.
Check
Prompts
This option will open a dialog that checks for prompt consistency – it looks for missing references to PROMPT.INI files, prompts that are defined but not used and the like.
Search
Prompt Text
(not implemented in Linux version yet)
This option lets you search for full or partial string matches across all PROMPT.INI files for the currently loaded language. This is helpful for finding a prompt that says what you want or part of what you want in a new conversation you are developing so you don’t add redundant prompts to the system.
Toggle
Bookmark
This option toggles the bookmark flag for the current line. Note that you need to have the option to see bookmarks enabled under the View menu to see the bookmark tags in the editor and the bookmark options in the toolbar.
Add
To Do
Adds a To-Do item for the current file and line number. See the To Do Interface section for more details on how To-Do’s work in CDE Studio.
Search
across files
This option spawns Search across files dialog that lets you search for a string across files and directories and lets you easily view and jump to files that contain the string you’re interested in. See the Searching Across Files section for more on this.
Insert
Code Template
This menu option will let you select any code template you’ve created on the server and it will insert directly into the code while preserving indentation from where it was inserted. You can also select to go to the code template management window from this menu. See the Using Code Templates section below for more on code templates.
Copy
Standard command to copy the currently selected text to the Windows clipboard.
Cut
Standard command to cut the currently selected text and move it to the Windows clipboard.
Paste
Standard command to past the text found on the Windows clipboard into the code where the cursor is located.
Exploring
a Conversation
One of the things CDE Studio was designed to do was to make it easy to navigate around large, complex, multiple file conversation easily. By default CDE Studio shows a “navigation pane” on the left when a conversation successfully compiles with no errors. The pane consists of two different views of all the states contained in the currently loaded conversation: a list of all the sates and their type and a tree view that shows the relationships between the states.
NOTE: CDE Studio will “remember” which navigation tab you had selected when you exit the application and that tab will be shown by default when you open CDE Studio next time.
NOTE: You can turn off the navigation view entirely by unchecking the “Navigation tree” option under the view menu.
List
View
The first tab on the navigation pane is the list view. This table shows all the states in the conversation and their type. The states shown includes those from other files that the selected conversation inherits from – see the CDE programmers guide under the help menu for more details on inheritance.

You can sort the table by clicking on either column and you can resize the size of the navigation pane by dragging the vertical separator bar to the right of the navigation pane and to the left of the code windows (the mouse will turn into left and right arrows indicating a resize operation is possible). As you click on each state in the list view, the code will position itself to the start of the selected state. For all states except a PlayPhrase state this means the .CDE file will be visible. In the case of a PlayPhrase state the corresponding PlayPhrase code in the .PS file will be shown by default. You can change this behavior by unchecking the “Always show phrase code for PlayPhrase states” option in the view menu. In either case, both the .CDE and .PS files will be positioned such that the PlayPhrase state is visible – you can click back and forth between them if you wish to see both.
The state shown in blue in the list view is the “entry” state, or the state that’s executed when the conversation is first loaded.
As noted above, all the states for a conversation are show, even those that are inherited from other conversation that have code in other files. When you click on a state CDE Studio will automatically load the appropriate file and move the code to the correct line in that file. The physical file name currently being shown appears in the status bar at the bottom of the CDE Studio application (in the screen shot above this is “d:\commserver\localize\scripts\submenu.cde”). You can hide the status bar by unchecking the “Status bar” entry in the View menu.
If you right click on any entry in the list view you will see one or two options in a pop up menu. For all states you will get a “Start new tree with this state” option – this constructs a tree view starting with that state instead of the default entry state (see the next section for more on the tree view tab). For “RunConversation” states you will also get an option to “Load this conversation”. If that conversation is available in script, it will be loaded into CDE Studio just as if you opened it off the hard drive directly. The current conversation you were looking at is unloaded and if there were pending changes you are given the opportunity to commit or discard them before opening the new conversation.
Tree
View
The second tab on the navigation pane is the Tree view tab. This view allows you to navigate the conversation by following the transitions off states in the conversation. Since a conversation is a collection of states and transitions off those states, it lends itself to a simple two dimensional tree view such as this very well.

As you click on the plus signs to the right of unexpanded conversation states, they are expanded to show all the transitions off that state – also the code is moved to the correct line so you can see the source for the state as well. As with the list view, the proper physical file that homes the code for the selected state is loaded and the file is positioned properly. Again, the PlayPhrase states will jump over to the .PS file by default just as with the list view.
By default the tree view shows the entry state for the loaded conversation. You can, however, load a new tree starting with a different state if you like. As noted in the previous section you can right click on any state in the list view and start a new tree. You can do the same thing by right clicking on any state in the tree view as well. Similarly you can right click on a “RunConversation” state in the tree view and load that conversation if it’s in script.
There are 8 icons that you’ll see in the tree view as you explore conversations:

1. Utility state. This icon is used for all built in conversation states that are used. This includes states such as SetPropBool, GetMailboxStatus, MenuHelp and many others.
2. Play Phrase. This icon is used for all play phrase states which are used to play prompts to a user over the phone.
3. JavaState. This icon is used for all JavaState states which are states that use JavaScript code to log data, put and get information into and out of the property bag and determine conversation flow logic.
4. RunConversation. This icon is shown for the RunCovnersation state which is used to goto or gosub to another conversation name. Note that you can right click on these states in either the List or Tree view tabs and select to jump to that conversation (i.e. it will load that conversation into CDE Studio).
5. NULL (or return). When a conversation transitions to NULL (or simply has no state transition list) this means the control will be returned to the calling conversation. If there is no calling conversation to return to, the call is terminated.
6. Stop. This icon is an indication that the current state is a duplicate found further up the tree. This mechanism is used to prevent eternal loops in the tree view since states can both call each other. If you see this you can look further up the branch your own and find that same conversation listed for review.
7. Error state. The conversation state cannot be found in the compiled output for the conversation. This normally wont happen since the conversation wont compile in this case and the tree view option wont be enabled. However in some cases a referenced conversation state in another file may be missing and this icon is used to indicate CDE Studio can’t find it.
The To-Do Interface
In version 1.0.68 of CDE Studio a new “To-Do” tab was added as a replacement for the old “Info” tab that was never really used. The To-Do tab looks like this:

Using
To-Dos
To Do’s allow you to set reminders for items you need to do in general, in a particular conversation project or on a particular line of code in a specific file. To-Do’s can be used for setting bookmarks of sorts that span files and conversation projects.
Be defuault when you load a conversation, all To-Do items that are related to that conversation or to any file included in that conversation project as well as all “global” to-do items are shown in the to-do table. Clicking on a to-do item will show it’s description (which is optional) as well as the file and line of code (if any) the to-do is linked to. If the to-do is linked to a conversation or a file if you double click on it, the code will be moved to that file and line.
If you select the “show all to-do items” then all pending to-do’s will be shown even if they are not related to the currently loaded set of files. If you double click on a to-do item that’s linked to a file or conversation not currently loaded, that conversation will automatically be loaded and the line of code for the file in question will be shown. Using this mechanism is a good way of keeping track of multiple pending updates that span many conversations or files.
Right clicking on the To-Do grid gives you the option of deleting the to-do item, editing it or (if it’s linked to a conversation or file) jumping to the line of code the to-do is linked to. Double clicking also will jump to the line of code the to-do is linked to, if any.
Simply clicking on the box in the to-do grid will toggle the to-do item’s complete status.
You can free type in the description box on the to-do tab and the updates are written through to the database automatically.
If you check the “Show file name in grid” the to-do grid will add the file name that the to-do items are linked to (if any) in a 3rd column. Items that are not linked to a specific file will be designated as “(global)” in the file name column.
Clicking on the title bar of the to-do grid will sort the grid by that column. This can be useful for finding to-do items related to a specific file you’re interested in for instance.
NOTE: To-Do items are stored locally – there are no hidden “tags” added to the code or the like. The database contains references to specific files and lines of code – if code is added/removed from the source files these bookmarks may no longer point where they did at the time you entered the to-do item. Keep this in mind.
Adding
New To-Do Items
You can add to-do items in three ways:
- Right click on a code editor and select the “Add To Do” menu item. This will bring up the add new to-do item dialog (see below) and have it prepopulated to have the to-do item linked to that file and line of code the mouse was over at the time you selected it. If you right click over a state name in a CDE file, it will default to adding a to-do for that state name.
- Right click on either the List view of states or the Tree view of states to add to-do’s for those state names
- Press the “Add” button on the To Do tab. This brings up the same add new to-do item dialog.

To-Do items that are marked with the “global” scope are not tied to any particular file and will show up all the time regardless of which conversation files you have loaded.
If the To-Do item is linked to the conversation, it’s mapped to line #0 of the primary .CDE file (the file in the first tab in your editor).
If the To-Do item is linked to a specific file and line of code in that file, you can use to-do’s to jump to that line when you select it. This is the default assumption when adding new To-Do items, however you can override it if you wish.
If the To-Do item is linked to a specific file and state name in that file, you can use to-do’s to jump to that state name when you select it. States are linked to their corresponding .CDE files – there are no states in header files and state in phrase files are linked via their CDE “companion” state. Using state names is nice since if the state moves around in the source file across versions, the To-Do link will still find it for you.
Editing
To-Dos
Select a to-do item in the grid, right click and select the edit option. You can change the title, description and even the scope settings of an existing to-do and select to save.
Deleting
To-Dos
You can either right click on a to-do in the list and select the “delete” option or you can select the “purge” button which will automatically delete all visible to-do items that are marked as completed. NOTE: the purge option ONLY deletes completed to-do items that are visible. If you wish to purge all completed to-do items, be sure to select the “show all to-do items” option first so everything is showing before selecting purge.
Managing
And Creating Prompts
CDE Studio is designed to make it easy to create new prompts, edit existing prompts and listen to prompts in your conversation dynamically. It allows you to record prompts using your phone or sound card via the built in TTS engine. It also allows you to use your favorite 3rd party player for playback functions.
Playing
an existing prompt
If right click on the name of a prompt anywhere in the phrase server code, the popup menu will include the “Play prompt file” and “Edit prompt file” as active options. The “Insert prompt file” is always a viable option anywhere in a phrase server file.

If you select “Play prompt file”, CDE studio will go fetch the WAV file off the hard drive and play it using whatever WAV file player is registered on the server.
You can load as many files in a row as you like. With a 3rd party WAV playback device, it will typically launch new instances of the application (assuming the application allows for that – in most cases they do).
Editing
an existing prompt
If you right click on an existing prompt name anywhere in the phrase server code, the pop up menu will have an “Edit prompt” option in the menu. If you select that the “Edit Prompt” dialog will be shown:

In this dialog you can play back the prompt by pressing the cleverly named “Play prompt” button.
You can also record a new version of the prompt using the built in Text to Speech engine by using the “Create with TTS” button. The existing WAV file will be over written with the new prompt. The TTS option uses the text in the “Full text” box on the form to generate the WAV file. It’s not the greatest sounding TTS engine in the world, but it’s passable.
Any edits that you make to the “Full text” box will be written through into the appropriate PROMPT.INI file – this is important to keep up to date since the audio engineers use this file for generating their recording sessions with the professional voices that make our production prompts for us.
NOTE: You are not allowed to change the readable name, WAV file name or full path values on this form – there are there for reference only.
Inserting
a prompt
Right clicking anywhere in a phrase server file, the pop up menu will always offer the “Insert Prompt” option. Be aware that an “AddPrompt” code line will be inserted into the file at the point where the cursor is when you right click. When you select the Insert Prompt option, the Insert Prompt dialog is shown:
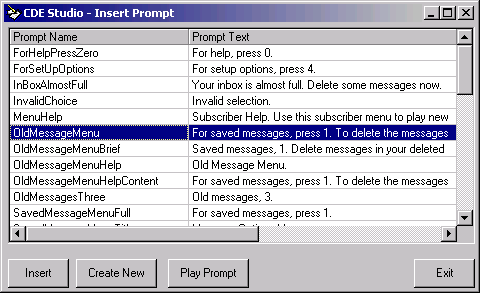
The Insert Prompt dialog shows all the prompts used in the currently loaded phrase server. You can sort by the prompt name or prompt text column to find what you’re looking for. You can then select the “Play Prompt” button or double click the entry in the list to play the prompt back. Again, this function will use the 3rd party WAV file player your OS is configured for.
You can also create a new prompt from scratch by selecting the “Create New” button. See the next section for more on that.
Once you’ve found the prompt you want to insert into the code, select the “Insert” button. If you’ve changed your mind you can hit “Exit” and close the dialog. If you choose to insert a selected prompt (or create a new one) the following line of code is inserted into the phrase server file at the point where your mouse was when you right clicked:
AddPrompt( "UrgentFax"
);
Obviously the appropriate prompt name is used, but you get the idea. The purpose of this function is so that you don’t have to keep jumping up to the top of the file to find which prompt you want to use at a particular place or to break out of your development cycle to go record one and add it to the file – this can all be done automatically for you.
Creating
a new prompt
If you select the “Create New” prompt off the Insert Prompt dialog, a new dialog is shown that allows you to create a brand new prompt from scratch:

The Create New Prompt dialog does a number of things for you in the background:
- It automatically finds the next available WAV file name that’s available in the prompt directory for the currently loaded phrase server. In the screen shot above this is the “AvSubMsgPlayENU379.WAV” file – this implies that there are 378 prompt files in that directory already.
- The full path is calculated automatically, including the use of G711 or G729 on the local box.
- When you save the prompt file you record, it automatically adds a new entry for the prompt in the appropriate PROMPT.INI file and then updates it with the contents of the “Full text” box.
- An entry for the new prompt is automatically added to the phrase server’s [Prompts] section.
- An “AddPrompt (‘prompt name’);” line is added into the phrase server file at the location where the mouse was when you selected the “insert prompt” option.
As such, all you should have to do is enter a good readable name, fill in the full prompt text and generate a prompt WAV file using the TTS engine with the click of a button. All the rest of the busy work is done for you in the background. You can continue coding your phrase server without having to move to a different part of the file or open up other external files or applications to do you job. We in the FMS care about you, the intrepid conversation developer and localization engineer.
NOTE: You’ll notice that after inserting a new prompt into the phrase server that its prompt text and file name do not show up when you move your mouse over it or click on it. This wont happen for you until after you compile the conversation again since that information is pulled from the output generated by the compiler.
Compiling
Conversations
At the heart of the CDE Studio is, of course, the compilation features that allow you to quickly and easily run down errors in your scripts and phrase servers without having to run them as conversations in Unity first.
There are optional settings for the compilation that you’ll find under the Options menu. The list of items in that dialog will be changing from time to time as we move forward with development and debugging – each option will include an explanation of what it does and why you’d want to use it which should be self explanatory.
The
Compilation Process
CDE Studio follows a specific series of steps when compiling a conversation and each step must be completed successfully with no errors before the next step is undertaken. When you click on the “check script syntax” option in the file menu or the corresponding button in the tool bar, CDE Studio follows these steps:
- If the currently loaded file does not have an extension of .CDE, .CDX, .CS or .CSX, the compile process is terminated and a warning dialog is presented.
- If the option to compile ABNF files into GRXML is enabled in the Application Options page then all open ABNF files are compiled into GRXML and the resulting GRXML files are loaded and saved.
- The conversation script is run through the script compiler. If there are any errors presented, the compilation process stops and the errors found are loaded into the error list box. The user is told the script contains errors and they are then given the opportunity to review and address them before trying again. See the “Errors” section below for more on that.
- The phrase servers for the current conversation are fetched. If no phrase servers are found, the compilation process is terminated and the user is told that a conversation requires at least one phrase server.
- The appropriate phrase server is loaded based on the default language the user has selected. See the Multiple Language Conversations section below for more on that.
- The phrase server is run through the phrase compiler. No error checking is done at this point.
- If the phrase server compilation had no errors, then the compilation process is considered successful. At this point all the macros and prompt references in the script and phrase server are loaded so that they appear when you click or move your mouse over them. This is also the point at which the list and tree views in the navigation pane to the right are loaded.
Errors
When errors are encountered at any step in the above process, the information about those errors are loaded in to the error list at the bottom of the form. Normally this list is hidden from view but if one or more errors or warnings are encountered during a compile process, it’s made visible.
Errors are considered “show stopper” events and will stop the compilation process. Warnings are not fatal and the compilation process will continue. These are less serious but usually do indicate an item that needs to be addressed in your conversation.

NOTE: You can resize the error list by moving your mouse over the horizontal separator between the error list and the code page above it – the mouse will turn into an up and down arrow indicating you can click and drag to resize accordingly.
Notice that the above screen shot does not show a navigation pane on the left side of the form. This is because the navigation views are generated only after the conversation has compiled successfully and the above example has a fatal error in the .CDE file. In this case the macros and prompt file will typically also not show their information when you move your mouse over them or click on them since that text resolution is also done near the end of the compilation process.
NOTE: In cases where an error does not have a specific line in the code, the cursor is moved to the top of the file. For instance if you forgot to add a “[Main]” section to your .CDE file, the compiler will throw an error for that file but there’s no line to show indicating the omission, so the cursor is moved to the top of the file.
If you click on any error in the error list, it will move the code to the appropriate file (if necessary) and to the line where the error was reported. Many times the compiler will report the line directly after the actual error so look around a bit. It’s also not uncommon for more than one error to be generated from a single code problem, so don’t be thrown off by that if it happens. A description of the error will appear in the error list as well which should give you a reasonable clue as to the source of the problem.
Errors in the script or phrase server are noted with “[error]”, warnings in the script or phrase server are noted with “[warning]” and errors in the grammars are noted with “[grammar error]”. The grammar parsing does not generate warnings, only errors.
Warnings
As noted above, warnings are not considered fatal and the compilation process will continue. Like errors, you can click on them in the error list and the appropriate source file will load (if necessary) and the line that generated the error will be loaded.

If only warnings were encountered and no errors, you may right click on the list of warnings and select to hide the window. If there are one or more errors included in the output this option will not be available – to get the list window to go away, you will have to address the error(s) indicated. Even though you can choose to hide the error list for warnings, you should still be sure to address them. The next time you compile, they’ll be reported again. There’s no way to force CDE Studio to ignore warnings.
Multiple Language
Conversations
The CDE Engine is build around conversations consisting of a single script (.CDE file) and multiple phrase servers (.PS files) – one for each language supported. Given that Unity currently supports over 20 languages for the phone conversation, on a production multilingual server there will be many phrase server files to deal with.
With this in mind and assuming that a given engineer is only working on one language at a time, CDE Studio is designed to show only a single phrase server file for a given conversation at a time. Out of the box CDE Studio will show the US English phrase server file if it’s loaded on the local system. You can change the preferred language and CDE Studio will remember your selection and always attempt to load that language phrase server for any conversation you open. If that language phrase server is not found, it will fall back to US English. If the US English phrase server can’t be found it will load the first phrase server it can find for the conversation. If there are no phrase servers found, the conversation is not considered complete and an error message is displayed to the user letting them know of the problem.
Changing
default language
All the language phrase servers found for a conversation are listed under the “Phrase Languages” option in the View menu on the main form. Each language discovered is loaded dynamically into the drop down list off that menu item as shown in the following screen shot:
If you select another language in the list, that phrase server code is loaded and this becomes your preferred language. The next time you load a conversation (even after exiting and reentering CDE Studio) it will attempt to load the phrase server for you preferred language automatically. If it can’t be found it will fall back on US English and if that can’t be found, the conversation is not valid and an error is reported to the user.
Adding
a new language to an existing conversation
(this is not yet implemented in the Linux version of CDE Studio)
When developing conversations, it’s necessary for localization engineers to add new phrase servers for each language. There’s a number of little steps involved in this process and CDE Studio has automated it to make it easy. If you have a valid, compiled conversation loaded, you can select the “Add Language to Conversation” option in the File menu off the main form and the following dialog will appear:

The only thing you need to enter is the 3 letter Windows language code for the new language you wish to add (i.e. DEU=German, JPN=Japanese, FRA=French etc…). Everything else is done for you automatically:
- The language code is verified against the list of languages in Windows – if the code you entered is invalid, the creation process is terminated.
- If the language code is good, CDE Studio makes sure that phrase server does not already exist. If it does, the user is told there’s a duplicate and the creation process is terminated.
- If the language code is good and new, then a new prompts directory for that language is added automatically if necessary. This includes the creation of a new PROMPT.INI file and it takes into account if the local server is setup for G711 or G729 automatically.
- All the code in the currently loaded phrase server is copied and entered into a new phrase server for the new language. This ensures all the states necessary are there and all the localization engineer needs to do is update the phrase code for the new language as necessary.
Since all the code is copied from the currently loaded phrase server when creating a new one, be sure you have the phrase server loaded that you want to copy. Typically this is the US English phrase since those are developed and tested first and should be complete.
Using
Code Templates
Code templates are simply small chunks of code that CDE Studio lets you insert into your code through the right click menu. The template is added into the code at the position where the mouse is at when the right click option to add the code template is selected. The code is all spaced in from the left to the column where the mouse is positioned as well.
You can add as many templates as you like – CDE Studio comes with a few sample templates to get you started. You can edit, add or delete templates using the “manage templates” option off the “Insert template” item in the right click pop up menu or through the “Manage code templates” item in the Options menu. In either case you’ll see the following dialog:

You can add any text you like in the template. While it’s colored using the same syntax rules as the main code pages, it is not syntax checked or verified in any way – it’s simply added as is. There’s no limit to the number or the size of the templates.
Searching Across Files
The File Search feature allows you to search for a string across files in a directory and, optionally, all sub directories under that directory as well. The results are displayed in a grid that shows each line in each file the string is found in. The text of the line in that file is shown in blue in the “text” column so you can quickly scan to find what you’re looking for. You may view the file at that location by simply clicking the “Preview” button – the file will be shown either on a separate form or in the “macro window” on the main form. You can also use the “Load File in Notepad” option if you’d like the file copied locally and shown in a separate instance of Notepad. The “Load file in CDE Studio” will cause the current instance of CDE Studio to load that file.

You can evoke the File Search from the toolbar button for the function, from the edit menu’s “Search across files” option or from the right click popup menu for “Search across files”. The word the mouse is currently on when you right click and select the option will be the default search string filled in for the form.
The last 20 search terms you’ve used are automatically saved in the drop down list, even between CDEStudio sessions.
You can choose any file extension you like and as many as you like – common defaults are provided in the drop down list however you can customize these. Simply include the extension you wish to include as “.EXT” (no * in front) separated by commas. There’s no limit to the number of extensions you can include. “.*” gets all extensions (this is an option in the drop down list).
By default the directory is “/opt/Cisco/connection/share/tui”, however you can manually type any path you wish or use the “browse” button to select a folder. The last 20 folders you’ve used are saved in the drop down, even between CDE Studio sessions.
If you choose the “Show text in separate form” radio button, when you click on search results in the grid the text of the file will be shown in a separate form that pops up. The position and size of the form will be remembered so the next time you search across files it will load itself into the same position. The name and full path of the file being shown will be displayed on the title of the form.
If you select the “Show text on main form” radio button instead the text of the files that contain the search results will be shown in the attached macro window on the main CDE Studio form. The name and path of the file will be displayed in the status bar at the bottom of the form if the status bar is selected to be visible.
NOTE: If you select the “Search text in open tabs only” option, the search will be limited only to those files currently open – selecting matches will move the code to those tabs in your editor instead of showing in the “macro window” as noted above.
CDE Studio remembers the location of the File Search form and your default preferences so the next time you load the form it will be configured the way you left it last.
File
Change History Feature
The File Change history dialog can be reached by pressing F12, selecting File : View file change history or by pressing the file change history button in the toolbar (clock icon at the far right). This dialog shows a list of all files that have been changed and pushed over to the remote Connection server sorted by date and time (most recent at the top). The intent is to provide an easy way to copy all the files you’ve updated recently to your local box for insertion into the source control system being used.
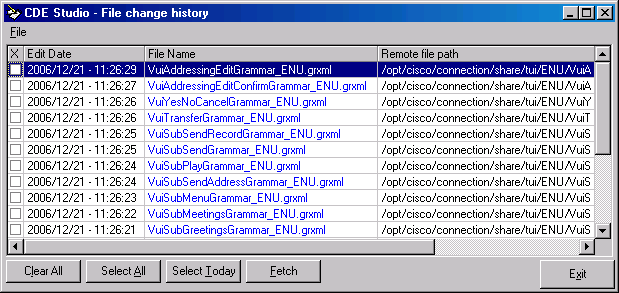
The columns can be sorted by clicking on them, individual files can be selected by clicking on the checkbox on the left or by doubleclicking anywhere on the row in question. You can also automatically select all files that have changed today by using the “select today” button at the bottom. Once you have the files you’d like to copy locally, press the Fetch button (or hit ALT-F) and all the selected files will be copied over to the \ChangedFiles\ folder under the install directory for CDE Studio.
You can select to clear the file history data entirely or just for entries older than today by using the corresponding options under the File menu. CDE Studio keeps the file change history around forever unless you clear it yourself – the amount of space used in the database for this is very small since only the most recent update of any particular file is noted.
NOTE: You can also close the File Change History dialog with F12 if you wish.
File
Archive Features
CDE Studio includes a full file archive feature built into the application. Each time you save a file (or perform a function that causes a save such as compiling a conversation) a copy of the file is saved in an archived on the hard drive. You can go back and review previous versions of files, compare them to the currently loaded version of that file and revert back to the archived version if you like.
To view the archives for the currently visible file, just select the “View Archives” button on the tool bar or select “View archives for current file” option under the File menu. When you do that, you’ll see the following dialog:

The name and path of the currently loaded file are shown at the top. The file selected is the one visible in CDE Studio at the time you select the option – so for instance if you have the SubHotel.CDE file tab visible, that’s the file that will be loaded. If the phrase server tab is selected instead, then the currently loaded phrase server’s archive will be shown instead.
NOTE: If you edit the same file name in different parts of your hard drive, those files are archived separately from one another. So if you edit “MyConv.CDE” in c:\mydir\ and also in d:\temp\, two separate archives are kept for those files. They’re not considered related in any way even though the file names match.
All the archived files found for the currently loaded file will be in the grid on the form above – they are loaded from the most recently created archive to the least recent. By default CDE Studio will save 50 archives of each file you’ve worked on. This is adjustable from 5 to 200 in the File Archive Options discussed below. Old archives that exceed the number set will be deleted so if you’ve set your maximum archive limit to 10, you will never see more than 10 items listed in the archive table (as shown above).
To compare the differences between the currently loaded file and an archived file, simply select one of the archived files in the table and press the “Compare Files” button. This will, by default, launch the ExamDiff freeware Windows file differentiation tool which will show the currently loaded file on the left and the archived file on the right and differences will marked for review. The ExamDiff tool is quite nice (much nicer than the old WinDiff tool) but you can choose to use your own file diffing tool if you like by selecting one in the File Archives Options dialog discussed below.
NOTE: Many file diffing tools will allow you to edit the files directly – this is OK just be aware of what you’re doing. CDE Studio will notice that the file has been edited and will ask you if you’d like to load the updated text.
If you would like to “roll back” to a previous archived version, you can do this easily by selecting the archive you want and pressing the “Revert to archived version” button. You will be asked to verify that this is what you want to do and then the archive dialog box will close and CDE Studio will automatically update the currently loaded file with the archived version.
NOTE: When you restore an archived version, CDE Studio archives the current file before that happens – so you can always jump back if you discover this is a mistake.
You can change the default file archive and file compare functionality in CDE Studio by selecting the “File archives option” item under the Options menu. When you do this, the following dialog comes up:

The first item on the dialog determines how many copies of archived files are kept around for each file. By default this is 50, however you can adjust it to as few as 5 and as many as 200. Be aware that entire copies of the files are being archived, not just the differences. Hard drive space is cheep but 200 copies of every conversation script on your drive can get pretty big.
The archive directory is setup by default to go under the CDE Studio installation directory in the “FileArchives” folder. Don’t worry about uninstalling CDE Studio when updating versions – the directory will not be removed and your archives will be preserved. However, if you wish to move your archives to a new directory you can. NOTE – moving the archive directory starts a NEW archive directory- it does not move your archives. You can do this manually if you wish. Just copy all the files and directories over to the new location.
By default CDE Studio will use the ExamDiff freeware file comparison tool when showing you the differences between the current file and an archived version. It’s a very nice tool and I highly recommend it. However, if you have your own file comparison tool that allows you to pass in the files to be compared via command line parameters, you can configure CDE Studio to launch it instead. You can do this by selecting the “Select my own file comparison tool” radio button and pressing the “browse” button to select the executable. Then configure the command line as you wish – the command line must contain both “%Master%” and “%Archived%” strings on it or CDE Studio will not allow it to be saved. These tokens are used to pass the file names to be compared to the tool. Shown in the screen shot above is what it would look like to setup CDE Studio to use WinDiff.exe.
NOTE: These options, as with most options in CDE Studio, are saved in the registry and can be exported and imported to another development box. If you’ve setup custom paths for the archive location and/or the file comparison tool, be sure to modify those as appropriate on the new machine after you import the registry keys.
Prompt
Check Feature
The prompt check feature can be called up for any conversation that compiles – this option can be found by right clicking on the code form or by selecting the “Check prompts” option under the Edit menu on the main form. When called, the following form is loaded:

The first “Full Prompt List” grid is just that – all the prompts defined in the local conversation’s phrase server file and all prompts that are added to the conversation through inheritance are included in this grid. The name of the prompt and the full path to the WAV file it points to are shown. If the prompt is inherited from another file it shows up in read.
The “Invalid Prompt Name References” shows all instances of an “AddPrompt” function call in the phrase server for the local conversation that contains anything other than a defined prompt (either local or inherited). The name of the prompt called and the line it appears in are shown. If you click on an entry in this grid the main form will move to the phrase server file and position the code at that line so you can see the reference.
NOTE: It is perfectly legal to have compound variable names/strings or hard coded WAV file paths in your “AddPrompt” function calls. They will show up in this grid, however. This is just a tool to help you find potential problems. As a side note, it’s not a good idea to use hard coded WAV file paths in your production scripts if you can help it.
The last “Prompts Defined But Not Used” grid shows all local prompts that were defined in the [Prompts] section of the phrase server but were not used in an “AddPrompt” function call anywhere in the conversation. This grid only checks LOCAL prompts, it ignores inherited prompt names.
NOTE: Prompts defined in one conversation may be used by another through inheritance. While unusual, this is legal so don’t necessarily assume that you can delete any prompt definition that shows up here without doing a little research first. Use the cross-file search function to help run down other potential references to this prompt name.
Obtaining
Updates
To check for updates to this tool, visit http://www.CiscoUnityTools.com
Revision
History
3.0.1 – 6/14/2010
· Removed 3rd party tab control
· Updated for Windows 7 compatibility
· Changed help file structure and location for install
· Updated to qSetup from Install Shield.
· Added logic to automatically reconnect when Connection terminates the SSH session CDE Studio is using.
2.0.40 – 4/19/2010
- Added support for CAT and ZHH language definitions for localization.
2.0.39 – 12/4/2009
- Modifications to the Phrase Server Utility for Connection 8.0. Added support for new and changed backend conversation states such as Object Presentation Interface and the like.
2.0.38 – 3/20/2009
- Updated to add TRK, PLK, ELL language codes.
2.0.36 – 2/5/2008
- Fixed some problems with saving response file input and output for the localization features.
- Fixed PSU function where optional Boolean parameter into AddTTS function was not being allowed.
- Added logic to handle PromptDir path referenced in common JS files for PSU function.
- Added logic to pull prompt text for manually constructed prompt paths in JS files for PSU functionality
- Added logic to pull in the entire convProps.CDH file into the script engine for the PSU utility if the file exists.
2.0.34 – 1/10/2008
- Updated CDE language files to correct some case sensitivity issues.
- Added option in edit menu to show all state references to help find unreferenced ones
- Removed some unsupported functions such as prompt checks.
- Added compiler option along with updated CDEStudioStub to optionally generate errors for unused states.
2.0.32 – 11/7/2007
- Updated Phrase and CDE language files to remove some key words such as “static” and “abstract” from the default language definition.
2.0.31 – 9/16/2007
- Opened up the new file capability on the remote file explore form.
- Removed some unused keywords from the language definition file for token parsing
- Fixed some error handling when compiling bad CDE files (in particular empty files)
- Fixed logic such that if a file fails to edit locally force the file to be opened with notepad if using the “edit locally” option on the file open dialog.
2.0.30 – 8/25/2007
- Fixed problem with TTS prompt file generation – now forced 8 bit 11 KHz PCM codec for the output.
- Updated to handle new grammar compilation and reference architecture in the 7.0(x) Connection line
- Fixed problem with error handling on remote connection failure.
- Updated the FileTracker version included with CDE Studio to 1.0.3 to handle a slow connection error handling issue.
2.0.29 – 6/4/2007
- Fixed problems with automatic prompt file creation/insertion.
- Removed all references to the media master control and associated options
- Stubbed out Check Prompts and Edit Prompt options for now.
- Updated SSH/SFTP library
2.0.27 – 4/10/2007
- Fixed support for Russian language not being picked up when installed.
- Fixed a problem when swapping languages without recompiling where sometimes the old language file name was still loaded for one of the open phrase files.
2.0.25 – 3/27/2007
- Added support for calling external conversation graph utility
- Fixed problem with error output parsing for prompt name errors.
- Forced DosToUnix formatting when fetching files via the edited files dialog.
- Fixed problem with prompt text that is only 1 character long not showing up.
- Force “View Raw Prompt.INI” function to convert into DOS text formatting before displaying.
2.0.24 – 3/22/2007
- Fixed problem with non ENU languages not loading prompts properly.
- Fixed problem with switching languages on the fly not pulling over proper phrase server files on a recompile.
- Fixed a few UI issues with the PSU functionality.
- Added logic to force font for prompt INI display of double byte characters for the PSU functionality\
- Forced inclusion of additional linefeed for output of double byte language prompt text in the PSU utility
- Fixed problem with AddDate vs. fn_AddDate functionality.
- Added function to output result information from PSU runs to the same folder response files are stored in.
- Added TTS libraries back to install
- Fixed form resize issue when running in XP for some forms.
- Added logic to better handle use of external WAV play application for PSU functionality
- Updated property bag logic to stub out RemoveProp and handle “classic” PSU response file input.
2.0.13 – 2/19/2007
- Added first drop of the Phrase Server Utility functionality
- Updated java script compiler checks to be faster – removing unnecessary recompiles
- Added common phrase server compiler output to all compilations – common_xxx.ps is now visible in the tab strip at all times.
- Removed parameter “hot listing” from editor logic for now. Triggers for this can misfire and cause unnecessary error reports.
- Fixed a problem with the phrase server parser that was not searching through include files properly.
2.0.12 – 1/31/2007
- Updated DOM extensions for java compile logic
- Added more keywords to the Phrase and CDE language definitions
- Added “file tracker” link to the toolbar
- Fixed an overly-long timeout issue when the stub fails to compile correctly
- Removed some “auto complete” function definition logic since it’s a bit heavy for the return.
2.0.11 – 1/25/2007
- Added CSMgr debug output file tracker functionality
- Fixed a problem with parsing out the configuration data dictionary XML file.
- Updated all 4 data dictionary files from build 249
2.0.10 – 1/16/2007
- Fixed functions not showing up when defined in CDE files
- Added java script interpreter – stand alone checks only for now with the “Flying J” toolbar button.
- Updated LNG file for case issues with some key words.
- Fixed a problem where editor preferences (colors, converting tabs to spaces etc…) were not being saved and loaded properly for all language types on included files.
- Changed logic for forcing recompile of all ABNF files on a VUICommon change to always ask first no matter what.
- Fixed a version check problem for aforementioned VUICommon file where long paths are involved
- Updated setup to properly add link to CDEStudio, ignoring the presence of “Cisco Systems” branch in the tree already.
2.0.8 – 1/8/2007
- Added current connection info to help menu
- Adjusted date format in remote file explore box so it sorts properly
- Updated case of a few command in the CDE.LNG file
- Updated error catching logic to be more specific with respect to SSH shell related bugs.
2.0.7 – 1/4/2007
- Added option to view raw error output file to the file menu – inconsistencies in the error reporting make parsing the file for details sometimes difficult so this gives an option to eyeball it directly if necessary.
- Fixed a problem with a taunting “conversation compiled ok” status message in cases where the compiler did not complete cleanly.
- Added “quick view” option for adding remote files to the open tab strip
- Fixed problem where symbolic links were not being handled as “directories” in the file explorer
2.0.6 – 1/2/2007
- Broke out SSH and SFTP into two separate control groups
- Added separate SSH and SFTP debug forms that show when the /debug option is on.
- Reorganized tab strip logic to be nicer to extend
- Fixed problem with not picking up “File =” references in the [template] section for include/inherited files
- Updated stand alone ABNF compile option to throw up progress dialog
- Added additional diags around the SFTP file transfer and “local root” translation logic
- Updated SSH debug output logic to allow for more history to be retained
- Fixed problem with compiler error view logic to handle the case where the file that caused the error is not yet copied locally (i.e. in the case of an inherited file missing a section).
- Fixed a problem with duplicate adds to the tab strip if the same file is referenced as an include file _and_ is an inherited file.
- Updated logic for forcing a recompile of all ABNF files on remote server based on a change to VUICommon so it’s less aggressive (i.e. it wont recompile unless the actual GRXML compile output changes).
- Updated BlackBox SSH library being used to the 5.0 release version
- Updated how FileHistory.MDB file is added to the system during installs vs. upgrades so as not to wipe out existing history.
2.0.5 – 12/21/2006
- Added logic to recompile all ABNF files on remote server for current language if the Common VUI ABNF file is updated in the current project.
- Fixed some file archive issues where saves were not updating the local archive in all cases.
- Updated help file for new features and screen layout
- Added additional error handling specific to local temporary folder creation failure due to apps like ExamDiff holding files open during a compile.
- Updated About box with snappy new Cisco logo
2.0.4 – 12/20/2006
- Added File Change history logic to application
- Updated ABNF compile to only mark GRXML files “dirty” if the compiler output differs from what’s already loaded
- Fixed a bug with bookmark navigation when only one tab is loaded
- Added Save All and File History options to tool bar
2.0.1 – 12/12/2006
· First internal beta release of the Linux Link edition.
© 2006 Cisco Systems, Inc. -- Company Confidential