Cisco Utilities Data Link for Informix (CUDLI)
Connecting
to the Remote Connection Server
Attaching
to any installation post 2.1(1)
Task
2: Set the Database Proxy Service Shutdown Time
Task
3: Activate the Remote Database Proxy Service
Task
4: Login to the Remote Server
Viewing
and Executing Stored Procedures
Overview
The Cisco Utilities Database Link for Informix (CUDLI) tool is designed to allow users to quickly navigate around a Connection (on Linux) database, find out information about what data in a particular table or column means and jump around between referenced objects in the database easily. It also has the ability to show Unity stored procedures and includes a custom SQL query builder. It is an ideal tool for field techs, tech support folks and development staff attempting to make sense of the Connection SQL tables. Since it’s a read only viewer it’s also safe to walk customers through using if necessary.
Use of the viewer is fairly straight forward for the most part, some of the less obvious features are described in the Features section below.
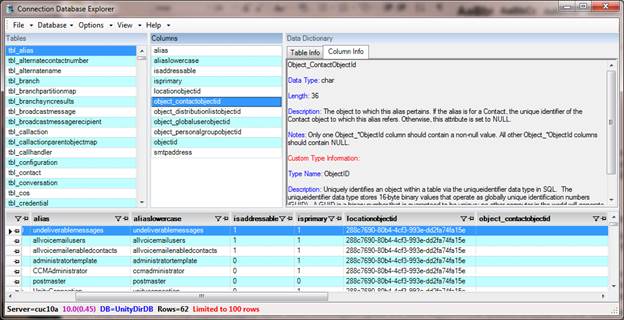
When you first run CUDLI it connects to the remote Linux server via ODBC and interrogates Informix SQL database and populates the “Table Name” list box on the left with all the user defined tables it finds. For each table in the database it gets a list of columns in that table which show up in the Column Name list box in the middle. You can change which of the four databases it’s connected to (UnityDirDB, UnityRptDB, UnityDynDB or UnityMBX1DB) using the “Database” menu option.
As you select a row in the Table Name list on the left it reloads the column information and updates the data in that table shown in the bottom grid. The data grid is loaded such that the column names are presented in alphabetical order running left to right. “Frozen” columns are excluded from the sort order – see the Features section below for more on freezing columns and rows in the data grid. In addition, information about what that table is used for in the database is shown in the “Data Dictionary” tab text box to the right.
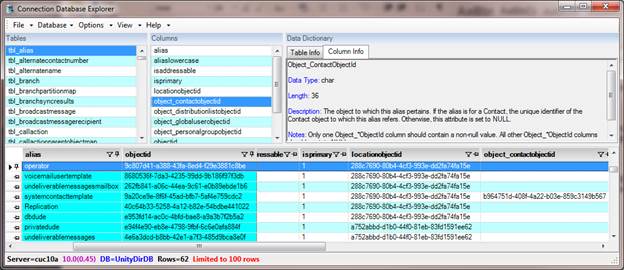
When you select a row in the Columns table, basic information about the data stored in that column is shown in the “Column Info” text box on the right. In addition the data grid on the bottom will reposition such that the selected column appears as the left most column. This makes it easier to find what you’re looking for quickly instead of hunting through the columns in dbAccess provided by Informix.
The data grid itself offers several features to help user sift through the information in the tables quickly. These are covered in the Features section below.
NOTE: You can not only resize the form itself but you can move the “bars” between section up or down or left and right to show more of the data table or more of the column/table/description text area as desired. CUDLI will remember the size and position of these sections in between runs.
Requirements/Special Notes
This version of CUDLI is designed to run on Windows 2000/2003 (server or client) or Windows XP, Vista, Window 7 or Windows 8 and connect to a Linux install running Connection 2.1(1) or better. It’s been tested specifically with co-res installs on both VMWare and MCS servers.
Connecting to the Remote Connection Server
Attaching to any installation post 2.1(1)
For installations of 2.1(1) and later you must use the database proxy service for access to the database from off box for any database tool including CUDLI.
Task 1: Configure a User without a mailbox with the Remote Administrator and System Administrator roles
1. Go to the Cisco Unity Connection Administration web interface for your installation.
2. You can leverage a user with or without a mailbox for off box data access purposes, but it’s strongly suggested that you create a new user without a mailbox that is used solely for the purpose of remote administration tasks for security reasons. This is also required if you want to export messages from a Connection 7.0(2) or later server – a user with a mailbox may not be allowed to extract messages from other mailboxes, whereas a user without a mailbox should have no problem.
3. Be sure the web administration password for this user is not configured to require a change at first login on the “Password Policy” page for that user.
4. If necessary, change the web administration password on the “Change Password” page. Note that only the web application password comes into play for remote data access.
5. Finally, on the “Role” page for the user, add the “Remote Administrator” and the “System Administrator” roles to the “Assigned Roles” list and save. You can assign any or all other roles as well but for the purposes of remote access to the database and making updates to users those two are necessary.
Task 2: Set the Database Proxy Service Shutdown Time
Out of the box the database proxy service is not running and if you try to start the service it will shut down right away. First you need to set the “Database Proxy: Service Shutdown Timer” value found in the System Settings -> Advanced -> Connection Administration section of the Cisco Unity Connection Administration page. By default this is 0. You can set it to as high as 999 days if you like. After the number of days configured here the remote database proxy service will shut down. This is useful if you want to do some migration work, for instance, and don’t want to forget to have the service disabled for security reasons.
NOTE: If you restart the server, the remote database proxy service will remain shut off. After a system restart you have to go in and manually turn on the service again (see step 3)
Task 3: Activate the Remote Database Proxy Service
1. Out of the box the service that listens to remote database requests is not active, you must turn it on. To do this, go to the “Cisco Unity Connection Serviceability” web admin page.
2. On the Tools menu, select the “Service Management” page.
3. The “Connection Database Proxy” item under the “Optional Services” section will be marked as “Deactivated” and stopped. Press the “Activate” button and it will be activated and started automatically.
Once you’ve started the proxy service you can connect with any tool that needs off box database access using the user name, web administration password and port “20532”.
NOTE: The service will automatically shut down after the number of days configured in step 2 above or if you restart the server.
Task 4: Login to the Remote Server
When you first start CUDLI, you will see a login dialog box that will be empty except for port 20532 filled in as the default for the port. You must provide the server name or IP address for the “Server” field and provide the login and PW for the database connection account. Use the alias and web administration password of the database user created above for the login and password fields.

CUDLI will remember your entries including the password (which is stored in a secure hash). Each time you run CUDLI it will load the settings of the last connection you made (or attempted to make). Every server you’ve successfully connected to in the past will be listed in the drop down list in the order in which you connected to it last – most recent to least recent.
NOTE: The login and password information is stored along with the local Windows login name. Only those servers that have been attached to successfully using the current Windows login will be listed. If you are logging into the same Windows server with different users you will only see servers connected to with that particular Windows login.
NOTE: Providing the wrong password or login will fail quickly and give you a chance to try a different pair. Providing an incorrect server or port, however, results in a 60 second timeout while CUDLI waits for the Informix ODBC driver to return. Unfortunately this cannot be shorted. Type carefully.
Features On Main Viewer Form
The data grid shown at the bottom of the form offers several features to help navigate around the database and help find what you’re looking for in the database tables.
Hover-Resolve ObjectId columns.
Most ObjectId (GUID) columns in most tables will do an automatic resolve of that objects name when you hover the mouse over that cell. In other words if you hove your mouse over a GUID for the locationObjectId in the vw_Subscriber view, the name of the location will show up next to the mouse cursor for you. This can be handy when just wanting to know which object an ObjectId references.
Sort and Move columns
Each column header can be sorted by clicking on it with the mouse. The ascending/descending sort order is indicated by a small triangle in the header itself. You can also move a column by clicking and dragging the column header. This can be useful if you want to “freeze” a particular column or row when sifting through a large table of data – see the “Freezing columns and rows” section below.
Searching for Data
Selecting the File | “Find value in current DB tables” option allows you to enter any string and it will search every column on every row in every table in the currently loaded database for either a full or partial string match based on what you enter. As matches are found that table and row are loaded for you to view and you can select to continue searching from that point or stopping.
This is a somewhat slow process, naturally, but this function is extremely useful when trying to find all references to an ObjectID or a server name reference for instance.
Freezing columns and rows
When sifting through large tables of information where there are many columns you may be interested in, it’s sometimes very handy to “freeze” a particular column or row in place while you scroll through the data so you can keep track of which row you’re interested in and/or compare values in various rows to one another.
Freezing Columns
To freeze a column in the data output simply hit the “pin” icon in the header for that column – the column will be shown “ice blue” and move to the left. The shot below has the Alias and ObjectId columns “pinned” to the left allowing the user to scroll other columns while keeping them in view.
Freezing Rows
To freeze a row, simply select the same “pin” icon for the row along the right – it will show the row as green and “pin” it to the top of the grid, allowing other rows to scroll under it why it always stays in view. The following shot shows two rows “pinned” to the top of the grid output.

Exporting Table to CSV file
If you would like to save the current table to a CSV file you can select the option to export the entire grid or just the visible rows to CSV from the File menu on the main form.
Options
A couple of options currently appear under the Options menu.
- Show all data. This will have CUDLI fetch entire contents of tables when exploring the database. This can be slow for large tables and you may consider using the “Limit data to top 100 rows only” option to speed things up if you are just exploring. By default the limit to 100 rows is on since attaching to very large databases remotely can be very slow pulling that much data over the wire. Turn this option off only if you need to.
- Limit data to top 100 rows only. This is the default value when you start up CUDLI. As the name implies, this has CUDLI ask for only the top 100 rows on any table you select while exploring the database. This has no impact on custom queries executed in the Query builder interface.
Viewing and Executing Stored Procedures
To see all the stored procedures in the UnityDB select the “View | Stored Procedures” option and a stored procedure form will come up. The stored procedures used by Unity are listed on the left and when you select a particular item it’ll show all the parameters for that stored procedure in the middle column as shown in the screen shot:
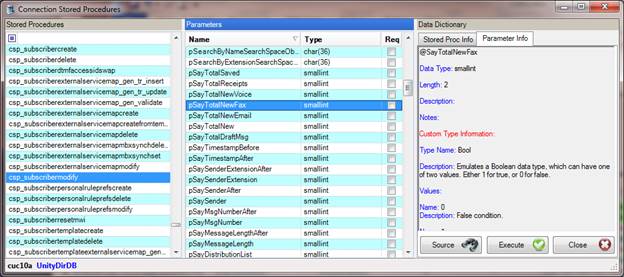
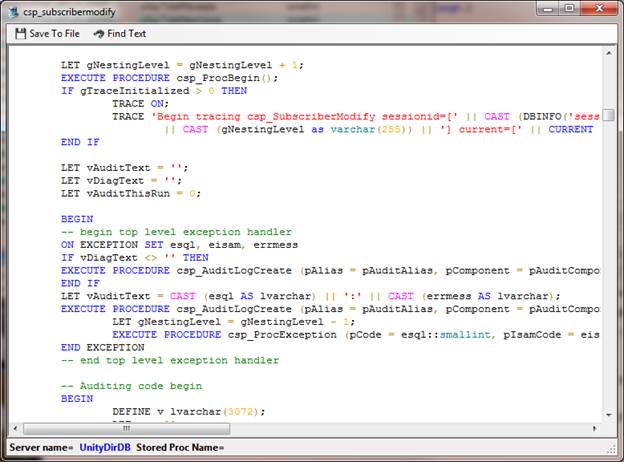
On the right there is some information on the use of the stored procedure and each parameter. You can also see the source code for the stored procedure if you like by pressing the “View Source” button in the lower right of the form which then shows the source code for the procedure itself:
This is a read only view that’s there to help you understand how it works, you cannot edit, save or create stored procedures of your own through this interface.
To execute a stored procedure you can select the procedure you want to run and press the “Execute” button – the follow form comes up when you do that:
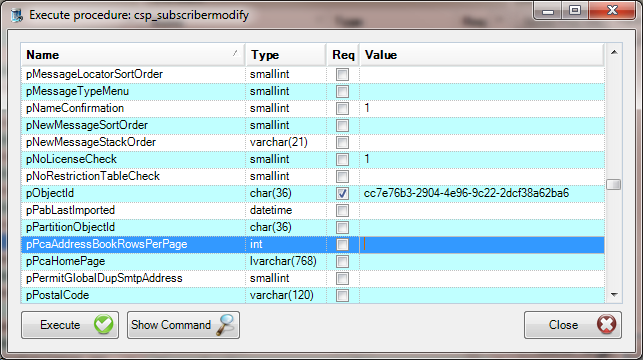
All the input parameters for the selected procedure along with their types and lengths are shown. Items that are required are indicated with the “Req” checkbox. The “AuditAlias” and “AuditComponent” values will always be filled in for you and you cannot edit them. To change a value, simply click or tab to the “value” column for the row you want and enter the value. Basic type checking is done for each value when you enter it.
When you have the values you’d like in, you can press the Execute button to run the procedure or you can press the “Show Command” button instead and it will show you the fully formatted command string that will be executed, but it will not execute the procedure. For instance a typical command text would look like this: “execute procedure csp_aliasmodify( pAuditAlias='WORKGROUP-Jeffs',pAuditComponent='CUDLI',pObjectId='51f04042-83f6-438f-9a0b-1ad5dfbed886')”. If you execute the procedure and it completes properly, you will get a dialog indicating this – if not, the error raised by the stored procedure is presented to you and you can correct the problem and try again.
NOTE: this form is not modal so you can go fetch ObjectId values from the main CUDLI form easily by right clicking on them and selecting “copy” from there and then pasting them in. Easy as pie.
Construct Custom SQL Queries
CUDLI includes a fully featured SQL command window similar to the SQL Query Analyzer offers. You can enter any valid SQL string you like and execute it by pressing the “execute” button on the right. Queries are automatically color coded to assist you with making sure your syntax is correct. Command words such as “select” and “from” are colored blue, table names and columns are green and so on.
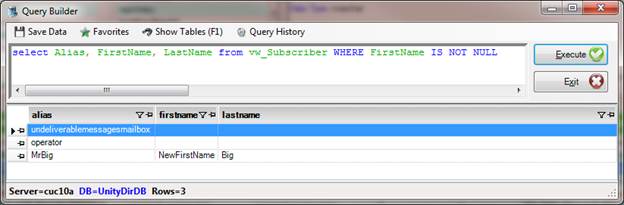
The results of your query will show up in the grid at the bottom of the form. You can sort this grid by clicking on the columns if you like. If you would like to save the results of your SQL query you can use the “save data” button in the toolbar.
NOTE: You can also update the database in this window using UPDATE and DELETE commands just like SQL Query Analyzer so be careful! If you apply an update or a delete you will be told how many rows were affected by the operation. There is no “undo” for changes like this so make sure you know what you’re doing if you are executing updates.
The last 20 queries you’ve run are available to you by pressing the “Query History” button in the toolbar – this can be handy when running a few queries multiple times with just small changes. Additionally you can permanently save queries using the “Favorites” menu selection which works much like a typical web browser does – you can name a query anything you like and the full text of the query will be saved. You can select any saved favorite just by clicking on it.
This query builder also will provide a list of all the tables and all the columns in those tables using “intelisense” type drop downs and auto complete. To see a list of all tables for the currently loaded database, press “F1”.
NOTE: The queries you enter are run against the currently selected database (i.e. UnityDirDB vs. UnityRptDB) – to change which database you are connected to, use the Database menu option.
Revision History
4.0.17 – 8/31/2017
· Included data dictionary files for the Unity Connection 12.0 release.
4.0.16 – 6/30/2016
· Updated to include the data dictionary files for the Unity Connection 11.5 release
4.0.15 – 1/16/2016
· Added updated data dictionary files for the Unity Connection 11.0 release
4.0.14 – 1/2/2016
· Updated setup for Windows 10 deployments
4.0.13 – 3/18/2015
· Updated 3rd party libraries to latest – configured for NuGet deployment
· Updated setup to handle recent Windows and .NET version checks
4.0.12 – 8/24/2014
· Updated data dictionary files for the Unity Connection 10.5.2 release
4.0.11 – 5/27/2014
· Updated data dictionary files for the Unity Connection 10.5 release.
· Removed beta Python scripts function – moved to Python Scripting Host application for more complete treatment and support
4.0.10 – 12/12/2013
· Fixed an issue where UnityMbxDb2 menu option was wired to the UnityMbxDb3 event – resulting in pulling up the wrong database in a multiple mailstore configuration.
4.0.9 – 11/16/2013
· Added option to search for a column name instead of actual data string matches in the global search function.
· Fixed remote version check logic
· Fixed help link
4.0.8 – 8/2/2013
· Updated data dictionary files for upcoming 10.0 release
· Added Python scripting runtime interface
4.0.6 – 4/8/2013
· Updated data dictionary for Connection 9.1 releases.
· Fixed a problem where custom attributes were not showing the name if the description attribute is blank.
· Fixed a problem where columns from a view were not pulling descriptions from the corresponding table if there’s a table column reference key in the data dictionary for it.
4.0.5 – 2/23/2013
· Added ability to be able to filter table names with a “contains” filter in top row.
· Added ability to be able to filter column names with a “contains” filter in top row.
· Fixed a problem with SQLite settings database not storing “last connection time” dates in a sortable format so most recent logins were not showing up first in login dialog.
· Added logged in user information and “CUDLI” for audit alias and component fields when executing stored procedures by default.
· Added option to check for latest version on CiscoUnityTools.com
4.0.4 – 1/25/2013
· Fixed an issue handling NULL case for Nvarchar and LVarchar params in stored proc construction.
· Added option to examine the database view source code – helpful for finding which tables they pull from.
· Fixed an issue with stored procs always including auditalias and auditcomponent in calls – not all stored procs support both of these.
4.0.1 – 1/18/2013
· First release of 2nd rev of CUDLI