Unity Connection CUE Import
Connecting
to Unity Connection 7.x or Later
Task
2: Set the Database Proxy Service Shutdown Time
Task
3: Activate the Remote Database Proxy Service
Task
4: Login to the Remote Server
Troubleshooting
Connectivity Issues
Double
Check Connection Server Settings
Disable
CSA and all Virus Scanning Applications
Trouble
with Initial Unity Connection Login
WAV
Upload or Download with Connection 7.x and later
Overview
The CUE Import Utility is designed to import top level User data from a CUE Configuration backup file into Unity Connection 7.0(2) or later. Currently it gets user’s first name, last name, display name, primary extension, alias and recorded voice name if one exists.
Requirements/Special Notes
The CUE Import Utility should be able to read configuration backup information from any version of CUE supported today.
You can import users into any version of Unity Connection 7.0(2) or later if properly configured for off box access (see the following sections).
This version of CUE Import runs on Windows XP/2000/2003/2008, Windows 7 or Vista.
This version of CUE Import requires .NET framework 2.0 or better. The install will detect if this needs to be installed and launch the setup automatically if it’s missing.
You must enable the ODBC proxy service on the Unity Connection server and attach to the database using an account enabled for the remote database access role. See the next section for details on this.
You must first install the Informix ODBC drivers before using this tool. Many off box tools for Connection 2.1(1) and later use these same drivers and you only need to install them once per client machine. You can download the installer for this on its home page here: http://ciscounitytools.com/App_InformixDrivers.htm
Connecting to Unity Connection 7.x or Later
For installations of 7.0(1) and later you need to use the database proxy service for access to the database from off box for any tool that uses database access.
Task 1: Configure a User without a mailbox with the Remote Administrator and System Administrator roles
1. Go to the Cisco Unity Connection Administration web interface for your installation.
2. You can leverage a user with or without a mailbox for off box data access purposes, but it’s strongly suggested that you create a new user without a mailbox that is used solely for the purpose of remote administration tasks for security reasons. This is also required if you want to export messages from a Connection 7.0(2) or later server – a user with a mailbox may not be allowed to extract messages from other mailboxes, whereas a user without a mailbox should have no problem.
3. Be sure the web administration password for this user is not configured to require a change at first login on the “Password Policy” page for that user.
4. If necessary, change the web administration password on the “Change Password” page. Note that only the web application password comes into play for remote data access.
5. Finally,
on the “Role” page for the user, add the “Remote
Task 2: Set the Database Proxy Service Shutdown Time
Out of the box the database proxy service is not running and if you try to start the service it will shut down right away. First you need to set the “Database Proxy: Service Shutdown Timer” value found in the System Settings -> Advanced -> Connection Administration section of the Cisco Unity Connection Administration page. By default this is 0. You can set it to as high as 999 days if you like. After the number of days configured here the remote database proxy service will shut down. This is useful if you want to do some migration work, for instance, and don’t want to forget to have the service disabled for security reasons.
NOTE: If you restart the server, the remote database proxy service will remain shut off. After a system restart you have to go in and manually turn on the service again (see step 3)
Task 3: Activate the Remote Database Proxy Service
1. Out of the box the service that listens to remote database requests is not active, you must turn it on. To do this, go to the “Cisco Unity Connection Serviceability” web admin page.
2. On the Tools menu, select the “Service Management” page.
3. The “Connection Database Proxy” item under the “Optional Services” section will be marked as “Deactivated” and stopped. Press the “Activate” button and it will be activated and started automatically.
Once you’ve started the proxy service you can connect with any tool that needs off box database access using the user name, web administration password and port “20532”.
NOTE: The service will automatically shut down after the number of days configured in step 2 above or if you restart the server.
Task 4: Login to the Remote Server
When you select to connect to a remote server from Pubic Distribution List Builder, you will see a login dialog box that will be empty except for port 20532 filled in as the default for the port. You must provide the server name or IP address for the “Server” field and provide the login and password for the database connection account. Use the alias and web administration password of the database user created above for the login and password fields.

Pubic Distribution List Builder will remember your entries including the password (which is stored in a secure hash). Each time you run Pubic Distribution List Builder it will load the settings of the last connection you made. Every server you’ve successfully connected to in the past will be listed in the drop down list in the order in which you connected to it last – most recent to least recent.
NOTE: The login and password information is stored along with the local Windows login name. Only those servers that have been attached to successfully using the current Windows login will be listed. If you are logging into the same Windows server with different users you will only see servers connected to with that particular Windows login.
NOTE: Providing the wrong password or login will fail quickly and give you a chance to try a different pair. Providing an incorrect server or port, however, results in a 60 second timeout while Pubic Distribution List Builder waits for the Informix ODBC driver to return. Unfortunately this cannot be shorted. Type carefully.
Using CUE Import
The CUE import tool is currently a simple 3 page wizard that allows you to select a CUE backup file to import from, edit user information from that backup if desired and import those users into Connection 7.0(2) and later.
Page 1
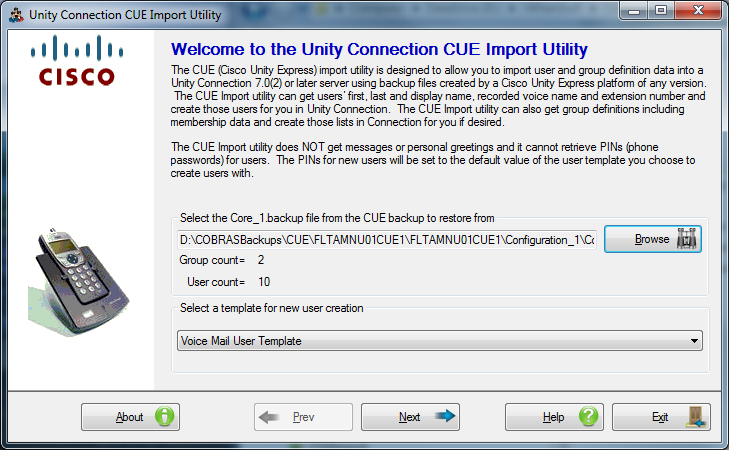
After you’ve attached to a remote Connection server successfully (see above for configuration on that) you will see the first page of the CUE Import wizard shown here.
Before proceeding you will need to select the “Core_1.Backup” file from the CUE backup – this is found in the Configuration_x folder of the backup – there may be more than one Configuration folder created by the backup depending on the size of the CUE system you backed up. You will need to import users into Connection using one of these files at a time, CUE Import cannot read multiple backup files at a time. When you select a valid backup file CUE Import parses it and shows the total users and groups found in that backup for verification purposes.
You will also need to select a user template that’s used by CUE import when creating new users. The default template will be selected automatically but if you wish to use different options for users created during import you will need to select a different template using the drop down provided.
NOTE: You cannot use multiple user templates in a single import operation. If you wish to use different templates for different users from the same CUE backup you will need to run the CUE Import tool multiple times.
Page 2
Once you’ve selected a valid user configuration backup file from a CUE export and a user template to use you can advance to the 2nd page of the wizard which is for user selection/editing shown here.
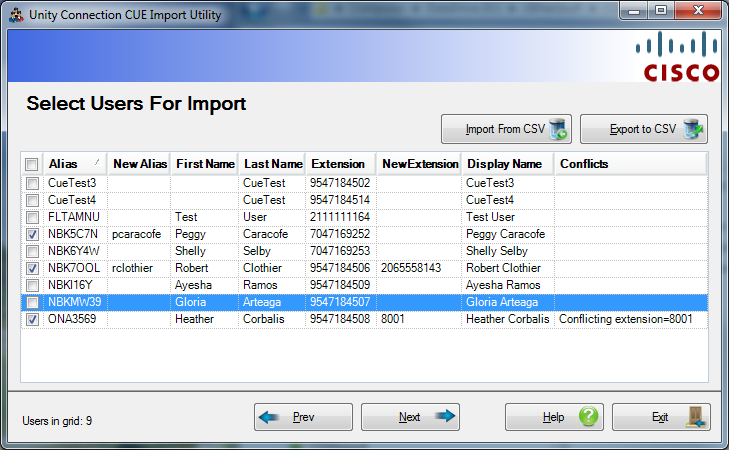
All the valid users found in the CUE configuration backup file selected on the first page of the wizard will be shown on this form. By default none of them are selected for import. You will need to select at least one user for import before being allowed to move to the next page of the wizard.
If any user you have selected to import conflicts with an existing user on the target Connection server, the conflict details will be presented in the “Conflicts” column on the far right of the gird and you will not be allowed to proceed until resolving the conflict or unselecting that user for import. You can NOT overwrite details of existing users in Connection using CUE Import. All users selected for import must have unique aliases and primary extensions in the partition that the template you are creating new users with is assigned to.
You can edit user’s aliases and/or extensions one at a time using the grid control if you like – simply type the new extension into the “New Extension” column and/or the new alias into the “New Alias” column and it will be used during creation. If these values are edited then they are the ones used for uniqueness checking but CUE import instead of the existing values from the CUE export file.
You can also edit alias and/or extension values using CSV in bulk if you’d rather – see the next section for details on that.
Editing User Data Using CSV
You can export all the selected users on page 2 of the wizard to CSV file and edit the “new alias” and/or “new extension” columns and then import them back in – or you can provide your own CSV file for import – HOWEVER – CUE Import searches only for users IN THE GRID for updates so the existing alias AND existing extension in the CSV file must match a user in the grid or CUE Import ignores that line in the CSV and considers it a no match.
When you press export, CUE will automatically default to dumping all the selected users into a CSV file in a folder called “CSV” under the installation directory for CUE Import and it will name the file “UserDump_xxx.csv” where xxx is the year, month, date and time of the export. The CSV file format will look like this:
ALIAS, NEW_ALIAS,
FIRST_NAME, LAST_NAME, EXTENSION, NEW_EXTENSION, DISPLAY_NAME, CONFLICTS
CueTest3,,,CueTest,9547184502,,CueTest3,
CueTest4,,,CueTest,9547184514,,CueTest4,
NBK5C7N,,Peggy,Caracofe,7047169252,,Peggy
Caracofe,Conflicting extension=7047169252
The only columns that CUE Import cares about when you import this file with changes are the ALIAS, NEW_ALIAS, EXTENSION and NEW_EXTENSION columns – these are all required and as noted above only users that have a matching Alias AND Extension value in the grid will get updated NEW_ALIAS and/or NEW_EXTENSION values applied to them. The remaining columns in the output are there for your reference – for instance in the above example you can see that the extension currently assigned to Peggy Caracofe conflicts with an extension already on Connection.
Page 3
Once you have selected at least one non conflicting user to import from page 2 you arrive at the last page which is the import page shown here.
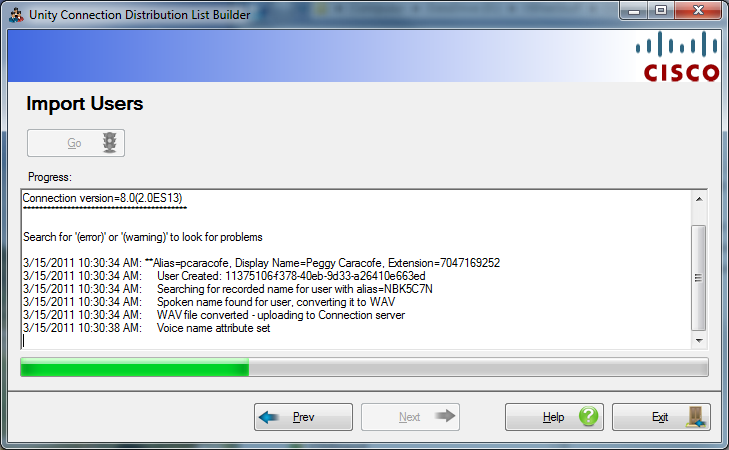
There’s nothing to select or configure here, you can simply hit “go” and the progress bar will update as CUE Import works through the user list. When import is complete you will get a chance to review the diagnostic output. Be sure to review any errors or warnings issued in the logs.
Troubleshooting Connectivity Issues
Whenever you encounter a problem connecting to Unity Connection, review these troubleshooting steps prior to escalating to TAC – they will go through these as a first step anyway.
Double Check Connection Server Settings
If you are attaching to a remote Connection server for import, make sure the remote database proxy service is running. This service does shut itself off after a period of time and does not start itself automatically on a server reboot. Also be sure the user you are logging in as has the remote administration role assigned and that their web password is not locked or set to require a change at next login.
Review Connecting to Unity Connection 7.x and Later section
Disable CSA and all Virus Scanning Applications
For Windows based systems (all Unity versions and Connection 1.2) it’s a good idea to disable CSA and all virus scanning applications if you are having problems running imports. CSA and various virus scanning packages often block access to ports necessary to attach to remote servers and file systems and/or create local files and the like. Before escalating a failure be sure to make sure this basic issue is not tripping you up since TAC will usually first start here.
Trouble with Initial Unity Connection Login
If the initial login to Unity Connection for import fails then there is a problem making the ODBC connection. The dialog box that comes up should have more details but here’s a list of the common failure reasons:
· “Unspecified System Error = -27001”. This means the application was able to find the server and attach to the ODBC proxy service but the service rejected the credentials you supplied. This can be due to the wrong login name or password for your remote user account or it could be that the account is locked out or that the password settings have the “must change password at next login” value set. The latter is the default value for the password settings on Connection installs and is a common failure reason – be sure you uncheck this.
· “Unspecified System Error = -908”. This means the server name is wrong or the ODBC Proxy service is not responding. The former is often a DNS issue – be sure name resolution is pointing where you think it is. The latter usually means the service is not running properly on the target server or that the port being used (20532) is being blocked between your Windows client you’re running the application on and the target Connection server.
· “Error -11048”. This can sometimes mean that the PATH environment variable in Windows is too long – try moving the INFORMIXDIR/bin reference to the beginning of the PATH variable. Also make sure only one version of the ODBC driver is installed on this client machine.
· “Unspecified System Error -930” This usually means the server is not found. Make sure that the server name can be resolved properly from this Windows machine.
WAV Upload or Download with Connection 7.x and later
Note that voice names for users are fetched and uploaded from/to Connection via HTTP. If you see failures with voice name uploads/streaming there is likely an issue with HTTP connectivity between the client you are running CUE Import on and the Connection server you are importing to. There’s a few things to check:
- Make sure there is no secure proxy server or secure HTTP access between the system you’re running CUE Import on and the server you are restoring to. CUE Import has to use HTTP POST/GET routines to get wav files for greetings and voice names on and off remote Connection servers. You should be able to HTTP directly to the Connection server in a browser that is not configured for proxy access.
- Make sure that port 443 is open between the client box you’re running CUE Import on and the Connection server you’re doing an import against.
- Make sure you’ve installed the unsigned certificate from the Connection server on the client box you’re running CUE on. In other words when you open your browser to the Connection system administration pages you should not get unsigned certificate warnings. Either IE or Fire Fox allows you to override the security warning and install the certificate on your system. Be careful, however, because Fire Fox lets you just ignore certificate errors even if the certificate is not properly installed on the local box.
- Check for duplexing inconsistencies (i.e. half and full duplex between the client machine and server). This can result in WAV file uploads or downloads sometimes working and sometimes not or in a lot of retries being necessary before a WAV file gets transferred properly.
- When uploading WAV files CUE Import needs to create temporary WAV files on the hard drive and call an external executable to upload these via HTTP Post. Make sure no security application prevents this execution or gets in the way of creation/deletion of files.
Obtaining Updates
The About dialog box has a link to automatically check for updated versions of this tool.
To manually check for updates, visit http://www.CiscoUnityTools.com
Revision History
Version 1.0.0.1 – 3/15/2011
- First beta release
© 2011 Cisco Systems, Inc. -- Company Confidential