Cisco Call Handler Data Dump
Connecting
to Unity Connection 7.x or Later
Task
2: Set the Database Proxy Service Shutdown Time
Task
3: Activate the Remote Database Proxy Service
Task
4: Login to the Remote Server
Troubleshooting
Remote Login Issues
Double
Check Connection Server Settings
Disable
CSA and all Virus Scanning Applications
Make
sure the Informix ODBC Driver is Installed and the PATH Points to it.
Selecting
Call Handlers for Output
Emailing
Results of Scheduled Runs Automatically
Overview
The mission of the Call Handler Data
Dump utility is simple. To allow
folks to quickly dump out specific information about the hahdlers
in their system to a file they can view or import into another application such
as a database utility or Excel or whatever. The file generated automatically creates
a header row that lists the data type found in that column of the output for
ease of import into other programs.
Note that the column headers may not match up to what is used by other
utilities such as BAT or Bulk Migration tool etc… so you may need to edit them based on
what application you’re trying to import with.
A full list of the fields you can drop out are available below.
The Call Handler Data Dump version 8 and later is a simple 4 page wizard that walks you through selecting the output location, the handlers to dump and then what items for those handlers you wish to output. The details of each page of the wizard are covered below.
You can also scheduled Call Handler Data Dump to export regularly and even email you the results of the output of those unattended exports. The details of how to configure this are covered in the Scheduling Exports section below.
Requirements/Special Notes
This version of Call Handler Data Dump runs on Windows
XP/2000/2003/2008,
You must Install the 32 bit Informix ODBC drivers even if you are running on a 64 bit version of your operating system. The Call Handler Data Dump tool is strictly 32 bit. See the Informix ODBC Driver Download Page for details.
This version of Call Handler Data Dump only works with Unity Connection 7.0(1) or later.
You must enable the ODBC proxy service on the Unity Connection server and attach to the database using an account enabled for the remote database access role. See the next section for details on this.
This tool uses Microsoft’s full .NET 4.0 library (the limited “client” version of .NET 4.0 is not sufficient). The installation will check to see if you have that installed and if not will offer you the option to download and install it automatically.
Connecting to Unity Connection 7.x or Later
For installations of 7.0(1) and later you need to use the database proxy service for access to the database from off box for any DB tool including Call Handler Data Dump.
Task 1: Configure a User without a mailbox with the Remote Administrator and System Administrator roles
1. Go to the Cisco Unity Connection Administration web interface for your installation.
2. You can leverage a user with or without a mailbox for off box data access purposes, but it’s strongly suggested that you create a new user without a mailbox that is used solely for the purpose of remote administration tasks for security reasons. This is also required if you want to export messages from a Connection 7.0(2) or later server – a user with a mailbox may not be allowed to extract messages from other mailboxes, whereas a user without a mailbox should have no problem.
3. Be sure the web administration password for this user is not configured to require a change at first login on the “Password Policy” page for that user.
4. If necessary, change the web administration password on the “Change Password” page. Note that only the web application password comes into play for remote data access.
5. Finally,
on the “Role” page for the user, add the “Remote
Task 2: Set the Database Proxy Service Shutdown Time
Out of the box the database proxy service is not running and if you try to start the service it will shut down right away. First you need to set the “Database Proxy: Service Shutdown Timer” value found in the System Settings -> Advanced -> Connection Administration section of the Cisco Unity Connection Administration page. By default this is 0. You can set it to as high as 999 days if you like. After the number of days configured here the remote database proxy service will shut down. This is useful if you want to do some migration work, for instance, and don’t want to forget to have the service disabled for security reasons.
NOTE: If you restart the server, the remote database proxy service will remain shut off. After a system restart you have to go in and manually turn on the service again (see step 3)
Task 3: Activate the Remote Database Proxy Service
1. Out of the box the service that listens to remote database requests is not active, you must turn it on. To do this, go to the “Cisco Unity Connection Serviceability” web admin page.
2. On the Tools menu, select the “Service Management” page.
3. The “Connection Database Proxy” item under the “Optional Services” section will be marked as “Deactivated” and stopped. Press the “Activate” button and it will be activated and started automatically.
Once you’ve started the proxy service you can connect with any tool that needs off box database access using the user name, web administration password and port “20532”.
NOTE: The service will automatically shut down after the number of days configured in step 2 above or if you restart the server.
Task 4: Login to the Remote Server
When you first start Call Handler Data Dump, you will see a login dialog box that will be empty except for port 20532 filled in as the default for the port. You must provide the server name or IP address for the “Server” field and provide the login and password for the database connection account. Use the alias and web administration password of the database user created above for the login and password fields.
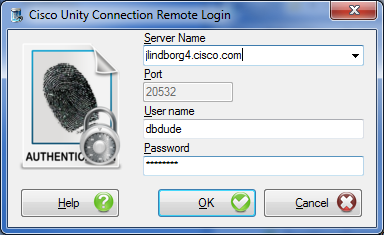
Call Handler Data Dump will remember your entries including the password (which is stored in a secure hash). Each time you run Call Handler Data Dump it will load the settings of the last connection you made. Every server you’ve successfully connected to in the past will be listed in the drop down list in the order in which you connected to it last – most recent to least recent.
NOTE: The login and password information is stored along with the local Windows login name. Only those servers that have been attached to successfully using the current Windows login will be listed. If you are logging into the same Windows server with different users you will only see servers connected to with that particular Windows login.
NOTE: Providing the wrong password or login will fail quickly and give you a chance to try a different pair. Providing an incorrect server or port, however, results in a 60 second timeout while CHDD waits for the Informix ODBC driver to return. Unfortunately this cannot be shorted. Type carefully.
Troubleshooting Remote Login Issues
Double Check Connection Server Settings
Make sure the remote database proxy service is running. This service does shut itself off after a period of time and does not start itself automatically on a server reboot.
Make sure the user you are logged in as has the remote administrator role assigned to their account, that their password is not set to reset at the next login and that their account is not currently locked.
Make sure the server name or IP address you are using to connect with is reachable from your Windows client. DNS issues often come up in connection failures.
Disable CSA and all Virus Scanning Applications
It’s a good idea to disable CSA and all virus scanning applications if you are having problems connecting to be sure the ODBC port (20532) is not being blocked. Also check your firewall settings (assuming you are running one).
Make sure the Informix ODBC Driver is Installed and the PATH Points to it.
For 32 bit OS installs, the IBM Informix ODBC driver is installed in C:\Program Files\IBM\Informix\Client-SDK. Make sure this path exists on your server and has not been removed or renamed.
The system PATH variable will also include a reference to the “\IBM\Informix\Client-SDK\bin” location where the ODBC driver is installed. Make sure this path is referenced in the PATH. Also, if the PATH is very long sometimes the Informix driver will not find it, try moving it to the beginning of the PATH statement.
Using Call Handler Data Dump
Call Handler Data Dump is a simple four page wizard – each page is covered here.
Wizard Intro
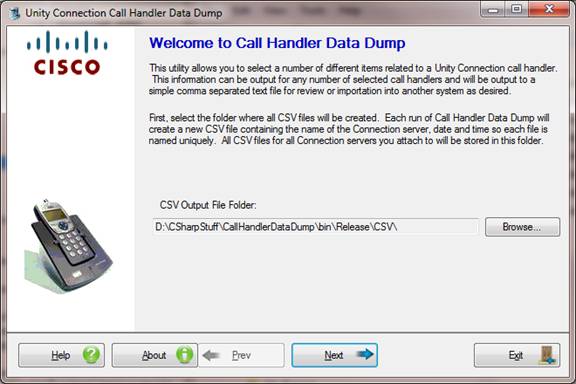
On the opening page you can pick the output folder where all CSV files will be output. Additionally if you select to output WAV files for voice names they will appear in this directory as well.
All CSV files for all Connection servers you attach to and export data from on the client you’ve installed Call Handler Data Dump on will be placed here. If you change the default location (the “CSV” folder under the install directory for CHDD), then all exports run manually or scheduled will store their CSV output files here. The CSV file names will indicate the Connection server name as well as the time/date the export was run. The file name for the CSV output files is constructed like this:
“Unity Connection Call Handler Data Dump_[server name]_CSV_Output_[date/time].CSV”
These files are not deleted or cleaned up automatically (the log files are) so be sure to remove old ones that you no longer want to keep around as needed.
The Log files (for diagnostic purposes) are always stored in the “Logs” folder off the install directory for CHDD – this is not configurable. The logs file folder is cleaned up to remove logs older than 30 days on each run of CHDD so if you need to save off a log file for whatever reason, be sure to move it out of that directory.
Selecting Call Handlers for Output
The 2nd page of the wizard allows you to select which handlers you wish to dump information out for. Note that CHDD can only output handlers homed locally on the Connection server you’ve attached to, it cannot include information about handlers replicated across a digital network. You will need to run CHDD against each Connection server (or cluster if you’re using high-availability installs) in your network if you wish to get information about all handlers. You must select at least one handlers for output before moving on to the next page in the wizard.
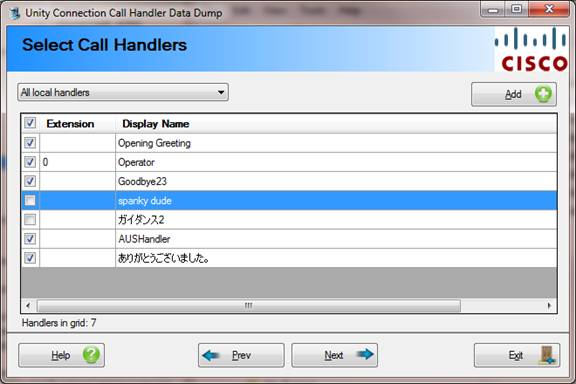
There are several ways you can select handlers for output:
· All Local Handlers.
· Handlers in this extension range. Enter a starting and ending extension range and hit the “Add” button.
· Handlers in this CSV file. Select a CSV file that contains a column titled “EXTENSION” and or “NAME” and handlers with be searched for by one or both of those fields for selection.
· Handlers associated with this phone system. Select a phone system from the drop down that shows up with this option and all handlers assigned to that system will be added to the grid.
· Handlers with this string in their display name. You can any string and all handlers that contain all or part of that string in their display name will be added to the grid. The search is not case sensitive.
· Handlers associated with this search partition. Select a search partition and all handlers on the local Connection server assigned to that partition will be added to the grid.
NOTE:
By default you must select the handlers you wish to output on each run of
CHDD. If, however, you run CHDD
with the “/AlwaysLoadLastSelectedHandlers” command line option the last set of handlers
chosen for the Connection server you are attaching to will automatically be
loaded again (assuming they still exist on the server). You can also use the /AlwaysLoadAllHandlers if you wish to have all local call handlers (even if
they change over time) selected for output – this can be useful if you
are driving Call Handler Data Dump via scripts or the like.
Selecting Items for Output
The 3rd page on the wizard allows you to select which items you want to have output for each user selection on the 2nd page of the wizard.
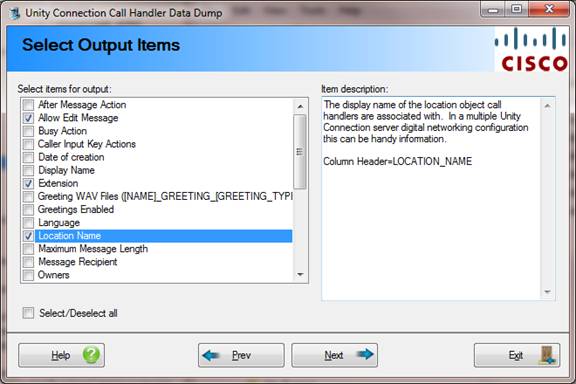
In version 8 and later of CHDD the full description and header column construction for each item is displayed on the right hand side of the screen automatically when selected on the left – this is largely the same information found in the help file in the secitons below. You must select at least one item before moving on in the wizard.
NOTE: Any items to select for a particular Connection server will be saved and reloaded automatically the next time you run CHDD against that Connection server.
Executing Export
The 4th and last page of the wziard is the execution page. Primarily this is just for allowing you to start the export, monitor it’s progress and cencel it if you desire. However the “Options button” also provides numerous important functions detailed below.
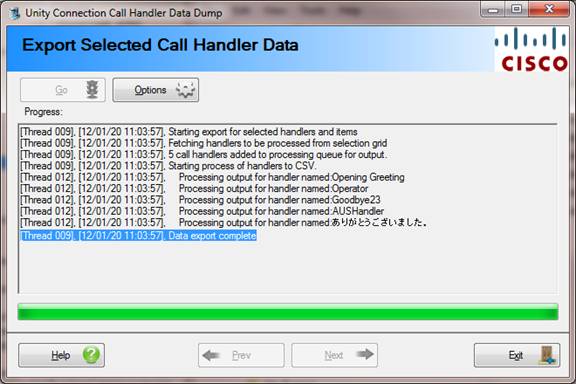
Options Button Items
· Scheduled Run Options. This allows you to schedule Call Handler Data Dump to run at a later time or at regular intervals against a particular Connection server and optionally have the output emailed to you. See the Scheduling Exports section below for more details.
· Debug Mode. Allows you to turn on/off debug mode. When in debug mode Call Handler Data Dump outputs much more information to the log files such as all queries executed against the remote Connection database. This slows down the processing of handlers and expands the size of the log files generated so it’s best to leave this off unless there’s a specific need for it.
· Execution Priority. This allows you to set the processing speed of Call Handler Data Dump to high, medium or low. High speed processing means CHDD will run faster but will add additional load to Connection. Low speed processing will take longer but will impact the Connection server’s processing less. If you are running CHDD during heavy call traffic times it’s best to run at low priority.
· CSV Output Options. This allows you to decide if all items are wrapped in quotes when output (by default only items containing a comma are quoted) and if you want to use comma separated or tab separated output for the file construction.
· Save Settings. This saves the current user selection and item selection into the local Access database used by Call Handler Data Dump. These settings are saved on a per Connection server basis and are used for scheduled runs of CHDD. If you’re scheduling backups you can select handlers and items and configure the backup then select to save settings and exit without doing the export if you wish. The save settings is done when you run an export as well.
Field Definitions
The following is a list of all the fields you can optionally have Call Handler Data Dump include in the CSV output. You can select one or as many items as you like.
- After Greeting Action. This will dump
out a human readable description for what happens to the caller after
hearing any of the 7 greeting types for a call handler (standard, busy,
off hours, error, internal, alternate, holiday).
- After Message Action. This will dump out a human readable
description for what happens to the caller after leaving a message for
each selected call handler.
- Allow Edit Message. Per handler
setting that dictates if outiside callers are
given the option to edit their messages before sending them. 0 is off, 1 is on.
- Busy Action. This value represents what Unity
Connection will offer the caller as options in the case the handler's
extension is busy. A value of
“0” means no holding will be offered (i.e. the caller is sent
right to the user’s greeting).
A value of “1” means Unity Connection will always offer
to hold (the caller can always over ride that and go to the greeting,
however). A value of
“2” means Unity Connection will ask the caller if they would
like to hold or not. This
value can include the alternate, standard and closed transfer rule for
handlers.
- Caller Input Key Actions. This value will dump out a human readable action string for each
of the 12 user input keys for all handlers. Columns
“CALLER_INPUT_0” through “CALLER_INPUT_9”,
“CALLER_INPUT_*” and “CALLER_INPUT_#” will be
added to the output. The
action strings for these columns will read like “Send to greeting
for call handler: operator”, or “Ignore”, or “Take
Message”. The strings
will look very similar to what you see on the user input key page in the SA.
- Date of creation. The date the handler was added to
the Unity Connection system.
- Display
Name. The display name of the handler - these are unique for call
handlers on the local directory.
- Extension.
The extension number value
from Unity Connection. For call handlers this value is optional
- Greetings Enabled. This value will show you if the closed, alternate, busy or
internal greetings are enabled for each handler or not. The columns
“GREETING_ALTERANATE_ACTIVE”,
“GREETING_BUSY_ACTIVE”, “GREETING_INTERNAL_ACTIVE”,
and “GREETING_CLOSED_ACTIVE” will be added to the output. A value of “0” means
the greeting is not active and a value of “1” means it is. Remember that the standard and
error greetings are always active no matter what so they are not included
in the output here.
- Greeting WAV Files. This option
downloads the WAV file for each greeting on each call handler if it's
recorded. All greetings that
have a custom recording will be included using a file name format of
"[CALL HANDLER NAME]_GREETING_ALTERNATE.WAV"
and "[CALL HANDLER NAME]_GREETING_STANDARD.WAV" etc… since
call handler display names are unique in the database this will prevent
any duplicates. All WAVs are
deposited in the same folder where the CSV file is being saved.
- Language. Outputs the MS NT standard 3
letter codes for languages.
ENU is US English, JPN is Japanese etc… A list of 3 letter
language codes is included below.
- Location
Name. The display name of
the location object this handler is associated with.
- Maximum
Message Length. The
maximum length of messages (in seconds) that outside callers can leave
this handler.
- Message Recipient. Outputs the
alias of the user or public distribution list that is set to receive
messages for each selected call handler and a column indicating the type
of the recipient (user or distribution list). In Connection there is always one
and only one message recipient and it is either a local user with a
mailbox or a public distribution list. The type is 1 for a user and 2 for
a public distribution list.
- Owners. Outputs a semi
colon seperated list of user aliases that are
included as owners for each call handler selected for output.
- Partition Name. Name of the
partition that the handler is assigned to.
- Post Greeting Recording Setting. Outputs the post greeting recording
setting for each call handler.
The value will be either 0 (post greeting recording not enabled for
this user), 1 (post greeting recording always plays) or 2 (post greeting
recording played to external callers only).
- Rings To Wait.
The number of rings to wait that are configured for the transfer
rule on the handler. NOTE: If the transfer is disabled (i.e. the transfer
type above is “0”) or the transfer type is release (transfer
type is “1” above) then this value is meaningless and may show
up as “4” which is the default. This value can include the
alternate, standard and closed transfer rule for call handlers.
- Schedule
Name. The name of the
schedule this handler is associated with. The schedule determines when the
“standard” vs. “closed” greetings are played.
- Send Private Message Setting. Per handler
setting that dictates if messages left by outside callers are marked
private or not. 0 is off, 1 is
always send private and 2 is ask callers.
- Send Secure Message Setting. Per handler setting that dictates if
messages left by outside callers are marked secure or not. 0 is off, 1 is on.
- Send Urgent Message Setting. Per handler
setting that dictates if messages left by outside callers are marked
urgent or not. 0 is off, 1 is
always send urgent and 2 is ask callers.
- Set For Dispatch Delivery. Per handler
setting that dictates if messages left by outside callers are set for
dispatch delivery (meaning the first recipient to accept the message then
owns it and all other copies are removed). 0 is set for normal delivery, 1 is
set for dispatch.
- Switch
Name. This value indicates
which switch a handler is associated with in a multiple switch
installation.
- Time Zone. Outputs the timezone
a call handler is associated with.
- Transfer Number. This will be the dial string
configured for the transfer rules of a handler. This value will include the
alternate, standard and closed transfer rules.
- Transfer Type.
This will be “-1” if the transfer rule is disabled,
“0” if it’s enabled but the rule is set to go to the
greeting and not ring a phone, “1” if it’s configured to
do a release transfer or “2” if it’s configured for a
supervised. This value can include the alternate, standard and closed transfer
rule for handlers.
- Voice Name Recorded.
This will return a “1” if the handler has a voice name
recorded or a “0” if it does not.
- Voice Name WAV File ([NAME]_VOICE_NAME.WAV. This option downloads the WAV file for
each selected handler's recorded voice name and saves it in the same directory
the CSV file is being created using the handler's display name in the file
name. For instance
“OpeningGreeting_VOICE_NAME.WAV”. Since display names for handlers
are all unique this should avoid conflicts in the folder. NOTE: This can take a lot of hard
drive space and does require HTTPS (port 443) to be open between the
computer you are running User Data Dump on and the Connection server.
Scheduling Exports
You can schedule Call Handler Data Dump exports to run in the future either once or on a regular schedule. This uses the Windows Scheduler to have the Call Handler Data Dump tool launched with command line parameters identifying the server you wish to run the export against and that you’d like it to run “silent” meaning no user input is required to complete the execution.
To configure this you need to do the following things:
1. Attach to the Connection server you wish to schedule exports against. Call Handler Data Dump can handle multiple scheduled exports against different Connection servers with different options. Each server you attach to has its configuration and item selection data stored locally in a database that Call Handler Data Dump uses when attaching to that server.
2. Once you’ve selected all your options and handlers to output, on the last page of the wizard press the Options button and select to save settings. This will save the handlers and items selected into the database used by Call Handler Data Dump when running scheduled exports.
3. Finally, advance to the last page of the wizard, press the Options button and select the “Scheduled Run Options” and select “Schedule Export”.
The schedule export interface launches the Windows scheduler task wizard – this will look a little different on Windows XP/2000/2003 than it will on Vista or Windows 7 or Windows 2008. But the same basic options are available in all interfaces. You need to provide an account to run under (preferably the same one you are running CHDD currently if possible) and configure the schedule options (on the “Trigger” tab for the Windows 7 style schedule wizard below).
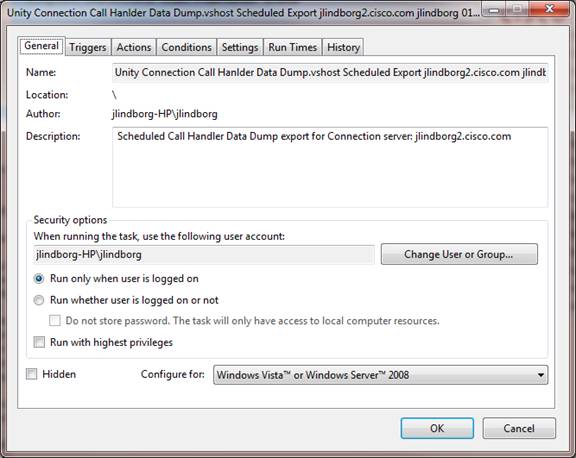
This gives you the option of scheduling it one time or to run daily, weekly, several times a week etc…
NOTE: A common mistake for scheduling exports is to forget to check the “enabled (scheduled task runs as specified time)” box on the task tab on the old style interface or selecting the “Run whether user is logged on or not” option on the new style interface above.
NOTE: Call Handler Data Dump will create new CSV files that will show up in the folder you’ve selected in the “CSV Output File Folder” field on the first page of the wizard. Call Handler Data Dump does NOT clean up these CSV output files, they stick around forever. When you no longer wish to have them around it’s up to you to clean them up.
Emailing Results of Scheduled Runs Automatically
With Call Handler Data Dump you have the option of having the results of all scheduled exports sent as ZIP-ed up files via email to one or more addresses. You configure this option by pressing the Options button on the last page of the wizard, selecting “Scheduled Run Options” and then “Configure Email Notifcation”. Selecting that will show the following dialog:
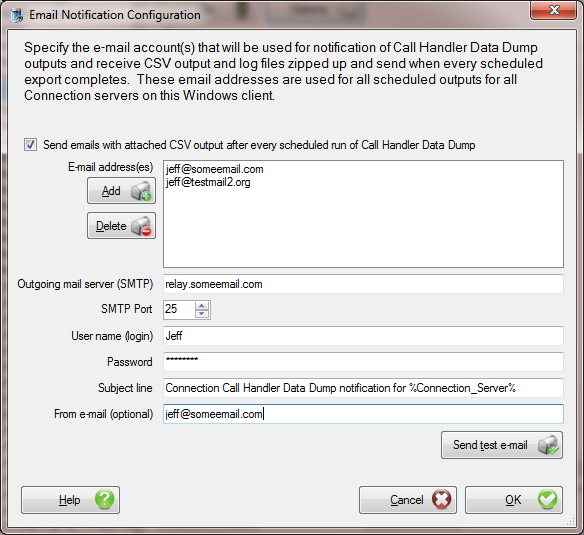
By default the “Send emails with attached CSV output after every scheduled run of Call Handler Data Dump” checkbox is unchecked which turns off all email notification attempts. You can check this box and the controls on the form will be activated.
You will need to use an external SMTP server to send the mail out for you. This will normally require you provide not just the server name/IP address but also a login and password to authenticate against that server. It is possible that you have an “open” SMTP server that will blindly relay messages sent to it, but this is exceedingly rare in this age of SPAM we live in today.
It is highly recommended you send a test email using the “Send test e-mail message” button. This will simply send a text-only email to all addresses you have added to the list. If the SMTP server attachment/login/send completes, it will indicate the message was sent. Please verify the message(s) arrived at their destination before hitting “OK” and saving the data.
Call Handler Data Dump will send out emails with the CSV output file in a ZIP file after EVERY scheduled run of Call Handler Data Dump. The file name of the ZIP and the body of the email will have information about the time the export was run, which client it was run on, which Connection server it was run against and if there were any errors or warnings. If there were one or more errors or warnings the log file produced by Call Handler Data Dump will also be included in the ZIP file, however if there are no errors or warnings this file will not be included.
NOTICE: The subject line contains the string “%Connection_Server%” – when the email is sent out this gets replaced by the actual server name of the Connection server the export was run against. It’s not required to be in your subject line but is highly recommended.
NOTE: While the “From e-mail” field is optional, some SMTP servers will not send mail off server unless a valid from address (in some cases a valid address that lives in its mail domain) is provided. It’s best to provide this.
NT Language Codes
When exporting user language information the 3 letter “Windows” style language code is used – this is a full map of those language codes for languages supported by Unity Connection.
“ENX” = “English (TTY/TDD)
"ENU" = "English (US)"
"ENG" = "English (British)"
"ENA" = "English (Australian)"
"ENC" = "English (Canadian)"
"ENZ" = "English (
"ENI"
= "English (
"DEU" = "German
(Standard)"
"DES" = "German (Swiss)"
"DEA"
= "German (Austrian)"
"
"DEC" = "German (
"ESP" = "Spanish (Traditional)"
"ESM" =
"Spanish (Mexican)"
"ESN" = "Spanish (Modern)"
"ESG" = "Spanish (
"ESC" = "Spanish (
"ESA" = "Spanish (
"ESD" = "Spanish (Dominican)"
"ESV" = "Spanish (
"ESO" = "Spanish (
"ESR" = "Spanish (
"ESS" = "Spanish (
"ESF" = "Spanish (
"ESL" = "Spanish (
"ESY" = "Spanish (
"ESZ" = "Spanish (
"ESB" = "Spanish (
"ESE" = "Spanish (
"ESH" = "Spanish (
"ESI" = "Spanish (
"ESU" = "Spanish (
"FRA" = "French (Standard)"
"FRB" = "French (Belgian)"
"FRC" = "French (Canadian)"
"FRS" = "French (Swiss)"
"FRL" = "French (
"ITA" = "Italian (Standard)"
"ITS" = "Italian (Swiss)"
"NLD" = "Dutch (Standard)"
"NLB" = "Dutch (Belgian)"
"NOR" = "Norwegian (Bokmal)"
“NON" = "Norwegian (Nynorsk)"
"PTB" = "Portugese
(Brazilian)"
"PTG" = "Portugese
(Standard)"
"JPN" = "Japanese"
Obtaining Updates
To check for updates to this tool, visit http://www.CiscoUnityTools.com
Revision History
Version 1.0.11 – 1/1/2016
· Updated setup for Windows 10 deployments
Version 1.0.10 – 8/25/2014
· Updated setup with modified Informix dependencies to fix an issue on some systems with 2.0 vs. 4.0 binaries.
Version 1.0.7 – 6/25/2014
· Added after greeting action output for all greeting types.
Version 1.0.6 – 5/6/2013
· Fixed version update check for 3 value construction instead of 4.
· Added “visit homepage” link on about.
· Fixed issue with action string construction not taking “error greeting” route into account
· Added option to use secure email in notifications
Version 1.0.5 – 1/19/2013
· Updated for Windows 8 installations
Version 1.0.4 – 10/22/2012
· Updated to have all data fetches filling table objects instead of data readers.
· Added additional diagnostic output in debug mode.
· Fixed a problem with the greeting enabled output with an off by one count.
· Fixed problem fetching call handler owner details on versions older than 8.0
Version 1.0.2 – 3/29/2012
· Updated to work with the Informix .NET database drivers for version 3.5 or later from IBM.
Version 1.0.1 – 1/20/2012
· First beta drop of tool
© 2014 Cisco Systems, Inc. -- Company Confidential