DRS Message Fisher
Restoring
Messages to a Connection User Mailbox.
Configuring
Connection 7.0 and Later For Message Restore
Task
2: Set the Database Proxy Service Shutdown Time
Task
3: Activate the Remote Database Proxy Service
Task
4: Enable SMTP Connectivity For Importing Messages
Troubleshooting
Remote Connection Failures
Disable
CSA and all Virus Scanning Applications
Message
Import for Connection 7.x and later
Overview
The DRS Message Fisher is a tool designed to allow administrators to pull specific voice messages out of a Disaster Recovery System (DRS) backup archive and review the WAV file(s) locally on a Windows client or to restore selected messages to a selected subscriber’s mailbox on a Connection 7.x or later server.
The DRS Message Fisher is not designed to extract non voice messages such as faxes, receipts or emails. It is designed to provide a way to review or restore individual voice messages from a selected backup.
Using DRS Message Fisher
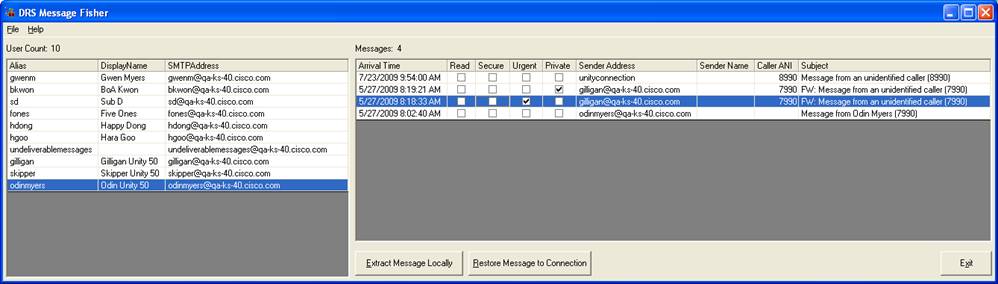
When you launch DRS Message Fisher it will ask you to point it to a TAR file created by the Disaster Recovery System of a Connection 7.0(1) or later server. It is specifically looking for a message store backup file. If you did a full backup you will typically have multiple TAR files created (one for the directory, one each for mailstores, one for the syste tables etc…). Each mailstore creates it’s own TAR file and to extract messages you need to select the mail store that homes the user’s mailbox you wish to get messages for. If you open any file that does not contain a message store backup, you will get an error message indicating that. Once you do open a valid message store backup, the total count of messages found in the archive is provided in a dialog box and a full list of users will be provided on the main form (seen above).
You can only open one TAR file at a time, however using the File menu you can open a different message TAR file if you wish.
DRS Message Fisher builds a small Access database with the information found in the message headers in the TAR file you point it at. These resulting MDB files (one each for every TAR file you open) can be found in the \MessageMDBs\ folder where you installed DRS Message Fisher. The MDB files constructed contain the full name of the DRS message file backup with a simple “.MDB” file extension added on. They are not deleted (they are typically fairly small since it’s just sender/recipient information and not actual messages) and you can review this information later. In the event of a problem with DRS Message Fisher the MDB file it creates may be helpful in determining the problem.
After all the message headers have been reconstructed and examined by DRS Message Fisher you are presented with a simple form that has recipients with one or more messages in that TAR file presented on the left and messages for the currently selected user presented on the right. Change the currently selected user on the left grid and the messages shown for that user are updated on the right.
To extract a message’s WAV file(s) or restore a message to a Connection user’s mailbox, use the buttons at the bottom of the form.
Restoring Messages Locally
This option is very simple – all WAV files associated with the currently selected message are extracted from the TAR file and copied into the \TEMPMsgs\ folder where you installed DRS Message Fisher. This folder is opened for you automatically after the files are extracted so you can easily review the file(s). Typically a voice message will have a single WAV file, however it was a forwarded message with one or more introductions recorded for it, each introduction is its own WAV file – all files will be pulled out for you.
You may also see files with “other” as the extension and possibly additional files as well. These are pulled out for your review only – they typically have to do with receipts or NDRs and DRS Message Fisher does not deal with them explicitly and does not include that information when restoring a message to a subscriber’s mailbox.
Restoring Messages to a Connection User Mailbox
If you select to restore a selected message to a Connection mailbox, you will be asked to connect to a remote Connection server first. See the “Configuring Connection 7.0 and Later for Message Restore” section below for details on this.
Once you are connected and DRS Message Fisher has determined that SMTP messages can be accepted by Connection, you will be presented with a subscriber search dialog box:
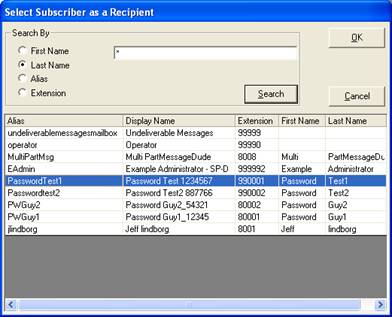
You must select the mailbox of the user you wish to restore to. Currently DRS Message Fisher does not automatically select the user for you based on the recipient information found in the header and does not enforce that you’ve selected the correct mailbox (and, in fact, it’s completely legitimate to restore messages to a different mailbox for various reasons).
NOTE: Once you’ve attached to a remote Connection server to restore messages, DRS Message Fisher will keep that connection option until you exit the application. If you wish to restore messages from the backup to a different user on a different Connection server you will have to exit DRS Message Fisher and run it again.
Once you’ve selected a subscriber the message is restored to that user’s mailbox. The sender information, message properties, read status and original send time should be preserved. If the sender is not found on the system using the SMTP address of the original sender then the message is left as an outside caller message from the Connection messaging system.
A couple items to note about messages restored with DRS Message Fisher:
· You can add duplicate messages into a user’s mailbox. There is no clean way to make sure a message being restored is not already in a user’s mailbox. As such you need to be sure the message you are restoring is the one you want and be aware that the user may already have a copy of that message in their inbox.
· Multiple part messages are restored as a single WAV File attachment message. For messages that have been forwarded with introductions, the WAV files are all separate (one for the original message, one each for introductions recorded as part of the forwarding process). DRS Message Fisher concatenates all these WAV files into one file separated by beep tones and restores it with information about the most recent sender. The header “history” of the message as it’s been forwarded is not preserved. If this is a requirement you will need to do a full DRS restore to get that information.
You cannot currently restore entire mailboxes and/or multiple messages at a time. DRS Message Fisher is designed primarily as a mechanism to get at individual messages for special purposes (i.e. someone accidentally deleted a message they need or there’s a security/Human Resources issue and messages need to be archived locally for a particular user or the like).
Configuring Connection 7.0 and Later For Message Restore
If you are restoring messages to a Connection 7.0 or later there are a couple of important things you need to configure on your server first. You must create a remote database access account, start the Remote Database Proxy service and configure the system to allow SMTP messages to be inserted.
Task 1: Configure a User without a mailbox with the Remote Administrator and System Administrator roles
1. Go to the Cisco Unity Connection Administration web interface for your installation.
2. You can leverage a user with or without a mailbox for off box data access purposes, but it’s strongly suggested that you create a new user without a mailbox that is used solely for the purpose of remote administration tasks for security reasons.
3. Be sure the web administration password for this user is not configured to require a change at first login on the “Password Policy” page for that user.
4. If necessary, change the web administration password on the “Change Password” page. Note that only the web application password comes into play for remote data access.
5. Finally, on the “Role” page for the user, add the “Remote Administrator” and the “System Administrator” roles to the “Assigned Roles” list and save. You can assign any or all other roles as well but for the purposes of remote access to the database and making updates to users those two are necessary.
Task 2: Set the Database Proxy Service Shutdown Time
Out of the box the database proxy service is not running and if you try to start the service it will shut down right away. First you need to set the “Database Proxy: Service Shutdown Timer” value found in the System Settings -> Advanced -> Connection Administration section of the Cisco Unity Connection Administration page. By default this is 0. You can set it to as high as 999 days if you like. After the number of days configured here the remote database proxy service will shut down. This is useful if you want to do some migration work, for instance, and don’t want to forget to have the service disabled for security reasons.
NOTE: If you restart the server, the remote database proxy service will remain shut off. After a system restart you have to go in and manually turn on the service again (see step 3)
Task 3: Activate the Remote Database Proxy Service
1. Out of the box the service that listens to remote database requests is not active, you must turn it on. To do this, go to the “Cisco Unity Connection Serviceability” web admin page.
2. On the Tools menu, select the “Service Management” page.
3. The “Connection Database Proxy” item under the “Optional Services” section will be marked as “Deactivated” and stopped. Press the “Activate” button and it will be activated and started automatically.
Once you’ve started the proxy service you can connect with any tool that needs off box database access using the user name, web administration password and port “20532”.
NOTE: The service will automatically shut down after the number of days configured in step 2 above or if you restart the server.
Task 4: Enable SMTP Connectivity For Importing Messages
You must disable any authentication restrictions on the SMTP service to import messages with DRS Message Fisher.
1. Go to the “SMTP Configuration” section of the “System Settings” in the Cisco Unity Connection Administration web page.
2. On the “Server” page check the “Allow Connections from Untrusted IP Addresses”
3. Uncheck the “Require Authentication from Untrusted IP Addresses”
4. Select “Disabled” for the “Transport Layer Security from Untrusted IP Addresses” and save your changes.
The Unity
Connection SMTP Server configuration page should look like this at the bottom:

NOTE: Once you are done importing messages you should go uncheck the “allow Connections From Untrusted IP Addresses” option on this page.
Troubleshooting Tips
Troubleshooting Remote Connection Failures
- The most common issue with remote connection failures is the database proxy service has been stopped for one reason or another. This service will not start automatically after a Connection server restart and is shut down automatically after a configured number of days. There have also been several defects along the way that cause it to simply stop on its own. If you cannot log into the remote system and you are certain you’ve configured the remote user correctly and are using the right login/PW then double check the status of the remote database proxy service. It is often a good idea to stop and start it again – make sure it comes up in a running state (i.e. not “pending”). There is no harm in stopping and starting this service, it’s only role is providing off box tools with direct database access.
- Make sure nothing is blocking access to the port being used to create the ODBC connection. In Connection 7.x and later this should always be port 20532.
- Make sure the Informix ODBC driver is installed. Note that if you’re on a 64 bit operating system this still must be the 32 bit ODBC driver since all Connection tools at this time are 32 bit applications. The ODBC driver download page has two versions of the 32 bit driver that have been tested. There is a link to download the full development kit containing the ODBC driver from IBM as well.
Disable CSA and all Virus Scanning Applications
CSA and various virus scanning packages often block access to ports necessary to attach to remote servers and file systems and/or create local files and the like. Before escalating a failure be sure to make sure this basic issue is not tripping you up since TAC will usually first start here.
Message Import for Connection 7.x and later
Couple things to note here:
- Please check and double check that you do not have a virus scanning package installed on the Windows server you are running DRS Message Fisher on. This is by far the most common problem. By default they will block use of port 25 (SMTP) and message restores will fail if that’s the case. Virus scanning packages will often allow a connection to port 25 but will then block subsequent message transfers so the initial checks the tool makes up front before starting import may pass even though this is still a problem.
- Make sure there is no firewall either on the Windows server or between the Windows server and the Connection server blocking port 25 (for import) or port 7993 (for export).
- Make sure port 443 is open between the client machine and the server you’re backing up or restoring to.
- Be sure you are using Connection 7.0(2) or later. Also make sure you are connecting to the server using a user _without_ a mailbox.
- Make sure you’ve set the SMTP connectivity for Connection correctly when importing messages. See Step 4 under the “Configuring Connection 7.0 and Later for Message Restore” section above for details on this.
- If you have verified that the above do not apply, turn on all SMTP and MTA traces on the Connection server attempt to import a single messages (which will presumably fail) and gather the Connection logs and provide them to the TAC engineer you’re working with.
If you see IMAP errors during import coming back that contain text that
looks like this:
- 538 Encryption required for requested
authentication mechanism
- 530 Authentication Required
Then you need to review the SMTP authentication settings in Connection – see “Configuring Connection 7.0 and Later for Message Restore section above for details.
Requirements/Special Notes
Requires tar files created by the DRS tool from a Connection 7.0(1) or later backup.
Requires that you install the Informix ODBC Driver on your Windows installation where you are running DRS Message Fisher. The drivers can be found on The ODBC driver download page.
Multiple part messages are constructed as a single WAV file separated by beeps when restoring to a Connection mailbox.
Obtaining Updates
To check for updates to this tool, visit http://www.ciscounitytools.com
You can also check for an updated version using the “Check for updated version” option under the Help menu.
Revision History
Version 1.0.3 – 3/9/2010
- First beta release of application
© 2010 Cisco Systems, Inc. -- Company Confidential