Unity Connection Distribution List Syncher for CSV
Connecting
to Unity Connection 7.x or Later
Task 2: Set
the Database Proxy Service Shutdown Time
Task 3:
Activate the Remote Database Proxy Service
Task 4:
Login to the Remote Server
Using
Connection Distribution List Syncher for CSV
Overview
The Distribution List Syncher for CSV tool is designed to allow you to manage public distribution list membership details for lists in Connection using CSV files generated from external directories such as Domino or other 3rd party databases used for corporate list management. There is already an Active Directory List Syncher available to help with automatic list management for AD users, however if you are using another system for directory management you can leverage this tool along with a CSV export from your system to automatically create/edit distribution lists in Connection to match the membership details in your directory.

All lists and users are searched for by alias in Connection so the alias naming convention for lists and users must match between your external directory and Unity Connection or this tool will not work properly for you.
Requirements/Special Notes
This version of Connection List Syncher
runs on Windows XP/2000/2003/2008, Vista or Windows 7. When run on
This version of Connection List Syncher requires .NET framework 4.0 or better. The install will detect if this needs to be installed and launch the setup automatically if it’s missing.
This version Connection List Syncher only works with Unity Connection 8.0(1) or later.
You can use REST or ODBC for connectivity. ODBC is considerably faster but requires you install the IBM database drivers on the local client and configure the system for ODBC connectivity (see the next section)
Connection to Unity Connection 8.x or Later via REST
There’s nothing special that needs to be configured on the client for REST access other than making sure HTTP access to the server is possible. Proxy HTTP servers will not present a problem, so long as HTTPS traffic is allowed to/from the server you are connecting to.
You’ll need to authenticate against Unity Connection using an account that has the full administrator role to be able to use this tool via REST since it will need to create and edit distribution lists which requires administrator access.
Connecting to Unity Connection 8.x or Later via ODBC
If you are using ODBC for connectivity, you will need to follow these steps. If you are using REST instead you can skip this section.
You must first install the Informix ODBC drivers before using this tool. Many off box tools for Connection 2.1(1) and later use these same drivers and you only need to install them once per client machine. You can download the installer for this on its home page here: http://ciscounitytools.com/App_InformixDrivers.htm
For installations of 7.0(1) and later you need to use the database proxy service for access to the database from off box for any tool that uses database access.
Task 1: Configure a User without a mailbox with the Remote Administrator and System Administrator roles
1. Go to the Cisco Unity Connection Administration web interface for your installation.
2. You can leverage a user with or without a mailbox for off box data access purposes, but it’s strongly suggested that you create a new user without a mailbox that is used solely for the purpose of remote administration tasks for security reasons. This is also required if you want to export messages from a Connection 7.0(2) or later server – a user with a mailbox may not be allowed to extract messages from other mailboxes, whereas a user without a mailbox should have no problem.
3. Be sure the web administration password for this user is not configured to require a change at first login on the “Password Policy” page for that user.
4. If necessary, change the web administration password on the “Change Password” page. Note that only the web application password comes into play for remote data access.
5. Finally,
on the “Role” page for the user, add the “Remote
Task 2: Set the Database Proxy Service Shutdown Time
Out of the box the database proxy service is not running and if you try to start the service it will shut down right away. First you need to set the “Database Proxy: Service Shutdown Timer” value found in the System Settings -> Advanced -> Connection Administration section of the Cisco Unity Connection Administration page. By default this is 0. You can set it to as high as 999 days if you like. After the number of days configured here the remote database proxy service will shut down. This is useful if you want to do some migration work, for instance, and don’t want to forget to have the service disabled for security reasons.
NOTE: If you restart the server, the remote database proxy service will remain shut off. After a system restart you have to go in and manually turn on the service again (see step 3)
Task 3: Activate the Remote Database Proxy Service
1. Out of the box the service that listens to remote database requests is not active, you must turn it on. To do this, go to the “Cisco Unity Connection Serviceability” web admin page.
2. On the Tools menu, select the “Service Management” page.
3. The “Connection Database Proxy” item under the “Optional Services” section will be marked as “Deactivated” and stopped. Press the “Activate” button and it will be activated and started automatically.
Once you’ve started the proxy service you can connect with any tool that needs off box database access using the user name, web administration password and port “20532”.
NOTE: The service will automatically shut down after the number of days configured in step 2 above or if you restart the server.
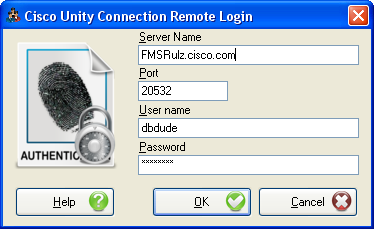
Task 4: Login to the Remote Server
When you select to connect to a remote server from the tool, you will see a login dialog box that will be empty except for port 20532 filled in as the default for the port. You must provide the server name or IP address for the “Server” field and provide the login and password for the database connection account. Use the alias and web administration password of the database user created above for the login and password fields.
The tool will remember your entries including the password (which is stored in a secure hash). Each time you run the tool it will load the settings of the last connection you made. Every server you’ve successfully connected to in the past will be listed in the drop down list in the order in which you connected to it last – most recent to least recent.
NOTE: The login and password information is stored along with the local Windows login name. Only those servers that have been attached to successfully using the current Windows login will be listed. If you are logging into the same Windows server with different users you will only see servers connected to with that particular Windows login.
NOTE: Providing the wrong password or login will fail quickly and give you a chance to try a different pair. Providing an incorrect server or port, however, results in a 60 second timeout while the tool waits for the Informix ODBC driver to return. Unfortunately this cannot be shorted. Type carefully.
Using Connection Distribution List Syncher for CSV
Pick your CSV files:
Select the list details and the list membership CSV definition files (see the file formats section below).
Select your mode
Choose from:
· Report: this is a read only mode and no changes will be made to the system – it will only report on what it WOULD do if it were run in full synch mode so you have an opportunity to review behavior first.
· Add Only: Users and lists from the CSV file found as users or lists in Connection’s directory will be added to the distribution list however no users or lists are ever removed from the distribution list definition. If you’re nervous about removal of members this can be a good option.
· Full Synch. Users and lists are added to AND removed from the distribution list in Connection to bring its membership into alignment with the membership details in the CSV file provided. It’s very important to test this first before using this option as there is NO UNDO for this option.
Execute
Press the “Go” button – progress indication will be given and you can cancel a running session if you need to. Once the session is completely finished you will be given an error total and given an opportunity to review the log file created.
“Home” Server Requirements for List Updates
One note to make. A distribution list is “homed” on only one Connection server even though it can replicate around and be available on all of the servers (clusters) in a networked configuration. You can only make membership edits on the server that owns that list, however, not from another server. When processing lists if the Distribution List Syncher sees that a list alias is available in the directory but is not “homed” on the server it’s currently attached to, it will log this fact and skip edits in question for that list.
If you will have lists homed on several different clusters in your organization you can greatly increase the efficiency of the tool by generating CSV files for membership details that contain only lists that a particular server owns when running a membership update for that server. This reduces the number of wasted database fetches that need to be made while processing the CSV file.
Another technique is to have a single cluster be responsible for maintaining all the list membership details for all distribution lists in your organization.
CSV File Formats
The Distribution List Builder requires two separate files be supplied to operate correctly: one with the distribution list definitions (display name, alias and extension details) and one detailing the membership data (user or list aliases associated with distribution list aliases).
List definition file
The list definition file needs to have 3 columns defined in the first line (not case sensitive):
DisplayName, Alias, Extension
There can be other columns defined but they will simply be ignored. Alias and DisplayName cannot be blank, of course, however extension can be. The extension column still needs to be defined, however.
Member definition file
The member CSV file needs to contain at least two columns (not case sensitive):
DLAlias, MemberAlias
Again, it can contain other columns but they will be ignored. The DLAlias column should correspond to the Alias column in the list definition file, of course. Member aliases will be aliases of users or other lists in the directory (not contacts). Users and lists are searched for in the global directory, not just users local to the Connection Server the tool is currently attached to. Make sure directory synchronization is up to date if users you think should be found are not being resolved.
Each line in this file defines a membership relationship – it’s best to organize the file output such that all members of the same list are sorted together (i.e. sort the output by the distribution list alias) – this will help performance when parsing the file for details.
Running via Command Line
To run the tool via the command line you must provide 4 parameters and you can optionally also include the “/ODBC” option to use ODBC connectivity instead of the default REST connection.
·
/Silent=[<server
name>]. For example
/Silent=[lindborgload17.cisco.com].
Note that you MUST have logged into this server at least once using the
tool from the client you are running it from via CLI.
· /Mode=[<mode name>]. For example /Mode=[full]. Valid modes are “full”, “addonly” and “reportonly”.
· /ListDetailsCsvFile=[<file path>]. For example /ListDetailsCsvFile=[D:\MyListDefinitions.csv]
· /MemberDetailsCsvFile=[<file path>]. For example /MemberDetailsCsvFile=[D:\MyListMembershipDetails.csv]
Obtaining Updates
To check for updates to this tool, visit http://www.CiscoUnityTools.com or you can use the “Check for updated versions” link found in the About dialog box of this application.
Revision History
Version 1.0.7 – 7/26/2013
· Added list ObjectId caching to both ODBC and REST implementations to reduce the number of database lookups when mapping Alias to ObjectId for list membership.
· Updated logic for handling duplicate alias values for distribution lists - if more than one match is found but it includes a local list, default to the local list for matching purposes.
Version 1.0.5 – 7/8/2013
· Added option to limit list export details to only those lists hosted by the Unity Connection server presently attached.
Version 1.0.4 - 6/26/2013
· Added contacts to the synch logic for both export and import in REST and ODBC transports.
· Changed logic to ignore members of lists if they are user templates. They do not get exported or updated during syncs.
Version 1.0.3 – 6/13/2013
· Added export capability from Unity Connection to go with corresponding import function.
Version 1.0.2 - 6/12/2013
· Updated to support including sub lists in the membership details.
· Logging output updated to include users and lists in output and a separate "lists to be added" section.
Version 1.0.1 – 6/4/2013
· First beta release of tool
© 2013 Cisco Systems, Inc. -- Company Confidential