|
Creating a Monitored Event
|   |
|
Creating a Monitored Event
| |
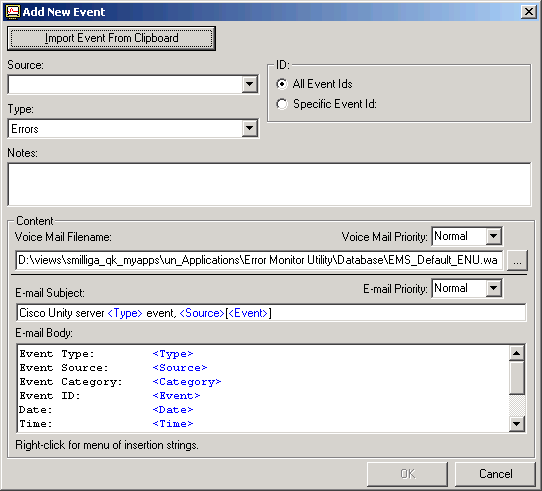
Once you have created at least one recipient you will be able to create and activate a monitored event (this document may sometimes refer to these as triggers). Since we are all about choices there are also two ways to create a new monitored event, use the File – New – Event menu option or select the Monitored Events node in the navigation tree and click the Create New Event button. This brings you to the following dialog box where you can configure the new event.
|
Source – This corresponds to the Source column in the Event Viewer. |
|
|
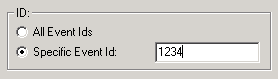
ID – This is the event id. Here you have two choices: All Event Ids or Specific Event Id. If you are interested in receiving notification for all event log messages from a source use the All Event Ids option. If you want to receive notification for a specific event id select the Specific Event Id option and enter the Event Id in the box. |
|
|
Type – This option allows you to specify what type of event log messages you want to receive notification for. The options are Errors, Errors & Warnings, Errors, Warnings & Informational. It you want to receive notification on every event log message for the specified Event Source select the Errors, Warnings & Informational option, otherwise select a more restrictive option. |
|
|
Notes – This field allows you to enter a short note (up to 255 characters) that can be included with the notification. For example, this could be used to provide the location of a more detailed document on how to handle this event. |
|
|
Voice Mail Filename – This is the full path to the WAV file that will be sent to any voice mail recipients assigned to this event. You can use the default WAV file shipped with the EMS or record your own. If you are monitoring several different event sources you may want to record individual files for each event so that the person receiving the notification can tell what event log message was detected. Use the ellipse button to bring up a file browser and select the wav file. Once you select a wav file, that file will be copied to the EMS Database subdirectory; this is to facilitate Disaster Recovery Backup and Restore. See the section Recording a New Voice Mail .WAV File for details on creating custom message for voice mail notification. |
|
|
Voice Mail Priority – You can select to have the voice mail sent with Urgent, Normal or Low priority. |
|
|
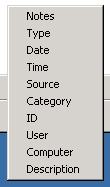
E-mail Subject – This field allows you to configure the subject of any e-mail or SMTP notifications. The EMS provides insertion strings that are replaced by the actual text of the event log message when the e-mail is sent. Right click on the field where you want to place the insertion string and you will see a popup menu of the possibilities. Select the one you want and it will be inserted into the field at the current mouse pointer position. Be careful to not change the text of the insertion strings. If you want to delete an insertion string make sure to delete the angle brackets as well as the text. |
|
|
E-mail Body – This field allows you to configure the body of any e-mail or SMTP notifications. The field also allows insertion strings. |
|
|
E-mail Priority – You can select to have the e-mail sent with Urgent, Normal or Low priority. |
|