Connecting to Unity Connection 7.x or Later
Task
2: Set the Database Proxy Service Shutdown Time
Task
3: Activate the Remote Database Proxy Service
Task
4:For Connection 12.x and Later Enable Secure IMAP
Task
5: Login to the Remote Server
Troubleshooting Remote Login Issues
Double
Check Connection Server Settings
Disable
CSA and all Virus Scanning Applications
Make
sure the Informix .NET Driver is Installed and the PATH Points to it.
Delete
Message over Digital Network
Overview
The
Message Hunter tool is designed to allow administrators to delete all the
instance of a voice message over the digital network. It will allow you to
directly login onto all Connection Servers connected into a digital network.
You can search a subscriber all over the digital network, based on alias,
display/first/last name string sub match, extension range. After subscriber
selection, you can fetch voice message based on inbox items, sent items or both
for this subscriber. Once you select a voice message, you can find all the instances
of the selected voice message over the digital network and delete them based on
read, unread and both.
Updated
versions of the tool also allow for simply deleting one or more messages in the
selected user’s inbox and not searching out all instances of that message on
all servers.
Message Hunter tool also allow you to
delete dispatch messages for a Unity Connection server. This tool also provides
an option to download voice messages as an EML file before deletion. This will
help administrator to make sure they have the right message or not before
proceeding with it’s
removal.
Requirements/Special
Notes
This
version of Message Hunter runs on Windows Server 2008 or 2012 or Windows 10.
You
must install the 32 bit Informix Client SDK version 4.0
or later including the .NET drivers even if you are running on a 64 bit version
of your operating system. See the Informix
Driver Download Page for details.
This
version of Message Hunter is specially design for digital network but it also
works for standalone Unity Connection servers.
You
must enable the ODBC proxy service on the all Unity Connection servers
connected in digital network and attach to the database using an account
enabled for the remote database access role.
See the next section for details on this.
This
tool uses Microsoft’s full .NET 4.5 library (the limited “client” version of
.NET 4.5 is not sufficient).
Connecting to Unity
Connection 7.x or Later
For
installations of 7.x and later you need to use the database proxy service for
access to the database from off box for any DB tool including Message Hunter.
NOTE: Repeat following three steps onto all Unity Connection
servers connected into digital network by using same remote administrator name
and password.
Task 1: Configure a User without a mailbox with the Remote
Administrator and System Administrator roles
1. Go
to the Cisco Unity Connection Administration web interface for your
installation.
2. You
can leverage a user with or without a mailbox for off box data access purposes,
but it’s strongly
suggested that you create a new user without a mailbox that is used solely for
the purpose of remote administration tasks for security reasons. This is also required if you want to export
messages from a Connection 7.0(2) or later server – a user with a mailbox may
not be allowed to extract messages from other mailboxes, whereas a user without
a mailbox should have no problem.
3. Be
sure the web administration password for this user is not configured to require
a change at first login on the “Password Policy” page for that user.
4. If
necessary, change the web administration password on the “Change Password”
page. Note that only the web application
password comes into play for remote data access.
5. Finally,
on the “Role” page for the user, add the “Remote
Administrator” and the “System
Administrator” roles to the “Assigned Roles” list and save. You can assign any or all other roles as well
but for the purposes of remote access to the database and making updates to
users those two are necessary.
Task 2: Set the Database Proxy Service Shutdown Time (for
Connection versions earlier than 10.x)
Out
of the box the database proxy service is not running and if you try to start
the service it will shut down right away.
First you need to set the “Database Proxy: Service Shutdown Timer” value
found in the System Settings -> Advanced -> Connection Administration
section of the Cisco Unity Connection Administration page. By default this is 0. You can set it to as high as 999 days if you like. After the number of days configured here the
remote database proxy service will shut down.
This is useful if you want to do some migration work, for instance, and
don’t want to forget to have the service disabled for security reasons.
NOTE: If you restart the server, the remote database proxy
service will remain shut off. After a
system restart you have to go in and manually turn on the service again (see
step 3)
Task 3: Activate the Remote Database Proxy Service
1. Out
of the box the service that listens to remote database requests is not active,
you must turn it on. To do this, go to
the “Cisco Unity Connection Serviceability” web admin page.
2. On
the Tools menu, select the “Service Management” page.
3. The
“Connection Database Proxy” item under the “Optional Services” section will be
marked as “Deactivated” and stopped.
Press the “Activate” button and it will be activated and started
automatically.
Once
you’ve started the proxy service you can connect with any tool that needs off box
database access using the user name, web administration password and port
“20532”.
NOTE: The service will automatically shut down after the number of
days configured in step 2 above or if you restart the server.
Task 4:For Connection 12.x and Later Enable Secure IMAP
Connection 12.0 and later ships with secure IMAP connections turned off by default. For message extraction in 12.0 and later you must:
1. Attach the server to a licensing service. You cannot turn on secure protocols for a server that is not licensed – as such you cannot extract messages via IMAP until you’ve licensed the server.
2. From the Unity Connection CLI logged in as an administrator you need to run the command “utils cuc encryption enable”. Once this is done successfully the secure IMAP connection used by COBRAS and other tools will be enabled.
Task 5: Login to the Remote Server
When you first start Message Hunter, you will see a login
dialog box that will be empty except for port 20532 filled in as the default
for the port. You must provide the server name or IP address for the “Server”
field and provide the login and password for the database connection
account. Use the alias and web
administration password of the database user created above for the login and
password fields.
Message Hunter will remember your entries including the
password (which is stored in a secure hash).
Each time you run Message Hunter it will load the settings of the last connection
you made. Every server you’ve
successfully connected to in the past will be listed in the drop down list in
the order in which you connected to it last – most recent to least recent.
NOTE:
The login and password information is
stored along with the local Windows login name.
Only those servers that have been attached to successfully using the
current Windows login will be listed. If
you are logging into the same Windows server with different users you will only
see servers connected to with that particular Windows login.
NOTE:
Providing the wrong password or login
will fail quickly and give you a chance to try a different pair. Providing an incorrect server or port,
however, results in a 60 second timeout while MESSAGE HUNTER waits for the Informix
driver to return. Unfortunately
this cannot be shortened. Type
carefully.
Troubleshooting Remote
Login Issues
Double Check Connection Server Settings
Make sure the remote database proxy
service is running. This service does
shut itself off after a period of time and does not start itself automatically
on a server reboot.
Make sure the user you are logged in as
has the remote administrator role assigned to their account, that their
password is not set to reset at the next login and that their account is not
currently locked.
Make sure the server name or IP address
you are using to connect with is reachable from your Windows client. DNS issues often come up in connection
failures.
Disable CSA and all
Virus Scanning Applications
It’s a good idea to disable CSA and all
virus scanning applications if you are having problems connecting to be sure
the ODBC port (20532) is not being blocked.
Also check your firewall settings (assuming you are running one).
Make sure the Informix
.NET Driver is Installed and the PATH Points to it.
For 32 bit OS installs, the IBM
Informix driver is installed in C:\Program
Files\IBM\Informix\Client-SDK. Make
sure this path exists on your server and has not been removed or renamed.
The system PATH variable will also
include a reference to the “\IBM\Informix\Client-SDK\bin”
location where the driver is installed.
Make sure this path is referenced in the PATH. Also, if the PATH is very long sometimes the
Informix driver will not find it, try moving it to the beginning of the PATH
statement.
If you had an older version of the IBM
Informix Client SDK installed it's a good idea to uninstall all other versions
and make sure you have a single instance of the SDK 4.x or later. Mixing versions of Informix drivers is not a
good idea as only one can be active at a time.
Using Message Hunter
Welcome to Message Hunter
The Message Hunter is a simple wizard
interface. The first panel is what you’d expect – you have to login onto the
all Connection servers in the digital network. Grid will be auto loaded with
the list of Connection servers (including few Unity Connection servers’
details) connected in digital network with the logged in Unity Connection
server.
Once you click on ‘Login’ button, tool
will start the process of login onto all Connection servers connected in
digital network by using same ‘remote administrator name’ and ‘password’ that
you logged in to the Unity Connection server on ‘Cisco Unity Connection Remote
Login’ page.

Color indicates:
This tool used certain color to represent the current login status with the
Unity Connection servers over the digital network.
· Medium Sea Green: Successfully connected with Unity Connection server [Connected].
·
Deep Sky Blue: Login process still running [Login
Pending].
·
Tomato: Unable
to connect with Unity Connection server [Login Failed].
·
White: Not connected with Unity
Connection server [Off Line].
When login process
invoked, grid row color will changes automatically based on login status with
Unity Connection server. Once the login process completed, gird will have
either medium sea green or tomato or white colors based on login status with
Unity Connection server. If any row in the grids has deep sky blue color, this
will indicate that login process is still running for that Unity Connection
server, so you have to wait.
When login process
completed, you have to select any one of the Unity Connection server from the
grid. ‘Next’ button will become enable only for the Unity Connection server
with medium sea green color in grid i.e. only for the connected Unity
Connection server. Tool will not allow you to proceed further with a Unity
Connection server that is not in connected state.
NOTE: Voice message are
only searched and deleted against the Unity Connection servers that are logged
in. If you are removing messages only from a single select users inbox, you only
need to attach to that Connection server.
Select Subscriber
The 2nd page of the wizard is to select
a subscriber with a mailbox on the Unity Connection server that you selected on
pervious page. Here you have to select a
subscriber for which you have to search voice messages.
Pressing ‘Search’ button just brings up
the standard user search dialog that lets you find a subscriber by alias, first
name, last name, display name or extension. You must select a user with a
mailbox before being allowed to continue.
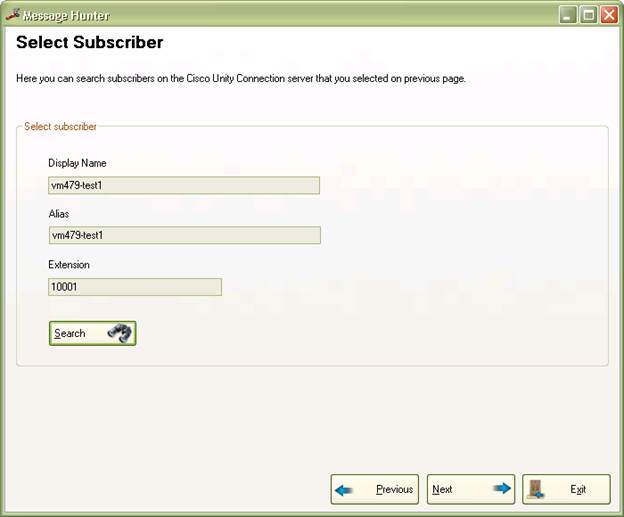
Once you select a subscriber, ‘Next’
button become enable and you can processed to next step.
Select a Message for Deletion
On page 3 of the wizard you can load
voice messages for the selected subscriber based on:
· All Messages: This will load all voice messages for the selected subscriber including inbox messages as well as sent messages.
· Only Inbox Messages: This will load all voice messages for the selected subscriber available in inbox.
· Only Sent Messages: This will load all voice messages that were sent by the selected subscriber.

You can load voice messages for the selected subscriber by
clicking on ‘Load Messages’ button. This will load the grid with the voice
messages based on selected criteria. Now you have to select one or more of the
voice message for which you have to find out all the
instances over the digital network (only for connected Unity Connection
servers). Alternatively
you can select messages that you wish to delete only from the target user’s
inbox.
Once you select a voice message, ‘Next’ and ‘Generate EML’
button will become enable. By clicking on ‘Next’ button you can processed to
next step.
‘Generate EML’ option will allow you to download the
selected voice message as an EML file, just to confirm that you are selected
the correct voice message for deleting over the digital network.
The ‘Export to CSV’ will dump the contents of the entire
inbox grid being shown to a CSV file for review – all columns, including a few hidden
ones for folder and message ObjectId values are
included for diagnostic purposes.
NOTE:
All downloaded EML files are stored in
the “EML” folder where you installed it.
NOTE: As dispatch message cannot be retrieved through IMAP, hence
Message Hunter will not allow you to generate an EML file for dispatch
messages.
Delete Message over Digital Network
Once you’ve selected a voice message for deletion over the
digital network, you can advance to the last page of the wizard. You can search
all instance of selected voice message over the digital network based on:
· All copies of the message: This will look for all instances of selected voice message included read and unread voice message over the digital network.
·
Only copies of the message that have been
seen: This will look for only those
instances of selected voice message that have been read over the digital
network.
· Only copies of the message that have not been seen: This will look for only those instances of selected voice message that are still unread over the digital network.
· Only selected message(s) from the target inbox: This will look only in the inbox you attached to and delete those instances of the selected message(s), not remove all instances of the message found for all users on the network.
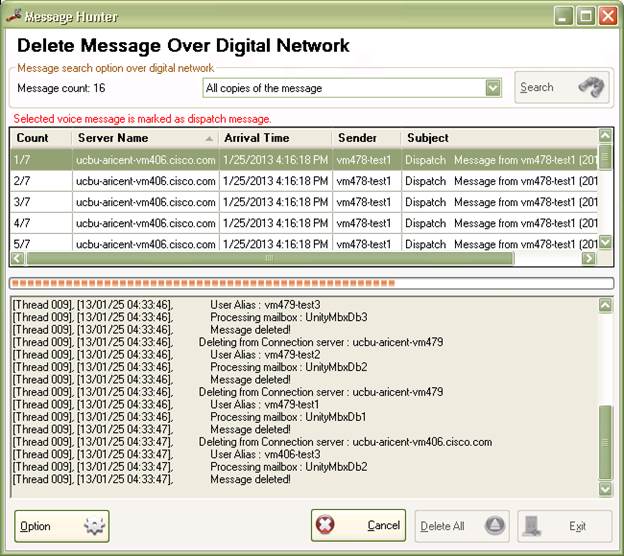
Here initially you need to click on ‘Search’ button. This
will invoke the searching process for all the instances of selected voice
message over the digital network. Once the searching process completed, grid
will be populated with all instances of voice messages found over digital
network (including few message details like count, Unity Connection server
name, message arrival time, sender, subject and user alias). Now ‘Delete All’ button will become enable
and you can invoke the deletion process by clicking on ‘Delete All’ button.
Once you hit the ‘Delete All’ button, you will be asked to confirm that you
want to permanently delete all the instance of selected voice message over the
digital network.
Delete Dispatch Messages: If the selected message is marked as a dispatch message
then Message Hunter will display a warning note that selected voice message is
marked as a dispatch message. Now you can delete all dispatch messages by
hitting on “Delete All” button.
If you checked it, tool will delete all dispatch messages
otherwise it will skip all dispatch messages.
As the Message Hunter progresses, the
progress bar proceeds to the right and logging information scrolls by. The information shown in the text box is also
found in the log file created by the tool in the “Logs” folder where you
installed it.
All errors start with the text
“(error)” and show up in red in the output to draw attention to them. Please review these carefully and include the
full log file generated by the tool when reporting a problem to TAC.
All warnings start with the text
“(warning)” and show up as purple in the output text. These are usually not critical problems but a
situation where a voice message could not be deleted. This is provided for
informational purposes only and does not require action or an escalation to TAC
for explanation.
You can press the “Cancel” button during the deletion
process to abort if you like – you will be asked to confirm the abort command
before it exits the process.
NOTE: When the deletion process is complete you can press the ‘Previous’ button and go back and adjust your choices.
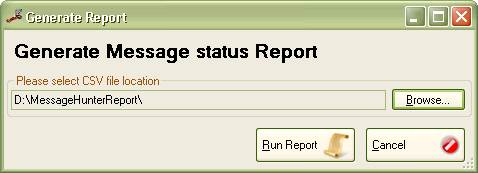
Generate Report
The options menu allows you to generate
a voice message report as a CSV format. The generate report option will
generate a complete list of all instances of selected voice message based on
search criteria. Before generating a report, you need to search all instances
of selected voice messages over the digital network. Here you just need tell
the folder location where you want to store CSV file generated by tool.

The CSV report output has the information
displayed in a flat comma separated format. The CSV report file has 3 columns
in it:
ServerName, UserAlias,
Read/Unread
Obtaining Updates
To check for updates to this tool, visit http://www.CiscoUnityTools.com
Revision History
Version
1.0.11 – 3/18/2019
· Added ability to delete only local inbox messages for selected user
· Added ability to pick multiple messages for search/delete
· Updated all NuGet packages
· Updated all libraries to use .NET 4.5 instead of 4.0
Version
1.0.10 – 8/8/2016
· Updated setup to support Win 8.1 and 10 installations
Version
1.0.9 – 6/2/2016
· Updated ChilKat libraries used for IMAP access
· Added option to export message lists to CSV file to the UI
· Updated exit logic to clean up all form instances to avoid unnecessary error dialogs
Version
1.0.7 – 3/14/2015
· Updating NuGet packages
· Revamping SQLite access settings sub project
Version
1.0.5 – 1/25/2013
· Added support for deleting dispatch messages.
· Added debug output option
Version
1.0.1 – 1/11/2013
· First drop of beta tool.
© 2019 Cisco Systems, Inc. -- Company Confidential