Unity Connection Network Migration Tool
Connecting
to Unity Connection 10.x or Later
Task
1: Configure a User with the Remote Administrator and System Administrator
roles
Task
2: Activate the Remote Database Proxy Service
Task
3: Login to the Remote Server
Troubleshooting
Remote Login Issues
Double
Check Connection Server Settings
Disable
CSA and all Virus Scanning Applications
Make
sure the Informix .NET Driver is Installed and the PATH Points to it.
Page
2 – Network Health Checks
Page
3 – Define the HTTP Network Topology
Page
4 – Network Replication Options.
Overview
In short the Network Migration Tool allows you to convert your entire SMTP based Unity Connection network (legacy network links) into a new HTTP based network in one rapid process that should only take a few minutes as opposed to the hours of manual steps it would take doing it by hand.
The tool lets you determine your HTTP network layout with up to 5 nodes attached to each server and up to 3 levels of nodes. All users, distribution lists, distribution list membership, VPIM and contacts will all be fully synced and up to date and your network will be ready to handle new users and lists right away after completing the migration to HTTP networking.
This requires you upgrade all your Unity Connection servers to a version of 10.0 or later first and that your existing SMTP network is functioning properly and is healthy. Basic checks are made against all servers in your network by the tool prior to the conversion process taking place to avoid unnecessary errors here.
NOTE: This is only for migrating from legacy SMTP networking to HTTP networking configurations. It will not allow you to reconfigure a standing HTTP network into a new topology or add SMTP nodes to an existing HTTP network or the like. Only full “pure” SMTP networks are handled by the migration tool and all nodes are converted to HTTP in one shot.
Requirements/Special Notes
This version of the Network Migration Tool runs on Windows XP/2000/2003/2008, Vista or Windows 7.
You must install the 32 bit Informix Client SDK version 3.5 or later including the .NET drivers even if you are running on a 64 bit version of your operating system. The Network Migration Tool is strictly 32 bit. See the Informix Driver Download Page for details.
This version of Network Migration Tool only works with Unity Connection 10.0(1) or later.
You must enable the ODBC proxy service on the Unity Connection server and attach to the database using an account enabled for the remote database access role. See the next section for details on this. To work properly all Unity Connection servers in your network need to use the same login/password pair for remote database access as the tool must log into all servers at the same time.
This tool uses Microsoft’s full .NET 4.0 library (the limited “client” version of .NET 4.0 is not sufficient). The installation will check to see if you have that installed and if not will offer you the option to download and install it automatically.
Connecting to Unity Connection 10.x or Later
For installations of 10.0(1) and later you need to use the database proxy service for access to the database from off box for any DB tool including Network Migration Tool.
Task 1: Configure a User with the Remote Administrator and System Administrator roles
1. Go to the Cisco Unity Connection Administration web interface for your installation.
2. You can leverage a user with or without a mailbox for off box data access purposes.
3. Be sure the web administration password for this user is not configured to require a change at first login on the “Password Policy” page for that user.
4. If necessary, change the web administration password on the “Change Password” page. Note that only the web application password comes into play for remote data access.
5. Finally,
on the “Role” page for the user, add the “Remote
Task 2: Activate the Remote Database Proxy Service
1. Out of the box the service that listens to remote database requests is not active, you must turn it on. To do this, go to the “Cisco Unity Connection Serviceability” web admin page.
2. On the Tools menu, select the “Service Management” page.
3. The “Connection Database Proxy” item under the “Optional Services” section will be marked as “Deactivated” and stopped. Press the “Activate” button and it will be activated and started automatically.
Once you’ve started the proxy service you can connect with any tool that needs off box database access using the user name, web administration password and port “20532”.
NOTE: The service will no longer automatically shut down as in previous versions of Connection – once started it will stay started until you shut it down.
Task 3: Login to the Remote Server
When you first start Network Migration Tool, you will see a login dialog box that will be empty except for port 20532 filled in as the default for the port. You must provide the server name or IP address for the “Server” field and provide the login and password for the database connection account. Use the alias and web administration password of the database user created above for the login and password fields.
Network Migration Tool will remember your entries including the password (which is stored in a secure database). Each time you run Network Migration Tool it will load the settings of the last connection you made. Every server you’ve successfully connected to in the past will be listed in the drop down list in the order in which you connected to it last – most recent to least recent.
NOTE: The login and password information is stored along with the local Windows login name. Only those servers that have been attached to successfully using the current Windows login will be listed. If you are logging into the same Windows server with different users you will only see servers connected to with that particular Windows login.
NOTE: Providing the wrong password or login will fail quickly and give you a chance to try a different pair. Providing an incorrect server or port, however, results in a 60 second timeout while the migration tool waits for the Informix driver to return. Unfortunately this cannot be shorted. Type carefully.
Troubleshooting Remote Login Issues
Double Check Connection Server Settings
Make sure the remote database proxy service is running. This service does shut itself off after a period of time and does not start itself automatically on a server reboot.
Make sure the user you are logged in as has the remote administrator role assigned to their account, that their password is not set to reset at the next login and that their account is not currently locked.
Make sure the server name or IP address you are using to connect with is reachable from your Windows client. DNS issues often come up in connection failures.
Disable CSA and all Virus Scanning Applications
It’s a good idea to disable CSA and all virus scanning applications if you are having problems connecting to be sure the ODBC port (20532) is not being blocked. Also check your firewall settings (assuming you are running one).
Make sure the Informix .NET Driver is Installed and the PATH Points to it.
For 32 bit OS installs, the IBM Informix driver is installed in C:\Program Files\IBM\Informix\Client-SDK. Make sure this path exists on your server and has not been removed or renamed.
The system PATH variable will also include a reference to the “\IBM\Informix\Client-SDK\bin” location where the driver is installed. Make sure this path is referenced in the PATH. Also, if the PATH is very long sometimes the Informix driver will not find it, try moving it to the beginning of the PATH statement.
If you had an older version of the IBM Informix Client SDK installed it's a good idea to uninstall all other versions and make sure you have a single instance of the SDK 3.5 or later. Mixing versions of Informix drivers is not a good idea as only one can be active at a time.
Using Network Migration Tool
The migration tool itself is a simple wizard construction consisting of six pages you work through in order. The first several pages do a number of consistency checks on your Unity Connection server attachments and network state before allowing you to continue to avoid unnecessary error conditions when you finish the process.
Page 1 – Login to All Servers
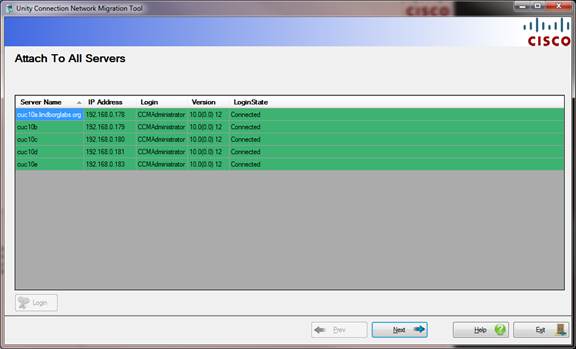
When you run the Network Migration tool you must first log into at least one Connection server via ODBC. Once attached the tool checks the database for all other Unity Connection servers that server is connected to and loads them into the grid above.
Assuming all the servers are configured with an account that has the Remote Database Access role assigned to it and the ODBC proxy service is running on each, you can press the “Login” button and the “Login State” will go to “Connected” and the line will turn green for each. If any server cannot be logged into the line will be red and a “failed” note will be added to the state.
Only when all servers are connected via ODBC and all servers are determined to be at version 10.0(1) or later will you be allowed to continue to the next step of the wizard.
Page 2 – Network Health Checks
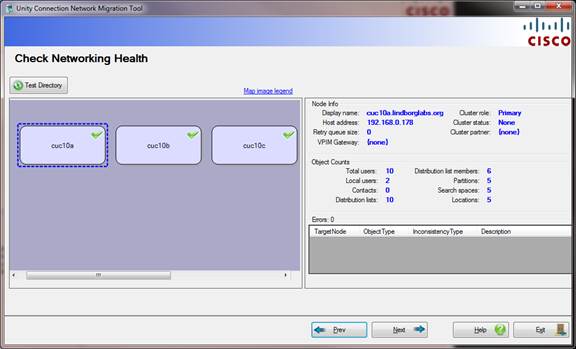
This page performs basic network health checks to be sure the SMTP network is fully functioning and all objects in the directory are fully replicated around to all other nodes in the network. If all nodes are not configured for SMTP networking you will not be allowed to proceed. If there are any replication errors or any object has not completed replicating around the network you will not be allowed to proceed. Any node that has an error will appear with a red “X” on it and if you click that node on the left, details of the error(s) will show up in the right side of the screen for review.
NOTE: Make sure you have a window of time when NO directory changes are planned, including distribution list membership, VPIM objects or the like. It’s important that all networking activity be static and complete at the time the tool migrates from SMTP to HTTP networking modes.
Page 3 – Define the HTTP Network Topology
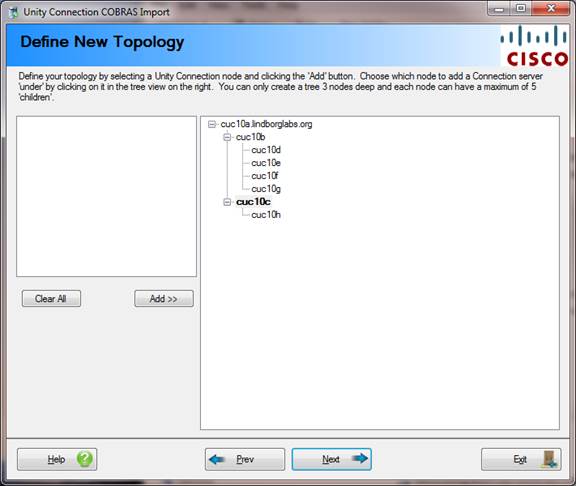
This page lets you define how your network nodes are connected to one another. In general the “bushier” your network (one level instead of three for instance) the better since then there are fewer “hops” replicating directory data needs to take to get to all nodes in the network.
You can create up to 3 levels deep and each node can have a maximum of 5 “children”. You must place all nodes listed on the left in the tree on the right before you can move to the next page in the wizard.
The first node is your “root” of the tree – after that you can click on any node in the tree on the right and it will be shown in bold indicating it’s active – when you select “Add” at that point the next node from the list on the left will be added as a child under the currently active node in the tree.
If you make a mistake or change your mind you can click “clear all” and start over.
Once you’ve place all the nodes legally in the tree you can advance.
Page 4 – Network Replication Options
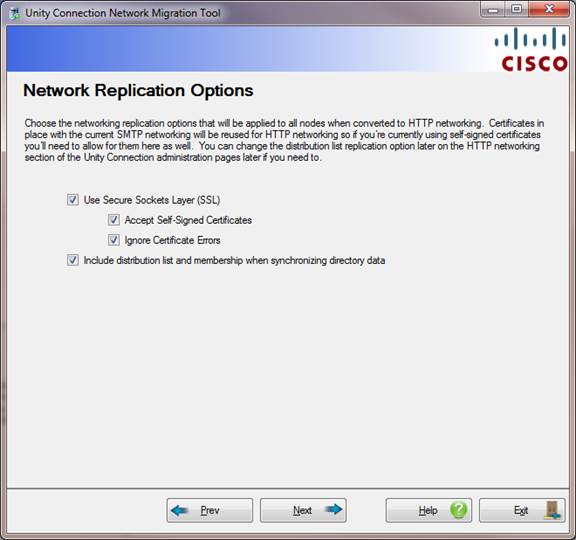
This page allows you to choose if you’re using SSL or not (this is highly recommended) and if you are replicating distribution list and membership data along with user data.
By default distribution lists and membership data is selected for replication since this is what SMTP networking does. If you choose to uncheck this make sure you understand that turning this on later after the HTTP networking is complete is not trivial, make sure you understand why you don’t want distribution list data replicated.
Using SSL is also default as is accepting unsigned certificates. If you are providing signed certificates you can uncheck this safely. It’s is highly recommended that you do not turn off SSL as this ensures all the HTTP traffic for network replication is secure.
Page 5 – Confirmation
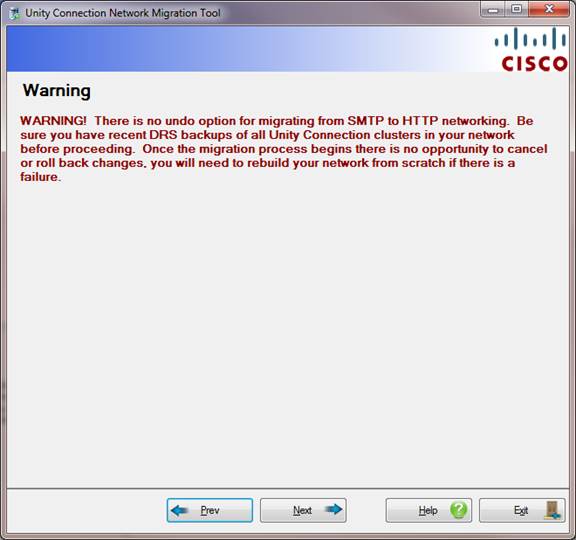
There’s nothing to do on this page – it’s a reminder that there is no undo option for the migration and to make sure you have recent DRS backups in place in case something goes wrong during a migration. Every effort is made to test every scenario and account for every eventuality but nothing is %100 so having backups in place is highly recommended.
Page 6 – Migrate

When you are ready to begin the migration just press “Start” and the process will run – the running log output will continue until it’s complete.
The “Options” button allows you to enable debug output for the migration utility which will cause much more data to be included in the log file including details of every database query and stored procedure called during the migration. If all your servers are at 10.5 ES21 or later you can also enable the option to automatically clean orphaned objects that may be in the directory – if any server is not at that version the option is disabled.
Once you start the migration there is no cancel operation or
rollback option.
Once complete the log output will indicate the migration has finished and you can review the log for errors or warnings. If there is a problem you will want to gather the log file for TAC to review.
Command Line Options
· /NoFailoverCheck – By default the Network Migration Tool checks to see if the Connection server it’s attached to is still available and operating as the publisher in a cluster pair. If it does not respond to ping requests or is not listed as the publisher it will attach to the secondary server in the cluster if it’s available. Running with this option removes that check and it will always attach to the servers it logged into at the beginning of the wizard.
Obtaining Updates
To check for updates to this tool, visit http://www.CiscoUnityTools.com
Revision History
Version 1.0.22 – 9/15/2018
· Updated setup package, removed unnecessary checks for IBM ADO tags
· Updated NuGet packages
· Added option “/NoFailoverCheck” to skip failover checks when attaching to Connection servers.
· Updated failover check logic to always return Publisher link regardless of ping results to that server if no sub found in cluster.
Version 1.0.19 – 5/10/2018
· Updated .net framework to 4.5.2 from 4.0
· Updated all NuGet packages referenced to the latest
· Updated setup package
Version 1.0.18 – 4/1/2016
· Updated with new binaries for SQLite deployment
· Updated setup to handle Windows 10 deployments
Version 1.0.17 – 7/5/2014
· Enabled “clean orphans” option if all the servers in the network are at 10.5(1) ES21 or later or 10.5.(2, 43) or later.
Version 1.0.16 – 5/28/2014
· Temporarily disabled the “clean orphans” object while potential issues with distribution list membership issues with it are resolved.
Version 1.0.15 – 4/28/2014
· Added “bounce” of HTTP directory sync service after migration complete
· Updated orphan cleanup logic to force strict “bottom up” node pulls followed by “top down” node replication pulls.
· Updated report output to log for orphan object removal
Version 1.0.13 – 3/11/2014
· Added support for cleaning orphaned items during migration and including report output in log file
Version 1.0.11 – 1/30/2014
· Fixed issue with VPIM topology resolution resulting in “neighbor nodes” not referencing correct mediator node.
Version 1.0.10 – 12/31/2013
· Added separate consistency checks for VPIM location object replication around the network on the health-check page.
Version 1.0.9 – 12/30/2013
· Added additional logic for managing VPIM location assignments in the topology table.
· Added debug output option on last page of wizard.
· Updated UI to move title text into wizard overlay bar.
Version 1.0.7 -11/27/2013
· First version of help file with details
· Updated logging output to include the tree view output of the topology selection
· Changed defaults to have distribution list and membership data selected.
Version 1.0.6 – 11/19/2013
· Fixed issue with node path creation in 3 tiered network topology.
· Added additional logging around topology creation results.
Version 1.0.5 – 11/14/2013
· Updated configuration settings instead of stopping/starting network replication service.
· Changed to shut down network replication service at the beginning but not attempt to restart it at the end.
Version 1.0.3 – 11/9/2013
· Removed remote user references during migration from SMTP to HTTP.
Version 1.0.2 – 11/5/2013
· Added service startup/shutdown via SOAP
· Add logic for setting distribution list replication status, using SSL, ignoring certificate errors and allowing self-signed certificates.
· Added additional health checks prior to migration including existence of HTTP network nodes.
· Fixed issue where certificate id reference was not being pulled from the locationvms table into the networklocal table during migration.
Version 1.0.1 – 10/16/2013
- First beta drop for internal testing
© 2016 Cisco Systems, Inc. -- Company Confidential