Unity Connection Partition Manager
Connecting
to Unity Connection 7.x or Later
Task
2: Set the Database Proxy Service Shutdown Time
Task
3: Activate the Remote Database Proxy Service
Task
4: Login to the Remote Server
Troubleshooting
Remote Login Issues
Double
Check Connection Server Settings
Disable
CSA and all Virus Scanning Applications
Make
sure the Informix ODBC Driver is Installed and the PATH Points to it.
Why
Isn't This A Full "Tenant Services" Offering?
Routing
Inbound Calls To Tenants
Important
Limitation of Partition Manager
List
of Objects Created for Each Tenant:
Viewing
Tenant Object Collections
Adding
Name Lookup Handlers to Tenants
Adding
Public Distribution Lists to Tenants
Overview
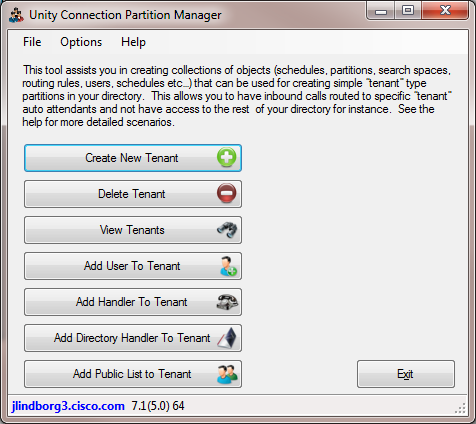
The Partition Manager tool is designed to assist in creating groups of objects in Unity Connection that provide a basic "tenant services" application. In short it allows you to create a tenant which includes numerous interrelated database object in Connection that work together to provide basic directory segmentation features to provide isolated groups of users and handlers within your Connection server. It is not a fully feature "tenant service" offering by any means but shares many of the same features that some organizations will find useful.
Be sure to review the "What is a Tenant" and "Why Isn't This A Full 'Tenant Services' Offering?" sections below for some more details on what's meant here.
Requirements/Special Notes
This version of Tenant Manager runs on Windows XP/2000/2003/2008, Vista or Windows 7.
You must Install the 32 bit Informix ODBC drivers even if you are running on a 64 bit version of your operating system. The Tenant Manager tool is strictly 32 bit. See the Informix ODBC Driver Download Page for details.
This version of Tenant Manager only works with Unity Connection 7.0(2) or later.
You must enable the ODBC proxy service on the Unity Connection server and attach to the database using an account enabled for the remote database access role. See the next section for details on this.
This tool uses Microsoft’s full .NET 4.0 library (the limited “client” version of .NET 4.0 is not sufficient). The installation will check to see if you have that installed and if not will offer you the option to download and install it automatically.
Connecting to Unity Connection 7.x or Later
For installations of 7.0(1) and later you need to use the database proxy service for access to the database from off box for any DB tool including Tenant Manager.
Task 1: Configure a User without a mailbox with the Remote Administrator and System Administrator roles
1. Go to the Cisco Unity Connection Administration web interface for your installation.
2. You can leverage a user with or without a mailbox for off box data access purposes, but it’s strongly suggested that you create a new user without a mailbox that is used solely for the purpose of remote administration tasks for security reasons. This is also required if you want to export messages from a Connection 7.0(2) or later server – a user with a mailbox may not be allowed to extract messages from other mailboxes, whereas a user without a mailbox should have no problem.
3. Be sure the web administration password for this user is not configured to require a change at first login on the “Password Policy” page for that user.
4. If necessary, change the web administration password on the “Change Password” page. Note that only the web application password comes into play for remote data access.
5. Finally,
on the “Role” page for the user, add the “Remote
Task 2: Set the Database Proxy Service Shutdown Time
Out of the box the database proxy service is not running and if you try to start the service it will shut down right away. First you need to set the “Database Proxy: Service Shutdown Timer” value found in the System Settings -> Advanced -> Connection Administration section of the Cisco Unity Connection Administration page. By default this is 0. You can set it to as high as 999 days if you like. After the number of days configured here the remote database proxy service will shut down. This is useful if you want to do some migration work, for instance, and don’t want to forget to have the service disabled for security reasons.
NOTE: If you restart the server, the remote database proxy service will remain shut off. After a system restart you have to go in and manually turn on the service again (see step 3)
Task 3: Activate the Remote Database Proxy Service
1. Out of the box the service that listens to remote database requests is not active, you must turn it on. To do this, go to the “Cisco Unity Connection Serviceability” web admin page.
2. On the Tools menu, select the “Service Management” page.
3. The “Connection Database Proxy” item under the “Optional Services” section will be marked as “Deactivated” and stopped. Press the “Activate” button and it will be activated and started automatically.
Once you’ve started the proxy service you can connect with any tool that needs off box database access using the user name, web administration password and port “20532”.
NOTE: The service will automatically shut down after the number of days configured in step 2 above or if you restart the server.
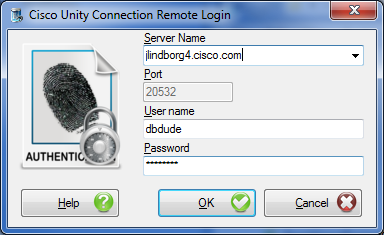
Task 4: Login to the Remote Server
When you first start Tenant Manager, you will see a login dialog box that will be empty except for port 20532 filled in as the default for the port. You must provide the server name or IP address for the “Server” field and provide the login and password for the database connection account. Use the alias and web administration password of the database user created above for the login and password fields.

Tenant Manager will remember your entries including the password (which is stored in a secure hash). Each time you run Tenant Manager it will load the settings of the last connection you made. Every server you’ve successfully connected to in the past will be listed in the drop down list in the order in which you connected to it last – most recent to least recent.
NOTE: The login and password information is stored along with the local Windows login name. Only those servers that have been attached to successfully using the current Windows login will be listed. If you are logging into the same Windows server with different users you will only see servers connected to with that particular Windows login.
NOTE: Providing the wrong password or login will fail quickly and give you a chance to try a different pair. Providing an incorrect server or port, however, results in a 60 second timeout while CHDD waits for the Informix ODBC driver to return. Unfortunately this cannot be shorted. Type carefully.
Troubleshooting Remote Login Issues
The error message issued by the application should have some details for you on the failure reason based on the error codes issued by the Informix ODBC driver to help narrow down your investigation. Here’s some general things to check that have been run across in the field for sites having trouble connecting via ODBC to their remote Connection servers.
Double Check Connection Server Settings
Make sure the remote database proxy service is running. This service does shut itself off after a period of time and does not start itself automatically on a server reboot.
Make sure the user you are logged in as has the remote administrator role assigned to their account, that their password is not set to reset at the next login and that their account is not currently locked.
Make sure the server name or IP address you are using to connect with is reachable from your Windows client. DNS issues often come up in connection failures.
Disable CSA and all Virus Scanning Applications
It’s a good idea to disable CSA and all virus scanning applications if you are having problems connecting to be sure the ODBC port (20532) is not being blocked. Also check your firewall settings (assuming you are running one).
Make sure the Informix ODBC Driver is Installed and the PATH Points to it.
For 32 bit OS installs, the IBM Informix ODBC driver is installed in C:\Program Files\IBM\Informix\Client-SDK. Make sure this path exists on your server and has not been removed or renamed.
The system PATH variable will also include a reference to the “\IBM\Informix\Client-SDK\bin” location where the ODBC driver is installed. Make sure this path is referenced in the PATH. Also, if the PATH is very long sometimes the Informix driver will not find it, try moving it to the beginning of the PATH statement.
Using Partition Manager
Overview – What is a “Tenant”
When we use the term "tenant", what are we talking about, exactly? A "tenant" is basically a small voice mail setup for a sub-company within your larger Connection server. In other words if you had 4 companies sharing a single Connection server for voice mail services, you can set each one up as a separate "tenant" in your install which effectively isolates them from one another.
The key aspects to a tenant is that each one is given their own set of routing rules, default operator and opening greeting call handlers, operator subscriber, schedule, switch assignment, partition and search space along with a few other things. The idea is you map the switch assignment for that "tenant" to some ports on your phone system and inbound calls get routed to users and handlers within that tenant. Once a call is in that tenant's partition they cannot access handlers or users outside of items assigned to that tenant.
The same is true for users assigned to that tenant. They cannot address to users or public distribution lists that are not assigned to that tenant. Their outbound notification devices use only the ports assigned to that tenant on the phone system integration. They are effectively an "island" within your Connection server.
To be clear Connection has had the ability to configure such setups since the 8.0 release. However the steps for managing the configuration are numerous and complex and highly error prone - this tool is designed to automate much of that and provide an easier way for administrators to create and manage such configurations.
Be sure to review the next section to understand what the limitations are here.
Why Isn't This A Full "Tenant Services" Offering?
There are a couple of important limitations here with the partitioning approach in Connection for providing true "tenant services" that need to be appreciated :
· First is that a tenant cannot be assigned their own domain and desktop client access is not "segmented" to allow for logins for users that may have the same alias across multiple tenants. Aliases for users must be unique system wide and only a single domain name is allowed currently.
· Second, there is no segmented administration capability. in other words you cannot have an administrator for a tenant that can edit/maintain users and handlers only for their tenant and also seeing and having access to other objects in the database.
· There is no tenant specific reporting capabilities.
· Finally, the tenant definition is not stored in the Connection database itself. The partition manager keeps a list of the items associated with a tenant in its own local database on the Windows machine you install and run it from - this prevents you from administering tenants from more than one location.
That said, there is still value in providing this as many customers use this for internal department segmentation, creating customer call-in areas, special group segmentation etc... that does not require a fully featured tenant services framework.
Routing Inbound Calls To Tenants
So before we discuss the process of creating and managing tenant collections, lets briefly review the call routing path for identifying calls as being assigned to a tenant - this is the most critical piece of functionality and needs to be understood up front to determine if you will be able to leverage the Partition Manager in your environment.
When you create a new tenant using the Partition Manager, a new phone system instance is created in Connection and assigned exclusively to that tenant. By default no ports are configured for it, it's just a switch instance that is then assigned to routing rules and all users/handlers created for that tenant. It's up to you to define the ports and hook it up to your phone system.
This is the only way Partition Manager allows you to assign inbound calls to a tenant. It's also important to note that MWI activity and phone based notification devices will also leverage that tenant's switch definition for users assigned to that tenant - keep this in mind when deciding how many ports to assign.
Connection can support numerous phone system definitions - so having each tenant assigned their own is not a problem from that perspective but it does entail extra work for the admin to configure and may require you configure additional port ranges on your Communications Manager for instance.
There are other ways you can map inbound calls to tenants such as calling number ranges, dialed number rules etc... but all are complex and error prone and have difficulties segmenting outbound traffic (MWI/Notification) - as such the separate phone system definitions are the only supported way of going about this.
In addition to the switch definition above, each tenant gets its own set of routing rules (two direct and two forwarding rules). The direct routing rules page for a system with four tenants configured on it is shown here:

Notice that the routing rules are assigned to the tenant's Phone System definition - so those rules will only trigger for calls that come in on that phone system and no other. In short the calls will route to the opening greeting call handler constructed for that tenant, log a user assigned to that tenant into their mailbox or forward a call to the greeting for a user/handler in that tenant.
Of course you can create additional routing rules "by hand" assigned to that phone system but be sure to make sure they route to an object for that tenant and are assigned to the partition for that tenant or you'll cause all kinds of havoc in the routing process.
Important Limitation of Partition Manager
Before getting into the use of Partition Manager it must be stressed that the definition of tenants is maintained within an Access database on the local Windows machine you install Partition Manager on. For the purposes of later removing tenants or adding objects and such you must run Partition Manager from that installation again.
Yes, you can manually remove all the objects created by the Partition Manager by hand if need be but this is tedious and slow given the number of them and their relationships (which prevent them from being deleted until you remove all external references first).
If you plan to use Partition Manager plan
to have ALL administrators who will be managing tenants with it use the same
installation. Using multiple
installs is NOT a good idea and will cause you problems.
Adding a New Tenant
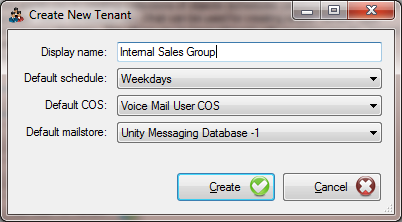
Let's take a look at using the Partition Manager - it's designed to be very simple to use. The first step is to, of course, create a new tenant. From the main screen select the "Create New Tenant" button at the top and the following dialog will appear:

The name of the objects created for this tenant will all pre preceded by "TENANT_" and the name you use where spaces are replaced with underscores. Most fields are limited to 64 characters so if you get too wordy here it will be truncated. All tenant names must be unique across all tenants.
The schedule you select is used to copy the data into a new schedule created for each tenant. This is used in the user template created for the tenant. This is done in case tenants have separate open/close hours or holiday needs separate from the larger organization. Having all tenants share the same schedule would be difficult in that case.
The COS and Mailstore's selected are used in the User Template for new user assignment. COS and Mailstores are system wide, they cannot be partitioned for tenant use.
When you select to create the tenant you will be presented with a "working..." dialog and it may take a few minutes as a number of objects are created and then relationships between them are established - the next section lists the objects created for each tenant.
List of Objects Created for Each Tenant:
Here's a rundown of all the objects that are created in Unity Connection when you add a new tenant. These are created and will reference each other - in other words the schedule created for a tenant is used in the subscriber and call handler templates which are used to create the users and handlers in that tenant:
· A phone system.
· Two direct and two forwarding routing rules.
· A system schedule - copied from the schedule selected when you create a new tenant.
· A user template.
·
A call
handler template.
·
Operator,
opening greeting and say goodbye call handlers.
·
An
Operator user
· An all voicemail users public distribution list. This gets referenced by the user template above such that all users created for this tenant are assigned to this distribution list
· A partition. All objects for this tenant are assigned to the partition.
· A search space. Contains the above partition.
· A system directory handler (name lookup handler - touch tone). This is referenced in the opening greeting.
· A default interview handler. This is just created in case its needed, by default it's not referenced anywhere.
Deleting a Tenant
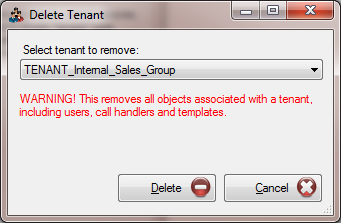
When you remove a tenant you will delete ALL objects associated with that tenant (in other words all objects in that tenant's partition). This include EVERYTHING in the list of objects above including public lists, users and call handlers. You will get a couple warnings when you go to delete a tenant and there is no undo option if you fail to heed their warnings.
Click the "Delete Tenant" button on the main form and you'll see the following dialog:
There's not much to do here - select the tenant you want to remove from the drop down and press the "Delete" button - you will get a final warning about the processing removing all objects associated with that tenant - when you confirm it will go through and remove them all while a "working..." dialog is presented. This may take a few minutes.
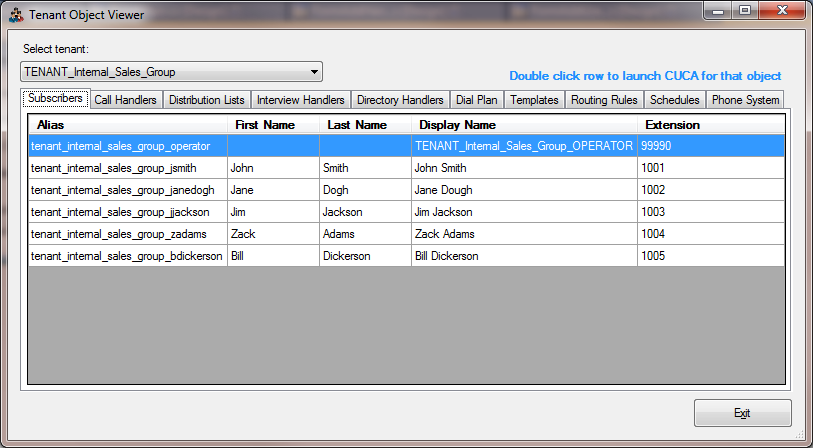
Viewing Tenant Object Collections
Given the large number of objects that work together to make a "tenant" configuration, a simple viewer option is provided that gathers them into groups for easy review. Just click on the "View Tenants" button on the main form and the following dialog is displayed:

Each object type is grouped onto its own tab - just select the tenant you want from the drop down and they'll populate. If you wish to edit an object or view more details about it you can double click on any object on any tab the a web browser will open to the CUCA admin page for that object automatically - the first time you do this you'll have to authenticate, of course, but after that the page will just open automatically. This is a convenient way of editing objects for tenants as opposed to hunting for them in the SA by name or partition assignment.
Adding Users to Tenants
To add a new user with a mailbox to an existing tenant, click on the "Add User To Tenant" button on the main form and the following dialog will appear:
The extension, alias and display name are required and all must be unique among users within the tenant. Since each tenant is in its own partition the extensions can overlap with other tenants without issue.
The display name and alias will both be prefixed with the tenant name to ensure they are unique. This is less important for the display name but it's done anyway for consistency with large directories where keeping track of which tenant a user is part of is critical.
For instance in the above example the display name and alias will look like this:
Display Name = TENANT_Internal_Sales_Group_John_Smith
Alias = tenant_internal_sales_jsmith
The display name can be changed to whatever you want later if you like however the alias should be left alone as all aliases must be unique across all users on the system regardless of tenant association.
Adding Handlers to Tenants
To add a call handler to a tenant click the "Add Handler" button on the main form and the following dialog will appear:
The display name is required and needs to be unique across all other call handlers system wide. For this reason it will be prefixed with "TENANT_" and the name of the tenant you are adding the handler for.
The extension number is optional and needs to be unique for extensions assigned to the tenant.
Adding Name Lookup Handlers to Tenants
To add a name lookup handler (directory handler) for a tenant, click the "Add Directory Handler to Tenant" button on the main form and the following dialog will appear:

The display name is required and needs to be unique against all other directory handlers system wide. For this reason it will be prefixed with "TENANT_" and the name of the tenant you are adding the handler for.
The extension number is optional and needs to be unique for extensions assigned to the tenant.
Adding Public Distribution Lists to Tenants
To add a public distribution list for a tenant, click the "Add Public List to Tenant" button on the main form and the following dialog will appear:

The display name and alias are required and need to be unique against all other distribution lists system wide. For this reason they will be prefixed with "TENANT_" and the name of the tenant you are adding the list for.
The extension number is optional and needs to be unique for extensions assigned to the tenant.
Obtaining Updates
To check for updates to this tool, visit http://www.CiscoUnityTools.com
Revision History
Version 1.0.3 – 1/20/2013
· Updated for Windows 8 installations
Version 1.0.2 - 6/27/2012
· Release version of tool
Version 1.0.1 – 5/2/2012
· First beta drop of tool
© 2013 Cisco Systems, Inc. -- Company Confidential