Unity Connection Distribution List Builder
Connecting
to Unity Connection 7.x or Later
Task
2: Set the Database Proxy Service Shutdown Time
Task
3: Activate the Remote Database Proxy Service
Task
4: Login to the Remote Server
Using
Distribution List Builder
Adding
Users to a New Public Distribution List
Adding
Users to an Existing Public Distribution List
Adding
Users to a Private Distribution List
Managing
Private Lists via CSV File
Managing
Public Lists via CSV File
Searching
for Users by Alias or Extension
Overview
The Distribution List Builder tool is designed to allow for easier bulk management of public and private (personal) distribution list membership for administrators.

You can select users
based on a number of search criteria and CSV file import and add them to a new
or existing public distribution list or a private distribution list assigned to
a user. You can also export subscriber
information to CSV using a number of search criteria including public
distribution list membership.
NOTE: The distribution list builder tool allows
for adding full users or contacts to public or private distribution lists. It does NOT allow for managing remote
contacts (VPIM contacts) or other distribution lists as members of distribution
lists.
Functions Supported:
- Add
selected users to new public distribution list. This option allows you to create a new
public distribution list and then add users to it via a number of
selection options. See the Choose Users section below for a run down on
the user selection capabilities.
- Add
selected users to an existing public distribution list. Allows you to select a single public
distribution list among those in the Connection directory and then add
users to it via a number of selection options. See the Choose
Users section below for a run down on the user selection capabilities.
- Add
selected users to a private distribution list for a selected user. Allows you to select a user in the
Connection directory and choose a private distribution list owned by that
user and then allows you to add users to the list via a number of
selection options. See the Choose Users section below for a run down on
the user selection capabilities.
NOTE: The private distribution list for that user must already be
created – the Distribution List Builder will now add a new list for
you automatically.
- Manage
multiple public lists in bulk from CSV. Allows you to create
and edit any number of public distribution lists via a single CSV
file. This function will add
users to existing lists or new lists as needed – if a list is referenced
in the CSV file that does not exist already in the Connection directory it
will be created for you on the fly.
Users and lists can be referenced by Alias and/or extension
numbers. This operation only
adds users to lists that are not already there – it will never
remove users as members of lists or delete lists. See the Managing Public Lists via CSV section
for more details.
- Managed
multiple private lists in bulk from CSV. Allows you to create and edit any number of private distribution
lists via a single CSV file.
This function will add users to existing lists or new lists as
needed – if a private list is referenced in the CSV file that does
not exist for a user already in the Connection directory it will be
created for you on the fly.
Users can be referenced by Alias and/or extension numbers, private
lists are referenced by a number between 1 and 99. This operation will only add users
to lists that are not already members and create new lists, it will never
remove users from a list or delete lists. See the Managing Private Lists via CSV section
for more details.
- Export
user data to a CSV file (used for CSV file imports).
Allows you to select users via a number of criteria and dump some
of their data to a CSV file for use when importing. This is designed to allow you to
more easily create lists of users to import into list definitions on other
servers on other networks. See
the Export User Data to CSV section for
more details. See the Choose Users section below for a run down on
the user selection capabilities.
- Export
private list data to a CSV file (used for CSV file imports).
Allows you to select users by a number of criteria and then export
their private list definition data to a CSV file. The file format is designed such
that it can be used for import purposes using the option to manage
multiple private distribution lists via CSV file noted above. This operation only exports top
level users and contacts from private list definitions, other private list
and public lists are not included in the output and the tool does not
recursively traverse those lists.
See the Choose Users section below
for a run down on the user selection capabilities.
- Export
public list data to a CSV file (used for CSV file imports). Allows you to select distribution
lists and then export their list definition data to a CSV file. The file format is designed such
that it can be used for import purposes using the option to manage
multiple public distribution lists via CSV file noted above. This operation only exports
top level users and contacts for public lists. It does not include other public
lists that may be included in that list and does not recursively traverse
those lists. If you wish to
get members of all lists, you must select all those lists for export
individually.
Requirements/Special Notes
This version of Distribution List Builder runs on Windows
XP/2000/2003 or
This version of Distribution List Builder requires .NET framework 2.0 or better. The install will detect if this needs to be installed and launch the setup automatically if it’s missing.
This version of Distribution List Builder only works with Unity Connection 7.0(1) or later.
You must enable the ODBC proxy service on the Unity Connection server and attach to the database using an account enabled for the remote database access role. See the next section for details on this.
You must first install the Informix ODBC drivers before using this tool. Many off box tools for Connection 2.1(1) and later use these same drivers and you only need to install them once per client machine. You can download the installer for this on it’s home page here: http://ciscounitytools.com/App_InformixDrivers.htm
Connecting to Unity Connection 7.x or Later
For installations of 7.0(1) and later you need to use the database proxy service for access to the database from off box for any tool that uses database access.
Task 1: Configure a User without a mailbox with the Remote Administrator and System Administrator roles
1. Go to the Cisco Unity Connection Administration web interface for your installation.
2. You can leverage a user with or without a mailbox for off box data access purposes, but it’s strongly suggested that you create a new user without a mailbox that is used solely for the purpose of remote administration tasks for security reasons. This is also required if you want to export messages from a Connection 7.0(2) or later server – a user with a mailbox may not be allowed to extract messages from other mailboxes, whereas a user without a mailbox should have no problem.
3. Be sure the web administration password for this user is not configured to require a change at first login on the “Password Policy” page for that user.
4. If necessary, change the web administration password on the “Change Password” page. Note that only the web application password comes into play for remote data access.
5. Finally,
on the “Role” page for the user, add the “Remote
Task 2: Set the Database Proxy Service Shutdown Time
Out of the box the database proxy service is not running and if you try to start the service it will shut down right away. First you need to set the “Database Proxy: Service Shutdown Timer” value found in the System Settings -> Advanced -> Connection Administration section of the Cisco Unity Connection Administration page. By default this is 0. You can set it to as high as 999 days if you like. After the number of days configured here the remote database proxy service will shut down. This is useful if you want to do some migration work, for instance, and don’t want to forget to have the service disabled for security reasons.
NOTE: If you restart the server, the remote database proxy service will remain shut off. After a system restart you have to go in and manually turn on the service again (see step 3)
Task 3: Activate the Remote Database Proxy Service
1. Out of the box the service that listens to remote database requests is not active, you must turn it on. To do this, go to the “Cisco Unity Connection Serviceability” web admin page.
2. On the Tools menu, select the “Service Management” page.
3. The “Connection Database Proxy” item under the “Optional Services” section will be marked as “Deactivated” and stopped. Press the “Activate” button and it will be activated and started automatically.
Once you’ve started the proxy service you can connect with any tool that needs off box database access using the user name, web administration password and port “20532”.
NOTE: The service will automatically shut down after the number of days configured in step 2 above or if you restart the server.
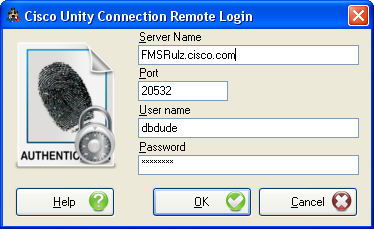
Task 4: Login to the Remote Server
When you select to connect to a remote server from Pubic Distribution List Builder, you will see a login dialog box that will be empty except for port 20532 filled in as the default for the port. You must provide the server name or IP address for the “Server” field and provide the login and password for the database connection account. Use the alias and web administration password of the database user created above for the login and password fields.
Pubic Distribution List Builder will remember your entries including the password (which is stored in a secure hash). Each time you run Pubic Distribution List Builder it will load the settings of the last connection you made. Every server you’ve successfully connected to in the past will be listed in the drop down list in the order in which you connected to it last – most recent to least recent.
NOTE: The login and password information is stored along with the local Windows login name. Only those servers that have been attached to successfully using the current Windows login will be listed. If you are logging into the same Windows server with different users you will only see servers connected to with that particular Windows login.
NOTE: Providing the wrong password or login will fail quickly and give you a chance to try a different pair. Providing an incorrect server or port, however, results in a 60 second timeout while Pubic Distribution List Builder waits for the Informix ODBC driver to return. Unfortunately this cannot be shorted. Type carefully.
Using Distribution List Builder
The Distribution List Builder is a simple 4 page wizard that walks you through the process of importing users into existing or new public distribution lists, an existing private distribution list or exporting subscriber data to a CSV file for user later.
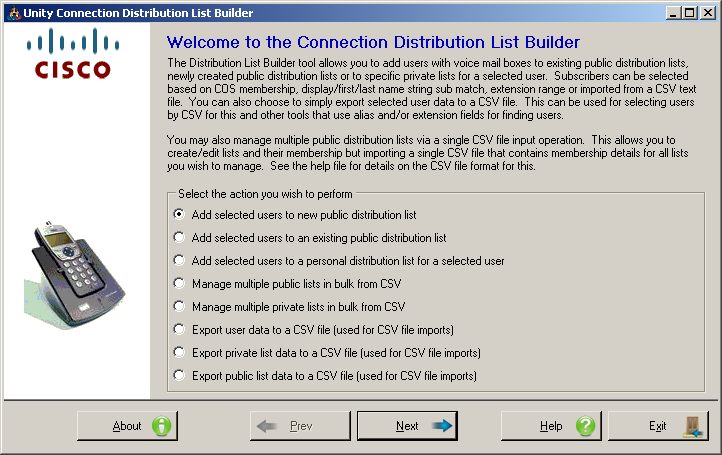
Page 1: Choosing an Action
Once you’ve attached to a Connection 7.0(1) or later Unity Connection server, the first page of the wizard will show allowing you to select which action you’d like to take.
NOTE: The wizard will let you travel back and forth between execution and action selection – so after selecting users, for instance, you can import them into an existing public distribution list and also go back and add those same users into a private distribution list if you like.
Page 2: Choosing a List
The 2nd page of the wizard is to select the target public or private distribution list or, in the case of the CSV export, the target CSV file to dump user information to.
Adding Users to a New Public Distribution List
If you are adding users to a new distribution list, page 2 of the wizard will look like this:
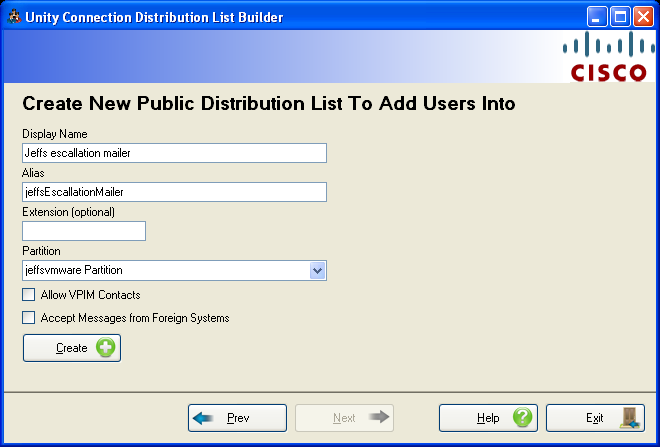
Remember that display names and aliases must be unique among all public distribution lists. If you attempt to create a list that has a conflicting name or alias you will see a warning dialog to the effect and you wont be allowed to continue. Similarly the extension (optional) must be unique among all extensions in the partition you have selected to create the public distribution list in. Again, if you select an illegal extension or one that conflicts in the partition, you will get a warning dialog and wont be allowed to continue.
The “Next” button will be enabled as soon as you successfully create a new public distribution list.
NOTE: You can create as many distribution lists here as you want – you can continue to edit the fields and press “create” repeatedly and those lists will be created. The last list created will be the one users will be added to when the wizard executes.
Adding Users to an Existing Public Distribution List
If you’ve selected to add users to an existing public distribution list, page two will contain only a set of read only text values and a “select” button to choose a public distribution list from. When you select that button, the following distribution list search dialog will be displayed.
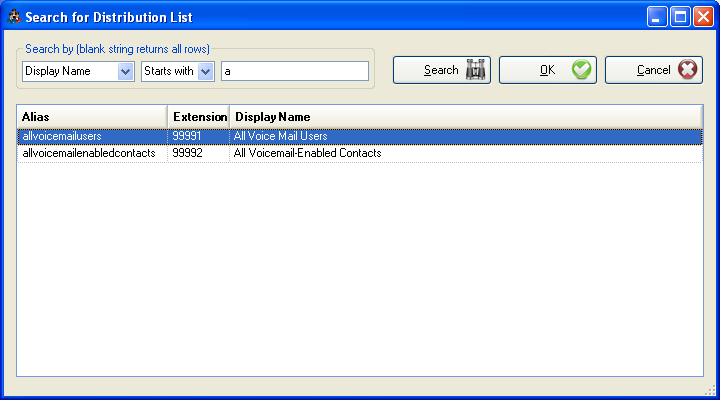
This dialog will allow you to show all public distribution lists or filter them based on display name, alias or extension number – remember that extensions are optional for public distribution lists. You can filter on any of these three fields starting with a string, containing a string or being exactly equal with a string. If the search string is blank when you select the “Search” button all public distribution lists will be returned.
You can sort the grid by clicking on any of the three column headers.
Once you find the distribution list you wish to add users to, either double click on it in the grid or select it and click “OK” to close the dialog out and continue. The wizard will not let you proceed until you select a list to add users to.
Adding Users to a Private Distribution List
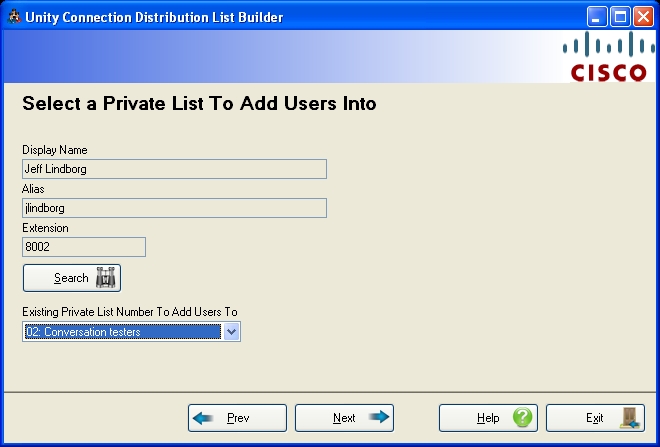
If you select to add users to an existing private distribution list, you will have to select a user first and then a private distribution list already configured for that user.
The “Search” button on this page pulls up the following user search dialog:
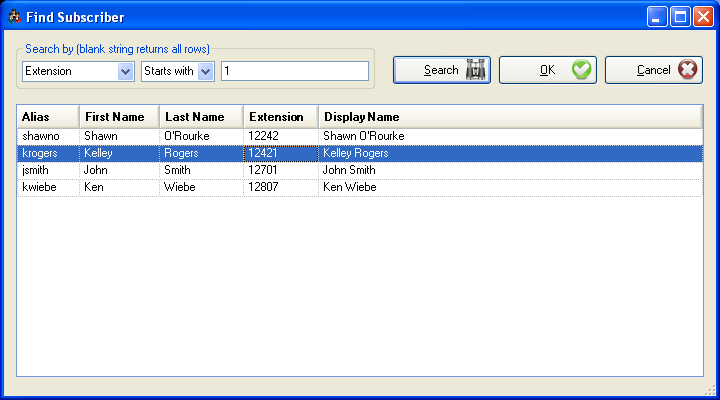
Once you’ve selected a user, you can choose the private distribution list you’d like to add users to for that list:
If the user has no private distribution lists to select from, you will see a warning dialog to that effect. You will need to create a private distribution list for that user ahead of time to add users to it, you cannot create new private distribution lists “on the fly” with the distribution list builder. You can leave the distribution list builder up and running while you go do that via the web based admin interface if you like, however.
You cannot proceed to the next page in the dialog until you’ve selected a user and a private distribution list owned by that user.
Export User Data to CSV File
If you’ve selected to export user data to a CSV file, page 2 of the wizard consists only of a file selection button:
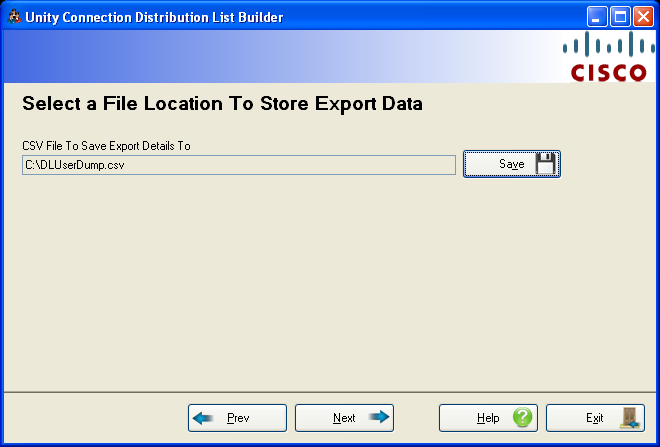
Once you’ve selected a valid file name and location you will be allowed to proceed to the next page of the wizard.
Page 3: Choosing Users
No matter what action you’ve selected to perform, the user selection page looks the same. This page allows you to select users by a number of criteria and then sort/select them to your liking.
Remember, the distribution list builder only allows for adding full local users or remote users to private or public distribution lists – it does not accommodate management of system or VPIM contacts. Global Users are presented with a green background in the grid if they are included and the “Type” column will indicate “Global User” or “Local User”. Global users will include Unity users in a Unity to Connection network or other Connection users in a Connection to Connection network.
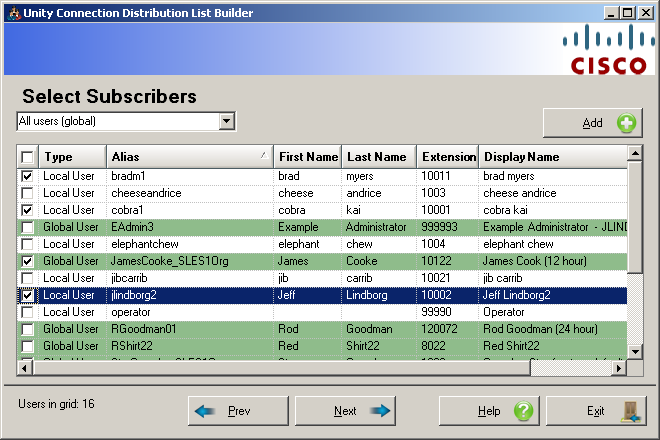
You can select/unselect individual users by either clicking the checkbox to the left of the grid or double clicking on the row the user is on.
You can select/unselect all users by checking or unchecking the checkbox in the upper left corner of the grid.
You can sort any of the named columns by clicking on the column header.
Select your user filter criteria and hit the “Add” button to populate the grid with user data. The filter options drop down list includes:
- All Local Users. All users on the Connection server will be loaded into the grid. For a very large system this may take a while.
- All Global Users. All users found on the network. Global Users are presented with a green background in the grid if they are included and the “Type” column will indicate “Global User” or “Local User”. Global users will include Unity users in a Unity to Connection network or other Connection users in a Connection to Connection network.
- Users in this class of service. With this option selected, press the “Search” button and you can select any of the class of service objects on the attached Connection server. All the users currently associated with that class of service will be loaded into the grid.
- Users in this extension range. With this option selected you can fill in a lower and an upper extension range. All users with extension numbers that fall within that range will be loaded into the grid.
- Users in this CSV file. You can select a CSV file off the hard drive to use for searching for subscribers. The CSV file must contain a first line that identifies a column named “ALIAS” and/or a column named “EXTENSION”. If the file contains neither column it will be rejected as an invalid format. All other column name will be ignored. If both an ALIAS and EXTENSION column are present then the Alias column is searched for first followed by the extension column if no match is found. All users found are added to the grid.
- Users associated with this phone system. With this option selected you can press the “Search” button and you can select any of the phone system integrations defined on the Connection server. All users associated with that phone system will be loaded into the grid when you press the “Add” button.
- Users with this string in their display name. You can enter any string into the text box and all users that contain that string in their display name will be added to the grid. This is useful for sites that use “site tags” in their object display names to organize users and handlers.
- Users in this public distribution list. You can select a public distribution list and all users found in that distribution list are added to the user grid.
- Users in this search partition. With this option you can press the “Search” button and pick a search partition defined on the Connection server. All users assigned to that partition will be added to the grid when you hit the “Add” button.
NOTE: When you change the selection mechanism and press the “Add” button, the grid clears of existing users first and then new users are added. You cannot “merge” selections from multiple search types into one grid. Note that you can run the wizard multiple times without exiting so one option here is to do multiple passes selecting users with different criteria and adding them to the same group.
Page 4: Execute
Once you’ve selected your action and the users to act on, all that’s left to do is hit the “Go” button on the last page of the wizard.
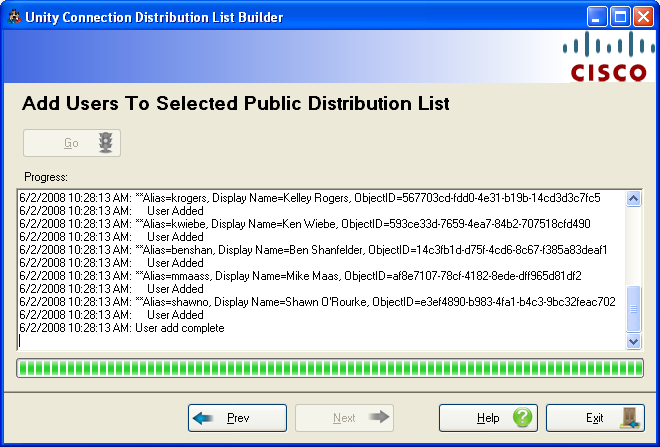
As the distribution list builder progresses, the progress bar proceeds to the right and logging information scrolls by. The information shown in the text box is also found in the log file created by the tool in the “Logs” folder where you installed it.
All errors start with the text “(error)” and show up in red in the output to draw attention to them. Please review these carefully and include the full log file generated by the tool when reporting a problem to TAC.
All warnings start with the text “(warning)” and show up as purple in the output text. These are usually not critical problems but a situation where a user could not be added to a distribution list. The most common warning you’ll see is a note that the user is already a member of the distribution list. This is provided for informational purposes only and does not require action or an escalation to TAC for explanation.
Managing Private Lists via CSV File
The private list management via CSV allows you to add users and contacts to private lists using a simple flat comma separated data file. If those lists exists, users will be added only if they are not already members of that list. If the list does not exist it will be created on the fly. The tool does NOT delete users from lists or remove lists from the directory, it only ever adds. The tool only deals with users and contacts. You cannot add a public distribution list to a private list via CSV with this function for instance.
Input File Format
When importing private list data via CSV, the file’s first line must contain the following column headers before the import will be allowed to continue:
USER_ALIAS,
USER_EXTENSION, PRIVATE_DL_NUMBER, MEMBER_TYPE, MEMBER_ALIAS, MEMBER_EXTENSION
NOTE: The PRIVATE_DL_NUMBER value must be a digit between 1 and 99. This is the only way to identify private lists in Connection. Any other value will result in the row being rejected as invalid.
NOTE: The MEMBER_TYPE can be either “USER” or “CONTACT”. No other member types will be processed.
Other columns may also be in your file but if all of those columns are not found, the file format will be rejected by the Distribution List Tool.
A single list will be referenced multiple times with different member data in a typical file output. For instance small example would look like this:
USER_ALIAS, USER_EXTENSION, PRIVATE_DL_NUMBER, MEMBER_TYPE, MEMBER_ALIAS, MEMBER_EXTENSION
ADUdess,838383,1,USER,bradm1,10011
ADUdess,838383,1,USER,cheeseandrice,1003
bradm1,10011,1,USER,cheeseandrice,1003
bradm1,10011,1,USER,EAdmin3,999993
bradm1,10011,1,USER,JamesCooke_SLES1Org,10122
bradm1,10011,2,USER,jibcarrib,10021
bradm1,10011,2,USER,jlindborg2,10002
jsmith,234,1,USER,adf,234
When you first select the CSV file for import it will check for the columns at the top and then load all users found referenced by alias or extension as owners of lists in the file. The tool will search by alias first and if a match is found it stops. If a match is not found the tool will then look at the extension number for a matching user. If a match is found that user is added, if not the user is noted as not being found in the log output and it moves to the next row.
You may unselect users in the grid of users during import and the Distribution List Builder will skip all lists owned by those users.
See the Searching for Users by Alias or Extension section for details on how Distribution List Builder searches for private list members via CSV file input.
NOTE: If a user is already a member of a list, this will be noted in the log file during import. It’s OK to run the same import with the same file multiple times, those users will simply be noted as already being members of the list and processing will move on.
NOTE: The Distribution List Builder will only ever ADD users to a list, it will never remove users.
Failure File Output
During parsing if any line is found that cannot be properly parsed out or fails to match a user by alias or extension, that line is written out to the failure log file. This file is stored in the same location as the import CSV file you selected and will have the same name with a “PARSING_FAILURE_(date)_(time).csv” tacked onto the end of the file name. You can review this and use it to retry the import (for instance after adding the missing users). The failure reason is noted in a new column added to the beginning of each line.
Managing Public Lists via CSV File
Input File Format
When importing public list data via CSV, the file’s first line must contain the following column headers before the import will be allowed to continue:
LIST_ALIAS,
LIST_EXTENSION, LIST_NAME, MEMBER_TYPE, MEMBER_ALIAS, MEMBER_EXTENSION
NOTE: The MEMBER_TYPE can be either “USER” or “CONTACT”. No other member types will be processed.
Other columns may also be in your file but if all of those columns are not found, the file format will be rejected by the Distribution List Tool.
A single list will be referenced multiple times with different member data in a typical file output. For instance small example would look like this:
LIST_ALIAS, LIST_EXTENSION, LIST_NAME, MEMBER_TYPE, MEMBER_ALIAS, MEMBER_EXTENSION, MEMBER_DISPLAY_NAME
"allvoicemailusers","99991","All Voice Mail Users","USER","UMsgDude","8002","UnSecure MsgDude"
"allvoicemailusers","99991","All Voice Mail Users","USER","EAdmin2","999992","Example Administrator - JEFFSDEVSERVER2"
"allvoicemailusers","99991","All Voice Mail Users","USER","SMessageGuy","8001","Secure MessageGuy"
"allvoicemailusers","99991","All Voice Mail Users","USER","JamesCooke_SLES1Org","10122","James Cook (12 hour)"
"allvoicemailusers","99991","All Voice Mail Users","USER","TestGuy1","7001","TestGuy1"
"CSV","","Cisco Speech View","USER","operator","99990","Operator"
"CxN Distribution List","","CxN DL","USER","undeliverablemessagesmailbox","99999","Undeliverable Messages"
"CxN Distribution List","","CxN DL","USER","operator","99990","Operator"
"CxN Distribution List","","CxN DL","USER","RShirt22","8022","Red Shirt22"
NOTE: The values may have quotes around them or not – the Distribution List Builder will process them fine either way. However is a value has a comma in it (for instance a list name with a comma) then it MUST be surrounded by quotes or the text parser will fail for that line.
When you first select the CSV file for import it will check for the columns at the top and then load all public distribution lists found referenced by alias or extension in the file. The tool will search by alias first and if a match is found it stops. If a match is not found the tool will then look at the extension number for a matching list. If a match is found that list is added, if not the list will be created as new on the fly during the import process. You will be given the opportunity to review which lists are to be created as new vs. those that will update membership information for existing lists.
You may unselect lists in the grid of list during import and the Distribution List Builder will skip those lists during processing.
See the Searching for Users by Alias or Extension section for details on how Distribution List Builder searches for public list members via CSV file input.
NOTE: If a user is already a member of a list, this will be noted in the log file during import. It’s OK to run the same import with the same file multiple times, those users will simply be noted as already being members of the list and processing will move on.
NOTE: The Distribution List Builder will only ever ADD users to a list, it will never remove users.
Failure File Output
During parsing if any line is found that cannot be properly parsed out or fails to match a user by alias or extension, that line is written out to the failure log file. This file is stored in the same location as the import CSV file you selected and will have the same name with a “PARSING_FAILURE_(date)_(time).csv” tacked onto the end of the file name. You can review this and use it to retry the import. The failure reason is noted in a new column added to the beginning of each line.
Searching for Users by Alias or Extension
When managing multiple private distribution lists or public distribution lists, the CSV file identifies users in the Connection database using the Alias and/or Extension fields provided by you in the CSV file being processed. The Distribution List Builder uses a specific series of queries when searching for users in order to deal with potential conflicts with various forms of networking are at play and/or when partitions are in use for overlapping extension support and the like.
The Distribution List Builder always searches locally first. Only when that search fails to find a match does it look in the larger global directory. The Distribution List Builder searches for alias first before extension if both are passed in. Only if no match for the alias is found does the extension search come into play.
The Distribution List Builder ONLY searches for primary extensions. Alternate extensions are not searched for when finding member users.
If more than one match is found, a message to this effect is logged into the output file and the users found are not added to the public or private list being managed.
The search process used by Distribution List Builder when provided with both an alias and extension to find a member user by follows these steps:
1. Search for both the alias and extension locally. If a match is found, stop. Otherwise continue.
2. Search for both the alias and extension globally. If a single match is found, stop. If no matches are found, continue searching. If multiple matches are found log a warning and give up – this is considered a failure condition.
3. Search for the alias in the local Connection server. If one is found, stop. Otherwise continue. Duplicates aliases are not possible for local searches here.
4. Search the global directory for an alias match. If a single match is found, stop. Otherwise continue to search.
5. Search the local directory for an extension. If a single match is found, stop. If multiple matches are found, log a warning and give up. Otherwise continue.
6. Search the global directory for an extension. If a single match is found, stop. If multiple matches or not matches are found, log a warning and give up.
Obtaining Updates
The About dialog box has a link to automatically check for updated versions of this tool.
To manually check for updates, visit http://www.CiscoUnityTools.com
Revision History
Version 2.0.11 – 2/1/2019
· Fixed an issue with private list export where a double lock could be put on the database access causing a mutex failure in subsequent calls.
Version 2.0.10 – 9/13/2018
· Updated project and all sub projects to the .NET 4.5 level
· Updated all NuGet packages including Sqlite, Chilkat and IBM Ifx libraries
· Updated Infragistics GUI libraries to the latest
· Updated setup to handle recent versions of Windows and remove the checks for MDAC
Version 2.0.9 – 3/18/2015
· Updated Sqlite libraries
· Updated setup to properly handle all modern Windows versions and .NET library versions.
Version 2.0.8 – 2/9/2015
· Fixed issue creating parsing details output file when including users by CSV parse for either new or updated distribution list assignment.
Version 2.0.7 – 1/20/2015
- Updated logic for fetching local users and users outside of the local location (i.e. global users) using alias and/or extension while managing private list.
Version 2.0.5 – 11/20/2013
· Added in CSV parsing error output into separate file in same folder where input CSV is being read from for easy reparsing.
Version 2.0.4 - 5/8/2013
· Moved all long fetch and processing operations to background threads.
· Added option for limiting searches of public lists to only those homed on the Connection server attached to.
· Added additional logging details in a few places to narrow down long processing time conditions.
Version 2.0.2 - 5/1/2013
· Removed .NET CSV parsing libraries, replaced them with open source CSV reader using firehose cursor style stream reader.
· Plumbed in remaining grids to use Infragistics 3rd party grid controls which handle large rows better.
· Optimized parsing for large numbers of users and lists via CSV for bulk import and export functions.
Version 2.0.1 – 4/15/2013
· Converted project to C#, code reorganization.
· Switched from using DataReaders and ODBC to .NET data provider and DataTables.
· Switched from Access database settings to SQLite.
Version 1.0.0.26 – 3/7/2013
· Added more error handling.
· Updated CSV parsing routines to handle ill formed data and null string parsing better.
Version 1.0.0.25 – 1/20/2013
· Updated for Windows 8 installations
Version 1.0.0.24 - 11/14/2012
· Updated extension range query to include only primary extensions to avoid problems with potential non numeric alternate extensions.
Version 1.0.0.23 – 7/20/2012
· Updated to full .NET 4.0 library
· Updated Infragistics grid library
· Fixed problem with alias/name creation to handle forcing lower case for conflict checks.
Version 1.0.0.22 – 10/18/2010
· Fixed a problem with the version fetching routine that was expecting only digits in the build token – text is allowed in some EFT build numbering schemes.
· Fixed a problem parsing very large CSV files for public and private distribution list updates where memory would not be released and the UI would not update in a timely fashion.
· Added row count roller to splash screen during large CSV parsing.
Version 1.0.0.21 – 7/28/2010
· Fixed a problem with bulk public DL management where the MEMBER_DISPLAY_NAME column was being required when it should not have been.
· Updated to the qSetup framework
· Make installation changes to support working on x64 OS installs
Version 1.0.0.19 – 5/18/2010
- Updated UI items in the wizard. Made drop down lists read only, changed the wording on some options and fixed some typos in the help file.
- Changed threading model on large queries to avoid problems with grid binding errors resulting the red “X” rendering of the grid control on the user select form.
- Fixed an issue with private list user population where users outside of the local location (i.e. global users) were not being found by alias or extension.
- Changed the logic behind alias and extension search criteria to handle duplicates in a networked environment better.
- Changed default CSV file naming convention to include server name for uniqueness.
- Fixed cosmetic issues with traveling back and forth in wizard and selecting different functions without exiting – forced the select-all checkbox to be cleared, forced user or list count text box to zero out, forced drop down selection combo box to show only local users when working with private lists.
- Added logic to remove failure parsing logs for CSV import functions when they contain no actionable data.
Version 1.0.0.10 – 5/5/2010
- Added new functionality to export and import private list data via CSV.
- Added new functionality to export and import public list data via CSV.
- Added ability to move back and forth in wizard and reset functions on the fly without having to exit the application and start over each time.
Version 1.0.0.8 – 4/2/2010
- Added the ability to select global users in a network instead of only local users.
- Updated partition selection drop down to include only local partitions.
- Changed default grid sort to be enforced on all selects.
Version 1.0.0.7 – 12/21/2009
· Updated connection string to force both DB and CLIENT locales to us_utf8 to avoid problems with double byte character strings.
Version 1.0.0.6 – 11/25/2009
· Updated some UI issues on the subscriber selection page.
- Changed the user query for all the options to
use a background task which allows for large queries to work better and
allow cancels cleanly
Version 1.0.0.4 – 10/6/2009
- Added automatic version checking option to the About box.
Version 1.0.0.3 – 8/27/2009
- Added multiple server login/PW memory with Windows user name filtering.
- Upgraded Infragistics 3rd party controls to 2009.1 rev.
Version 1.0.0.2 – 8/6/2009
- Fixed some button location problems when resizing
Version 1.0.0.1 – 6/2/2009
- First beta release
© 2018 Cisco Systems, Inc. -- Company Confidential