Cisco User Data Dump
Connecting
to Unity Connection 7.x or Later
Task
2: Set the Database Proxy Service Shutdown Time
Task
3: Activate the Remote Database Proxy Service
Task
4: Login to the Remote Server
Troubleshooting
Remote Login Issues
Double
Check Connection Server Settings
Disable
CSA and all Virus Scanning Applications
Make
sure the Informix .NET Driver is Installed and the PATH Points to it.
Emailing
Results of Scheduled Runs Automatically
Exports
of Call Manager Sync Status on Business Edition (CoResident) Installations
Overview
The mission of the User Data Dump
utility is simple. To allow folks
to quickly dump out specific information about the users in their system to a
file they can view or import into another application such as a database
utility or Excel or whatever. The file
generated automatically creates a header row that lists the data type found in
that column of the output for ease of import into other programs. Note that the column headers may not
match up to what is used by other utilities such as BAT or Bulk Migration tool
etc… so you may need to edit
them based on what application you’re trying to import with.
A full list of the fields you can drop out are available below.
The User Data Dump version 8 and later is a simple 4 page wizard that walks you through selecting the output location, the users to dump and then what items for those users you wish to output. The details of each page of the wizard are covered below.
You can also scheduled User Data Dump to export regularly and even email you the results of the output of those unattended exports. The details of how to configure this are covered in the Scheduling Exports section below.
Requirements/Special Notes
This version of User Data Dump runs on Windows
XP/2000/2003/2008,
You must Install the 32 bit Informix Client SDK version 3.5 or later including the .NET drivers even if you are running on a 64 bit version of your operating system. The User Data Dump tool is strictly 32 bit. See the Informix Driver Download Page for details.
This version of User Data Dump only works with Unity Connection 7.0(1) or later.
You must enable the ODBC proxy service on the Unity Connection server and attach to the database using an account enabled for the remote database access role. See the next section for details on this.
This tool uses Microsoft’s full .NET 4.0 library (the limited “client” version of .NET 4.0 is not sufficient). The installation will check to see if you have that installed and if not will offer you the option to download and install it automatically.
Connecting to Unity Connection 7.x or Later
For installations of 7.0(1) and later you need to use the database proxy service for access to the database from off box for any DB tool including User Data Dump.
Task 1: Configure a User without a mailbox with the Remote Administrator and System Administrator roles
1. Go to the Cisco Unity Connection Administration web interface for your installation.
2. You can leverage a user with or without a mailbox for off box data access purposes, but it’s suggested that you create a new user without a mailbox that is used solely for the purpose of remote administration tasks for security reasons.
3. Be sure the web administration password for this user is not configured to require a change at first login on the “Password Policy” page for that user.
4. If necessary, change the web administration password on the “Change Password” page. Note that only the web application password comes into play for remote data access.
5. Finally,
on the “Role” page for the user, add the “Remote
Task 2: Set the Database Proxy Service Shutdown Time
NOTE: For Unit Connection 10.0(1) and later this step is not necessary as there is no longer a Database Proxy Service Shutdown Time.
Out of the box the database proxy service is not running and if you try to start the service it will shut down right away. First you need to set the “Database Proxy: Service Shutdown Timer” value found in the System Settings -> Advanced -> Connection Administration section of the Cisco Unity Connection Administration page. By default this is 0. You can set it to as high as 999 days if you like. After the number of days configured here the remote database proxy service will shut down. This is useful if you want to do some migration work, for instance, and don’t want to forget to have the service disabled for security reasons.
NOTE: If you restart the server on versions prior to Unity Connection 10.0(1), the remote database proxy service will remain shut off. After a system restart you have to go in and manually turn on the service again (see step 3)
Task 3: Activate the Remote Database Proxy Service
1. Out of the box the service that listens to remote database requests is not active, you must turn it on. To do this, go to the “Cisco Unity Connection Serviceability” web admin page.
2. On the Tools menu, select the “Service Management” page.
3. The “Connection Database Proxy” item under the “Optional Services” section will be marked as “Deactivated” and stopped. Press the “Activate” button and it will be activated and started automatically.
Once you’ve started the proxy service you can connect with any tool that needs off box database access using the user name, web administration password and port “20532”.
NOTE: For versions of Unity Connection prior to 10.0(1) the service will automatically shut down after the number of days configured in step 2 above or if you restart the server.
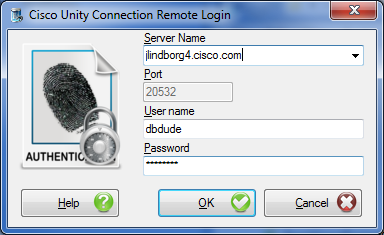
Task 4: Login to the Remote Server
When you first start User Data Dump, you will see a login dialog box that will be empty except for port 20532 filled in as the default for the port. You must provide the server name or IP address for the “Server” field and provide the login and password for the database connection account. Use the alias and web administration password of the database user created above for the login and password fields.
User Data Dump will remember your entries including the password (which is stored in a secure hash). Each time you run User Data Dump it will load the settings of the last connection you made. Every server you’ve successfully connected to in the past will be listed in the drop down list in the order in which you connected to it last – most recent to least recent.
NOTE: The login and password information is stored along with the local Windows login name. Only those servers that have been attached to successfully using the current Windows login will be listed. If you are logging into the same Windows server with different users you will only see servers connected to with that particular Windows login.
NOTE: Providing the wrong password or login will fail quickly and give you a chance to try a different pair. Providing an incorrect server or port, however, results in a 60 second timeout while UDD waits for the Informix driver to return. Unfortunately this cannot be shorted. Type carefully.
Troubleshooting Remote Login Issues
Double Check Connection Server Settings
Make sure the remote database proxy service is running. This service does shut itself off after a period of time and does not start itself automatically on a server reboot.
Make sure the user you are logged in as has the remote administrator role assigned to their account, that their password is not set to reset at the next login and that their account is not currently locked.
Make sure the server name or IP address you are using to connect with is reachable from your Windows client. DNS issues often come up in connection failures.
Disable CSA and all Virus Scanning Applications
It’s a good idea to disable CSA and all virus scanning applications if you are having problems connecting to be sure the ODBC port (20532) is not being blocked. Also check your firewall settings (assuming you are running one).
Make sure the Informix .NET Driver is Installed and the PATH Points to it.
For 32 bit OS installs, the IBM Informix driver is installed in C:\Program Files\IBM\Informix\Client-SDK. Make sure this path exists on your server and has not been removed or renamed.
The system PATH variable will also include a reference to the “\IBM\Informix\Client-SDK\bin” location where the driver is installed. Make sure this path is referenced in the PATH. Also, if the PATH is very long sometimes the Informix driver will not find it, try moving it to the beginning of the PATH statement.
If you had an older version of the IBM Informix Client SDK installed it's a good idea to uninstall all other versions and make sure you have a single instance of the SDK 3.5 or later. Mixing versions of Informix drivers is not a good idea as only one can be active at a time.
Using User Data Dump
User Data Dump is a simple four page wizard – each page is covered here.
Wizard Intro
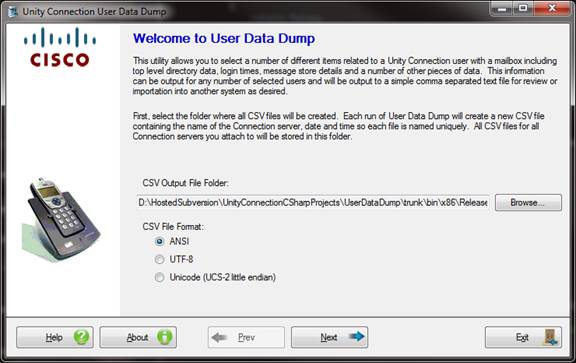
On the opening page you can pick the output folder where all CSV files will be output and optionally the file format. The default ANSI format is usually fine but if you have a need for UTF-8 (without BOM) or basic Unicode format you can choose those here. Once selected the file format will default to that option each time its run in the future.
All CSV files for all Connection servers you attach to and export data from on the client you’ve installed User Data Dump on will be placed here. If you change the default location (the “CSV” folder under the install directory for UDD), then all exports run manually or scheduled will store their CSV output files here. The CSV file names will indicate the Connection server name as well as the time/date the export was run. The file name for the CSV output files is constructed like this:
“Unity Connection User Data Dump_[server name]_CSV_Output_[date/time].CSV”
These files are not deleted or cleaned up automatically (the log files are) so be sure to remove old ones that you no longer want to keep around as needed.
The Log files (for diagnostic purposes) are always stored in the “Logs” folder off the install directory for UDD – this is not configurable. The logs file folder is cleaned up to remove logs older than 30 days on each run of UDD so if you need to save off a log file for whatever reason, be sure to move it out of that directory.
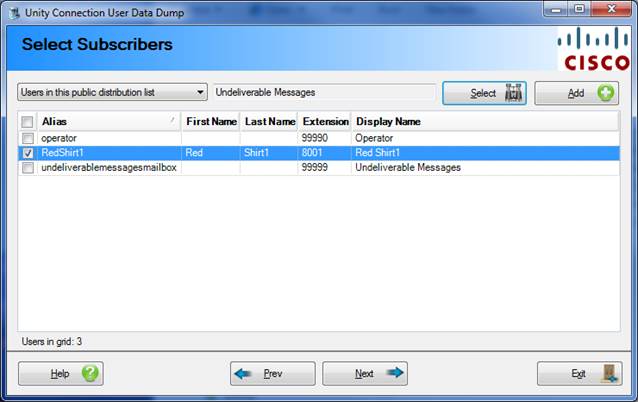
Selecting Users for Output
The 2nd page of the wizard allows you to select which users you wish to dump information out for. Note that UDD can only output users homed locally on the Connection server you’ve attached to, it cannot include information about users replicated across a digital network. You will need to run UDD against each Connection server (or cluster if you’re using high-availability installs) in your network if you wish to get information about all users. You must select at least one user for output before moving on to the next page in the wizard.
There are several ways you can select users for output:
· All Local Users.
· Users in this class of service. Select a COS in the drop down box that shows up with this option and hit the “Add” button.
· Users in this extension range. Enter a starting and ending extension range and hit the “Add” button.
· Users in this CSV file. Select a CSV file that contains a column titled “EXTENSION” and or “ALIAS” and users with be searched for by one or both of those fields for selection.
· Users associated with this phone system. Select a phone system from the drop down that shows up with this option and all users assigned to that system will be added to the grid.
· Users with this string in their display name. You can any string and all users that contain all or part of that string in their display name will be added to the grid. The search is not case sensitive.
· Users in this public distribution list. Select a public distribution list and all users with mailboxes on the local Connection server in the top level of that list will be added to the grid. Note that this is NOT a recursive search meaning it will not look into members of other public lists included in the selected public list.
· Users associated with this search partition. Select a search partition and all users on the local Connection server assigned to that partition will be added to the grid.
NOTE:
By default you must select the users you wish to output on each run of
UDD. If, however, you run UDD with the “/AlwaysLoadLastSelectedUsers” command line option the last set of users chosen
for the Connection server you are attaching to will automatically be loaded
again (assuming they still exist on the server). You can also use the /AlwaysLoadAllUsers if you wish to have all local users (even if they change
over time) selected for output – this can be useful if you are driving
User Data Dump via scripts or the lie.
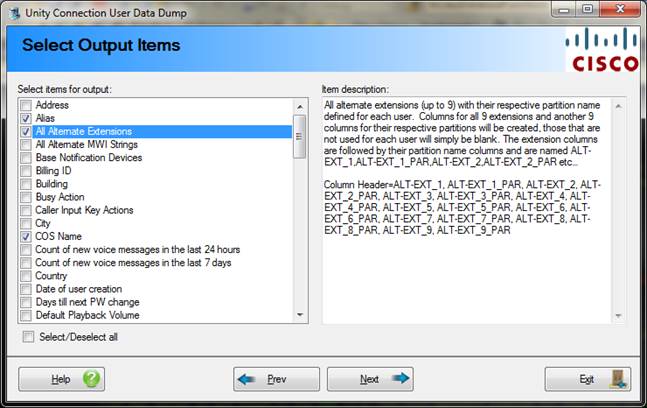
Selecting Items for Output
The 3rd page on the wizard allows you to select which items you want to have output for each user selection on the 2nd page of the wizard.
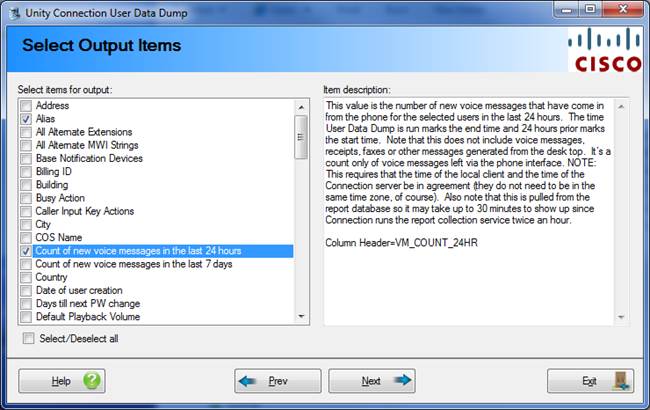
In version 8 and later of UDD the full description and header column construction for each item is displayed on the right hand side of the screen automatically when selected on the left – this is largely the same information found in the help file in the secitons below. You must select at least one item before moving on in the wizard.
NOTE: Any items to select for a particular Connection server will be saved and reloaded automatically the next time you run UDD against that Connection server.
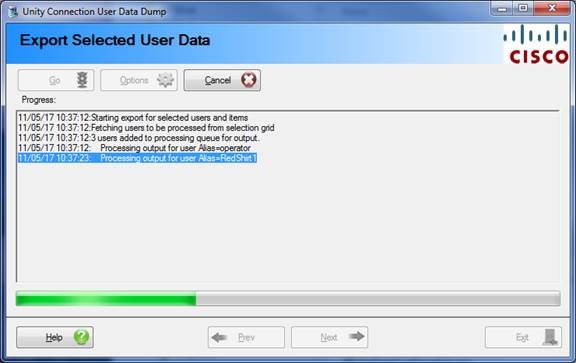
Executing Export
The 4th and last page of the wziard is the execution page. Primarily this is just for allowing you to start the export, monitor it’s progress and cencel it if you desire. However the “Options button” also provides numerous important functions detailed below.
Options Button Items
· Scheduled Run Options. This allows you to schedule User Data Dump to run at a later time or at regular intervals against a particular Connection server and optionally have the output emailed to you. See the Scheduling Exports section below for more details.
· Debug Mode. Allows you to turn on/off debug mode. When in debug mode User Data Dump outputs much more information to the log files such as all queries executed against the remote Connection database. This slows down the processing of users and expands the size of the log files generated so it’s best to leave this off unless there’s a specific need for it.
· Execution Priority. This allows you to set the processing speed of User Data Dump to high, medium or low. High speed processing means UDD will run faster but will add additional load to Connection. Low speed processing will take longer but will impact the Connection server’s processing less. If you are running UDD during heavy call traffic times it’s best to run at low priority.
· CSV Output Options. This allows you to decide if all items are wrapped in quotes when output (by default only items containing a comma are quoted) and if you want to use comma separated or tab separated output for the file construction.
· Save Settings. This saves the current user selection and item selection into the local Access database used by User Data Dump. These settings are saved on a per Connection server basis and are used for scheduled runs of UDD. If you’re scheduling backups you can select users and items and configure the backup then select to save settings and exit without doing the export if you wish. The save settings is done when you run an export as well.
Field Definitions
The following is a list of all the fields you can optionally have User Data Dump include in the CSV output. You can select one or as many items as you like.
- Address. Mailing address of user.
- After Greeting Action. This will dump
out a human readable description for what happens to the caller after
hearing any of the 7 greeting types for a call handler (standard, busy,
off hours, error, internal, alternate, holiday).
- Alias.
The Exchange alias of the
user.
- All
Alternate Extensions. All
alternate extensions (up to 9) with their respective partition name
defined for each user. Columns
for all 9 extensions and another 9 columns for their respective partitions
will be created, those that are not used for each user will simply be
blank. The extension columns are followed by their partition name columns
and are named ALT-EXT_1,ALT-EXT_1_PAR,ALT-EXT_2,ALT-EXT_2_PAR
etc…
- All
Alternate MWI Strings. All
alternate MWI strings (up to 9) defined for each user. Columns for all 9 alternate MWI
strings will be created, those that are not used for each user will simply
be blank.
- Alternate Notification Devices. For all
notification devices that have been defined for users beyond the base set
of 5 devices (Home Phone, Work Phone, Pager Phone, Mobile phone, SMTP, HTML) this
option will output the device name, it’s type (Phone, Pager, SMTP,
HTTP or SMS) if it’s enabled (0 = disabled, 1 = enabled) and its
target (phone number or address) if configured. 10 devices are output (4 columns
per device – 40 columns total), if fewer than 10 alternate
notification devices are defined for a user then the remaining columns
will simply be blank. If more
than 10 devices are defined then only the first 10 will be represented in
the output. Column Header=ALTERNATE_NOTIFICTAION_DEVICE_1_NAME, ALTERNATE_NOTIFICTAION_DEVICE_1_TYPE,
ALTERNATE_NOTIFICTAION_DEVICE_1_ACTIVE,
ALTERNATE_NOTIFICTAION_DEVICE_1_DESTINATION,ALTERNATE_NOTIFICTAION_DEVICE_2_NAME,
ALTERNATE_NOTIFICTAION_DEVICE_2_TYPE,
ALTERNATE_NOTIFICTAION_DEVICE_2_ACTIVE, ALTERNATE_NOTIFICTAION_DEVICE_2_DESTINATION,ALTERNATE_NOTIFICTAION_DEVICE_3_NAME,
ALTERNATE_NOTIFICTAION_DEVICE_3_TYPE,
ALTERNATE_NOTIFICTAION_DEVICE_3_ACTIVE,
ALTERNATE_NOTIFICTAION_DEVICE_3_DESTINATION,ALTERNATE_NOTIFICTAION_DEVICE_4_NAME,
ALTERNATE_NOTIFICTAION_DEVICE_4_TYPE,
ALTERNATE_NOTIFICTAION_DEVICE_4_ACTIVE,
ALTERNATE_NOTIFICTAION_DEVICE_4_DESTINATION,ALTERNATE_NOTIFICTAION_DEVICE_5_NAME,
ALTERNATE_NOTIFICTAION_DEVICE_5_TYPE,
ALTERNATE_NOTIFICTAION_DEVICE_5_ACTIVE,
ALTERNATE_NOTIFICTAION_DEVICE_5_DESTINATION,ALTERNATE_NOTIFICTAION_DEVICE_6_NAME,
ALTERNATE_NOTIFICTAION_DEVICE_6_TYPE,
ALTERNATE_NOTIFICTAION_DEVICE_6_ACTIVE,
ALTERNATE_NOTIFICTAION_DEVICE_6_DESTINATION,ALTERNATE_NOTIFICTAION_DEVICE_7_NAME,
ALTERNATE_NOTIFICTAION_DEVICE_7_TYPE, ALTERNATE_NOTIFICTAION_DEVICE_7_ACTIVE,
ALTERNATE_NOTIFICTAION_DEVICE_7_DESTINATION,ALTERNATE_NOTIFICTAION_DEVICE_8_NAME,
ALTERNATE_NOTIFICTAION_DEVICE_8_TYPE,
ALTERNATE_NOTIFICTAION_DEVICE_8_ACTIVE,
ALTERNATE_NOTIFICTAION_DEVICE_8_DESTINATION,ALTERNATE_NOTIFICTAION_DEVICE_9_NAME,
ALTERNATE_NOTIFICTAION_DEVICE_9_TYPE,
ALTERNATE_NOTIFICTAION_DEVICE_9_ACTIVE,
ALTERNATE_NOTIFICTAION_DEVICE_9_DESTINATION,ALTERNATE_NOTIFICTAION_DEVICE_10_NAME,
ALTERNATE_NOTIFICTAION_DEVICE_10_TYPE,
ALTERNATE_NOTIFICTAION_DEVICE_10_ACTIVE, ALTERNATE_NOTIFICTAION_DEVICE_10_DESTINATION
- Base Notification Devices. This outputs information about the
6 build in notification devices created for all users with mailboxes in
Connection. It includes the
destination of the device (either a phone number or an email address) and
if each device is active or not (1 means active, 0 means disabled). Note that the HTML notification
device is only present in Connection 9.0 and later, for earlier versions
this will always show up simply as a disabled device in the output. Selecting this option will add 10
columns to the output: HOME_PHONE_ACTIVE, HOME_PHONE_DESTINATION,
WORK_PHONE_ACTIVE, WORK_PHONE_DESTINATION, PAGER_ACTIVE,PAGER_DESTINATION,
MOBILE_PHONE_ACTIVE, MOBILE_PHONE_DESTINATION, SMTP_ACTIVE,
SMTP_DESTINATION, HTTP_ACTIVE, HTTP_DESTINATION
- Billing
ID. The billing Id value
for this user. You’ll
find this on the Edit User Basics page for the user on the SA.
- Building. Building name of user.
- Busy Action. This value represents what Unity
Connection will offer the caller as options in the case the user’s
extension is busy. A value of
“0” means no holding will be offered (i.e. the caller is sent
right to the user’s greeting).
A value of “1” means Unity Connection will always offer
to hold (the caller can always over ride that and go to the greeting,
however). A value of
“2” means Unity Connection will ask the caller if they would
like to hold or not. This
value can include the alternate, standard and closed transfer rule for
users.
- Caller Input Key Actions. This value will dump out a human readable action string for each
of the 12 user input keys for all users. Columns
“CALLER_INPUT_0” through “CALLER_INPUT_9”,
“CALLER_INPUT_*” and “CALLER_INPUT_#” will be
added to the output. The
action strings for these columns will read like “Send to greeting
for call handler: operator”, or “Ignore”, or “Take
Message”. The strings
will look very similar to what you see on the user input key page in the
SA.
- Call Manager ID. For Business
Edition installations with Unity Connection and Call Manager on a single
installation, all users in Connection are imported from Call Manager and
the Call Manager ID is filled in.
If the ID is blank then this means the user is
“orphaned”, meaning the user in Call Manager’s database
has likely been removed or the user was created directly in Connection and
not properly imported from Call Manager. This value will always be blank for
stand alone installations of Connection, it only
has meaning for Business Edition installations.
- Call Manager ID Type. This value
represents the type of Call Manager object a Call Manager Id
represents. Types include 0:
End User, 1: Application User, 2: Directory Number, 3: LDAP User, 4:
Inactive LDAP User
- Call Manager ID Sync Status. Used to determine if users in the
Connection database are properly “linked up” with objects in
Call Manager’s database for Business Edition (“CoResident”) installation types. This value will not work and will
have no meaning in stand alone
installations. This will
output 0 if there is no Call Manager ID for the user, 1 if the Call
Manager Id in Connection matches that in Call Manager and 2 if they both
have IDs but they do not match (meaning they are not linked
properly). NOTE: this requires
that AXL be configured, enabled and the account you are logging in with
User Data Dump as to have AXL rights.
See the section on configuring this
for more.
- City. City name for user.
- COS
Name. The display name of
the Class Of Service this user is associated
with.
- Count of new voice messages in the last
24 hours. This value is the number of new voice messages that have come in
from the phone for the selected users in the last 24 hours. The time User Data Dump is run
marks the end time and 24 hours prior marks the start time. Note that this does not include
voice messages, receipts, faxes or other messages generated from the desk
top. It’s a count only
of voice messages left via the phone interface. NOTE: This requires that the time of the local client and
the time of the Connection server be in agreement (they do not need to be
in the same time zone, of course).
Also note that this is pulled from the report database so it may
take up to 30 minutes to show up since Connection runs the report
collection service twice an hour.
- Count of new voice messages in the last
7 days. This value is the number of new voice messages that have come in
from the phone for the selected users in the last 7 days. The time User Data Dump is run
marks the end time and 7 days prior marks the start time. Note that this does not include
voice messages, receipts, faxes or other messages generated from the desk
top. It’s a count only
of voice messages left via the phone interface. NOTE: This requires that the time of the local client and
the time of the Connection server be in agreement (they do not need to be
in the same time zone, of course).
Also note that this is pulled from the report database so it may
take up to 30 minutes to show up since Connection runs the report
collection service twice an hour.
- Country. Country name
for user.
- Date of user creation. The date the user was added to the
Unity Connection system.
- Days till next PW change. (Only
available in stand alone installation) How many days are left till the user
will be required to change their phone password. This field is blank if the user has
“Password never expires” on their PW policy page or if the
system wide password policy does not enforce password expirations.
- Default Playback Volume. This will return “Medium” (default),
“Louder” or “Quieter” depending on what the
playback value is set to on the user’s messages page.
- Department name. Department name for user.
- Display
Name. The display name property from Exchange.
- EMAIL Address (corporate email). For Connection 8.5 and later this
will include the corporate email address for users. This is not the same as the SMTP
address available below which is specific to Connection. The EMAIL Address is the address
where user’s get their external email sent.
- Employee ID.
- Encryption Type. This value
will show you type of encryption used to generate the credentials for the
user’s PIN. The two more
common values you will see here are 2 (SHA1) and 1 (MD5). It’s possible to see 0
(unknown) or 3 (IMS style hash) but these are not common. SHA1 has been in use since the
release of Unity 7.0 and Connection 2.1 – however backups of older
Unity servers that are imported into Connection will preserve their MD5
style until they’ve been changed. Using this output can be helpful in
seeing who has yet to update their PINs before enabling FIPS mode on a
Connection 8.6 or later server.
- First
Name. The first name property from Exchange for this user.
- Greetings Enabled. This value will show you if the closed, alternate, busy or
internal greetings are enabled for each user or not. The columns
“GREETING_ALTERANATE_ACTIVE”,
“GREETING_BUSY_ACTIVE”, “GREETING_INTERNAL_ACTIVE”,
and “GREETING_CLOSED_ACTIVE” will be added to the output. A value of “0” means
the greeting is not active and a value of “1” means it
is. Remember that the standard
and error greetings are always active no matter what so they are not
included in the output here.
- Greetings Source. This value will show you what the greeting source (blank, system,
user recorded) of the standard, closed, alternate, busy, holiday or
internal greetings are. The
columns “GREETING_STANDARD_SOURCE”, “GREETING_ALTERANATE_SOURCE”,
“GREETING_BUSY_SOURCE”, “GREETING_INTERNAL_SOURCE”,
“GREETING_HOLIDAY_SOURCE” and
“GREETING_CLOSED_SOURCE” will be added to the output. A value of “0” means
the system greeting will played (generated by system), a value of 1 means
a custom recorded greeting will play and a value of 2 means blank (nothing)
will play.
- HTML Notification Device. This outputs
information about the default HTML notification device for all users
selected in Unity Connection 9.0 and later. It includes the destination of the
device (an email address) and if the device is active or not (1 means
active, 0 means disabled) and what the callback number is set for as well
as the HTML device template name.
Column Header=HTML_ACTIVE,HTML_DESTINATION, HTML_CALLBACK_NUMBER,
HTML_TEMPLATE_NAME
- Language. Outputs the MS NT standard 3
letter codes for languages.
ENU is US English, JPN is Japanese etc… I include a list of 3
letter language codes below.
- Last
Name. The last name property from Exchange for this user.
- LDAP ID. Unique
identifier (32 char GUID) for a user in Call Manager's database. Even in a stand
alone installation of Unity Connection the LDAP synch works with a
local Call Manager controlled database which syncs objects with the LDAP
store, this ID is from that database.
- LDAP User ID. Unique identifer (128 char ID) from the LDAP store (such as
Active Directory) for an LDAP syncronized user.
- LDAP Type. For use with the LDAP_ID and
LDAP_USER_ID values - indicates the tpe of LDAP
user this is. Values can be 0:
no LDAP integration, 1: LDAP synchronization enabled , 2: LDAP authentication
enabled and 4: LDAP is enabled but temporarily inactive for user
- List
In Directory. Either 0 or 1. 0 means the user will not be listed
in the alpha directory where outside callers can find them by spelling
their name. A 1 indicates they
will be listed.
- Location
Name. The display name of
the location object this user is associated with. In a multiple Unity Connection
server digital networking configuration this can be handy information.
- Mailbox deleted message count. The total number of deleted
messages in the user’s inbox.
This applies only if the user is associated with a Class of Service
that copies deleted messages into the deleted items folder instead of
immediately purging them.
- Mailbox oldest unread message (in days). Outputs the number of days older
the oldest unread (new) message in each user’s mailbox is. If there are no unread messages in
the user’s mailbox, 0 is output for this
field.
- Mailbox read message count. The total number of messages that are
marked as read in the user’s inbox.
- Mailbox read secure message count. The total number of secure messages that
are marked as read in the user’s inbox.
- Mailbox Send Quota (in
bytes). Maximum number of
bytes the user can have in their inbox before they will no longer be
allowed to send new voicemail messages.
- Mailbox Send/Receive Quota (in
bytes). Maximum number of
bytes the user can have in their inbox before they will not longer be allowed to send or receive voicemail
messages.
- Mailbox size (in bytes). Total size in bytes of all messages in
the users inbox.
- Mailbox store name. The name of the mailstore
the subscriber’s mailbox is stored on.
- Mailbox unread message count. The total number of messages that are
marked unread (new) in the user’s inbox.
- Mailbox unread secure message
count. The total
number of secure messages that are marked unread (new) in the user’s
inbox.
- Mailbox read messages older than 7 days. The number of messages currently in
the users’ mailbox that are read (saved) and arrived 7 days ago or
more. NOTE: This requires that the time of the
local client and the time of the Connection server be in agreement (they
do not need to be in the same time zone, of course).
- Mailbox read messages older than 30 days. The number of messages currently in
the users’ mailbox that are read (saved) and arrived 30 days ago or
more. NOTE: This requires that the time of the
local client and the time of the Connection server be in agreement (they
do not need to be in the same time zone, of course).
- Mailbox read messages older than 60 days. The number of messages currently in
the users’ mailbox that are read (saved) and arrived 60 days ago or
more. NOTE: This requires that the time of the
local client and the time of the Connection server be in agreement (they
do not need to be in the same time zone, of course).
- Mailbox unread messages older than 1 day. The number of messages currently in
the users’ mailbox that are unread (new) and arrived 24 hours ago or
more. This can be useful in
finding mailboxes that are not being used. NOTE:
This requires that the time of the local client and the time of the
Connection server be in agreement (they do not need to be in the same time
zone, of course).
- Mailbox unread messages older than 7
days. The number of messages
currently in the users’ mailbox that are unread (new) and arrived 7
or more days ago. This can be
useful in finding mailboxes that are not being used. NOTE:
This requires that the time of the local client and the time of the
Connection server be in agreement (they do not need to be in the same time
zone, of course).
- Mailbox unread messages older than 30
days. The number of messages
currently in the users’ mailbox that are unread (new) and arrived 30
or more days ago. This can be
useful in finding mailboxes that are not being used. NOTE:
This requires that the time of the local client and the time of the
Connection server be in agreement (they do not need to be in the same time
zone, of course).
- Mailbox unread messages older than 60
days. The number of messages currently in the users’ mailbox that
are unread (new) and arrived 30 or more days ago. This can be useful in finding
mailboxes that are not being used.
NOTE: This requires that the
time of the local client and the time of the Connection server be in
agreement (they do not need to be in the same time zone, of course).
- Mailbox Warning Quota (in
bytes). Maximum number of
bytes the user can have in their inbox before they will start getting a
warning each time they log in that their mailbox is “almost
full”
- Manager.
- Maximum
Message Length. The
maximum length of messages (in seconds) that outside callers can leave
this user.
- Message Action Settings. Outputs all
4 message action settings and the email relay address configured for the
user. The message actions
include a number describing what Connection will do with inbound email,
faxes, voice mail and receipts for a user. The actions are as follows: 0=reject
the message, 1=accept the message, 2=relay the message to the relay
address or 3=accept and relay a copy of the message to the relay address.
- Message Aging Policy. Outputs the name of the message
aging policy that the selected user’s mailboxes are associated with.
- Message Playback Speed. Outputs the
message playback speed as a value from 50 (half speed) to 200 (double
speed). Default is 100
(regular speed).
- Message Playback Volume. Outputs the
message playback volume as a value from 0 (very quiet) to 100 (very
loud). Default is 50 (normal
volume)
- Partition Name. Name of the
partition that the user is assigned to.
- Password Encrytpion
Type. Either MD5, SHA1 or
Empty (if no password is set).
Used for situations where FIPS is going to be enabled on a server
which does not support MD5 so users with older passwords from a previous
upgrade/import who have never updated their passwords are in the system
still can be alerted to change their password.
- PIN Encryption Type. Either MD5,
SHA1 or Empty (if no PIN is set).
Used for situations where FIPS is going to be enabled on a server
which does not support MD5 so users with older PINs from a previous
upgrade/import who have never updated their PIN are in the system still
can be alerted to change their PIN.
- Post Greeting Recording Setting. Outputs the post greeting recording
setting for each user. The
value will be either 0 (post greeting recording not enabled for this
user), 1 (post greeting recording always plays) or 2 (post greeting
recording played to external callers only).
- Postal Code.
- Primary
Extension. The primary
extension number value from Unity Connection (i.e. the value you dial to
sign into your mailbox when calling in over the phone to check
messages). This value is not
visible in the Exchange admin.
- Primary MWI Phone System. The display
name of the phone system that the primary MWI device is tied to.
- Primary MWI Status. Either 1 for “on” or 0 for “off”. This is the status of the
user’s MWI as Unity Connection knows it (i.e. if we think
we’ve turned it on or off).
- Primary
MWI String. The number
configured on the MWI box on the messages page of the user. By default the SA page shows
“X” which means to replace it with the extension number for
this user. For this reason
it’s always a good idea to include the extension as well when you
want to see the MWI string.
- Prompt
Playback Speed. Outputs the prompt (menu) playback
speed as a value from 50 (half speed) to 200 (double speed). Default is 100 (regular speed
- Public Distribution List Membership.
This will produce a single column that contains all the public
distribution lists that Unity Connection knows about that each users is a
member of. The aliases of the
distribution lists will be separated by semicolons which looks something
like this “allusers;unaddressedmessages;marketingsouth”.
- Receive Secure Message Setting. Per user setting that dictates if
messages left by outside callers are marked secure or not. 0 is off, 1 is on.
- Rings To Wait.
The number of rings to wait that are configured for the transfer
rule on the user. NOTE: If the transfer is disabled (i.e. the transfer
type above is “0”) or the transfer type is release (transfer type
is “1” above) then this value is meaningless and may show up
as “4” which is the default. This value can include the
alternate, standard and closed transfer rule for users.
- Role names user is assigned. Every role (if any) that each user is
assigned to will be output in a comma separated list bounded by quotes in
this column. For instance
“Greetings Administrator, Remote Administrator” could be
included. There are up to 8 roles
currently (in Connection 8) that can be assigned, however you’d
never assign them all to any one user.
- Schedule
Name. The name of the
schedule this user is associated with. The schedule determines when the
“standard” vs. “closed” greetings are played.
- Send Secure Message Setting. Setting pulled from the class of
service the subscriber is configured for. The value is either
“Always” for always mark messages secure, “Never”
for never mark secure, “Ask” for ask the caller or
“Private” to set all private messages secure.
- Set
for First Time Enrollment. Either
0 or 1. 0 means the user is no
longer flagged for first time enrollment, a 1 means they are. Typically an administrator will set
everyone up for first time enrollment and when they call in and go through
the enrollment this flag is set to 0.
This can be a handy way of telling who has not yet setup their
mailbox so admins can go by and gently remind users they need to do this.
- Set to Use Brief Prompts. Either 0 or 1. Outputs 1
(true) if the subscriber is configured to use brief prompts in their
conversation or 0 (false) if they are set to use full prompts instead.
- SMTP Address (Connection specific). The internal SMTP Address used by
Connection for message delivery.
- State. State name for user.
- Switch
Name. This value indicates
which switch a user is associated with in a multiple switch installation.
- Time
of Last Call. Indicates
the date and time the user called in to check messages last. This can be handy for finding out
which boxes have not been access at all or which ones have not been
accessed in a long time. This
value is converted into the local time of the computer you are running
User Data Dump on.
- Time
of last password change. Indicate the date and time the user
changed their phone password (PIN).
This value is converted into the local time of the computer you are
running User Data Dump on.
- Time zone. The name of the time zone the selected
users are associated with.
- Title. User’s title.
- Touchtone conversation name. The name of the touchtone subscriber
conversation will be included in this field. “SubMenu”
is the default (standard) conversation, “SubMenu_AlternateN”
is the Alternate N conversation and so on. All users have a touchtone
conversation style even if they are configured to use the voice
recognition input style.
- Total phone logins for the last 7 days. The number of good logins via the
phone interface into user's mailboxes in the last 7 days. This does not take into account
failed attempts to log into mailboxes, that can be checked with a separate
output item.
- Transfer Number. This will be the dial string
configured for the transfer rules of a user. This value will include the
alternate, standard and closed transfer rule for users.
- Transfer Type.
This will be “-1” if the transfer rule is disabled,
“0” if it’s enabled but the rule is set to go to the
greeting and not ring a phone, “1” if it’s configured to
do a release transfer or “2” if it’s configured for a
supervised transfer or “99” if this transfer rule is
configured to launch the personal call transfer rules (PCTR) for the
subscriber. This value can include the alternate, standard and closed
transfer rule for users.
- User generated mailbox activity detected
in the last 60 days. How outputs a
1 if there's been any user generated activity detected for each mailbox
and 0 if there has not been any in the last 60 days. This can be helpful for finding
mailboxes that are no longer in use.
Note that mailboxes that have been created less than 60 days ago
will get a -1 value for this field.
- User generated mailbox activity detected
in the last 90 days. How outputs a
1 if there's been any user generated activity detected for each mailbox
and 0 if there has not been any in the last 90 days. This can be helpful for finding
mailboxes that are no longer in use.
Note that mailboxes that have been created less than 90 days ago
will get a -1 value for this field.
- User generated mailbox activity detected
in the last 180 days. How outputs a
1 if there's been any user generated activity detected for each mailbox
and 0 if there has not been any in the last 180 days. This can be helpful for finding
mailboxes that are no longer in use.
Note that mailboxes that have been created less than 180 days ago
will get a -1 value for this field.
- User Lockout Status. (Only
available in stand alone installation) Either 0 for “not locked out” or 1 for “locked
out”. This indicates if
Unity Connection has locked a users account as a
result of too many login failures over the phone.
- Voice Name Recorded.
This will return a “1” if the user has a voice name
recorded or a “0” if they do not.
- Voice Name WAV File ([ALIAS]_VOICE_NAME.WAV. This option downloads the WAV file for
each selected user’s recorded voice name and saves it in the same
directory the CSV file is being created using the subscriber’s alias
in the file name. For instance
“JSMITH_VOICE_NAME.WAV”.
Since aliases are all unique this should avoid conflicts in the
folder. NOTE: This can take a
lot of hard drive space and does require HTTPS (port 443) to be open
between the computer you are running User Data Dump on and the Connection
server.
- Voice Name WAV File ([Primary
Extension].WAV). This option downloads the WAV file for each
selected user’s recorded voice name and saves it in the same
directory the CSV file is being created using the subscriber’s
primary extension as the file name.
For instance “12345.WAV”. If you are using multiple
partitions and have overlapping extensions this may result in file name
conflicts. NOTE: This can take
a lot of hard drive space and does require HTTPS (port 443) to be open
between the computer you are running User Data Dump on and the Connection
server.
- Voice recognition input style being used.
If the user is configured to use VUI this field will output a
“1”, otherwise it’s “0”
Scheduling Exports
Starting in version 7.0.36 you can schedule User Data Dump exports to run in the future either once or on a regular schedule. This uses the Windows Scheduler to have the User Data Dump tool launched with command line parameters identifying the server you wish to run the export against and that you’d like it to run “silent” meaning no user input is required to complete the execution.
To configure this you need to do the following things:
1. Attach to the Connection server you wish to schedule exports against. User Data Dump can handle multiple scheduled exports against different Connection servers with different options. Each server you attach to has its configuration and item selection data stored locally in a database that User Data Dump uses when attaching to that server.
2. Once you’ve selected all your options and users to output, on the last page of the wizard press the Options button and select to save settings. This will save the users and items selected into the database used by User Data Dump when running scheduled exports.
3. Finally, advance to the last page of the wizard, press the Options button and select the “Scheduled Run Options” and select “Schedule Export”.
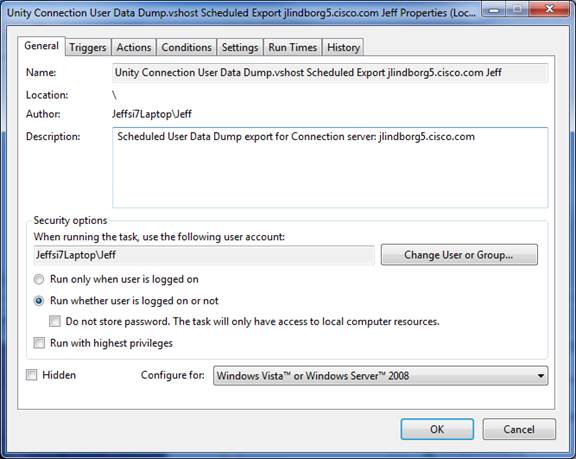
The schedule export interface launches the Windows scheduler task wizard – this will look a little different on Windows XP/2000/2003 than it will on Vista or Windows 7 or Windows 2008. But the same basic options are available in all interfaces. You need to provide an account to run under (preferably the same one you are running UDD currently if possible) and configure the schedule options (on the “Trigger” tab for the Windows 7 style schedule wizard below).
This gives you the option of scheduling it one time or to run daily, weekly, several times a week etc…
NOTE: A common mistake for scheduling exports is to forget to check the “enabled (scheduled task runs as specified time)” box on the task tab on the old style interface or selecting the “Run whether user is logged on or not” option on the new style interface above.
NOTE: Some versions of Windows 2008 Server will not properly fill in the “Start In” path under Actions | Properties. This needs to be the path that User Data Dump is configured to run from. Another Windows 2008 issue can be needing the “run with highest privileges” checkbox set on the General tab.
NOTE: User Data Dump will create new CSV files that will show up in the folder you’ve selected in the “CSV Output File Folder” field on the first page of the wizard. User Data Dump does NOT clean up these CSV output files, they stick around forever. When you no longer wish to have them around it’s up to you to clean them up.
NOTE: Finally, if you need to schedule a run manually, all that’s necessary is to have the User Data Dump executable called with a command line of “/Silent=[1.2.3.4]”, where “1.2.3.4” is replaced with the IP address or server name of the target Connection server.
Emailing Results of Scheduled Runs Automatically
With User Data Dump you have the option of having the results of all scheduled exports sent as ZIP-ed up files via email to one or more addresses. You configure this option by pressing the Options button on the last page of the wizard, selecting “Scheduled Run Options” and then “Configure Email Notifcation”. Selecting that will show the following dialog:
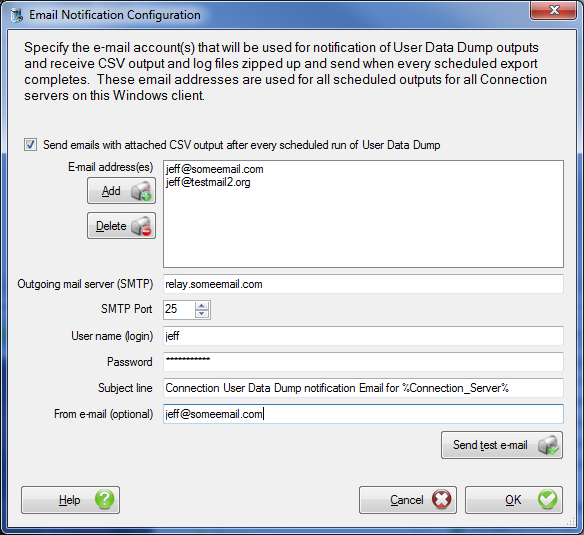
By default the “Send emails with attached CSV output after every scheduled run of User Data Dump” checkbox is unchecked which turns off all email notification attempts. You can check this box and the controls on the form will be activated.
You will need to use an external SMTP server to send the mail out for you. This will normally require you provide not just the server name/IP address but also a login and password to authenticate against that server. It is possible that you have an “open” SMTP server that will blindly relay messages sent to it, but this is exceedingly rare in this age of SPAM we live in today.
It is highly recommended you send a test email using the “Send test e-mail message” button. This will simply send a text-only email to all addresses you have added to the list. If the SMTP server attachment/login/send completes, it will indicate the message was sent. Please verify the message(s) arrived at their destination before hitting “OK” and saving the data.
User Data Dump will send out emails with the CSV output file in a ZIP file after EVERY scheduled run of User Data Dump. The file name of the ZIP and the body of the email will have information about the time the export was run, which client it was run on, which Connection server it was run against and if there were any errors or warnings. If there were one or more errors or warnings the log file produced by User Data Dump will also be included in the ZIP file, however if there are no errors or warnings this file will not be included.
NOTICE: The subject line contains the string “%Connection_Server%” – when the email is sent out this gets replaced by the actual server name of the Connection server the export was run against. It’s not required to be in your subject line but is highly recommended.
NOTE: While the “From e-mail” field is optional, some SMTP servers will not send mail off server unless a valid from address (in some cases a valid address that lives in its mail domain) is provided. It’s best to provide this.
Exports of Call Manager Sync Status on Business Edition (CoResident) Installations
Business Edition or CoResident installations is a product that includes Call Manager and Unity Connection installed on a single server providing phone and voice mail functionality in one package for smaller installations. One of the items User Data Dump allows you to export is the current state of the user’s synchronization with Call Manager’s database which requires accessing the Call Manager database instance via AXL web interface.
A check is made prior to exporting data to see if the installation is detected to be a CoResident configuration and if it is the ability to fetch data via an AXL call is tested using the credentials you supplied when attaching to the Connection service. If AXL is allowed, the export will continue. If not you will get an error message allowing you to fix the issue or go back and remove the option for outputting the Call Manager Sync status item.
In a CoResident installation you will need to create an Application or End User account in Call Manager that is then imported into Connection and granted the Remote Administration role. You will also need to associate that user with a group that has the “Standard AXL API Access” role associated with it in Call Manager’s interface. The super users group has this, however it’s normally better style to create a group just for AXL access, assign just the AXL API Access role to it and then assign your user to that group.
To create a new group in Call Manager, go to the Cisco Unified CM Administration page and under “User Management” select “User Group”. Select to add a new group, give it a name and hit the “Save” button. Once the group has been added choose the “Assign Role to User Group” option in the “Related Links” list in the upper right of the group page and click the “Go” button. Click the “Assign Role to Group” button and a list of all the roles defined will show. You need to select the “Standard AXL API Access” role in this case and then press the “Add Selected” button at the bottom of the page. Once you return to the group role assignment page, press the “Save” button at the bottom and your new group is configured.
Once the group is created and configured you can assign your user to that group by going to either the End User or Application User page in the User Management menu item and using the “Add to User Group” option. Once they’ve been added to the group and you press Save the “Standard AXL API Access” role should show up for that user in their “Roles” list below groups.
NOTE: Make sure the “Cisco AXL Web Service” is activated in the service management section of the “Cisco Unified Serviceability” page on your system. Be default the service is not active.
To test your AXL connectivity you can insert your server name into this URL:
https://<server
name>:8443/axl/
If the service is running you should get a login dialog – provide the login and password of the application user account above and you should see a screen that says the service is up and taking logins. If you don’t get a login dialog make sure the service is started. If you get a failure at the login, check your password and group assignment steps above.
NT Language Codes
When exporting user language information the 3 letter “Windows” style language code is used – this is a full map of those language codes for languages supported by Unity Connection.
“ENX” = “English (TTY/TDD)
"ENU" = "English (US)"
"ENG" = "English
(British)"
"ENA" = "English (Australian)"
"ENC" = "English (Canadian)"
"ENZ" = "English (
"ENI" = "English (
"DEU" = "German
(Standard)"
"DES" = "German (Swiss)"
"DEA" =
"German (Austrian)"
"
"DEC" = "German (
"ESP" = "Spanish (Traditional)"
"ESM" = "Spanish (Mexican)"
"ESN" = "Spanish (Modern)"
"ESG" = "Spanish (
"ESC" = "Spanish (
"ESA" = "Spanish (
"ESD" = "Spanish (Dominican)"
"ESV" = "Spanish (
"ESO" = "Spanish (
"ESR" = "Spanish (
"ESS" = "Spanish (
"ESF" = "Spanish (
"ESL" = "Spanish (
"ESY" = "Spanish (
"ESZ" = "Spanish (
"ESB" = "Spanish (
"ESE" = "Spanish (
"ESH" = "Spanish (
"ESI" = "Spanish (
"ESU" = "Spanish (
"FRA" = "French (Standard)"
"FRB" = "French (Belgian)"
"FRC" = "French (Canadian)"
"FRS" = "French (Swiss)"
"FRL" = "French (
"ITA" = "Italian (Standard)"
"ITS" = "Italian (Swiss)"
"NLD" = "Dutch (Standard)"
"NLB" = "Dutch (Belgian)"
"NOR" = "Norwegian (Bokmal)"
“NON" = "Norwegian (Nynorsk)"
"PTB" = "Portugese
(Brazilian)"
"PTG" = "Portugese
(Standard)"
"JPN" = "Japanese"
Obtaining Updates
To check for updates to this tool, visit http://www.CiscoUnityTools.com
Revision History
Version 8.0.56 – 6/15/2017
· Added “Primary MWI Phone System” output option
Version 8.0.55 – 12/7/2016
· Updated folder selection to allow for free entry and specifying network locations instead of limited to local drives only
Version 8.0.54 – 11/10/2016
· Updated to .NET 4.5 framework
· Added logic to force SSL3 HTTP connections when attaching to Unity Connection versions older than 10.0.
Version 8.0.53 – 8/20/2016
· Added logic to make 2nd DB connection to cluster pair if it exists – queries against the audit log for failed logins (TUI or GUI) will then make separate queries to each server as the report database does not replicate between cluster pairs as other data does.
· Updated AuditLog query logic to properly form failed login attempt and failed web access queries to pick up count.
Version 8.0.51 – 7/7/2016
· Fixed some spelling errors in dialog messages
Version 8.0.50 – 1/1/2016
· Updated for Windows 10 deployments
Version 8.0.49 – 3/18/2015
· Updated Chilkat version and changed to NuGet package delivery.
· Updated setup to properly handle Win 8.1 x64 and Win 2012 R2 install flags
Version 8.0.48 – 6/25/2014
· Added option for after greeting action output for selected users.
Version 8.0.47 – 6/10/2014
· Updated zip/email logic to handle log file being “held” open by an external process long enough to cause a conflict in the copy/zip process and causing an error.
Version 8.0.46 – 5/14/2014
· Added Time zone as a selectable option for user output.
Version 8.0.45 – 3/12/2014
· Added option to select CSV file format from ANSI, Unicode or UTF-8.
· Fixed issue where time of user creation was not being converted from UDT into local time of client running tool.
Version 8.0.42 – 2/3/2014
· Reconfigured for exclusive support of ADO .NET drivers instead of the older ODBC drivers from the IBM SDK package. Somewhat better performance.
· Removed all data reader constructs – now uses exclusively data tables being filled for all functions.
Version 8.0.41 – 11/22/2013
· Upgraded scheduler library to version 2.0.2 from 1.5.
· Fixed send email form for the text email to properly send through SSL check option
Version 8.0.39 – 11/9/2013
· Added Message_Aging_Policy item for output.
Version 8.0.38 – 7/27/2013
· Added HTML_Notification_Device item for output on Unity Connection 9.0 and later installations.
Version 8.0.37 - 6/26/2013
· Added options for outputting user mailbox activity in the last 60, 90 or 180 days.
· Added secure email options to the email notifications pate.
· Added logic to call "WAIT LOCK" for Informix driver at start of export so fetches on data readers on tables changing will wait for an index lock instead of failing right away.
Version 8.0.33 – 4/6/2013
· Added LDAP_ID to output options.
· Added LDAP_USER_ID to output options
· Added LDAP_Type
· Added CALL_MANAGER_ID_TYPE to output options
Version 8.0.31 – 3/7/2013
· Fixed an issue with loading items to export when attached to a CoRes installation.
Version 8.0.30 – 1/18/2013
· Added option for greeting source output for all greetings.
Version 8.0.29 - 11/16/2012
· Updated the extension range selection logic to restrict itself to only primary extensions for users to avoid issues with non numeric strings that are allowed in alternates.
Version 8.0.28 - 11/8/2012
· Fixed a bug relating to mailstore initialization that came up only on some scheduled runs (depending on items selected for output) where a null reference caused the application to exit when run unattended.
· Fixed email notification logic that was not catching errors when zipping/archiving csv and log files and causing the application to drop out.
Version 8.0.25 – 9/18/2012
· Fixed a problem with selecting users by extension range when one or more alternate extensions are not numeric. 2nd attempt with separate null check and different casting mechanism.
Version 8.0.23 – 8/17/2012
· Fixed a problem where count queries for unread messages older than 1 day would fail if that was the _only_ mailstore related item selected for output – it would work if any other mailstore related count was selected for output.
· Reworked logging for scheduled runs to be sure a log file is forced even if there’s an error prior to logging into a remote Connection server.
Version 8.0.22 - 7/18/2012
· Added support for 7, 30 and 60 day old counts of read (saved) messages.
Version 8.0.21 - 6/21/2012
· Added support for HTML notification devices added in Connection 9.0 release. These were added to the base notification and alternate notification output options.
Version 8.0.20 – 5/20/2012
· Added Alternate Notification Device output option.
Version 8.0.19 – 4/26/2012
· Running into problem with .NET drivers on XP and 2003 installs – scampering back to ODBC for the time being, opening a case with IBM.
Version 8.0.18 – 4/12/2012
· Fixed a problem with the 7 day/24 hour time spans for the message count in the last 7 days or 24 hours option.
Version 8.0.17 - 3/21/2012
· Added "Mailbox Unread messages older than 7 days" and "Mailbox unread messages older than 1 day" options.
· Updated to new setup framework version 11.
· Updated to use ADO.NET drivers from IBM's SDK client 3.5 instead of the older ODBC drivers.
Version 8.0.16 - 2/24/2012
· Added "Message Action Settings" option to the output.
Version 8.0.15 – 1/18/2012
· Added “Set to Use Brief Prompts” option to the output.
Version 8.0.14 – 12/15/2011
· Added the option for /AlwaysLoadAllUsers so folks driving UDD from the command line can have it always pick up all local users easily.
Version 8.0.13 - 11/30/2011
· Added option to output the total number of phone logins for users over the last 7 days.
Version 8.0.12 - 11/11/2011
· Updated setup that was missing a dependency DLL causing a problem on some versions of Windows expecting it.
Version 8.0.11 – 10/14/2011
· Removed dependency on 3rd party grid and retooled for generic VS 2010 grid.
· Updated Items database to allow Connection 7.0.0 instead of looking for 7.0.1 since 7.0(1) reports itself as 7.0(0.xxx) instead.
· Fixed problem loading previous selected items from the settings.mdb file correctly.
· Sped up the “select all” functionality when large numbers of users are in the grid.
Version 8.0.9 – 9/22/2011
· Added PIN and Password encryption type (MD5 or SHA1) as output options.
Version 8.0.7 – 7/26/2011
· Added Prompt Speed output.
· Added Message Speed output.
· Added Prompt Volume output.
Version 8.0.6 – 6/26/2011
· Added Post Greeting Recording option to output for 8.0(2) and later versions of Connection.
· Added Call Manager ID output.
· Changed common library layout to import projects instead of referencing DLLs directly.
Version 8.0.3 – 6/11/2011
· Updated to AOP model for easy entry/exit diagnostic output debugging and unhandled exceptions being dealt with smoothly in unattended mode.
Version 8.0.2 - 6/2/2011
· Major rework of User Data Dump. Converted to wizard build in C# using .NET 4, ADO.NET.
Version 7.0.49 – 3/16/2011
· Added “Encryption Type” to data item list.
Version 7.0.48 – 3/8/2011
· Added alternate extension Partition field for each alternate extension in dump file.
Version 7.0.47 – 3/6/2011
· Added additional information in the failure dialog and help file for problems logging into remote Connection servers via ODBC.
Version 7.0.46 – 2/16/2011
· Add "Mailbox read secure message count" to the list of data items.
· Add "Mailbox unread secure message count" to the list of data items.
Version 7.0.45 – 2/3/2011
· In the list of data items, Modify “Secure Message Setting” to “Send Secure Message Setting”.
· Added “Receive Secure Message Setting” to data item list.
Version 7.0.44 – 1/12/2011
· Added option to dump which role names (if any) users are associated with.
· Updated logging output to include some more detail on CSV parsing issues when limiting user selection.
· Added option to output number of unread (new) messages that are currently in user’s inboxes that arrived 30 or 60 days ago.
· Added option to output the oldest unread (new) message in days for users.
· Added option to dump out recorded voice name as a WAV file using either the primary extension and/or alias of the user.
Version 7.0.42 – 8/4/2010
· Added base notification devices as an option for output
· Added SMTP Address option
· Added EMAIL (corporate email address) for Connection 8.5 and later systems
Version 7.0.41 – 7/7/2010
· Added additional logging around scheduled backup executions.
· Include debug output automatically when running scheduled backups.
· Fixed a couple areas where silent runs could get “stuck” waiting for user input that will never come when running in scheduled mode.
Version 7.0.40 – 7/1/2010
· Added ability to be able to smoothly cancel an export mid run.
· Updated logic to allow multiple instances to run when in silent (scheduled) mode.
· Fixed a problem with message count fetch where conversion of local time into UTC was not working properly.
Version 7.0.37 – 6/17/2010
· Added form resize logic
· Added ability to schedule backups
· Added ability to “remember” settings for each Connection server attached to by default.
· Added new logic for auto creating CSV file names in the target directory using server name, date and time.
· Added new output options for new voice mails left in the last 24 hours and 7 days.
Version 7.0.35 – 5/18/2010
- Converted install to QSetup framework.
- Hard coded port field on remote connection form as Connection no longer supports configuring it.
Version 7.0.34 – 5/10/2010
- Added Address, Department, City, Country, State, Postal Code, Building, Title, and Employee ID to the output options.
- Made enforcement of 7.0 and later Connection versions strict (i.e. no longer will attempt “best effort” with 2.x CUC builds).
Version 7.0.33 – 3/5/2010
- Fixed a problem with CSV selection where ALIAS fields were not being forced to lower case during the search.
Version 7.0.32 – 2/25/2010
- Added “Touchtone conversation name” to the output options.
- Added “Voice recognition input style being used” to the output options
- Optimized startup code to remove in memory table indexing for DTMFAccessID which was taking too long on very large directories. Do “on the fly” alternate extension fetching instead.
Version 7.0.31 – 1/22/2010
· Changed log output for both CSV and log file creation to force Unicode files.
- Added UTF8 to UTF16 conversion routines to
handle differences between Windows and Linux string handling
- Fixed a problem where temporary recordsets for mailbox info output were not being
closed properly resulting in errors during processing.
- Added the option to select users by partition
assignment
- Added option to output partition name for
users
- Updated connection to remote Informix database
to force extended timeout value for long queries
- Fixed issue dealing with “restart
greeting” and “alternate contact number” conversation
options for user input keys.
- Added logic to escape out quotes for fields
that contain them.
Version 7.0.25 – 12/22/2009
- Changed connection string to force both DB and CLIENT locales to be us_utf8 to avoid issues with Unicode strings.
Version 7.0.24 – 11/20/2009
- Adjusted for change in Connection 8.0 release where the “time of last call” value is moved to its own table instead of being in the subscriber table. CSCsv15164.
Version 7.0.23 – 10/26/2009
- Added special error handling for the -21005 server side recordset processing error encountered in the field due to a BAT bug numerous times.
- Added ability to limit which users are included in the output.
- Fixed a problem with the automatic version checking routine if the connection to the remote web site could not be established.
Version 7.0.22 – 10/19/2009
- Fixed a problem with one key routing rules assigned to system transfer or subscriber system transfer conversations not being logged correctly.
Version 7.0.21 – 9/26/2009
- Added per Connection server login/PW memory based on Windows login name.
- Added updated version checking logic for the new CiscoUnityTools.com web site format.
Version 7.0.20 – 7/14/2009
- Added logic to force alias sorting order when in debug output mode.
Version 7.0.19 - 7/8/2009
- Added debug output option
- Added logic to exit from application when an error is encountered when in debug mode or skip the current user output entirely if not to avoid loop processing.
- Optimized query logic to avoid pulling transfer rule information unless one of the 9 items that needs it is specifically selected for output.
Version 7.0.17 – 6/3/2009
- Added more debug output information around the message store values fetch making sure to check for network connection failures with each fetch and log appropriate error information out to the affected column output.
- Added failure retries on message store property fetches to handle network connectivity issues.
Version 7.0.15 – 4/17/2009
- Added option to check restriction table patterns for all transfer numbers for subscribers.
Version 7.0.14 – 1/22/2009
- Added Mailbox Warning Quota, Mailbox Send Quota and Mailbox Send/Receive Quota items to the list of options
Version 7.0.13 – 1/14/2009
- Updated remote login dialog to be consistent with other remote tools
Version 7.0.12 – 1/7/2009
- Fixed version check routine that was not accommodating multiple digit ES versions properly.
Version 7.0.11 – 11/12/2008
- Fixed a problem where the mailbox store name was being pulled even if the Connection version was 2.x – the property did not exist in for that version.
- Fixed a problem where the personal call transfer override column was being fetch for contact rules when the Connection version was 2.x even though it didn’t exist in that version.
Version 7.0.10 – 8/18/2008
- Changed error logging location to a folder under the install directory instead of defaulting to the root of C
- Added
additional write checks for the CSV output folder –
Version 7.0.9 – 8/14/2008
- Fixed bogus error reports when exporting time of last password change. CSCsr96726
Version 7.0.8 – 7/29/2008
- Changed the message store data fetch to use the single shared UnityDirDB database connection instead of it’s own.
- Added message store name to output option
Version 7.0.7 – 7/22/2008
- Fixed some references to “off hours” instead of “closed”
- Fixed some minor help text issues.
Version 7.0.6 – 5/29/2008
- Added option to dump out total user inbox size in bytes for Connection 7.0.
- Added option to dump out unread message count for Connection 7.0.
- Added option to dump out read message count for Connection 7.0.
- Added option to dump out deleted message count for Connection 7.0
- Fixed remote version checking routine to differentiate between co-res and stand alone installs
Version 7.0.5 – 5/7/2008
- Updated setup to remove Informix ODBC drivers and check for dependencies at setup time.
Version 7.0.4 – 3/18/2008
- Added “clear all” button to go with the “select all button”
- Removed “location ID” as an option since it’s not configurable in 7.0(1)
- Updated the secure message setting in the help file to include all 4 possible values.
- Updated the form resizing logic to accommodate XP UI differences.
Version 7.0.2 – 2/5/2008
- Added PCRT type output for transfer type setting.
- Added “-1” value for transfer type to indicate contact rule is disabled.
Version 7.0.1 – 11/15/2007
- First drop for the Connection 7.0(1) release
© 2017 Cisco Systems, Inc. -- Company Confidential