Connection Wallet Card Wizard
Index
Connecting to Unity Connection 7.x or Later
Step 1. Configure a User with the Remote Administrator
and System Administrator roles
Step 2. Set the Database Proxy Service Shutdown Time
Step 3. Activate the Remote Database Proxy Service
Troubleshooting Remote Login Issues
Double Check Connection Server Settings
Disable CSA and all Virus Scanning Applications
Make sure the Informix ODBC Driver is Installed and
the PATH Points to it.
Overview
The Connection Wallet Card Wizard application is designed to let administrators generate end user key mapping “wallet cards” for any of the Connection conversation touch tone conversations, including the three custom key mapping conversations.
To create a wallet card wizard you simply use the “connect” button to attach to the remote Unity Connection server, select which conversation you wish to use and press the “Launch Wizard” button. This will fetch the key mapping data for that conversation from the Connection database and launch the wizard that will allow you to customize what shows up on the wallet cards.
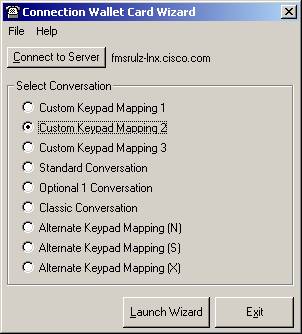
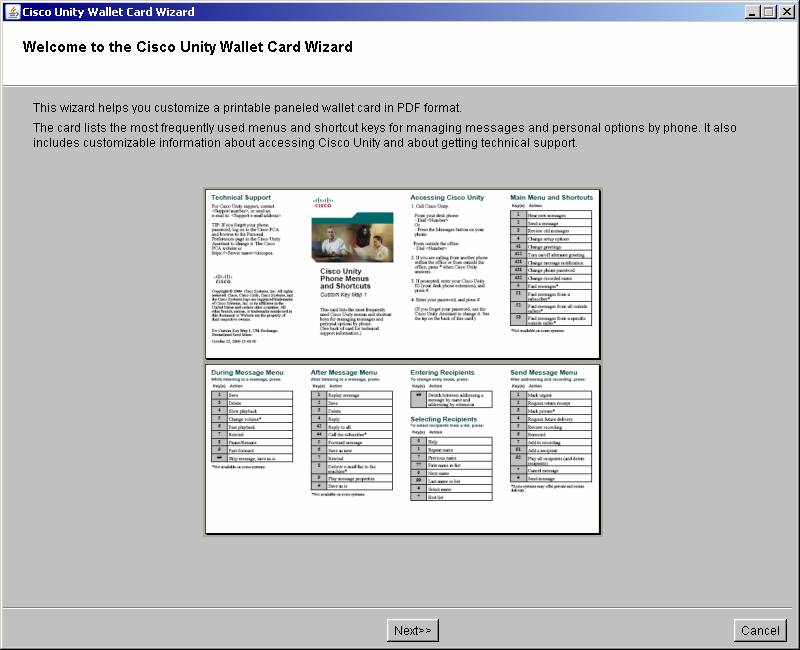
Simply follow the instructions on the Wallet Card Wizard to customize the content to taste and the resulting PDF file will be generated for you.
Requirements/Special
Notes
This utility runs against Unity Connection 7.0(1) and later releases.
You must have the Informix ODBC drivers installed: http://www.ciscounitytools.com/App_InformixDrivers.htm
You must have an account configured with remote data administration access and the remote database proxy service running. See the next section for details on how to set that up.
The
Windows XP, 2000, 2003 or
When
running on
Connecting to Unity
Connection 7.x or Later
NOTE: Remote data access configuration is also necessary for running tools such as the Database Explorer (CUDLI), User Data Dump (CUDD) and other diagnostic or reporting tools
Step 1.
Configure a User with the Remote Administrator and System Administrator roles
1. Go to the Cisco Unity Connection Administration web interface for your installation.
2. You can leverage a user with or without a mailbox for off box data access purposes, but it’s suggested that you create a new user without a mailbox that is used solely for the purpose of remote administration tasks for security reasons.
3. Be sure the web administration password for this user is not configured to require a change at first login on the “Password Policy” page for that user.
4. If necessary, change the web administration password on the “Change Password” page. Note that only the web application password comes into play for remote data access.
5. Finally, on the “Role” page for the user, add the “Remote Administrator” and the “System Administrator” roles to the “Assigned Roles” list and save. You can assign any or all other roles as well but for the purposes of remote access to the database and making updates to users those two are necessary.
Step 2. Set
the Database Proxy Service Shutdown Time
Out of the box the database proxy service is not running and if you try to start the service it will shut down right away. First you need to set the “Database Proxy: Service Shutdown Timer” value found in the System Settings -> Advanced -> Connection Administration section of the Cisco Unity Connection Administration page. By default this is 0. You can set it to as high as 999 days if you like. After the number of days configured here the remote database proxy service will shut down. This is useful if you want to do some migration work, for instance, and don’t want to forget to have the service disabled for security reasons.
NOTE: If you restart the server, the remote database proxy service will remain shut off. After a system restart you have to go in and manually turn on the service again (see step 3)
Step 3.
Activate the Remote Database Proxy Service
1. Out of the box the service that listens to remote database requests is not active, you must turn it on. To do this, go to the “Cisco Unity Connection Serviceability” web admin page.
2. On the Tools menu, select the “Service Management” page.
3. The “Connection Database Proxy” item under the “Optional Services” section will be marked as “Deactivated” and stopped. Press the “Activate” button and it will be activated and started automatically.
Once you’ve started the proxy service you can connect with any tool that needs off box database access using the user name, web administration password and port “20532”.
NOTE: The service will automatically shut down after the number of days configured in step 2 above or if you restart the server.
Step 4: Connect
The port the proxy service uses is 20532. Fill in the full server name or IP address, the port number, login and web password for the account you configured in step 1.
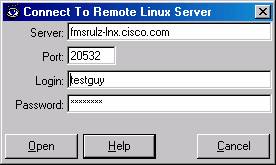
Future logins will have the information you enter on the login screen saved by default.
Troubleshooting Remote Login Issues
Double Check Connection Server Settings
Make sure the remote database proxy service is running. This service does shut itself off after a period of time and does not start itself automatically on a server reboot.
Make sure the user you are logged in as has the remote administrator role assigned to their account, that their password is not set to reset at the next login and that their account is not currently locked.
Make sure the server name or IP address you are using to connect with is reachable from your Windows client. DNS issues often come up in connection failures.
Disable CSA and all Virus Scanning Applications
It’s a good idea to disable CSA and all virus scanning applications if you are having problems connecting to be sure the ODBC port (20532) is not being blocked. Also check your firewall settings (assuming you are running one).
Make sure the Informix ODBC Driver is Installed and the PATH Points to it.
For 32 bit OS installs, the IBM Informix ODBC driver is installed in C:\Program Files\IBM\Informix\Client-SDK. Make sure this path exists on your server and has not been removed or renamed.
The system PATH variable will also include a reference to the “\IBM\Informix\Client-SDK\bin” location where the ODBC driver is installed. Make sure this path is referenced in the PATH. Also, if the PATH is very long sometimes the Informix driver will not find it, try moving it to the beginning of the PATH statement.
Choosing a Language Interface
This tool is not yet localized.
Obtaining
Updates
To check for updates to this tool, visit http://www.ciscounitytools.com/
Revision
History
Version 1.0.12 – 12/11/2016
· Added support for installs onto Windows 10
· Removed check for MDAC which is not supported by Microsoft for versions later than Windows 8
· Added support for Custom key maps 4, 5 and 6 for Connection 8.0 and later systems.
Version 1.0.11 – 1/20/2013
· Updated for Windows 8 installations
Version 1.0.10 – 3/9/2011
· Added additional information in the failure dialog and help file for problems logging into remote Connection servers via ODBC.
Version 1.0.9 – 10/2/2009
- Added updated version checking logic for the new CiscoUnityTools.com site design.
Version 1.0.8 – 7/27/2009
- Changed default port for remote connection to 20532 to match the 7.x default.
- Added error message to warn about missing JRE files if the PDF wizard launch fails
Version 1.0.7 – 2/6/2009
- Updated the wizard Java application with some wording and graphic changes
Version 1.0.6 – 1/14/2009
- Updated remote login dialog to be consistent with other tools.
Version 1.0.5 – 1/8/2009
- Fixed a version checking problem that was not accommodating ES version strings properly.
Version 1.0.4 – 11/20/2008
- Fixed wording on Optional Conversation 1 radio button text to match the admin interface.
- Changed logic to hide launching application while Java wizard is running and show itself when it terminates.
Version 1.0.3 – 11/11/2008
- Changed server name string on main form to a label instead of a text box to avoid confusion.
- Fixed a problem with connecting to a new server when you’re already connected to an existing server.
- Updated wording form to be in line with the conversation names in the SA interface
- Updated help
Version 1.0.2 – 10/27/2008
- Cleaned up help file for first beta release to web site.
- Fixed a problem when more than one GUI language is active on the Connection server.
- Fixed resource strings that had inaccurate port information when the remote database connection failed
Version 1.0.1 – 9/10/2008
- First version released for beta