COBRAS Data Viewer
Changing
Alias and/or Extensions in Backup Prior to Restore
Overview
The COBRAS Data Viewer is a simple database viewer for use with directory exports generated by all versions of COBRAS Export. It’s primarily used for diagnostic purposes by TAC and the BU engineers when troubleshooting problems with COBRAS import or export. You can open either the directory backup MDB file or a messages backup file. The directory output shows top level objects on the left and, in most cases, details about selected objects in the panel on the right. For instance a selected user from a backup looks like this:
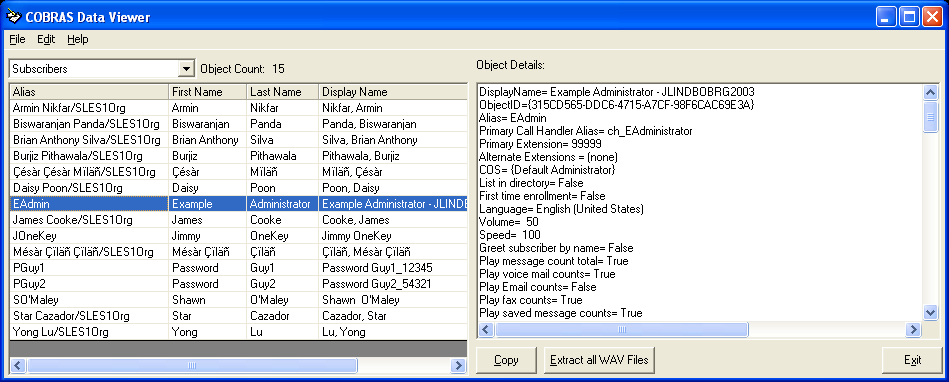
Directory Data
The interface will let you select the following objects from the backup database:
- Call Handlers. All system call handlers are shown in the table on the left and when you click on any one of them the details about that call handler are shown in text format on the right of the main form. You can get all the greetings and voice name (if recorded) for the selected call handler by clicking the “Extract all WAV Files” button at the bottom.
- Subscribers. All Users with Mailboxes (no contacts or users without mailboxes are backed up by COBRAS) are shown in the list in the left. When you click on any of the subscribers in the list you get details about that subscriber in text format on the right of the form. You can get all the greetings and voice name (if recorded) for the selected subscriber by clicking the “Extract all WAV Files” button at the bottom.
- Distribution Lists. All public distribution lists backed up are shown on the left of the main form. If the backup was constructed including public distribution list membership (this is optional) then when you click on any one of the distribution lists in the grid the list of members will be shown in the text box on the right of the main form. You can get the voice name (if recorded) for the selected distribution list by clicking the “Extract all WAV Files” button at the bottom.
- Schedule Names. Just the system schedule names in the backup are shown when this is selected – no specifics about the schedules themselves are shown.
- Interviewers (if the backup was done with version 7.0.29 of the COBRAS Unity Export). The interview handlers in the backup are shown in the grid on the left of the main form. When you click on one of the interview handlers in the grid details about the questions recorded for that interviewer are shown in the text box on the right of the main form. You can get all the questions and voice name (if recorded) for the selected interview handler by clicking the “Extract all WAV Files” button at the bottom.
- Backup Details. The version of the COBRAS backup tool and the version of the Unity or Connection server backed up are shown. If the backup was done with version 7.0.29 or later of the COBRAS Unity Export tool or version 1.3.1 of the Unity Connection Export tool then you will also see the user name and domain name of the account that ran COBRAS for the backup, the Unity or Connection server name and the time and date the backup was started.
- Extract Backup Log. If the backup was done with version 7.0.29 of the COBRAS Unity Export or version 1.3.1 of the COBRAS Unity Connection export this will extract the export log file from the backup database and put it into a ZIP file in the LogArchives folder under the install directory of the COBRAS Data Viewer application. COBRAS opens the folder for you in file explorer and you have to unpack it with a ZIP tool.
Messages
If you select to open a messages backup MDB file you can see all the top level messaging data and have the option to unpack the WAV file of a voice mail message from the backup and play it out:
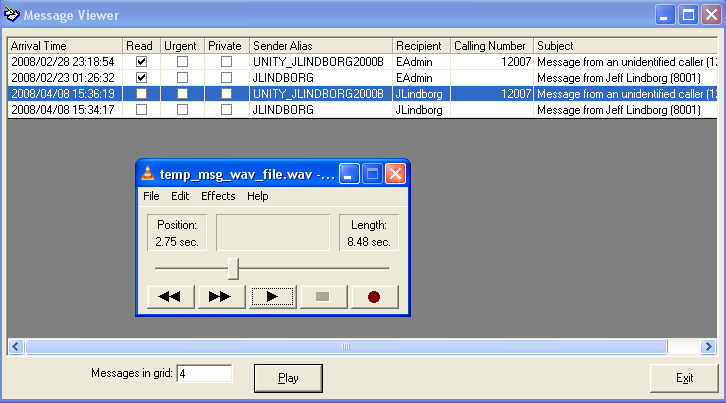
You can use the “Play” button at the bottom or double click on any message. The WAV file is restored into the folder where you installed the Data Viewer if you want to copy it somewhere instead of playing it out.
Backups done on any version of Unity will store the messages as single WAV files which will play using the system’s default WAV player (sound recorder in the screen shot above). If the default player can’t open or isn’t registered, the folder that stores the WAV file will be opened for you.
Backups done on any version of Connection store the messages as ZIP files of EML messages (email storage format). The folder that stores the ZIP file is opened and the ZIP is opened with the default Windows application for that (usually file explorer or WinZip). Any email reader such as Outlook Express can open an EML file and make the attachments available (including other messages for forwards or WAV files for voice messages).
Changing Alias and/or
Extensions in Backup Prior to Restore
One of the things many sites want to do when migrating directory data to a new installation or merging it into an existing site is to update the extension numbering plan and/or changing their alias naming convention. Some times when moving from a Voice Mail only configuration to a Unified Messaging setup or vice versa it’s also necessary to change the user aliases so they match or don’t match existing accounts in the corporate Active Directory.
The COBRAS Data Viewer includes a function to help with this. The model is to update the alias and/or primary extension numbers and/or alternate extension numbers for subscribers in the MDB backup file and any message backup files found in the same folder before running the import. As such it is HIGHLY RECOMMENDED that you make a copy of the backup MDB file and do your edits on that so you always have an unedited version of your original backup.
The basic steps to complete this process look like this:
- Copy the backup done by a COBRAS export tool and any message backup files created by the backup.
- Open that copy of the backup MDB file with the COBRAS data viewer.
- Export the user data to a CSV using the “Export users in backup to CSV” option under the Edit menu.
- Edit the resulting CSV file with new alias and/or extension strings you wish to apply.
- Apply the changes to the MDB file using the “Remap subscriber alias or extension” option under the Edit menu. NOTE, this will also run through and change those aliases in all message backup files found in the same folder as the directory backup file you’re updating.
Then when you run the COBRAS Import tool using that MDB file, the extensions and aliases will be what you wish them to be.
NOTE: Again, can’t stress this enough – this operation changes the data directly in the backup files and cannot be undone. Please be sure to perform this operation on a COPY of your backup file!
The option to export the exiting user data to CSV constructs a simple CSV file with 6 columns in it:
OLD_ALIAS, OLD_EXTENSION, NEW_ALIAS, NEW_EXTENSION, OLD_SMTP_ADDRESS, NEW_SMTP_ADDRESS
Note that for alias and extension remapping the two SMTP ADDRESS fields are ignored. The “OLD” refers to the existing values currently in the database. These two values are used to find subscribers in the backup. The “NEW” values are, not surprisingly, the values that will replace those associated with the subscriber found using the “OLD” values. In the case of Alias/Extension remapping the NEW_SMTP_ADDRESS field is ignored. There’s a specific order to the search logic that you need to understand.
- If an old alias value is provided in the CSV, this is used to search for a user. If a user is found then it will use the new alias and/or the new extension value for that subscriber’s alias and primary extension.
- If an old alias is not provided or does not match a user in the backup, then the old extension value is used to search for a subscriber’s primary extension. If a user is found then it will use the new alias and/or the new extension value for that subscriber’s alias and primary extension.
- If an old alias is not provided or does not match a user in the backup and the old extension value does not match an existing user’s primary extension, then the old extension is searched for among all the alternate extensions in the backup. If a match is found for a user’s extension then that alternate extension is replaced with the new extension value. Nothing is done in this case with the new alias string if its provided.
When you load a CSV file, all the valid rows are shown in a simple grid that contains a human readable action COBRAS intends to take with each row in the Info column as shown below:
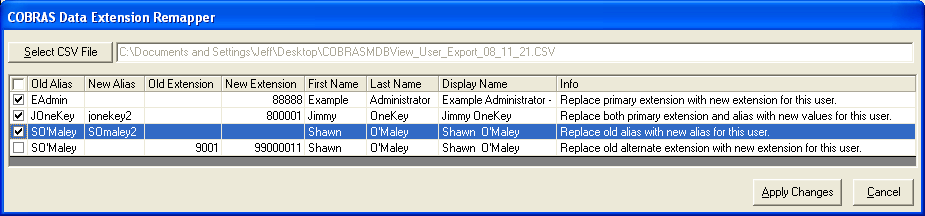
It’s very important that you review this output carefully and make sure the changes you want are going to be made. You can select individual lines to apply or select/unselect all users by clicking the checkbox in the upper left of the grid header. At least one row much be selected before you will be allowed to apply changes to the backup database.
NOTE: In the screen shot above Shawn O’Maley shows up twice – one row for replacing the user’s alias and one for replacing one of his alternate extensions. This is ok. But please be aware that the CBORAS Backup utility does NOT make sure you don’t apply multiple changes to your directory. If you add the same account into your CSV multiple times, COBRAS will make changes (so long as they’re valid and legal) to that user in the order in which they are shown in the CSV file. Whatever is done last is what “sticks”
When you open a CSV file to parse COBRS Backup Viewer does checks on the file and then each row as it reads it in. If there are problems with any of the rows in the file such as invalid extension strings (i.e. that contain non digits) or illegal alias strings (for instance longer than 64 characters) or the extension conflict with an existing object etc… these rows are not added to the grid and are written out to an error log file which is created in the same folder as the CSV file you selected for parsing. When the CSV file parsing is complete you are told how many rows were read and how many rows are in the grid and then you are given the opportunity to review the error output file. Each line in the original CSV file will be shown in the file along with a human readable failure reason explaining why it failed.
NOTE: Extension conflicts and alias conflicts are not allowed, even temporarily. This includes conflicts with other object’s extension in the backup (for instance you can’t change a subscriber’s extension to conflict with a call handler extension). COBRAS must maintain the integrity of the backup even if you don’t plan to restore anything but users. There is no option to ‘turn this off’. This also means you can’t “swap” extensions around between existing users in one pass. You’d have to make multiple passes assigning users to temporary unique extensions and then applying another pass to put them where you want.
When you apply the changes a log file indicating each database change made is generated – review the log output for warnings and errors as normal. It’s also a good idea to spot check users in the main viewer interface to make sure the updates you expected were made.
Changing STMP Address in
Backup Prior to Restore
One of the things sites may want to do when migrating directory data to a new installation or merging it into an existing site is to update the corporate email address in Connection that points to the email mailbox used by their subscribers. From a Unity backup this is the Exchange or Domino SMTP Addresses and you have the option to import it as the corporate email address in Connection by COBRAS Import. If, however, you are migrating to a new environment with a different mail server its desirable to change this up front so you can import users with this preconfigured into your new Connection setup.
The COBRAS Data Viewer includes a function to help with this. The model is to update the SMTP Address for subscribers in the MDB backup file before running the import. As such it is HIGHLY RECOMMENDED that you make a copy of the backup MDB file and do your edits on that so you always have an unedited version of your original backup.
The basic steps to complete this process look like this:
1. Copy the backup done by a COBRAS export tool and any message backup files created by the backup.
2. Open that copy of the backup MDB file with the COBRAS data viewer.
3. Export the user data to a CSV using the “Export users in backup to CSV” option under the Edit menu.
4. Edit the resulting CSV file with new SMTP Addresses you wish to apply.
5. Apply the changes to the MDB file using the “Remap subscriber email addresses” option under the Edit menu.
Then when you run the COBRAS Import tool using that MDB file, the SMTP Addresses used for corporate email creation will be what you wish them to be.
NOTE: Again, can’t stress this enough – this operation changes the data directly in the backup files and cannot be undone. Please be sure to perform this operation on a COPY of your backup file!
The option to export the exiting user data to CSV constructs a simple CSV file with 6 columns in it:
OLD_ALIAS, OLD_EXTENSION, NEW_ALIAS, NEW_EXTENSION, OLD_SMTP_ADDRESS, NEW_SMTP_ADDRESS
Note that for SMTP Address remapping the NEW_EXTENSION and NEW_ALIAS columns are ignored.
The “OLD” refers to the existing values currently in the database. These two values are used to find subscribers in the backup. The “NEW” values are, not surprisingly, the values that will replace those associated with the subscriber found using the “OLD” values. In the case of SMTP Address remapping only the NEW_SMTP_ADDRESS column is used.
1. If an old alias value is provided in the CSV, this is used to search for a user.
2. If an old alias is not provided or does not match a user in the backup, then the old extension value is used to search for a subscriber’s primary extension.
3. If an old alias is not provided or does not match a user in the backup and the old extension value does not match an existing user’s primary extension. If a match is not found the row in the CSV file is skipped with an error note.
When you load a CSV file, all the valid rows are shown in a simple grid that contains a human readable action COBRAS intends to take with each row in the Info column as shown below:
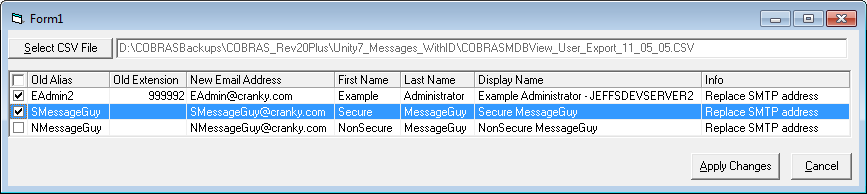
NOTE: The “Old Extension” field will only be filled in if the user was not found by the OLD_ALIAS column value – so if you see values for the Old Extension column on the grid be sure to check carefully that the user pulled from the backup database is the correct one.
When you open a CSV file to parse COBRS Backup Viewer does checks on the file and then each row as it reads it in. If there are problems with any of the rows in the file such as invalid extension strings (i.e. that contain non digits) or illegal alias strings (for instance longer than 64 characters) etc… these rows are not added to the grid and are written out to an error log file which is created in the same folder as the CSV file you selected for parsing. When the CSV file parsing is complete you are told how many rows were read and how many rows are in the grid and then you are given the opportunity to review the error output file. Each line in the original CSV file will be shown in the file along with a human readable failure reason explaining why it failed.
When you apply the changes a log file indicating each database change made is generated – review the log output for warnings and errors as normal. It’s also a good idea to spot check users in the main viewer interface to make sure the updates you expected were made.
Requirements/Special Notes
Requires the MDB files from a COBRAS Export tool to run. Any version of COBRAS Export will work however some features are specific to backups done with version 7.0.29 and later of the COBRAS Unity Export tool.
Obtaining Updates
To check for updates to this tool, visit http://www.ciscounitytools.com/App_COBRAS.htm
You can also check for an updated version using the “Check for updated version” option under the Help menu.
Revision History
Version 1.0.35 – 3/27/2012
· Fixed an issue with Alias/Extension remapping causing the recordset to not be closed in some compound update scenarios resulting in an error on subsequent changes from the CSV file.
· Updated setup to check for admin rights of account doing the install.
Version 1.0.34 – 7/11/2011
· Added private distribution list dump option
Version 1.0.33 – 5/5/2011
· Added ability to bulk edit SMTPAddresses in the backup MDB files.
Version 1.0.32 – 12/3/2010
· Repacked setup to remove 3rd party Unicode controls.
Version 1.0.31 – 11/19/2010
· Fixed a problem with alias strings used as file names that were allowing some illegal file characters be used for wav file names (ie. “/” and “\”).
· Fixed a binary wav/message extraction issue where 3 bytes could be chopped off the end of the file. Some ZIP programs did not like the file format, others handled it ok.
Version 1.0.30 – 6/8/2010
- Standardized on the use of “directory handler” instead of “name lookup handler” which is a deprecated term in both product lines.
Version 1.0.29 – 5/11/2010
- Added corporate email output for MDB build 20 and later.
Version 1.0.28 – 4/21/2010
- Fixed a problem where alias strings for handlers and users were in UTF8 (Japanese display characters for instance) and errors were thrown extracting greetings and voice name WAV files from the MDB backup trying to use these strings for file names.
- Added the archived mailbox sign in conversation to the list.
Version 1.0.27 – 4/19/2010
- Added additional file naming and type checking when iterating over files in a folder looking for related message backup databases during the renaming routines for alias/extension remapping.
Version 1.0.26 – 4/5/2010
- Added name lookup handlers to the output options including WAV file extraction options to get voice names and custom recorded greetings for version 8 and later of Connection systems that support that.
Version 1.0.25 – 3/29/2010
- Added special check for empty message MDB file on open – instead of reporting invalid it reports empty.
- Added SMTP addresses to subscriber output if they are present.
Version 1.0.24 – 2/18/2010
- Added secure message check for message view if the MDB version is rev 14 or later.
Version 1.0.23 – 1/26/2010
- Added support for pulling either UTF8 from Connection backups or UTF16 from Unity backups so multi byte character strings look correct on Windows controls.
Version 1.0.22 – 12/22/2009
- Added Unicode aware text controls so opening double byte character backups would display properly.
Version 1.0.20 – 9/26/2009
- Added updated version checking logic for new CiscoUnityTools.com web site format.
Version 1.0.19 – 9/22/2009
- Added private distribution list membership alias to the alias/extension update utility logic.
Version 1.0.18 – 9/18/2009
- Fixed some display issues with CUC 1.2 backups for call handler aliases and CUC 1.2 specific conversation names.
Version 1.0.17 – 8/21/2009
- Fixed problem updating the sending alias string in message backup files that contain apostrophes.
Version 1.0.16 – 8/18/2009
- Fixed a problem with displaying owner information for system call handlers on CUC 1.2 backups
Version 1.0.15 – 6/12/2009
- Updated alias changing logic to allow for the “@” character in the alias string.
Version 1.0.14 – 6/4/2009
- Updated logic to handle changing sender alias in the message backup files on the Alias remapping function if the backups include the information
Version 1.0.13 – 3/24/2009
- Added command line protected function for removing notification devices for a specific end user site.
Version 1.0.11- 3/3/2009
- Added command line file name parsing so the MDB viewer can be opened directly by selecting an “open with” option on an MDB file via file explorer.
Version 1.0.10 – 2/24/2009
- Added option to clear object mapping history from the selected backup database to the edit menu.
Version 1.0.9 – 2/20/2009
- Added support for viewing directory backups from Connection 7.0
- Added support for extracting WAV files for call handlers, subscribers, distribution lists and interviewers
- Fixed a problem with message extraction for Connection backups vs. Unity backups (WAV vs. EML file extraction)
- Removed “load” button on the object type selection box
- Added fetch of backed up server name as well as the name of the server the backup was run from to the backup details dump option.
Version 1.0.7 – 12/8/2008
- Fixed a problem with pulling sender email address from Domino message backup files.
Version 1.0.6 – 12/2/2008
- Updated with support for viewing exports created by Connection 1.2 COBRAS export tool.
- Fixed a problem with display name for interview handlers not always showing in the grid on the left when selected.
Version 1.0.5 – 11/25/2008
- Fixed problem where alias change was not updating alias in the public distribution list members table.
- Throttled the tool to run at below normal priority to keep it’s CPU usage under control if it’s being run on a Unity server.
- Updated public distribution list membership output to include display name and extension in addition to just alias.
- Changed object grid selection to show updated object details on any row/column change instead of requiring a double click.
Version 1.0.4 – 11/22/2008
- Added support for changing standing alias and/or extension values in the backup prior to import
- Added version check option under the help menu on the main form.
Version 1.0.3 – 11/7/2008
- Added support for viewing distribution list data.
- Added support for viewing interview handler data.
- Added support for viewing top level schedule names
- Added support for viewing backup details and extracting the backup log file
Version 1.0.2 – 8/26/2008
- Added support for viewing and playing messages from a backup.
Version 1.0.1 – 7/29/2008
- First release of application
© 2008 Cisco Systems, Inc. -- Company Confidential