COBRAS Briefcase Mode
COBRAS Backup and Restore High Level Process
Key Differences Between DiRT and COBRAS
Restore onto a different version or product
(migration)
Merge multiple backups onto a single server
Copy complete audio text applications onto many
servers
Getting Messages via CUMI for Connection
Data Changed During Connection Imports
Codec Changes for Connection Imports
Notification Device Mapping for Connection Imports
A Word About Migrating Unity Subscribers Between Unity
Servers in a Network
A Word About Restoring Public Distribution Lists to
Connection
Connecting to Remote Connection Servers for Both
Export and Import
Troubleshooting Remote Connection Failures
Message Export/Import for Connection 12.x and later
Limiting Which Mailboxes Are Backed Up
Limiting Which Messages Are Backed Up
Limiting Which Distribution Lists to Backup Membership
For
Manually Selecting a Domain Controller for use in
Public Distribution List Membership Export
Scheduled Backups for Connection 7.x and Later
Backups of Business Edition (also called CoResident)
Installations
Important Preparation for Connection 7.0 and Later
Imports and Exports
Directory Synchronization with Unity Restores
Important Notes About Message Backups and Restores
With Unity
Important Notes About Message Backups and Restores
With Connection
Important Note About Importing Users into Connection
with LDAP Integration
How Long Will a Backup Take on My System and How Much
Space Will it Take?
Double Check Connection Server Settings
Disable CSA and all Virus Scanning Applications
Trouble with Initial Unity Connection Login
Message Export/Import for Connection 12.x and later
Message Import/Export for Connection 7.x and later
Message Export for Connection 1.2
WAV Upload or Download with Connection 7.x and later
Directory Sync Issues with Import for Unity
TAC Directed Command Line Parameters for
Troubleshooting
COBRAS Briefcase Overview
Consolidated Object Backup and Restore Application Suite (COBRAS) is a set of tools designed to allow administrators to backup all subscribers, call handlers, interview handlers, public distribution lists, and schedules and to restore some or all of that information onto another Unity or Connection server. It is specifically designed to allow for partial restores, restores onto different versions or products than the version that was backed up, and “merges” of data from multiple system backups. This tool does not provide the same functionality as DiRT (Disaster Recovery Tools) in that it does not do a full backup of the entire Unity database and restore it “en mass” on a new server. See the Key Differences Between DiRT and COBRAS section for a more detailed run down on the differences between DIRT and COBRAS.
In short:
COBRAS Gets Most Data For:
- Call Handlers
- Subscribers (optionally including messages)
- Interview Handlers (a.k.a. Interviewers)
- Directory Handlers (a.k.a. Name Lookup Handlers) for Imports into Connection.
- Public Distribution Lists (optionally including membership information)
- Schedules
- Routing rules (for restores onto Connection servers only)
- Custom Key Mapping conversation data (for Connection 7.x and later backups only)
COBRAS Does Not Get:
- Class of Service
- Restriction tables
- Locations
- Contacts (includes SMTP/AMIS/Bridge/VPIM subscribers)
- Holidays for Unity (Connection Holidays are included in the backups)
- System configuration data such as switch configuration, LDAP integration details, IMAP login data, RSA configuration, advanced settings etc..
- Password policy information
- Mailstore details - this includes aging policies and message expiration rules.
- External Service definitions for Connection. This includes phone system configuration, fax, SMS servers, calendaring integrations with Exchange or Meeting Place etc… During restore COBRAS will link references to these external services from the backup system to ones you have created on the new target Connection server for you, but you must create these external services as normal, COBRAS will not create them for you. This allows for migrations between different configurations (for instance different switch configurations on the target then on the backup).
- Secure (encrypted) messages from Connection 1.2. Connection 7.x exports and Unity 5.0 and later export include the option to include secure messages in the backup, however this is off by default. If you’ve selected to backup messages for subscribers on Connection 1.2, secure messages will not be included. If only part of the message is secure (such as a forwarded message with introduction) then that message part will not be playable when restored to another server. See the “A Word About Secure Messages” for more details on secure message support in COBRAS.
IMPORTANT NOTE: Phone passwords (PINs) from Unity 7.0, Connection 7.0 and Connection 1.2 backups will NOT be restored when importing those users into Connection 7.0 systems. This has to do with a missing functionality in the credentials management system in the 7.0 releases. This was addressed in the 7.1(3) release of Connection at which point COBRAS provides PIN support for all three versions. It is strongly recommended that you upgrade to 7.1(3) or later prior to doing imports for this reason.
A more detailed list of what’s included and not included in COBRAS backup and restore see the Data Backed Up and Restored section.
COBRAS Backup and Restore High Level Process
More detailed information about the backup and restore options and steps are provided later in the help file but this is a very high level view of the COBRAS process.
Backup
There are not many options on the backup – COBRAS gets the entire directory structure for all objects every time it does a backup. You can choose if you want to include voice names, greetings, messages or distribution list members if you like, but all other basic object data is included in every backup to provide COBRAS restore with a complete object map to use during the restore process.
Restore
The number of pages in the wizard varies if you’re importing to Unity or Connection – there are 37 pages total but you will never see all 37 in one import since Unity and Connection have different object models and options offered during restore. The pages listed here are for imports into Connection.
Wizard Part 1 (pages
2 through 9)
Select
which backed up objects you want to restore.
You can choose all or only some of the different objects in the backup for restore in these pages. It’s legal to, say, restore only a single subscriber object and nothing else (for instance someone accidentally deleted a subscriber and you need to rebuild them). Or you can restore an entire set of call handlers that comprise an audiotext application onto several Unity or Connection servers to replicate them around your networked systems.
Wizard Part 2 (pages
10 through 21)
Resolve
conflicts restoring any of the objects you selected during part 1.
If there are any conflicts with display names, extensions or aliases for any of the objects you selected to restore with existing objects in the voice mail database, you must resolve them here. You have the option of changing the names or extensions on the spot to ensure they are created as new objects, or you can choose to overwrite an existing object in the voice mail database instead.
Wizard Part 3 (pages
22 through 37)
Resolve
link references for any of the objects you choose to restore in part 1.
For every object you selected to restore in part 1 you need to tell COBRAS what to do with any links it can’t resolve. Each object type has numerous types of “links”. For instance, a call handler can have a message recipient that’s a public distribution list. If that list is not known to COBRAS (for instance you are not restoring it from the backup), you need to tell COBRAS which distribution list to use from the voice mail’s existing database instead. There are also links from user input keys, after-message destinations, exit destinations from subscriber’s inbox conversation etc… All links need to be resolved by choosing a replacement object for that link. This can be a little more work for the administrator running COBRAS but produces a much more accurate and faithful representation of the backed up system behavior when you’re done. COBRAS has logic built in to take its “best guess” for which object you may want to use as a replacement to make this as easy as possible for you, but you do want to review its choices carefully before executing the import.
Key Differences Between DiRT and COBRAS
|
DiRT |
COBRAS |
|
Works only for backing up and restoring Windows-based Unity or Connection installations. |
Can backup Windows-based Unity and Unity Connection 1.2 and restore onto Windows-based Unity or Linux-based Connection 7.0 and later. Versions of COBRAS can also, of course, export from Linux based Connection 7.0 and later. |
|
Backs up entire Unity directory including holidays, name lookup handlers, interviewers etc… |
Backs up only information about subscribers, call handlers, name lookup handlers, Interview handlers, public distribution lists, schedules and routing rules. |
|
Does a complete directory synchronization on restore and forces any existing users in AD that match a subscriber in the Unity database to “point” to the new restored box. |
Will create new subscribers or bind to existing users in AD but will not “force” a user in AD to point to the server if that user is already assigned to another Unity server. Does not force a full rebuild of the global subscriber and global location information. |
|
Only allows restores onto the same version of Unity or Connection 1.x that was backed up. |
Allows for restores onto different versions (the same or newer than the version backed up) of Unity and Connection regardless of the version or product that was backed up. Be sure to review the differences in data provided in the different versions of Unity or Connection you back up in the help sections that follow. |
|
Must restore the entire backup. |
Allows for individual objects to be selected for restore. |
|
Backup is very quick because it’s getting entire SQL table as a single binary blob using MS SQL’s backup capability. |
Backup is somewhat slower given it pulls data for each object one at a time and constructs a set of MDB files that contain the object data and messages (if included). |
|
Uses ExMerge from Microsoft for getting entire inbox contents for messages. The account you use to run backups needs to have full send as/receive as rights for all mailboxes touched. |
Uses MAL interface to get just voice mails (no emails, receipts or faxes) for message backups of Unity. This means you need to run the tool as the account associated with AvCsMgr service on the Unity server for message backups and restores. However this does allow for message backups of both Exchange and Domino backed systems. |
|
Will not recreate membership information for public distribution lists in a new directory other than “top level” members. |
Will create public distribution lists and include all members it can find in the new directory to that distribution list. |
|
DiRT restores are very “heavy” in that they force an entire directory resync of all local and global object references. |
Will ask for resyncs for only new subscribers or public distribution lists being created or when information about an existing subscriber that is being updated requires a directory sync. |
|
DiRT wipes out the entire local installation during a restore. |
COBRAS is designed to allow for “merging” objects from multiple backups into one Unity or Connection restore. No information is ever removed during a restore. You are in control of COBRAS decision to create the object as new or overwriting an existing object on the target server. This allows for easy “copying” of audio text applications and the like. |
|
DiRT restores are very straight forward from an administrative standpoint because there are very few options. |
Depending on the type and extent of the operation, the administrator may have quite a bit of legwork to do during a COBRAS restore. All references and conflicts must be addressed before the restore is allowed to continue. A 37 page wizard is involved and many items may need to be manually created to complete the operation such as COS instances and switch references. |
Usage Scenarios
This is not a comprehensive list of uses but is intended to demonstrate the targeted uses of COBRAS in the field.
Straight backup and restore
COBRAS can be used for simply backing up all subscribers, call handlers, schedules, distribution lists, interviewers and routing rules and restoring them to a clean install of Unity or Connection after a failure. For just plain backup and restore scenarios where the version of Unity is not changing, however, DiRT (for Unity or for Connection 1.x) or DRS (for Connection 2.x and later) is the better tool since it’s faster and includes data COBRAS does not such as COS objects, name lookup handlers and holiday information. See the Data Not Backed Up section for more details on what’s not included with COBRAS backups.
Restore only select objects
For scenarios where Administrators would like to restore just a single object such as a subscriber, COBRAS is the ideal tool. It can be used to restore a subscriber that has been accidentally deleted or update the user’s settings (including greeting and voice name) if they’ve been changed or lost for some reason. COBRAS can also restore just that subscriber’s messages.
This can be as many or as few objects of any type that COBRAS backs up. If an administrator accidentally deletes a schedule, you can restore just that schedule information. If a call handler or several handlers are deleted or someone changes the user input keys or whatever, those handlers can be recreated/updated.
NOTE: All settings for any object you choose to restore are updated based on the backed up version. You can select which objects you wish to restore but you can NOT select which data on those objects is restored. For instance you cannot JUST restore the user input key rules for a call handler and not also update the transfer rules. Subscriber messages are optional items for restore, of course.
Restore onto a different version or product (migration)
COBRAS is unique in that it can take backed up data from a Unity 4.0(5) and restore it to a Unity 4.0(5) or later system. COBRAS can also move from Unity to Unity Connection 7.0. There are, of course, some items that cannot go between versions and products given the differences in features and data structures across them. Be sure to review the details in the Data Backed Up and Restored section below to understand what’s potentially lost when going across versions or products.
NOTE: When restoring a Unity backup to another Unity installation, the version can be different but must be later than the version backed up. You can restore to the same version or later only, you cannot restore to an older installation of Unity. See the Version Support table below.
Merge multiple backups onto a single server
Again, COBRAS is unique in that it does not require a clean installation of Unity to do a restore of some or all objects in the backup database. You can, for instance, take all subscriber data, including messages, from one Unity server and restore them onto another without damaging the existing subscribers. If you are collapsing multiple Unity servers into one, this is an ideal use of COBRAS.
NOTE: You may have to change aliases and/or extensions of subscribers to avoid conflicts. COBRAS does not allow subscribers with the same alias or extension number to be created on a restore. It does, however, allow you to change them to make those values unique during the restore process if you wish. When restoring into a Connection 7.0 or later system COBRAS does allow you to assign users, handlers, interviewers and distribution lists into separate partitions to keep extensions unique when merging multiple backups into one server. However aliases (for users and distribution lists) and display names (for handlers) need to be unique system wide in all cases. You can use the Data Viewer utility on the COBRAS home page to edit the alias and/or extension numbers of users prior to import if necessary to make this a little easier.
Copy complete audio text applications onto many servers
If you wish to move a complete set of connected call handlers that make up an audio text application, COBRAS is an easy way to do this. For instance if you deploy Unity servers with a set of handlers in a “tree” for caller input handling, you do not have to manually create those handlers on each installation any longer. You can backup a system that has these handlers on them and restore them over and over again on as many Unity servers as you like.
TIP: COBRAS lets you select objects for restore based on several criteria including sub string matches on display names. If you have several audiotext applications or a lot of handlers that are included in a “set” it can make things easier to include a unique string such as “{Sales AT}” or the like in the display name of all those call handlers in that application so they can easily be selected as a set during restore.
Version Support
The following is a table of support version paths – for Unity restores of a Unity backup the rule is you must restore it to the same version of Unity or later. You cannot backup, say, Unity 5.0 and restore it onto a Unity 4.0(5) installation. Newer data objects and conversations etc… cannot be restored into the older database so this is not allowed.
|
Backed Up Version |
Can be Restored To: |
|
Unity 4.0(3) |
Connection 7.x, 8.0, 8.5 ,8.6, 9.0, 9.1, 10.0 (no restores to Unity allowed) |
|
Unity 4.0(4) |
Connection 7.x, 8.0, 8.5, 8.6, 9.0, 9.1, 10.0 (no restores to Unity allowed) |
|
Unity 4.0(5) |
Unity 4.0(5), 4.1, 4.2, 5.0, 7.0, 8.0, Connection 7.x, 8.0, 8.5, 8.6, 9.0, 9.1, 10.0,11.x,12.x |
|
Unity 4.1 |
Unity 4.1, 4.2, 5.0, 7.0, 8.0, Connection 7.x, 8.0, 8.5, 8.6,9.0, 9.1, 10.0,11.x,12.x |
|
Unity 4.2 |
Unity 4.2, 5.0, 7.0, 8.0, Connection 7.x, 8.0, 8.5, 8.6,9.0, 9.1, 10.x,11.x,12.x |
|
Unity 5.0 |
Unity 5.0, 7.0, 8.0, Connection 7.x, 8.0, 8.5, 8.6,9.0, 9.1, 10.x,11.x,12.x |
|
Unity 7.0 |
Unity 7.0, 8.0, Connection 7.x, 8.0, 8.5, 8.6,9.0, 9.1, 10.x,11.x,12.x |
|
Unity 8.0 |
Unity 8.0, Connection 7.x, 8.0, 8.5, 8.6,9.0, 9.1, 10.x,11.x,12.x |
|
Connection 1.2 |
Connection 7.x, 8.0, 8.5, 8.6,9.0, 9.1, 10.x,11.x,12.x |
|
Connection 7.0 |
Connection 7.x, 8.0, 8.5, 8.6, 9.0, 9.1, 10.x,11.x,12.x |
|
Connection 7.1 |
Connection 7.x, 8.0, 8.5, 8.6, 9.0, 9.1, 10.x,11.x,12.x |
|
Connection 8.0 |
Connection 8.0, 8.5, 8.6, 9.0, 9.1, 10.x,11.x,12.x |
|
Connection 8.5 |
Connection 8.5, 8.6, 9.0, 9.1, 10.x,11.x,12.x |
|
Connection 8.6 |
Connection 8.6, 9.0, 9.1, 10.x,11.x,12.x |
|
Connection 9.0 |
Connection 9.0, 9.1, 10.x,11.x,12.x |
|
Connection 9.1 |
Connection 9.1, 10.x,11.x,12.x |
|
Connection 10.x |
Connection 10.x, 11.x,12.x |
|
Connection 11.x |
Connection 11.x,12.x |
NOTE: Restores to Connection 7.x or later are not supported for Business Edition 3000 (BE3K) installations. You can restore to BE5K, BE6K or a standalone install of Connection, but BE3K is not supported. You can do exports from a BE3K installation however, so you can migrate a BE3K to a standalone server if you like.
NOTE: Unrestricted versions of Connection (those that lack high encryption capabilities) cannot allow message exports using IMAP via COBRAS because the super user IMAP access needed by COBRAS for this works only over TLS/SSL which is not supported on unrestricted versions. To get messages from an unrestricted version you need to use the /UseCUMI command line option which extracts messages via HTTP which is slower than IMAP but does not require the SSL support missing in unrestricted versions. See the Getting Messages via CUMI For Connection section for more details.
Some important things to notice in this table:
- You cannot backup any version of Connection and restore it to any version of Unity.
- No Unity version older than 4.0(3) will ever be supported with COBRAS. The database interfaces used were not complete before the 4.0(3) release.
- Backups of Unity 4.0(3) and 4.0(4) can only be restored to Connection – imports into Unity are not supported for those older versions.
- You cannot ever restore INTO 4.0(3) or 4.0(4) – you can only migrate to Connection. The stored procedures necessary for Unity imports were not present and complete in versions prior to Unity 4.0(5).
- There is no backup option for Connection 2.0 or 2.1. Off box access to resources necessary was not included in those releases.
- You cannot restore a newer Unity backup onto an older Unity install. Only the same or newer versions can be restored to. The same applies to Connection backups and restores as well of course.
- Please review the information about what data you may lose when going across versions/products in the following sections carefully.
Getting Messages via CUMI for Connection
Starting with Unity Connection 8.5 and later you can use the “/UseCUMI” command line option to extract messages which allows messages to be pulled off the system using the REST based CUMI API instead of the IMAP API. This is necessary if you’re working with an “unrestricted” install of Unity Connection which does not allow for secure IMAP connections which are necessary for “super user” access to messages (secure IMAP is restricted by some countries).
As a rule you only want to do this when absolutely necessary because CUMI is far slower and less efficient than traditional IMAP so you should only use this command line option if you’re pulling messages off an unrestricted installation of Unity Connection.
To work the Unity Connection version must be 8.5 or later. “Super user” access to messages via CUMI was not in and fully supported until that version. If you’re at an unrestricted install prior to that version you will either have to leave voice messages out of the backup or first upgrade to 8.5 or later before migrating to a restricted installation of Unity Connection.
The account you use for attaching to Connection must be a user with a mailbox if you’re using the “/UseCUMI” command line option and that user must have both the remote access role (needed for ODBC) and the “Mailbox Access Delegate Account” role so they can gain access to all user mailboxes via CUMI during backup. This is checked prior to the export starting and you will get a warning message if that’s not configured properly and you’ve selected to include messages in the backup.
Finally, if you’re using secure messages and you want to extract them with the “/UseCUMI” command line option, you must enable secure messages to be exportable via the REST APIs. By default this is not allowed and secure messages will fail to export properly. In the System Settings | Advanced | API Settings section make sure the “Allow Access to Secure Message Recordings through CUMI” is checked if you want to include secure messages in the export.
Data Backed Up and Restored
At the top level, COBRAS gets all system call handlers, full subscribers (NOT internet subscribers, VPIM users, Bridge users or AMIS users), schedules, interview handlers and public distribution lists and allows them to be restored, complete with relationships between them if they exist on any supported version of Unity or Connection. See the COBRAS Export section for details on your options for backing up data.
NOTE: In recent versions of Exports of Connection some new items were added – these are not included in backups of Unity, only Unity Connection:
· User and call handler templates are now included and can be optionally restored. If you’d like to use these templates when restoring users or call handlers you will need to first restore the templates and then run import again and use them as your selected template for new users or call handlers.
· Routing rules are included
· Advanced system configuration settings are now included and can be optionally restored individually or en mass.
· Users without mailboxes (admin users) are included and can be restored.
· Roles for users are now included in the backup and restore process
COBRAS gets as much data as it can and restores as much data as possible based on what version was backed up and what version is being restored to. For instance if you back up a Unity 4.0(5) server and restore to a Unity 5.0(1) system, there is clearly a number of features new to 5.0(1) that will not be represented in the backup. In this case COBRAS just uses whatever is in the subscriber template for the missing properties. If COBRAS has data in the backup it will use it – the template is only used to fill in what it doesn’t have.
Data not backed up
Unity and Connection data not backed up
- Disabled Greeting rules. To preserve space in the backup, greeting rules that are disabled (not active) are not backed up. During restore missing greetings are forced to disabled to preserve the same functionality as the system that was backed up. Note that disabled greetings that have a custom recording associated with them ARE backed up in recent versions of COBRAS Export for Conneciton.
- Disabled MWIs. If MWIs are not configured to operate on Unity then they are not included in the backup and the subscriber template settings for MWI are used when that subscriber is restored.
- Password history, hack
count or lock status.
- GUI Passwords for Unity. Passwords used to access PCA and the SA web interfaces in Unity are Windows passwords and are not stored in Unity’s database and are not available for COBRAS to decrypt and/or backup/restore. Phone passwords, of course, are included in backup and restore since those are stored in the Unity database. GUI Passwords for Connection 7.0 and later are also included in COBRAS backup and restore since those are managed by Connection.
- Secure message settings. These are different across versions and sometimes apply only to private vs. all messages and it’s impossible to move across versions cleanly. All secure message settings are pulled from the template during subscriber creation or left alone on an over write.
- Alternative authentication settings (enhanced security). In particular, use of enhanced security options such as RSA are not included. If a user is configured for such an option, it is not included in their backup data and a new creation on the target restore server will simply use whatever is in the template and an over write of an existing user will leave whatever settings are on that account alone.
- Mailbox limits. In Unity these are pulled from Exchange or Domino and cannot be set in the Unity database and “pushed” out. Connection has its own limits. COBRAS uses the limits defined in the subscriber templates on new user creation in Connection.
- Mailstore details. This includes aging policies and message expiration rules. Those are defined in the target Connection server and get pulled from the user template during new user creation.
- Some Private List Membership Details. Only full subscribers and public distribution lists are backed up as private list members. Neither Unity or Connection backups include private lists as members of other private lists.
- Private List Alternate Names. This is a rarely used feature in Connection (Unity does not have it) – related to addressing to private lists via speech.
- IMAP mailbox connection information. Any information about a user’s connection to remote (foreign) mailstores via IMAP is not included in the backup. For Connection backups you can map a user’s IMAP connection to an existing IMAP service definition on the target that you’ve already created.
- SMS delivery device information. This is done via an external service configuration which COBRAS cannot preserve. For Connection backups you can map a user’s SMS devices to an existing SMS device on the target that you’ve already created.
- Fax server. Again, this is done via an external service configuration which COBRAS does not preserve. For Connection backups you can map a user’s fax service to an existing fax server on the target server that you’ve already created.
- Visual Message Locator (aka “Phone Apps”) setting. The message locator conversation feature is included in the backup and restore but the visual message locator requires setup on the phone side and will need to be configured after user import, they are left alone on overwrites.
- Cisco PCA settings. No details about the PCA options for a subscriber such as the refresh options, number of items shown, preferred home page etc… This includes any connection to the subscriber’s personal address book in Outlook.
- HTML Notification Device Templates. Introduced in 9.0 via the "Intelligent Notifications" feature, the templates have the HTML definition used for the custom templates that can be assigned to user's HTML notification devices. The actual custom HTML and image data is not stored in the database and is not available to COBRAS to back up. User's HTML notification devices will require you "map" the template they reference to one on the target Connection server during restore.
Unity data not backed up or not fully restored in Connection
- Secure messages. COBRAS includes an option to get secure messages from Connection 7 and later and Unity 5.0 and later, however Connection 1.2 exports cannot include secure messages. If a message contains a secure part (for instance a secure message forwarded with a nonsecure intro) the secure message itself will not be playable when restored. See the “A Word About Secure Messages” for more details on secure message support in COBRAS.
- Some private distribution list membership information from Unity. Backups only include membership information about full subscribers (users with mailboxes) and public distribution lists. Members that are remote contacts (for Unity) or other private lists (for both Unity or Connection) are not included in the private list membership backup.
- Alternate names (or “nicknames”) for users from Unity backups. This is used for ASR name searches in Unity 5.x and later. Note that backups of Connection 7.0 and later do include alternate names for users and public distribution lists.
- Custom Key Mapping data from Unity. If subscribers are assigned to one of the custom key map conversation from a Unity backup the conversation mapping itself will be preserved, however the custom key map data itself is not brought over – you must configure the key mapping conversation(s) on the target Connection server to match what you want. NOTE: Backups of Connection 7.x and later systems DO offer the option of restoring custom key mapping data to the target Connection server.
- Holiday information from Unity. System schedules are backed up as much as possible (Connection and Unity have different levels of detail for schedules), but no holiday data is included from Unity backups. Unity treats holidays as system wide and good for the entire day, Connection treats holidays as per schedule and can be defined down to the minute. Note that Connection backups do include holiday information and they are restored properly.
- For Unity public distribution lists the “Show list in email server address book.” Connection does not have this concept and Unity creation routines do not allow it to be set programmatically for imports.
- For Connection 7.0 – 10.0 call handlers cannot have distribution lists as owners. If a Unity system was backed up that had public distribution lists as owners, this is noted in the log as a warning. For restores into Connection 10.5 and later distribution lists can be owners and this data is preserved.
- For Connection 7.0 if subscribers (users) are listed as an owner in a Unity backup being restored, they are added to the owner list. Connection supports multiple owners, Unity does not – the list is not cleared, only added to.
- For Unity backups restored to Connection 7.0, the fax delivery number are not restored. In Connection the fax integration is an external service setup and the data is not stored as part of the subscriber record. For restores to another Unity system this information is preserved.
- For Unity 7.0 there is no backup of the alternate extension history or alternate extension block list data – this is used for asking to automatically add alternate extensions in the subscriber conversation.
- For Unity 7.0 the option to enable “name suggest” on spelled names is not included in the backup.
- For Unity 7.0 the option to play the “follow me transfer notification” option is not included in the backup.
- For Unity 7.0 the option of playing message duration or using message duration time stamps is not included in the backup.
- For Unity 7.0 none of the voice (speech) interface settings are backed up or restored. Unity and Connection have very different ASR implementations and these values do not translate.
Connection data not backed up
- Personal call transfer rules. These were introduced in Connection 1.2 and are not in any version of Unity at this time. No personal call transfer information is backed up or restored for any version.
IMPORTANT NOTE: Phone passwords (PINs) from Unity 7.0, Unity Connection 1.2 and Unity Connection 7.x backups will NOT be restored when importing those users into Connection 7.x systems that are earlier than 7.1(3). This has to do with a missing functionality in the credentials management system in the 7.0 releases. This was addressed in the 7.1(3) release of Connection at which point COBRAS takes advantage of it and provides PIN support for all three versions. If at all possible please try and upgrade to 7.1(3) or later prior to importing data for this reason.
IMPORTANT NOTE: Unrestricted versions of Connection (those that lack high encryption capabilities) cannot allow message exports using IMAP via COBRAS because the super user IMAP access needed by COBRAS for this works only over TLS/SSL which is not supported on unrestricted versions. For extracting messages from an unrestricted version you must use the /UseCUMI command line option which instead extracts messages via HTML protocols which are slower. See the Getting Messages via CUMI For Connection section for more details
NOTE: See the sections on limitations of message backups and restore with Unity below for details on the message data that is not preserved.
Data Changed During Connection Imports
When importing data into Connection 7.0 or later from a Unity backup, some data has to be changed. The two products have different ranges supported for some values, different conversations that are supported etc… Connection has strict database rules that do not allow for any “fudge” room for these differences and so COBRAS must force the values into an acceptable range. Whenever this is done an informational note is written to the COBRAS import log file as well as the HTML summary report indicating which value was changed, what its old value was and what its new value on Connection 7.0 is. You need to review this information for potential issues but in most cases these changes are minor.
Some examples of data that can be changed:
- Conversation names. For instance Unity supports the Hotel Guest conversation and Connection does not – references to the hotel guest conversation are changed to a standard subscriber conversation during import.
- Range values such as number of rings to wait for answer. Unity allows up to 99 Connection limits this to 20. Values greater than 20 are forced to 20 and a warning is logged.
- Speed and volume settings. Unity has more granularity for speed settings which can be stepped by 10% jumps. Connection has only 4 settings here – so COBRAS import “rounds up” to the next higher supported setting.
- Time values. For instance greetings can be set to be active till a specific time to the minute in Unity but Connection requires 5 minute boundaries. COBRAS import “rounds up” to the next higher 5 minute slot during restore.
- Time zones. The GMT offset for users will always be preserved for Unity backups being restored onto Unity or Connection. However, the actual name of the time zone may not match. There are often more than one timezone name for the same GMT offset – for instance GMT -8 hours is listed as both “Pacific” and “Tijuana, Baha”. During the restore of a Unity backup, COBRAS simply selects the first time zone that matches the GMT offset. Message playback and greeting rule expiration times and such will all be accurate but the name of the time zone may not match what was in your backup. Note that with restores of a Connection backup this is not an issue.
- Interview handler questions “compressed”. Unity allows you to create interview questions and “skip” slots and number them through 99. Connection has 20 slots and they must be filled in order with no gaps. COBRAS then ignores “empty” questions in Unity. Note that the behavior for callers remains the same.
- Codecs. Connection 7 does not support GSM 6.10 which is sometimes used with Unity. All WAV files including greetings, voice names and messages that are determined to be GSM 6.10 are converted into G711 before being uploaded to Connection 7.0 during import (see next section). Note that Connection 8.0 and later does support GSM 6.10 natively and this translation is not necessary.
- Domino aliases. When exporting from a Domino system the subscriber aliases and all references to those aliases (for instance private distribution list membership information) are modified to replace all forward slashes (“/”) with underscores (“_”). Active Directory and some other mail processing applications do not allow for forward slashes in alias/email strings.
NOTE: Most of these changes are not critical but some may change the behavior of your system in ways you were not expecting. COBRAS Import for Connection will log an information note every time any value has to be changed to bring it into compliance with Connection’s data model. It is incumbent upon you to review them in the consolidate report output after import and understand all the changes that had to be made. These messages should all be human readable and reasonably clear about the change made.
Codec Changes for Connection Imports
As noted above Unity Connection versions prior to 8.0 do not support as many codecs as Unity does in Windows. Notably it does not support playing or recording files in GSM 6.10. If you have backed up a Unity system that has any greetings, voice names and/or messages in GSM, when restored they will not play on Connection. During the import process COBRAS will convert these WAV files into G711. A note is made in the log for each WAV file that is converted into G711. For Unity Connection 8.0 GSM 6.10 is supported so this does not come into play.
Notification Device Mapping for Connection Imports
Unity and Connection have a slightly different list of notification devices. Further, Connection supports a dynamic list of devices which means you can have more notification devices of each type than Unity supports. For the most part all this is not critical, however two items come into play. Editing notification devices from the phone interface is limited to the five “base” devices for both Unity and Connection. Similarly BAT can only edit those same five devices. Other devices are imported with an ID of “other”. They work fine however they can only be edited via the SA or PCA web interfaces and not via BAT or over the phone. Editing notification devices in bulk is an unusual operation as a rule so normally this isn’t a critical issue.
The following table indicates how Unity notification devices are mapped into Connection notification devices during an import:
|
Unity Notification Device |
Connection Notification Device |
|
Text Pager 1 |
SMTP |
|
Text Pager 2 |
Other |
|
Home Phone |
Home Phone |
|
Pager |
Pager |
|
Pager 2 |
Other |
|
Work Phone |
Work Phone |
|
Spare Phone |
Spare Phone |
|
Phone 2 |
Mobile Phone |
|
Phone 3 |
Other |
|
Phone 4 |
Other |
|
Phone 5 |
Other |
|
Phone 6 |
Other |
|
Text for VMI |
Other |
|
SMS |
(not included in backup) |
Alternate Extensions
Alternate extensions are always backed up, however, during a restore they are considered secondary. In particular when determining which objects are in conflict based on what you decide to restore, the alternate extensions of subscribers you’ve selected to include are not evaluated. During the restore an attempt is always made to add the alternate extensions in when the subscriber is created, but if there is a conflict they are skipped and a warning is written to the log output. However, this does _not_ fail the creation or modification routine for the subscriber – COBRAS import will continue to move ahead. Be sure to check the log output for “(warning)” strings to check for this type of issue when restoring users to an existing system.
Language Support
COBRAS does an up front check to see if all languages in the backup are present on the target system however it will still allow the migration to proceed regardless after issuing a warning. It’s STRONGLY recommended that you have the same languages installed on the target as the source. It will restore the language settings for subscribers, call handlers and routing rules as they were backed up. If the target system does not have those languages installed, Unity and Unity Connection will both fall back to the default phone conversation language. This will not cause errors but may result in unexpected behavior. It’s up to the administrator to make sure the target system has the appropriate languages installed.
Routing Rules
Backups from Unity 4.x/5.x/7.x/8.x that are restored onto Unity 4.x/5.x/7.x/8.x include the option to insert routing rules from the backup onto the new system. Backups of any version of Connection and restores onto any version of Connection also support routing rules if you are running the restore with the “/RestoreRoutingRules” option – see the CLI options section for a full list of all CLI options.
Restores onto Connection 7.x and later do NOT offer the option to import routing rules – regardless of the version of Unity or Connection that was backed up.
NOTE: As a rule you should only include routing rules in your restore in special circumstances – it’s normally best to not try and include those unless you have a good reason to do so.
Data new to Unity 4.0(4)
· Alternate extensions enhanced with display names and aliases.
· Alternate extensions given types for admin added vs. user added extensions
· The ability to prevent skipping of the alternate greeting included for subscribers
· The ability to prevent leaving of messages via the alternate greeting (vacation rule) added
· The ability to prevent transfers off the alternate greeting (vacation rule) added.
Data new to Unity 4.0(5)
· The ability to set how many time subscriber menus replayed to callers added.
· Per user first digit and inter-digit timeouts added
· Message locator added
· Per user prompt speed option added
· Broadcast message capability added
· The ability to force users to record a voice name added.
Data new to Unity 4.1(1)
The following values were added in 4.1(1) and are not present in earlier versions. Backups of Unity 4.0(5) that are restored to this version will pull these values from the subscriber template.
- Ability to jump to new message stack automatically on log in
- Alternate contact number support
- Option to turn off the “please wait while I transfer your call” prompt for call handlers
- Option to turn off the “record your message at the tone…” prompt when taking messages
Data new to Unity 4.2(1)
The following values were added in 4.1(2) and are not present in earlier versions. Backups of earlier versions to this version will pull these values from the subscriber template.
- Per user command inter digit delay setting
- Continue add addressing mode set per user
- Confirm before delete setting per user
- Read/unread status for messages on hang-up configurable per user
- Name confirmation when addressing configurable per user
- Standard vs. streamlined message addressing conversations
Data new to Unity 5.0(1)
The following values were added in 5.0(1) and are not present in earlier versions. Backups of earlier versions to this version will pull these values from the subscriber template.
- Per user list of TUI conversations that subscribers can select in the PCA
- Voice conversation option
- SA exposes all three transfer rules for subscribers instead of forcing alternate to always be active.
- Dropped Call Recovery options per user
- Subscribers can be limited to addressing members of a specific name lookup handler (directory handler)
- Per user message locator option
- Prepend digits option for call handler transfers
Data new to Unity 7.0(2)
The following values were added in 7.0(2) and are not present in earlier versions. Backups of earlier versions to this version will pull these values from the subscriber template.
- 3 new contact rules for “follow me” functionality
- Private message flag for call
handlers
- Most Recently Used address history
(aka ”buddy lists”) were added.
COBRAS does include this information in the backup and restore
process in recent versions.
Data new
to Unity 8.0
- Properties related to digital
networking between Unity and Connection.
This comes into play only for ”Hot Mode” moves of users with COBRAS
and has no impact on the normal ”briefcase” backup/restore mode.
- Archived Mailbox Sign in conversation
used to get at mailboxes that have been migrated to Connection in a
digital network.
A Word About Migrating Unity Subscribers Between Unity Servers in a Network
One common use of COBRAS is to move subscribers from one Unity server to another in the same Active Directory network. It’s important to note that COBRAS does _not_ allow you to force overwrites of global subscriber information in this case. So if you’re moving John Smith from Unity A to Unity B you can’t just back up Unity A with COBRAS and import John Smith onto Unity B. COBRAS will see John Smith’s subscriber record on Unity B’s global subscriber table pulled from the directory and will not allow you to overwrite it.
There’s a couple different ways to approach this problem. After getting a COBRAS backup of Unity A you can follow either of these paths:
- The best way to go about this is to use Global Subscriber Manager (GSM) to move John Smith from Unity A to Unity B and then use COBRAS to restore John Smith’s more detailed backup information onto Unity B. GSM takes care of deleting the old subscriber entry on Unity A, creating them on Unity B and forcing Unity’s directory synchronization service on both servers to update Active Directory so John Smith’s directory entry now “points” at Unity B. GSM doesn’t get nearly as much data across as COBRAS does and doesn’t include call handler, schedule data or distribution lists and the like so doing a “two pass” process like this is ideal and gets the most data.
- You can delete John Smith from Unity A and wait for the directory sync to “clean” the Active Directory entry of Unity properties – this will remove John Smith from Unity B’s global subscriber table and allow you to create a new subscriber for him from a COBRAS import. The replication time can vary quite a bit depending on the network configuration so if you’re in a hurry then using GSM as noted above is a better option.
If you’ve already removed Unity A from the network or it’s crashed or the like, you’ll need to use the Remove Subscriber Properties tool (aka “Bunny Killer”) to clean the Active Directory objects of Unity properties first before being allowed to import them onto another Unity server in the network. Once the data has been removed from the Active Directory entries then Unity’s directory synchronization services will remove the user’s information from the global subscriber table on its own and you’ll be allowed to import those users into Unity via COBRAS.
COBRAS cannot simply “blast” over existing properties of user’s “tagged” as being owned by another Unity server cleanly without risk of damage to other Unity installs, so this is not allowed.
A Word About Secure Messages
COBRAS does support exporting and importing secure messages into Connection 7.x and later installations and exporting secure messages from Unity 5.x and later installations. It does not support importing secure messages into any version of Unity or to or from Connection 1.x.
COBRAS employs a highly secure AES 128 bit encryption algorithm to encrypt secure messages in the backup database. There are also additional checks required on export to see if each individual attachment (for instance a multiple part message) is secure – if it is the entire message needs to be encrypted. This will add some overhead to the export process – only select the option to include secure messages if you really need them.
There are a few important notes to keep in mind about secure messaging support:
· Secure messages can be exported from Unity 5.x and later. This is optional and it’s off by default. You must select the option to export secure messages AND provide a non trivial password used to encrypt the messages in the backup database. You will have to provide this password during restore to be able to include those secure messages. If you forget this password those messages cannot be recovered, they are lost to you.
- Secure
messages can be exported from Connection 7.x and later. This is optional and it’s off by
default. You must select the option
to export secure messages AND provide a non trivial
password used to encrypt the messages in the backup database. You will have to provide this password
during restore to be able to include those secure messages. If you forget this password those
messages cannot be recovered, they are lost to you.
- Secure
messages can NOT be exported from Connection 1.x systems.
- Secure
messages can be restored ONLY onto a Connection 7.x or later server.
- Secure
messages can NOT be restored onto any version of Unity.
- You
can NOT
extract secure messages from the backup database using the Data Viewer
utility. You can only restore
messages to a Connection 7.x or later server. These messages will be marked secure.
A Word About Deleted Messages
The COBRAS Export for Connection includes an option for including deleted messages in the backup. This is provided primarily for sites that are using COBRAS for message "archiving" purposes (i.e. backing up messages for selected users for archival/review purposes) and is not intended for migration. You should not select this option unless you have a specific reason to. If you restore user's mailboxes from a COBRAS backup that includes deleted messages they will be restored as saved (read) messages. The reason for this is the Connection SMTP processing of inbound messages does not accommodate inserting deleted messages being inserted externally - the read and unread flags are the only ones respected by the MTA in Connection currently.
A Word About Restoring Public Distribution Lists to Connection
If you are updating Public distribution list membership during your restore to Unity Connection 7.x or later, keep in mind that you must do that attached to the Connection server that “owns” that public distribution list. COBRAS will let you restore whatever lists you want (it won’t stop you from selecting lists that are homed on other servers) – it will update the voice name and/or create new lists on the server you attached to as necessary. HOWEVER, if you select to update membership from the data in the backup on a public distribution list that is homed on another Connection server than the one you attached to, no membership data will be updated. The post import report will have a warning message about this letting you know which Connection server you need to run COBRAS against to update membership data for that public distribution list.
Connecting to Remote Connection Servers for Both Export and Import
Both COBRAS Export and Import require a remote administration account be configured and the remote database proxy service activated and started. See the Preparation for Connection Imports section for details on this – the same procedure is necessary for both Export and Import – Exports do not require any SMTP service settings to be changed however.
When you first start COBRAS Export or Import for Connection 7 or later, you will see a login dialog box that will be empty except for port 20532 filled in as the default for the port and cannot be changed. This is used for ODBC access to Connection. You must provide the server name or IP address for the “Server” field and provide the login and password for the database connection account. Use the alias and web administration password of the database user created above for the login and password fields.
The login dialog shown here is for the COBRAS Export and includes an additional option for providing a separate login for an HTTP proxy server that may require it.
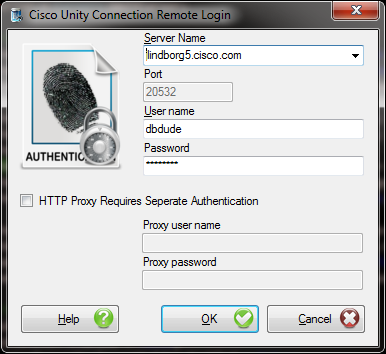
COBRAS will remember your entries including the password (which is stored in a secure hash). Each time you run COBRAS it will load the settings of the last connection you made (or attempted to make). Every server you’ve successfully connected to in the past will be listed in the drop down list in the order in which you connected to it last – most recent to least recent.
NOTE: The login and password information is stored along with the local Windows login name. Only those servers that have been attached to successfully using the current Windows login will be listed. If you are logging into the same Windows server with different users you will only see servers connected to with that particular Windows login.
NOTE: Some login errors will fail quickly and give you a chance to try a different pair. Other types of failures however, results in a 60 second timeout while CUDLI waits for the Informix ODBC driver to return. Unfortunately this cannot be shortened. Type carefully. There is no reason to change the port any longer – it’s there for legacy reasons.
NOTE: Attaching to a remote Connection server over a WAN or VPN link to do a large import is not recommended. It is best to use a LAN connection if at all possible. Issues with WAV file uploads and large remote database operations can cause timeout errors when going over a VPN or slow WAN link.
Troubleshooting Remote Connection Failures
- The most common issue with remote connection failures is the database proxy service has been stopped for one reason or another. This service will not start automatically after a Connection server restart and is shut down automatically after a configured number of days. There have also been several defects along the way that cause it to simply stop on its own. If you cannot log into the remote system and you are certain you’ve configured the remote user correctly and are using the right login/PW then double check the status of the remote database proxy service. It is often a good idea to stop and start it again – make sure it comes up in a running state (i.e. not “pending”). There is no harm in stopping and starting this service, it’s only role is providing off box tools with direct database access.
- Make sure nothing is blocking access to the port being used to create the ODBC connection. In Connection 7.x and later this should always be port 20532.
- Make sure the Informix ODBC driver is installed. Note that if you’re on a 64 bit operating system this still must be the 32 bit ODBC driver since COBRAS (as all Connection tools at this time) are 32 bit applications. The ODBC driver download page has two versions of the 32 bit driver that have been tested – if you’ve downloaded your own copy from IBM this may be an issue.
Message Export/Import for Connection 12.x and later
Connection 12.0 and later ship with secure IMAP connections turned off by default. For message extraction in 12.0 and later you must:
1. Attach the server to a licensing service. You cannot turn on secure protocols for a server that is not licensed – as such you cannot extract messages via IMAP until you’ve licensed the server.
2. From the Unity Connection CLI logged in as an administrator you need to run the command “utils cuc encryption enable”. Once this is done successfully the secure IMAP connection used by COBRAS and other tools will be enabled.
COBRAS Export
NOTE: If you are exporting from Connection 7.0 and later, be sure to review and follow the steps in the Important Preparation for Connection 7.0 and Later Imports and Exports section before continuing.
The COBRAS Export is very straight forward.
Backup File locations
Select a folder where backups will be stored. Each backup run will create a new folder _under_ this location that is named similar to this:
C:\<your backup folder location>\COBRAS_Backup_071108_18_36_14\
The number at the end is <year><month><day>_<hour>_<minute>_<second> that the backup is run. This folder will contain a file called “UnityDbData_Backup_071108_18_36_14.MDB” in all cases. If you’ve also selected to backup subscriber messages there will be another file named “UnityMessage_Backup_071108_18_36_14.mdb” in there.
NOTE: You may see more than one message backup file if you have a large mail database. Each message backup file contains a maximum of 3000 voice mail messages. If there are more than that to be backed up you will see additional message backup files for each set of 3000 messages.
You can select how many of these backup folders COBRAS will save before deleting old ones using the options found under the configure menu (see the Backup Options section). By default it’s set to 5 but can be adjusted from 1 to 365. Therefore, if you run COBRAS 6 times or more, only the most recent 5 backup folders will be left around. If you are including messages and/or you are backing up very large servers and drive space is a consideration, you may want to set this to value to “1” or “2” such that only the most recent or last 2 backups are saved.
Log File locations
Log files are stored under the COBRAS Backup installation directory under the “Logs” folder. This is not configurable. By default COBRAS will keep 30 days worth of logs around before deleting old logs. Again, you can configure this from 5 days up to 90 (see the next section). Log files are only cleaned up when a backup is run so if you have not run COBRAS in a while there may be log files in the folder older than the number of days you have specified.
Limiting Which Mailboxes Are Backed Up
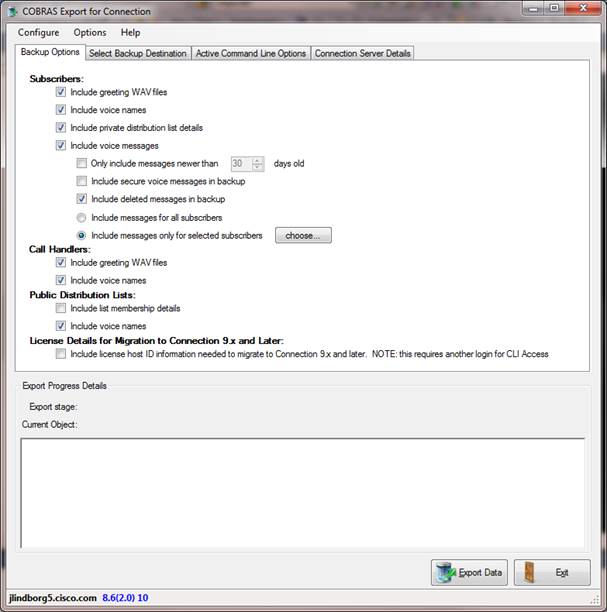
When exporting, COBRAS always gets all the directory information about all objects on the system. You can limit if it gets voice names, greetings or distribution list membership but that’s about it. Messages can result in considerably larger amounts of backup time and database space. As such COBRAS export allows for you to either select to export no messages, all messages or only messages for selected subscribers. To access the option to select specific subscribers to backup mailboxes for, select the “Include Messages Only for Selected Subscribers” radio button under the message export checkbox and then press the “Choose” button. The following dialog is displayed:
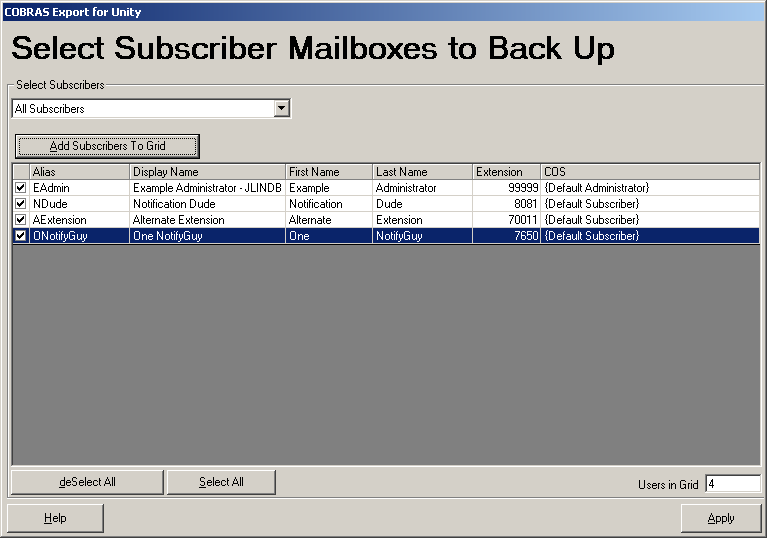
You can add users to the grid by a variety of options including COS membership, display name sub string, extension range or CSV file membership. Once the list of subscribers you wish to include is as you like it, press the “Apply” button and a filter file is created that COBRAS export will use when exporting messages for subscribers. This same filter file will be used for scheduled backups as well so long as the radio button for limiting mailbox output to subscribers in the list is active.
You can view the subscribers in the currently active filter file by choosing the “Show subscribers in existing mailbox filter” in the drop down on the above dialog – you can review and remove users by unchecking them on the left and then press “Apply” to save the new filter file.
If you choose to add users to the filter file using a CSV file of your own, the first line of the file must contain a column for “ALIAS” or “EXTENSION” or both. All other columns are ignored and only those two items can be used for searching for subscribers by CSV.
Limiting Which Messages Are Backed Up
In addition to deciding which mailboxes to include in the backup (see above) you can also select to include secure messages and limit the age of the messages backed up. See the “A Word About Secure Messages” for more details on secure message support in COBRAS.
By default secure messages are not included in the backup and this option does not appear for Unity Connection 1.2 backups. If you are exporting a Unity 5.0 or later system or a Connection 7.0 or later system this option is available to you. When you select this option you are prompted to provide a non trivial password to use for encrypting the messages with AES 128 bit encryption. Those messages cannot be extracted to the local hard drive with the COBRAS Database Viewer utility and will only be restored to another Connection system as a secure message if you provide the SAME password during the import process. There is no way to reconstruct the password for you – if you forget this password your secure messages in your backup are effectively lost to you. Be sure to use a password you won’t forget.
To limit the maximum age of messages you can use the “Only include messages newer than…” checkbox. This value can be from 1 to 999 days and it defaults to off – meaning all voice messages for all mailboxes being backed up will be included. If you set this value it applies to the arrival time and date of the message. There are other time/dates on messages such as sent time, last updated time and such. The filter here applies specifically to the arrival time of the message in the user’s inbox.
Limiting Which Distribution Lists to Backup Membership For
Similar to limiting which mailboxes are backed up, you can determine which public distribution lists COBRAS will “walk” in the directory to get a fully flattened membership list for. Given that COBRAS has to do this in Active Directory and potentially walk many sub lists, this can take some time and it may be desirable to limit this to only a few important lists instead of all of them Unity is aware of.
If you select the “Include Membership For Selected Lists” radio button and press the “Choose” button, the following public distribution list selection dialog is shown:
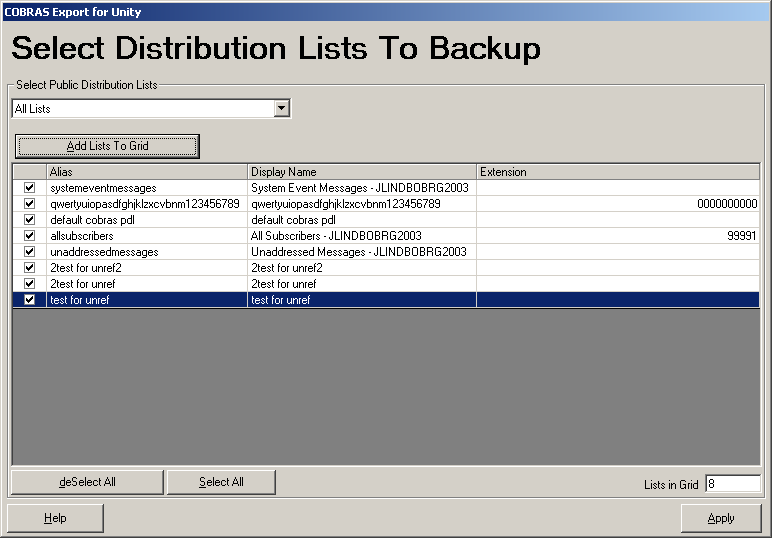
Like other dialogs of its kind there are several selection options to find the lists you want. Once you have all the public distribution lists you want COBRAS to generate membership information for, press the “Apply” button and this list will be saved as a CSV file in the application folder. When backups are done only these distribution lists will have their membership generated until you change the list or select a different option for the COBRAS distribution list behavior.
Backup Options
In the Configure menu you can access the “settings” dialog which lets you determine how many days to get log files around for and how many backups (both database and messages if selected) to keep.
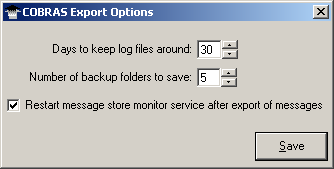
By default COBRAS saves 5 backups and 30 days worth of logs. You can set this to as few as 1 backup and 5 days worth of logs up to 365 backups and 90 days worth of logs. Keep in mind that backups can be quite large, particularly if messages are being saved so keep in mind the storage needs if you decide to keep larger numbers of backups around.
The option to restart the message store monitor service after the export of messages defaults to off. In some cases an extended export of messages from Unity will cause the message monitor service to become inactive and this forces COBRAS to kill the service and restart it. This will result in a full MWI resync. Normally this is not required, only turn this option on if you need to.
On the main form you can select options for backups. These options are saved to the registry and are used by default every time you run COBRAS backup until you change them again and do a successful backup run. Note that these same saved settings are used if you run a scheduled backup (see the next section).
- Voice names and greetings can be selected for subscribers, call handlers and public distribution lists. If you’re only interested in the “skeleton” of an audio text application, for instance, you can save time and database size by unchecking these options.
- Private Lists are optional for subscribers. Membership resolution during restore uses the alias of the subscriber or public distribution list that are members of these private lists. If you are restoring select users into a new system where those aliases will not be found or you just don’t want to include this information, you can uncheck this option.
- Public distribution list membership is optional. When exporting information from a Unity attached to Exchange this requires the account that you are logged in as to have rights to iterate over members of distribution lists in Active Directory. Often this will mean making sure you are logged in as the account assigned to the CsMGR service. This process is also quite slow in some cases and will add a significant amount of time to your backup for large installs with many lists. If you cannot use the account associated with the CsMgr service and you have rights issues with this option, then please uncheck this option. TAC will simply direct you to use the account associated with CsMgr and will not troubleshoot your rights issues into AD any further. See the Manually Selecting a Domain Controller for use in Public Distribution List Membership Export section below for options on how to attach to AD for this operation.
- Subscriber
Messages are optional. This option
will produce a 2nd MDB file (and possibly more – see Backup File locations above) separate
from the directory backup and includes ONLY voice messages. No receipts, emails, faxes or other
message types will be included in the message backup. Only read and unread voice messages from the inbox will
be included (no deleted messages, no messages in other folders, no sent
item information). No
broadcast messages are included either.
If you require more detailed backup (for instance in a Unified
Messaging configuration) then you should use Microsoft’s ExMerge utility which ships with Exchange to backup full mailbox information and restore it on your
own or another 3rd party backup package that gets the entire
mailbox. Please refer to vendor’s
documentation for details on the use of these tools.
This option requires you be logged in as an account that can attach to the AvCsMgr service – this usually means the Unity message store service account. If you have rights issues attaching to the DOH trying to use another account and for some reason you cannot use the account associated with the AvCsMgr service, then please don’t use this feature. TAC will direct you to use this account and will not troubleshoot further if you attempt to try another account for this purpose. That is not supported. In this case, again, refer to the ExMerge documentation from Microsoft for another option on mailbox content backup and restore.
Manually Selecting a Domain Controller for use in Public Distribution List Membership Export
By default COBRAS simply uses a Windows API call to get the “closest” domain controller to the current Unity server when attaching to Active Directory. In situations where there are multiple domain controllers and/or complex rights issues that require the use of a specific domain controller, you can dictate to COBRAS which DC to connect to. Under the Options menu choose the “Manually select a domain controller” option and the following dialog will come up:
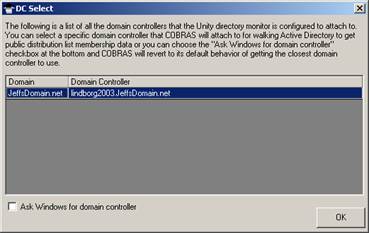
All the domain controllers visible to the Unity directory monitor will be shown (often there is only one as in the screen shot above).
If you choose a specific DC to use, COBRAS will attach directly to that DC when accessing Active Directory to get public distribution list membership data. This DC is saved in the registry and will be used in future runs of COBRAS export automatically, including scheduled backups. To go back to the default behavior of asking Windows for a DC, open the dialog again, check the “Ask Windows for domain controller” box and hit “OK”. This will cause COBRAS to always ask Windows for which DC to connect to.
Scheduled Backups on Unity
Scheduled backups for running nightly/weekly backups of your Unity or Connection 1.x installation can be configured using the “Configure” menu and selecting “Schedule backups”. The backup scheduler dialog will pop up:
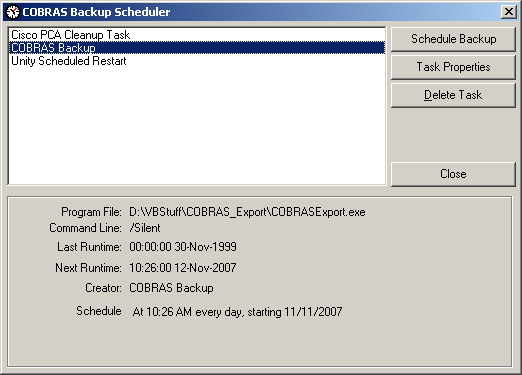
Notice that _all_ items in the Windows scheduler interface are shown, not just COBRAS backup schedules. You can delete and edit any of them in this dialog, so be cautious. The schedule interface is pretty straight forward – if you edit an existing schedule event or create a new one, you’ll see the schedule dialog:

It’s important to note that you need to remember to check the “Enabled” box at the bottom (it is not checked by default) and set the password for the “run as” account – this will default to the account you’re currently logged in as. Without both of these things done, scheduled COBRAS backups will not execute properly.
NOTE: The configuration you have setup in the last backup you’ve run or whatever configuration you have when you select “save settings” under the Configuration menu is what COBRAS will use when the scheduled task runs. You cannot have one set of options configured for scheduled backups and another when you run it manually interactively. If you wish to do something different manually, remember to setup the options you want for the scheduled backup and use the “Save settings” option to set them.
For Unity backups, information about the backup (errors, warnings, success info) will be logged to the Windows event log when they are run as a scheduled task. COBRAS does not write information to the event log if you run it manually at the desktop or for any Unity Connection backups. The event log information for COBRAS includes these 3 message types (eventIDs 1, 2, and 3):
Information for start
and stop of backup look like this (start is eventID
1, finished is 2) :
Event Type: Information
Event Source: COBRASBackup
Event Category: COBRAS Backup Status
Event ID: 1
Description: COBRAS Backup Started
Errors are EventID 3:
Event Type: Error
Event Source: COBRASExport
Event Category: COBRAS Backup Status
Event ID: 3
Description: (error) Could not log into DOH for message backup – skipping messages for this run.
Scheduled Backups for Connection 7.x and Later
The backup option for COBRAS Exports for Connection 7.x and later are somewhat more sophisticated than for Unity. The reason for this is that a single COBRAS export installation on a Windows box may be connection to several Connection servers for backup purposes. As a result the ability to do backups of multiple different Connection servers from one installation is necessary.
To accomplish this the COBRAS export for Connection keeps track of all login, password and backup options including the target folder for each server you connect to. As such you can schedule separate backups for SERVERA going to a folder called SERVERA and backups to SERVERB going to a folder called SERVERB and so on. All the folder aging policies and such work the same as for Unity backups (see above) but are applied to each folder individually.
NOTE: COBRAS will NOT run multiple instances of itself – if you schedule multiple backups to fire up at the same time or overlapping times the one started later while another is active will fail, create a log file saying it cannot run while another is active. Be sure to schedule backups on the same Windows machine such that there is time for one to end before another begins or use multiple Windows workstations if you must.
The login dialog for Connection 7x export is also a bit more sophisticated in that it keeps encrypted hashes of all the login and password details around so when you select a server you’ve connected to in the past from the drop down box it will fill all that information in for you automatically.
Finally, you’ll notice that exports done with COBRAS for Connection will include the name of the server you backed up in the folder name, MDB files created for directory and messaging backups and all the log file names to help keep this information differentiated.
Adjusting Processing Speed
By default COBRAS export runs a “normal” processing priority. This should be reasonably safe to run while Unity is taking a small number of calls. If you are running a backup while the system is not taking any calls and speed of backing up is more important, then you can run it at higher priority. If the system is busy and you want to avoid damaging system performance during the backup you can run it at a lower priority.
Under the Options menu you’ll see a “Processing Speed” option that allows you to select one of the three speeds. Your choice “sticks” for the next run and will be used for any scheduled backups as well.
NOTE: For systems that are configured for failover capability, if you run at a high priority and the system is taking calls it may result in Unity going into “failover” mode because the database is too busy – if you are running a failover configuration it is not recommended that you run any faster than “normal” priority, even if there is no load on the system to avoid going into failover mode.
Backups of Business Edition (also called CoResident) Installations
Business Edition or CoResident installations is a product that includes Call Manager and Unity Connection installed on a single server providing phone and voice mail functionality in one package for smaller installations.
In previous versions of COBRAS export the phone passwords (PIN) were not backed up if it was a CoResident installation. Starting in COBRAS Export version 1.0.49 the ability to fetch PIN via an AXL based database fetch into Call Manager’s database was added. A check is made up front if the installation is detected to be a CoResident configuration and if it is the ability to fetch data via an AXL call is tested using the credentials you supplied when attaching to the Connection service. If AXL is allowed, PINs will be included. If not, you are allowed to continue the export without PINs anyway if you wish, however it’s strongly suggested that you provide AXL connectivity before doing the backup.
In a CoResident installation you will need to create an Application or End User account in Call Manager that is then imported into Connection and granted the Remote Administration role (see the configuration notes on that here). You will also need to associate that user with a group that has the “Standard AXL API Access” role associated with it in Call Manager’s interface. The super users group has this, however it’s normally better style to create a group just for AXL access, assign just the AXL API Access role to it and then assign your user to that group.
To create a new group in Call Manager, go to the Cisco Unified CM Administration page and under “User Management” select “User Group”. Select to add a new group, give it a name and hit the “Save” button. Once the group has been added choose the “Assign Role to User Group” option in the “Related Links” list in the upper right of the group page and click the “Go” button. Click the “Assign Role to Group” button and a list of all the roles defined will show. You need to select the “Standard AXL API Access” role in this case and then press the “Add Selected” button at the bottom of the page. Once you return to the group role assignment page, press the “Save” button at the bottom and your new group is configured.
Once the group is created and configured you can assign your user to that group by going to either the End User or Application User page in the User Management menu item and using the “Add to User Group” option. Once they’ve been added to the group and you press Save the “Standard AXL API Access” role should show up for that user in their “Roles” list below groups.
NOTE: Make sure the “Cisco AXL Web Service” is activated in the service management section of the “Cisco Unified Serviceability” page on your system. Be default the service is not active.
To test your AXL connectivity you can insert your server name into this URL:
https://<server name>:8443/axl/
If the service is running you should get a login dialog – provide the login and password of the application user account above and you should see a screen that says the service is up and taking logins. If you don’t get a login dialog make sure the service is started. If you get a failure at the login, check your password and group assignment steps above.
Requirements/Special Notes
The backup has been tested on Windows 2000 and 2003 server, Windows XP and Windows Vista. Note that with Vista you will need to run the application with the “as administrator” option so it can create local WAV files on the file system and such.
All COBRAS applications are 32 bit and require the IBM Informix ODBC drivers for 32 bit operating systems. If you are running COBRAS export for Connection on Vista 64 bit or Windows 2008 64 bit, you will need to install the 32 bit drivers as COBRAS runs explicitly in 32 bit. See the Informix ODBC driver download page for details.
Unity or Connection must be up and running for a backup to take place.
Before running the
COBRAS Export utility I strongly recommend you take some steps to clean up any
database inconsistencies in your install. Make sure the latest version of dbWalker
runs clean prior to doing a backup.
Remember, any database inconsistencies present in the backup will be
encountered during restore. Garbage in
means Garbage out so try and start with as clean a backup as you can get.
Backup supported for Unity 4.0(3), 4.0(4), 4.0(5), 4.1(x), 4.2(x), 5.0(x), 7.0(x) or 8.0(x) with Exchange or Domino as the back end or with Connection 1.2, 7.x or 8,x and later.
Backups of Unity 4.0(3) and 4.0(4) can only be restored to a Connection 7.x or later - you cannot restore to a Unity installation. You can also never restore INTO a Unity 4.0(3) or 4.0(4) server.
No backup or restore support planned for Connection 2.x due to access limitations on the server.
NOTE: When backing up Connection 1.2 the command line tool for extracting messages provided by Connection does not handle spaces in user’s aliases. If you have users that have a space in their alias string you will need to remove it or messages will not be included for those users on export.
NOTE: When backing up Unity versions, if you select the option to include messages you MUST be logged in as the account associated with the AvCsMgr service. If not COBRAS Export will not allow the export to start until you uncheck the option for message export. There is no exception or work around for this, you have to be logged in as that account to export messages.
COBRAS Import
The import process is where all the detail work for administrators comes into play. Depending on what you want to do, you will need to fill out information on most or all of the 20 to 23 wizard panels in the COBRAS Import wizard. This may seem a bit daunting but for a typical configuration much of what you need to configure is either simple or already preconfigured for you. However, please be very cautious and check all the values before moving on.
The short version is that COBRAS needs to preserve all the many relationships between objects being restored and, in cases where that cannot be achieved (for instance you are only restoring a handful of users or call handlers from a large backup) you must tell COBRAS what to do with relationships that are no longer valid.
COBRAS is different than previous tools in that it lists the objects that are referenced which it cannot find and asks that you provide a corresponding object to replace that reference with. For instance if you have a call handler that is owned by John Smith and you are restoring just that call handler, COBRAS will ask you to select a subscriber on your target voice mail server to “stand in” for John Smith. ALL references to John Smith by that call handler (i.e. one key rules, owner, message recipient etc…) will be replaced by the subscriber you select. You MUST select a subscriber to replace John Smith, you cannot run through and pick a different owner, different recipient, change one key rules to not point at John Smith etc… This is a different model than used in the past with tools like Global Subscriber Manager and the like, but for functions like merging many objects into an existing installation this works much better and cleaner and provides a better all around solution even though on the surface it may look more complex.
This new model means you can select some or all subscribers and/or call handlers and/or public distribution lists and/or schedules and/or routing rules for restore. It’s completely legal to restore a single system schedule and nothing else. COBRAS is smart enough to only require you to resolve conflicts or dependencies based on what you select to restore.
Important Preparation for Connection 7.0 and Later Imports and Exports
If you are restoring a Unity or Connection 1.x backup onto Connection 7.0 or later or Exporting from Connection 7.0 or later there are a couple of important things to take note of.
- If you have a version earlier than Connection 7.0(2) installed, make sure you’ve “relaxed” all transfer and dial out restriction tables prior to import. It’s easiest to just change them to allow all numbers and then put them back after import. This will not be necessary with Connection 7.0(2) or later. The easiest way to do this is to just uncheck all the “Blocked” checkboxes for each transfer and delivery restriction table (no need to worry about fax numbers, COBRAS does not restore those to Connection). When the import is complete you can then go back and check these again.
- If you are restoring from a Unity 7.0, Connection 1.2 or Connection 7.0 backup into a Connection version earlier than 7.1(3), phone passwords will NOT be preserved from the backup. The password from the subscriber template selected for new user creation will be used when new users are created and existing phone passwords for users will remain in place as is when overwriting existing user data. If you’re restoring to Connection 7.1(3) or later PINs are preserved
- If you are restoring from a co-res installation (Call Manager and Connection on the same server), again phone passwords will not be preserved. The subscriber template’s PIN will be used for new user creation.
In addition, Connection 7.0(1) and later comes “out of the box” configured to not allow remote connections to the database for security reasons. To be able to run a data and message import into Connection requires you create a user with the rights to attach to the database remotely, activate the remote data service and, optionally, open access to inbound SMTP messages for importing messages. Do the following tasks.
NOTE: Remote data access configuration is also necessary for running tools such as the Database Explorer (CUDLI), User Data Dump (CUDD) and other diagnostic or reporting tools
NOTE: Restores to Connection 7.x and later are supported only for stand alone installations – you cannot import backups into co-resident (Business Edition) installations.
Task 1: Configure a User with the Remote Administrator and System Administrator roles
1. Go to the Cisco Unity Connection Administration web interface for your installation.
2. You can leverage a user with or without a mailbox for off box data access purposes, but it’s strongly suggested that you create a new user without a mailbox that is used solely for the purpose of remote administration tasks for security reasons. If you are backing up messages you MUST use a user without a mailbox for this purpose – a user with a mailbox may not be allowed to extract messages from other mailboxes, whereas a user without a mailbox should have no problem.
3. Be sure the web administration password for this user is not configured to require a change at first login on the “Password Policy” page for that user.
4. If necessary, change the web administration password on the “Change Password” page. Note that only the web application password comes into play for remote data access.
5. Finally, on the “Role” page for the user, add the “Remote Administrator” and the “System Administrator” roles to the “Assigned Roles” list and save. You can assign any or all other roles as well but for the purposes of remote access to the database and making updates to users those two are necessary.
Task 2: Set the Database Proxy Service Shutdown Time
For Unity Connection 10.0 and later this step is not necessary – this is no shut down timer any longer.
Out of the box the database proxy service is not running and if you try to start the service it will shut down right away. First you need to set the “Database Proxy: Service Shutdown Timer” value found in the System Settings -> Advanced -> Connection Administration section of the Cisco Unity Connection Administration page. By default this is 0. You can set it to as high as 999 days if you like. After the number of days configured here the remote database proxy service will shut down. This is useful if you want to do some migration work, for instance, and don’t want to forget to have the service disabled for security reasons.
NOTE: If you restart the server, the remote database proxy service will remain shut off. After a system restart you have to go in and manually turn on the service again (see step 3)
Task 3: Activate the Remote Database Proxy Service
1. Out of the box the service that listens to remote database requests is not active, you must turn it on. To do this, go to the “Cisco Unity Connection Serviceability” web admin page.
2. On the Tools menu, select the “Service Management” page.
3. The “Connection Database Proxy” item under the “Optional Services” section will be marked as “Deactivated” and stopped. Press the “Activate” button and it will be activated and started automatically.
Once you’ve started the proxy service you can connect with any tool that needs off box database access using the user name, web administration password and port “20532”.
NOTE: The service will automatically shut down after the number of days configured in step 2 above or if you restart the server.
Task 4: (Optional) Enable SMTP Connectivity For Importing Messages
If you are restoring messages from a COBRAS backup to a Connection 7.0 or later system you will need to enable access to send SMTP mail messages into the system. You must disable any authentication restrictions on the SMTP service to do this.
1. Go to the “SMTP Configuration” section of the “System Settings” in the Cisco Unity Connection Administration web page.
2. On the “Server” page check the “Allow Connections from Untrusted IP Addresses”
3. Uncheck the “Require Authentication from Untrusted IP Addresses”
4. Select “Disabled” for the “Transport Layer Security from Untrusted IP Addresses” and save your changes.
The Unity Connection SMTP Server configuration
page should look like this at the bottom:

NOTE: Once COBRAS is done importing messages you should go uncheck the “allow Connections From Untrusted IP Addresses” option on this page.
Restore Process
I realize 20+ pages seems alarmingly long, but don’t panic. It’s not nearly as bad as it sounds. The first 7 pages are selecting the backup you want to restore from and which objects you want to restore. Easy. Then you need to indicate what to do with potential conflicts (i.e. we can’t have two “John Smith” subscribers with extension 1000 in the system) on pages 8 through 12. Then you tell COBRAS what to do with references it cannot resolve in the rest of the wizard.
NOTE: You will only see pages you have something to review or configure on. So if there are no missing call handler references, for instance, you wont see that page in the wizard. As such in a typical restore you’ll see fewer than 22 pages of the wizard – this is by design.
NOTE: When doing a restore you will have the option of selecting routing rules to restore and then later where to put them if you run the import with the “/RestoreRoutingRules” option. These two pages are not shown when restoring to a Connection 7.x or later system. See the CLI Options section for a list of all CLI options.
The easiest way to get a feel for what’s involved is to just go through the wizard one page at a time.
Main Form
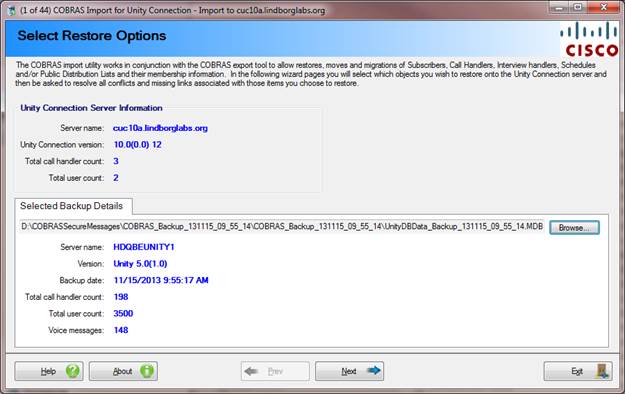
The first panel is what you’d expect – you have to select a backup MDB file to load. Before you are allowed to advance to the next page, COBRAS Import checks the backup file to make sure it’s valid and the version of COBRAS export that created it is compatible with the version of Import you’re trying to run. Since update to the backup file database structure may change across versions, both the backup and import portions of COBRAS may have to be updated which requires this type of check. When updating your import be sure to update the export you’re using as well to avoid compatibility problems.
Select Subscribers to Restore
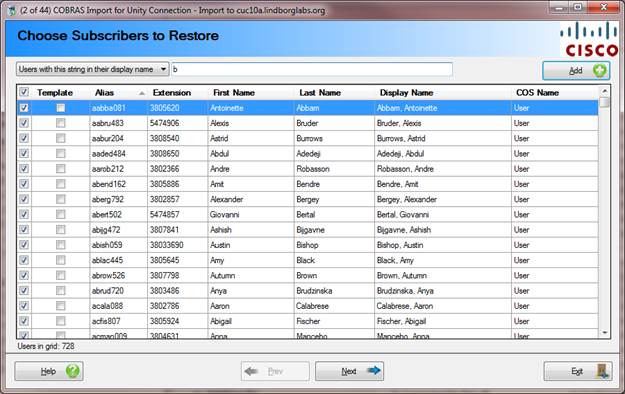
This page allows you to select subscribers you wish to restore from those in the backup. Remember, only FULL subscribers are included in the backup. Internet subscribers, Bridge, AMIS, SMTP users and such will not be included. COBRAS will either create new subscribers for these users or update existing users in the target voice mail server depending on your input later in the import wizard. As noted earlier it is not required that you choose any subscribers on this page before moving on.
There are 5 options for selecting subscribers from the backup file:
- All Subscribers
- Subscriber with extensions in a range
- Subscribers included in a CSV file. The CSV file needs to contain the column names “ALIAS” and/or “EXTENSION” in the first line of the file. Values must be comma separated and you can have as many other columns named anything else you wish, the data will simply be ignored. If both ALIAS and EXTENSION are present the Extension is searched for first followed by the Alias.
- Subscribers assigned to a Class of Service
- Subscribers with a string in their display name. Multiple sub strings separated by a “;” are allowed here.
Select Call Handlers to Restore
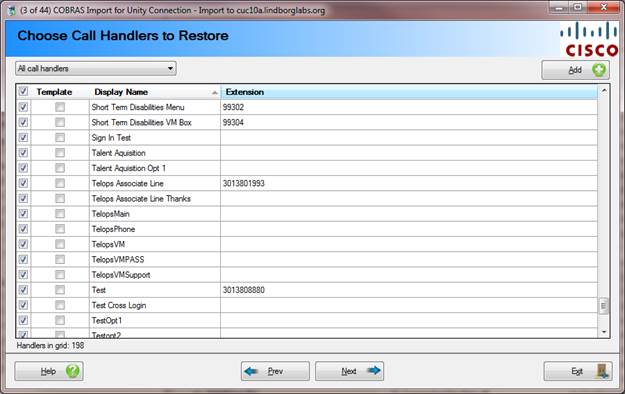
This page is the call handler selection page. Again, you are not required to select any call handlers here if you don’t wish to restore any handler data. As with subscribers, all selected call handlers will either be created as new or over write existing call handlers on the target voice mail server depending on your answers later in the Import Wizard.
There are 4 options for choosing call handlers from the backup database:
- All Call Handlers
- Call handlers with an extension in a specified range
- Call handlers found in a CSV file. The file must contain comma separated data and the field name of “ALIAS” and/or “EXTENSION” and/or “DISPLAY_NAME” in the first line. All other columns found will be ignored but one of those columns must be found for the search to proceed. NOTE that Connection backups do not have aliases for call handlers – that field will only be used to search for handlers in a Unity backup.
- Call handlers with a sub string in the display name. Multiple sub strings separated by a “;” are allowed here.
Select Post Greeting Recordings to Restore
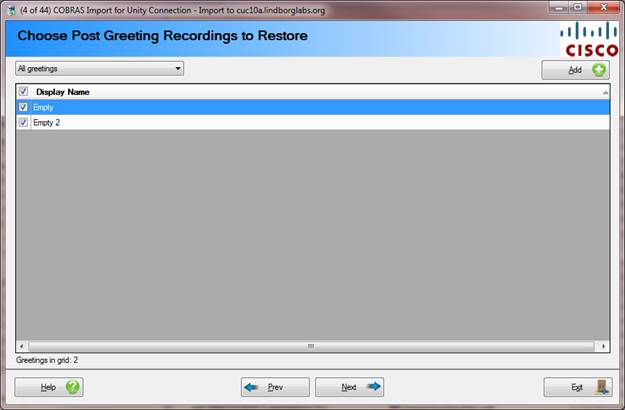
If you are restoring from a Connection backup that included one or more post greeting recordings (custom recordings that play after the greeting is played for a handler but before a recording is taken), then this page will show allowing you to restore them to the target Connection server.
There are only two options for choosing greetings since there are rarely more than a handful of them on a typical system:
· All greetings.
· Greetings containing sub string in their display names. You can enter a string or multiple strings separated by a semicolons to search for.
Select Interview Handlers to Restore
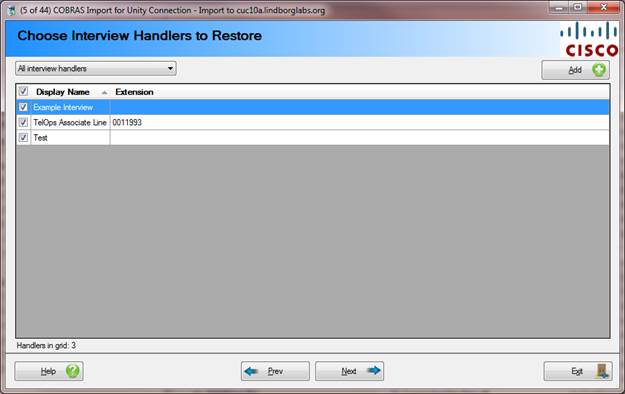
This page allows you to select which interview handlers to restore from the backup, if any. It’s not necessary to choose any interview handlers if you don’t wish to.
There are 4 options for selecting interview handlers for restore from the backup file:
- All interview handlers
- Interview handlers with an extension in a range.
- Interview handlers found in a CSV file. The file must contain comma separated data and the field name of “ALIAS” and/or “EXTENSION” in the first line. All other columns found will be ignored but one or both of those columns must be found for the search to proceed.
- Interview handlers with a sub string in their display name. Multiple sub strings separated by a “;” are allowed here.
Select Directory Handlers to Restore
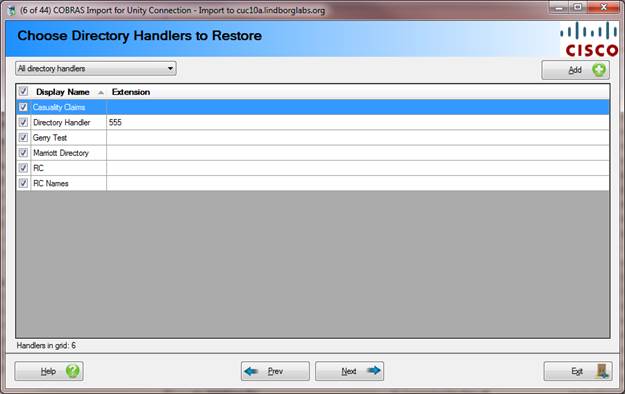
If you’re restoring to a Connection server and are using a recent backup, this page allows you to select which directory handlers to restore from the backup, if any. It’s not necessary to choose any directory handlers if you don’t wish to.
There are 3 options for selecting interview handlers for restore from the backup file:
- All directory handlers
- Directory handlers with an extension in a range.
- Directory handlers with a sub string in their display name. Multiple sub strings separated by a “;” are allowed here.
Select Custom Key Maps to Restore
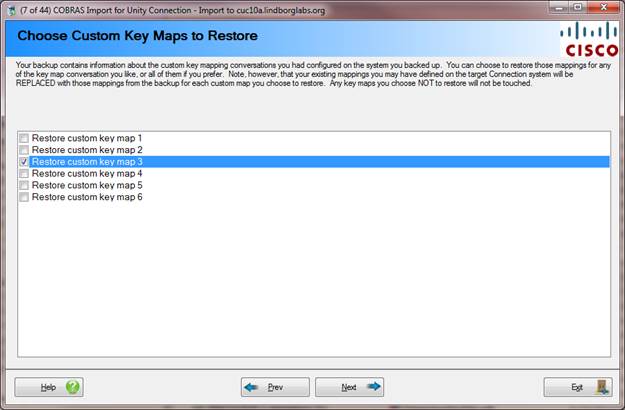
If you are restoring from a Connection 7.x or later backup done with a recent version of COBRAS Export, you will have the option to restore your custom key mapping data from the backup to the target Connection server. Only custom key map conversations included in the backup will be available for selection on this page. For instance if you are restoring a 7.0(1) backup you will only see 3 active checkboxes here (the others will be disabled) since 7.0 had only 3 custom key map conversations. Later versions of Connection include 6 custom key map conversations.
By default no key maps will be selected. If you choose to restore a custom key map conversations ALL settings for that conversation will be replaced with what’s in the backup for that conversation. Only custom key map conversations you select on this page will be touched, the rest will be left alone.
Select Public Distribution Lists to Restore
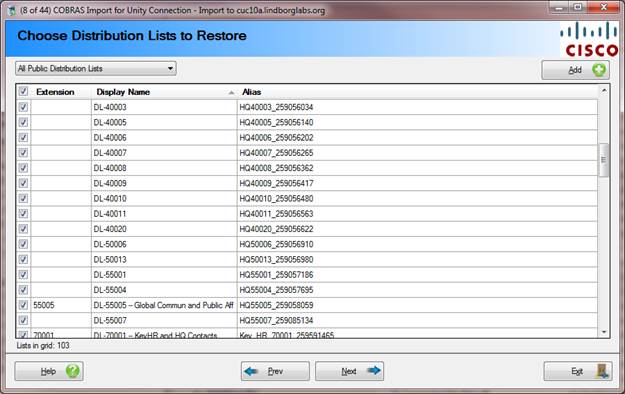
This page allows you to select which distribution lists from the backup, if any, you’d like to restore. If public distribution list membership information was included in the backup, an attempt to restore this will be made as well. Again, it’s not necessary to choose any public distribution lists on this page if you don’t want.
There are 4 options for selecting public distribution lists for restore from the backup file:
- All public distribution lists.
- Public distribution lists with an extension in a range.
- Public distribution lists found in a CSV file. The file must contain comma separated data and the field name of “ALIAS” and/or “EXTENSION” in the first line. All other columns found will be ignored but one or both of those columns must be found for the search to proceed.
- Public distribution lists with a sub string in their display name. Multiple sub strings separated by a “;” are allowed here.
Select Configuration Settings to Restore
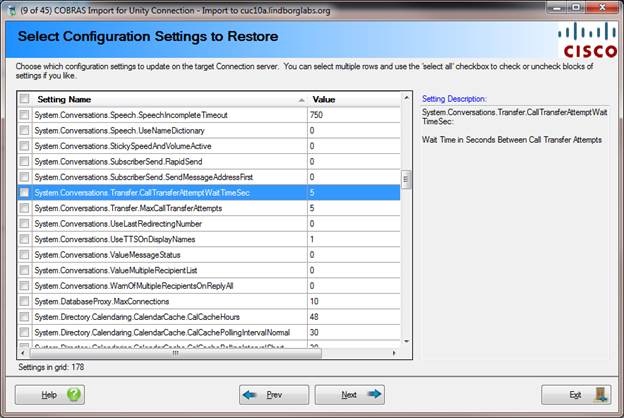
If you’re restoring from a recent Unity Connection backup you have the option to restore some or all of the advanced settings to the target Connection server.
Settings are only updated (there is no concept of adding new settings that do not exist). If the value from the backup matches the value already in the configuration table for the target Connection server no changes is made for that setting.
You can select blocks of settings (for instance all Conversation settings) by selecting multiple rows and using the “select all” checkbox in the top left of the form. You can either hold the control key down and pick different rows or you can hold the shift key down after selecting a row and then select another row further down the grid – all rows between the one you first selected and the next one you select will automatically be highlighted.
Select Schedules to Restore
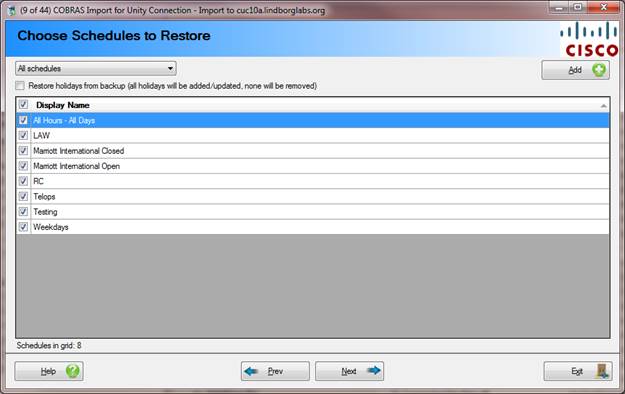
This page allows you to select which system schedules you’d
like to restore on the system from the backup data files. There
are two options for selecting schedules to restore:
- All Schedules
- Schedules with a sub string in their display name. Multiple sub strings separated by a “;” are allowed here.
Select Templates to Use During Import
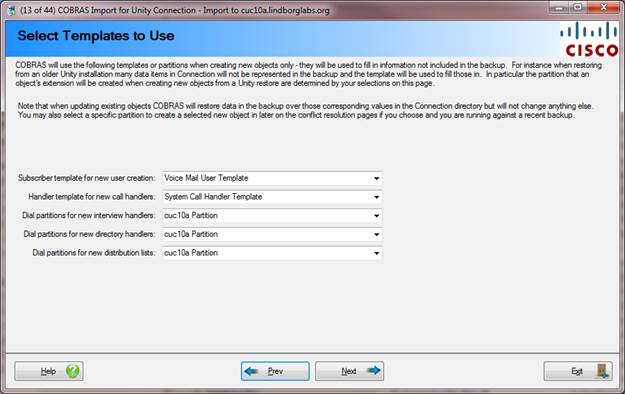
This page allows you to select templates or partitions for new object creation. Only items for which you’ve selected at least one object to restore will be enabled (for instance in the screen shot above no distribution lists were selected for restore so the option is disabled).
The template or partition is used when creating new objects only, not for updating existing objects. You select this here such that extension conflicts done later in the wizard are specific to the partitions that you will be adding new objects to.
If you wish to create new objects in multiple different partitions you will have to run COBRAS multiple times and select different templates or partitions to do that.
NOTE: When restoring from a Unity backup to Connection 7 or later all objects have to be associated with dial partitions when created. Since Unity does not have this concept, the partitions associated with the user and call handler templates are used for all new user and new handler creation for this purpose. The partitions are taken from the template and used as the default for all new objects created, however you can manually change which partitions are used on the conflict resolution pages later in the wizard. It’s best to create all your partitions, search spaces and templates with as simple a design as possible prior to starting your imports – this is especially true if you’re “merging” multiple Unity backups into a single Connection installation and there are overlapping extensions to be dealt with.
Select to Restore Corporate Email
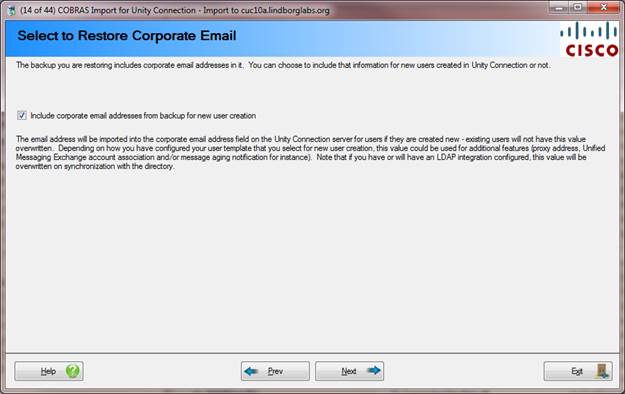
If you are restoring from a Unity backup or a Connection 7.1 or later backup, users will have a corporate email address associated with them. If you are restoring to a Connection 8.5 or later server then you have the option to add that email as a corporate email address which is separate from the email address created for each Connection user when they are added to the system. This is used for email notification functions (for instance where the SMTP email notification goes when a new voice mail arrives for a Connection user).
This is only applied to new users at creation time, this address has no effect on existing users that are being updated.
Resolve Partition References (Connection 7.x and later backups only)
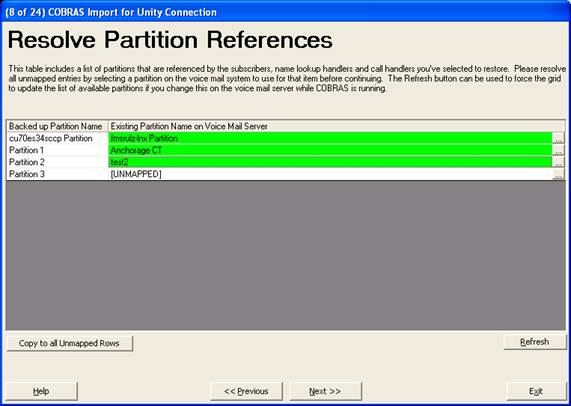
When restoring a Connection 7.0(1) or later backup into Connection 7.x or later you are given the opportunity to map all dial partition references in the backup to a corresponding partition in the existing voice mail database. You must resolve all references before being allowed to continue.
Note that you can map multiple partitions in the backup to a single partition in the new voice mail database, however this is NOT a good idea. All extensions in all partitions MUST be unique and trying to merge partitions is never a good idea. You can put multiple partitions into the same search space and have the results ordered – if you wish to “merge” partitions this is a better approach. It’s best to have a one-to-one mapping for all partitions in your backup to partitions in the new voice mail server.
Resolve Call Handler Conflicts
Starting with page 9 of the wizard, we move away from selecting WHAT to restore and determining HOW to restore it. The next five pages allow you to decide if you’re going to have objects you selected to restore created as new, unique objects in the target voice mail server or have them over write (replace) objects that are already there.
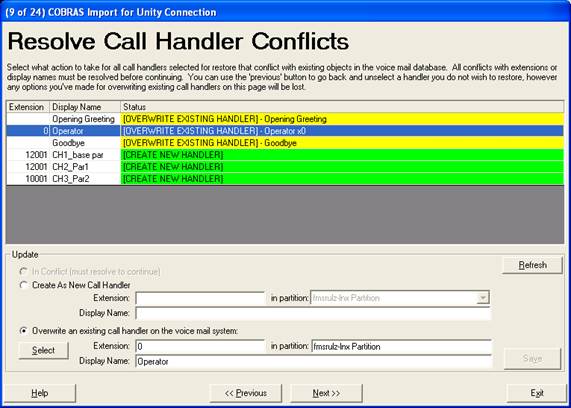
This page shows all the call handlers you selected to restore earlier in the wizard. Each call handler will be in one of three states in the grid:
- CREATE NEW HANDLER. These rows are green and indicate that the display name and extension of the call handler on this row are all unique and that COBRAS will create a new call handler on the target voice mail server. If you want this handler to replace an existing one on the voice mail server you can select the ”Overwrite an existing call handler on the voice mail system” radio button at the bottom and then press the ”Select” button to get a search dialog to find a call handler you wish to overwrite. ALL DATA for the selected call handler will be replaced with the backed up call handler data except for the name and extension. Choose carefully. Once you do this and press the ”Save” button, the row will change to OVERWRITE EXISTING HANDLER and turn yellow.
You can select a different partition to create the handler in – the partition shown will default to that found in the call handler template you selected earlier.
NOTE: If you choose to change the extension or display name of a call handler using the ”Create as new call handler” radio button and then saving, those changes are saved into the backup files. In other words if you change a call handler from ”Test Handler 1” with extension 1000 to ”Test Handler 2” with extension 1001 to avoid a conflict and save it, the next time you do a restore with this backup set, that handler will still be setup as ”Test Handler 2” with extension 1001. If this is undesirable behavior for you, make sure to do your restore using a copy of your backup database.
- OVERWRITE EXISTING HANDLER. These rows are yellow and indicate that the alias/display name and extension all matched an existing call handler on the system. COBRAS will default to assuming you want to over write the corresponding call handler on the target voice mail system. You can change this selecting the ”Create as new call handler” radio button and then editing the extension and/or display name values in the ”Update” box at the bottom and pressing the ”Save” button. If the display name and extension are unique the row will change to CREATE NEW HANDLER and turn green. If they are not unique you will get a dialog box telling you which object it’s conflicting with.
NOTE: When overwriting an existing call handler, the display name, alias and extension will not be changed on the existing call handler. All other data from the backup will be applied to the handler.
- CONFLICT. This means either the display name or the extension, but not both, matches an existing call handler so COBRAS can’t assume which one you want to overwrite if any. The name of the call handler or other object it’s in conflict with is noted in the row. You must choose a radio button at the bottom of the page to determine if you want to create this as a new call handler by changing the display name or extension or choosing a call handler on the voice mail server to overwrite and then pressing ”save”. You cannot move to the next dialog until there are no handlers marked as CONFLICT.
You can use the previous button to go back and remove a call handler from the list to be restored or add others. The selection of other objects such as subscribers and schedules will not be affected by this so you won’t lose any information at this point.
Resolve Subscriber Conflicts
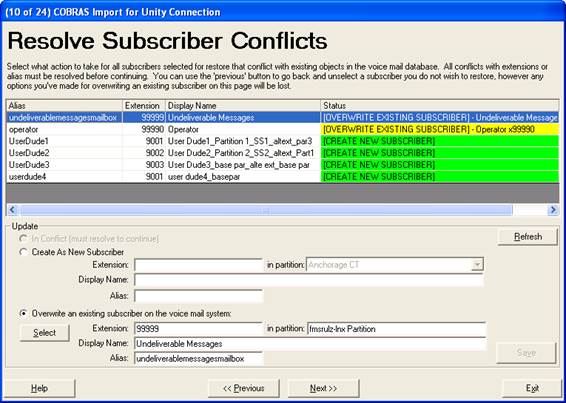
This page shows all the subscribers you selected to restore earlier in the wizard. Each subscriber will be in one of three states in the grid:
- CREATE NEW SUBSCRIBER. These rows are green and indicate that the display name, alias and extension of the subscriber on this row are all unique and that COBRAS will create a new subscriber on the target voice mail server. If you want this subscriber to replace an exiting one on the voice mail server you can select the ”Overwrite an existing subscriber on the voice mail system” radio button at the bottom and then press the ”Select” button to get a search dialog to find a subscriber you wish to overwrite. ALL DATA for the selected subscriber will be replaced with the backed up subscriber data except for the name, alias and extension. Choose carefully. Once you do this and press the ”Save” button, the row will change to OVERWRITE EXISTING SUBSCRIBER and turn yellow.
You can select a different partition to create the subscriber in – the partition shown will default to that found in the user template you selected earlier.
NOTE: If you choose to change the extension, alias or display name of a subscriber using the ”Create as new subscriber” radio button and then saving, those changes are saved into the backup files. In other words if you change a subscriber ”John Smith1”with extension 1000 to ”John Smith2” with extension 1001 to avoid a conflict and save it, the next time you do a restore with this backup set, that subscriber will still be setup as ”John Smith2” with extension 1001. If this is undesirable behavior for you, make sure to do your restore using a copy of your backup database.
- OVERWRITE EXISTING SUBSCRIBER. These rows are yellow and indicate that the alias, display name and extension all matched an existing subscriber on the system. COBRAS will default to assuming you want to over write the corresponding subscriber on the target voice mail system. All Unity subscriber data will be overwritten except for the alias, name and extension as well as the mailstore information including the email address which are not touched by COBRAS. In short, if you can edit it in the Unity System Administration console, it will be updated by COBRAS. You can change this by selecting the ”Create as new subscriber” radio button and then editing the extension and/or display name and/or alias values in the ”Update” box at the bottom and pressing the ”Save” button. If the display name, alias and extension are unique the row will change to CREATE NEW SUBSCRIBER and turn green. If they are not unique you will get a dialog box telling you which object it’s conflicting with.
NOTE: When overwriting an existing subscriber, the display name, first name, last name, alias and primary extension will not be changed on the existing subscriber. All other data from the backup will be applied to the user. Alternate extensions will be added to the subscriber from the backup on a best effort basis – no existing alternate extensions are ever removed. If there’s an extension conflict the alternate extension is not added and a warning is logged and shows up in the consolidated report at the end of the import process.
- CONFLICT. This means some combination of the display name, alias, or extension, but not all, match an existing subscriber so COBRAS can’t assume which one you want to overwrite if any. The name of the subscriber or other object it’s in conflict with is noted in the row. You must choose a radio button at the bottom of the page to determine if you want to create this as a new subscriber by changing the display name, alias or extension or choosing a subscriber on the voice mail server to overwrite and then pressing ”save”. You cannot move to the next dialog until there are no subscribers marked as CONFLICT.
You can use the previous button to go back and remove a subscriber from the list to be restored or add others. The selection of other objects such as call handlers and schedules will not be affected by this, however, choices you made earlier for call handler remapping may be reset if you go back to the beginning.
Resolve Distribution List Conflicts
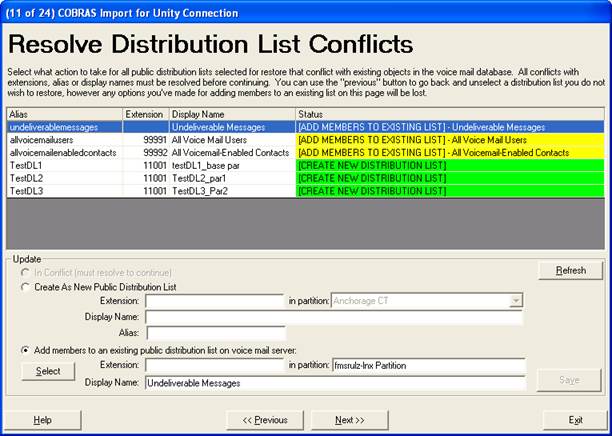
This page shows all the distribution lists you selected to restore earlier in the wizard. Each distribution list will be in one of three states in the grid:
- CREATE NEW DISTRIBUTION LIST. These rows are green and indicate that the display name and extension of the distribution list on this row are all unique and that COBRAS will create a new distribution list on the target voice mail server. If you want to instead add members to an existing distribution list, select ”Add members to an existing public distribution list on voice mail server” at the bottom of the form and use the ”Select” button to choose a distribution list. No other data on the distribution list will be touched other than attempting to add members to the list. The extension or display name are not touched on the existing list.
You can select a different partition to create the list in – the partition shown will default to the partition you selected for new lists earlier.
NOTE: If you choose to change the extension or display name of a distribution list using the ”Create as new distribution list” radio button and then saving, those changes are saved into the backup files. In other words if you change a distribution list from ”Test List 1” with extension 1000 to ”Test List 2” with extension 1001 to avoid a conflict and save it, the next time you do a restore with this backup set, that distribution list will still be setup as ”Test List 2” with extension 1001. If this is undesirable behavior for you, make sure to do your restore using a copy of your backup database.
- ADD MEMBERS TO EXISTING LIST. These rows are yellow and indicate that the display name and extension both matched an existing distribution list on the system. COBRAS will default to assuming you want to add members to the corresponding distribution list on the target voice mail system. You can change this selecting the ”Create as new distribution list” radio button and then editing the extension and/or display name values in the ”Update” box at the bottom and pressing the ”Save” button. If the display name and extension are unique the row will change to CREATE NEW DISTRIBUTION LIST and turn green. If they are not unique you will get a dialog box telling you which object it’s conflicting with.
- CONFLICT. This means either the display name or the extension, but not both, matches an existing distribution list so COBRAS can’t assume which one you want to update if any. The name of the distribution list or other object it’s in conflict with is noted in the row. You must choose a radio button at the bottom of the page to determine if you want to create this as a new distribution list by changing the display name or extension or choosing a distribution list on the voice mail server to add members to and then pressing ”save”. You cannot move to the next dialog until there are no distribution lists marked as CONFLICT.
You can use the previous button to go back and remove a distribution list from the list to be restored or add others. The selection of other objects such as subscribers and schedules will not be affected by this, however, any changes you’ve made on the subscriber and call handler conflicts page may be lost if you go back to the beginning.
Resolve Interview Handler Conflicts
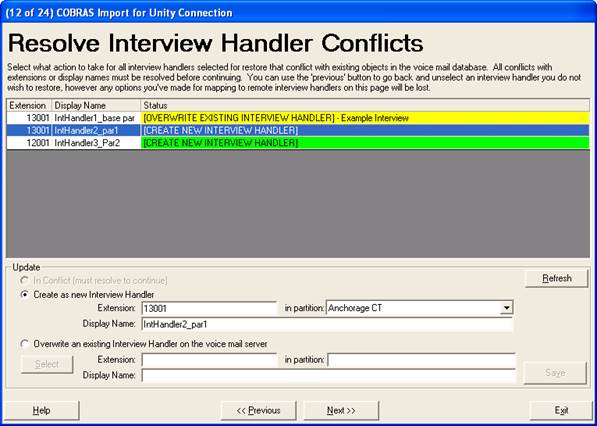
This page shows all the interview handlers you selected to restore earlier in the wizard. Each interview handler will be in one of three states in the grid:
- CREATE NEW INTERVIEW HANDLER. These rows are green and indicate that the display name and extension of the interview handler on this row are all unique and that COBRAS will create a new interview handler on the target voice mail server. If you want to instead overwrite an existing interview handler, select ”Overwrite an existing Interview Handler on the voice mail server” at the bottom of the form and use the ”Select” button to choose an interview handler.
You can select a different partition to create the interviewer in – the partition shown will default to the partition you selected for new interviewers earlier.
NOTE: If you choose to change the extension or display name of an interview handler using the ”Create as new interview handler” radio button and then saving, those changes are saved into the backup files. In other words if you change an interview handler from ”Test interview 1” with extension 1000 to ”Test interview 2” with extension 1001 to avoid a conflict and save it, the next time you do a restore with this backup set, that interview handler will still be setup as ”Test interview 2” with extension 1001. If this is undesirable behavior for you, make sure to do your restore using a copy of your backup database.
- OVERWRITE EXISTING INTERVIEW HANDLER. These rows are yellow and indicate that the display name and extension both matched an existing interview handler on the system. COBRAS will default to assuming you want to overwrite that interview handler on the target voice mail system. You can change this selecting the ”Create as new interview handler” radio button and then editing the extension and/or display name values in the ”Update” box at the bottom and pressing the ”Save” button. If the display name and extension are unique the row will change to CREATE NEW INTERVIEW HANDLER and turn green. If they are not unique you will get a dialog box telling you which object it’s conflicting with.
NOTE: When overwriting an existing interview handler, the display name and extension will not be changed on the existing interview handler. All other data from the backup will be applied to the interviewer.
- CONFLICT. This means either the display name or extension, but not both, matches an existing interview handler so COBRAS can’t assume which one you want to update if any. The name of the interview handler or other object it’s in conflict with is noted in the row. You must choose a radio button at the bottom of the page to determine if you want to create this as a new interview handler by changing the display name or extension or choosing an interview handler on the voice mail server to overwrite and then pressing ”save”. You cannot move to the next dialog until there are no interview handlers marked as CONFLICT.
You can use the previous button to go back and remove an interview handler from the list to be restored or add others. The selection of other objects such as subscribers and schedules will not be affected by this, however, any changes you’ve made on the subscriber and call handler conflicts pages may be lost if you go back to the beginning.
Resolve Directory Handler Conflicts
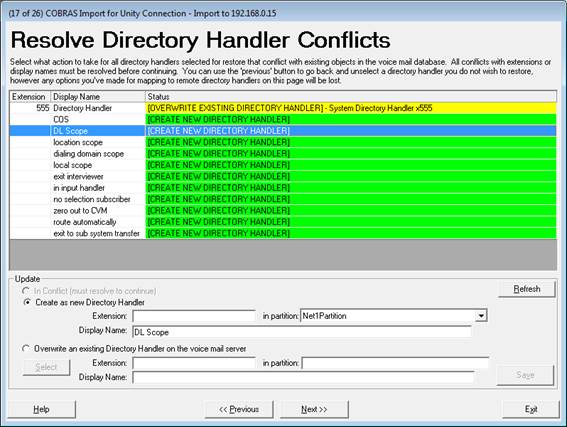
If you’re restoring to a Connection server using a recent backup, this page shows all the directory handlers you selected to restore earlier in the wizard. Each directory handler will be in one of three states in the grid:
- CREATE NEW DIRECTORY HANDLER. These rows are green and indicate that the display name and extension of the directory handler on this row are all unique and that COBRAS will create a new directory handler on the target voice mail server. If you want to instead overwrite an existing directory handler, select ”Overwrite an existing Directory Handler on the voice mail server” at the bottom of the form and use the ”Select” button to choose a directory handler.
You can select a different partition to create the handler in – the partition shown will default to the partition you selected for new directory handlers earlier.
NOTE: If you choose to change the extension or display name of an directory handler using the ”Create as new directory handler” radio button and then saving, those changes are saved into the backup files. In other words if you change a directory handler from ”Test 1” with extension 1000 to ”Test 2” with extension 1001 to avoid a conflict and save it, the next time you do a restore with this backup set, that directory handler will still be setup as ”Test 2” with extension 1001. If this is undesirable behavior for you, make sure to do your restore using a copy of your backup database.
- OVERWRITE EXISTING DIRECTORY HANDLER. These rows are yellow and indicate that the display name and extension both matched an existing directory handler on the system. COBRAS will default to assuming you want to overwrite that directory handler on the target voice mail system. You can change this selecting the ”Create as new directory handler” radio button and then editing the extension and/or display name values in the ”Update” box at the bottom and pressing the ”Save” button. If the display name and extension are unique the row will change to CREATE NEW DIRECTORY HANDLER and turn green. If they are not unique you will get a dialog box telling you which object it’s conflicting with.
NOTE: When overwriting an existing directory handler, the display name and extension will not be changed on the existing directory handler. All other data from the backup will be applied to the directory handler.
- CONFLICT. This means either the display name or extension, but not both, matches an existing directory handler so COBRAS can’t assume which one you want to update if any. The name of the directory handler or other object it’s in conflict with is noted in the row. You must choose a radio button at the bottom of the page to determine if you want to create this as a new directory handler by changing the display name or extension or choosing a directory handler on the voice mail server to overwrite and then pressing ”save”. You cannot move to the next dialog until there are no directory handlers marked as CONFLICT.
You can use the previous button to go back and remove a directory handler from the list to be restored or add others. The selection of other objects such as subscribers and schedules will not be affected by this, however, any changes you’ve made on the subscriber and call handler conflicts pages may be lost if you go back to the beginning.
Resolve Post Greeting Recording Conflicts
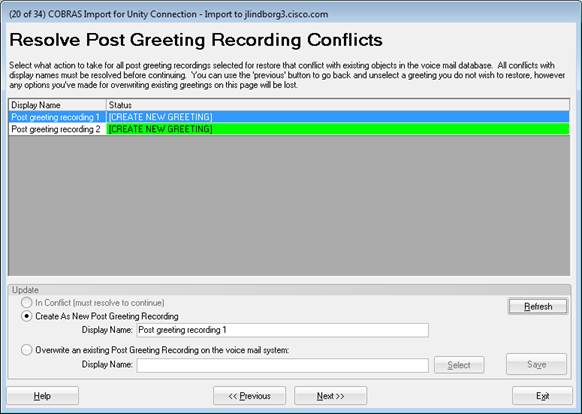
This page shows all the post greeting recordings you selected to restore earlier in the wizard. Each greeting will be in one of two states in the grid:
- CREATE NEW GREETING. These rows are green and indicate that the display name of the greeting on this row is unique and that COBRAS will create a greeting on the target voice mail server. If you want to instead overwrite an existing greeting, select ”Overwrite an existing Post Greeting Recording on the voice mail system” at the bottom of the form and use the ”Select” button to choose a greeting. Only the greeting details will be updated, the name won’t be changed.
NOTE: If you choose to change the display name of a greeting using the ”Create as New Post Greeting Recording” radio button and then saving, those changes are saved into the backup files. In other words if you change a greeting from ”Test greeting 1” to ”Test greeting 2” to avoid a conflict and save it, the next time you do a restore with this backup set, that greeting will still be setup as ”Test greeting 2”. If this is undesirable behavior for you, make sure to do your restore using a copy of your backup database.
- OVERWRITE EXISTING GREETING. These rows are yellow and indicate that the display name matched an existing greeting on the system. COBRAS will default to assuming you want to update the corresponding greeting on the target voice mail system. You can change this by selecting the ”Create as new post greeting recording” radio button and then editing the display name in the ”Update” box at the bottom and pressing the ”Save” button. If the display name is unique the row will change to CREATE NEW GREETING and turn green. If they are not unique you will get a dialog box telling you which greeting it’s conflicting with.
You can use the previous button to go back and remove a greeting from the list to be restored or add others. The selection of other objects such as subscribers and schedules will not be affected by this, however, any changes you’ve made on the subscriber, call handler, and distribution list conflicts pages may be lost if you go back to the beginning.
Resolve Schedule Conflicts
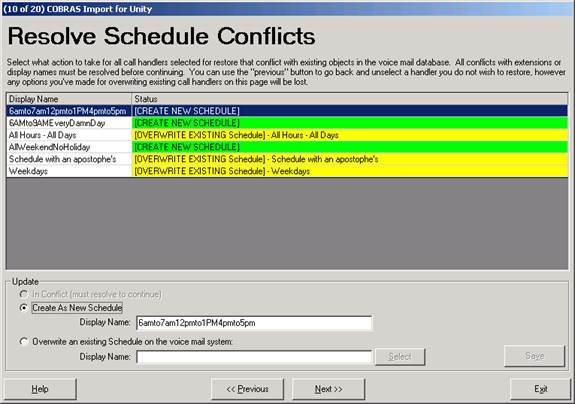
This page shows all the schedules you selected to restore from page 5 of the wizard. Each schedule will be in one of two states in the grid:
- CREATE NEW SCHEDULE. These rows are green and indicate that the display name of the schedule on this row is unique and that COBRAS will create a schedule on the target voice mail server. If you want to instead overwrite an existing schedule, select ”Overwrite an existing Schedule on the voice mail system” at the bottom of the form and use the ”Select” button to choose a schedule. Only the schedule details will be updated, the name won’t be changed.
NOTE: If you choose to change the display name of a schedule using the ”Create as New Schedule” radio button and then saving, those changes are saved into the backup files. In other words if you change a schedule from ”Test Schedule 1” to ”Test Schedule 2” to avoid a conflict and save it, the next time you do a restore with this backup set, that schedule will still be setup as ”Test Schedule 2”. If this is undesirable behavior for you, make sure to do your restore using a copy of your backup database.
- OVERWRITE EXISTING SCHEDULE. These rows are yellow and indicate that the display name matched an existing schedule on the system. COBRAS will default to assuming you want to update the corresponding schedule on the target voice mail system. You can change this by selecting the ”Create as new schedule” radio button and then editing the display name in the ”Update” box at the bottom and pressing the ”Save” button. If the display name is unique the row will change to CREATE NEW SCHEDULE and turn green. If they are not unique you will get a dialog box telling you which schedule it’s conflicting with.
You can use the previous button to go back and remove a schedule from the list to be restored or add others. The selection of other objects such as subscribers and schedules will not be affected by this, however, any changes you’ve made on the subscriber, call handler, and distribution list conflicts pages may be lost if you go back to the beginning.
Resolve Schedule References
The remaining wizard pages involve telling COBRAS what to do with references that it cannot resolve on its own. There are many references from call handlers and subscribers to other objects – some 30 separate possible links exist that have to be resolved. COBRAS consolidates these into lists of object types all together. COBRAS does not tell you HOW these objects are referenced, only that some reference to them is made by some object you’re restoring.
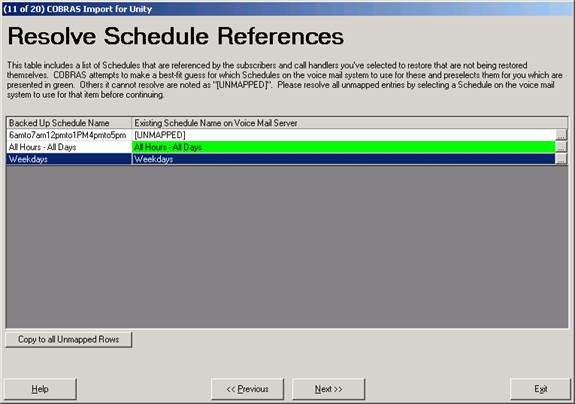
This page shows all the system schedules that you are not restoring from backup but that are referenced by a call handler or subscriber that you’ve selected to restore. In other words if you select to restore all schedules from your backup, there should be nothing on this page. However, if you did not restore one or more schedules from your backup for some reason, you will need to map those references to a schedule on the target voice mail server. COBRAS will map them for you if the schedule name matches exactly but if it can’t, the schedule will be listed as “UNMAPPED” and you will have to select a schedule yourself. Click the “…” button to the right of the grid and you can search all schedules on the voice mail server. The wizard will not let you move on until all UNMAPPED rows have references.
Mapping a schedule reference will not change any properties on that schedule at all. It simply means any time COBRAS is rebuilding a call handler or subscriber and the backed up schedule name is referenced, the mapped schedule you selected will be used.
Resolve Post Greeting Recording References
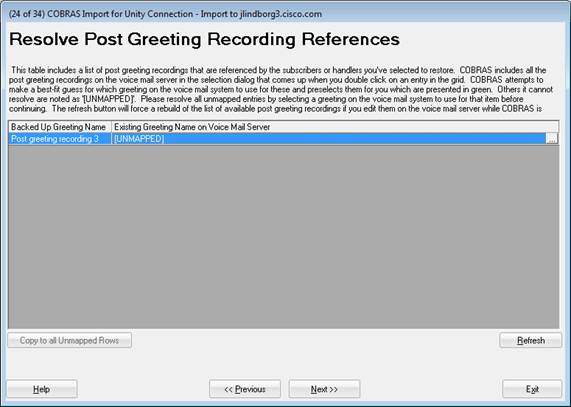
This page shows all the post greeting recordings that you are not restoring from backup but that are referenced by a call handler that you’ve selected to restore. In other words if you select to restore all post greeting recordings from your backup, there should be nothing on this page. However, if you did not restore one or more post greeting recordings from your backup for some reason, you will need to map those references to a greeting on the target voice mail server. COBRAS will map them for you if the greeting name matches exactly but if it can’t, the greeting will be listed as “UNMAPPED” and you will have to select a greeting yourself. Click the “…” button to the right of the grid and you can search all greetings on the voice mail server. The wizard will not let you move on until all UNMAPPED rows have references.
Mapping a greeting reference will not change any properties on that greeting at all. It simply means any time COBRAS is rebuilding a call handler and the backed up post greeting recording name is referenced, the mapped greeting you selected will be used.
Resolve Switch References
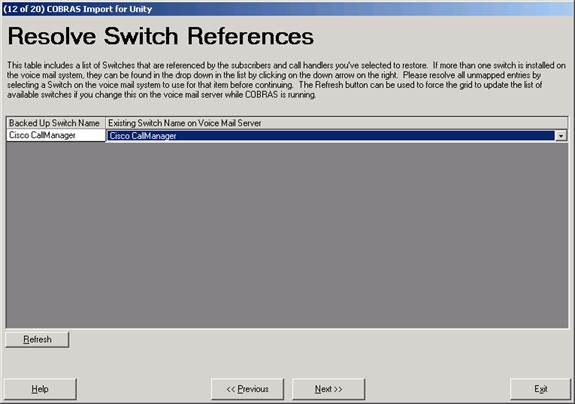
This page shows all the switch (phone system) references made by any of the call handlers or subscribers you’ve selected to restore. Since switch data is not included in the COBRAS backup, all switch references will be shown here regardless. If, however, you are not restoring any call handlers or subscribers then this page will be empty and you can move on.
If there is only one switch installed on the target voice mail server then all references will automatically map to that and there is nothing you need to do on this page.
If, however, there is more than one switch integration configured for the target voice ail server, you will have to use the drop down list to select one of those for each switch reference. It’s rare there are more than 1 or two switches configured for a typical system, however, so this should be pretty quick.
Resolve External Services References
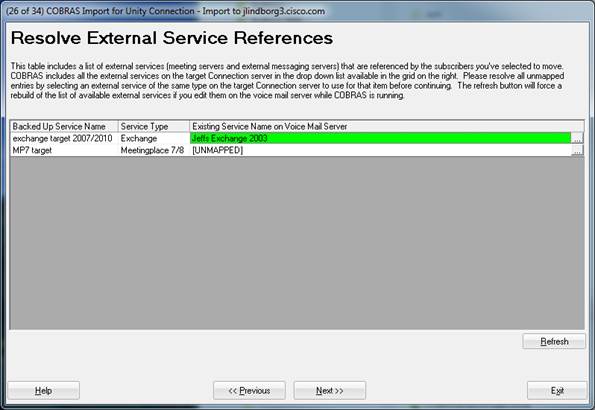
This page shows all the external service references made by any of the subscribers you’ve selected to restore. This applies only to backups of Connection 7.x and later. This includes references to Exchange servers (for calendaring and/or TTS and/or IMAP integration) or Meeting Place servers (for calendaring integrations). Since external service data is not included in the COBRAS backup, all external service references for all users being restored will be included here.
Each external service must be mapped to an external service of the same type. For instance a reference to an Exchange server must be mapped to an Exchange server reference on the target Exchange server – you cannot map an Exchange service to a Meeting Place service for instance. As such there is no automatic resolution here and there is no option to “copy to all unmapped references” option here – you need to manually choose a replacement service for each one. As a rule there are very few of these on any particular system so this shouldn’t be overly burdensome.
You cannot proceed to the next page until every external service reference is mapped to one on the target Connection server.
Resolve Message Store References
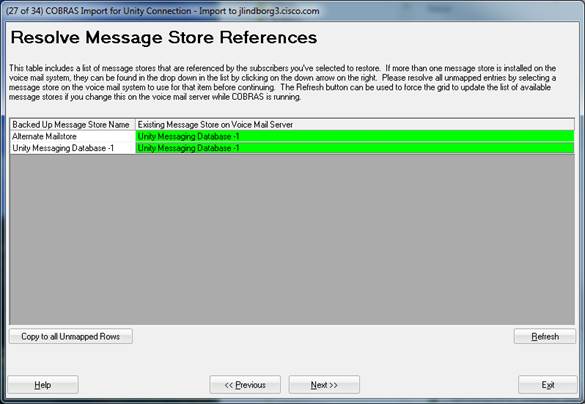
This page shows all the message stores references made by any of the subscribers you’ve selected to restore. This applies only to backups of Connection 7.x and later.
If there’s only one message store on the target Connection server (the default state) then all references will automatically be mapped to that mailstore. If, however, you have configured multiple mailstores on the target you have the option to choose an alternative mailstore mapping if you prefer.
Resolve SMMP Provider References

This page shows all the SMMP providers referenced in SMS notification devices for subscribers selected for restore. This applies only to backups of Connection 7.x and later.
If there are no SMMP devices defined on the target server this page will be skipped. If none of the subscribers you’ve selected for restore have an SMS notification device that was active then this page will also be skipped.
You must map all SMMP service references to one defined on the target Connection server before moving to the next page in the wizard.
Resolve Fax Server References
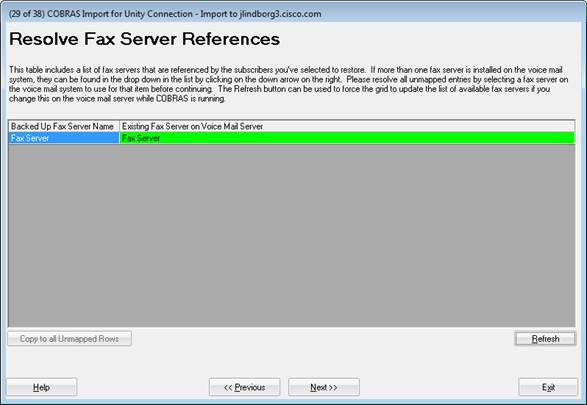
This page shows the fax servers referenced by subscribers selected for restore. This applies only to backups of Connection 7.x and later.
Currently Connection only supports a single fax server reference so this page will only ever show one fax server line. If the fax service on the target Connection server is not active then this page will be skipped. If no subscribers being restored reference a fax server then this page will also be skipped.
There’s no mapping to do on this page currently – future versions of Connection may support multiple fax servers, however, so the link resolution page follows the same model as the other link resolution pages in COBRAS.
Resolve Class of Service References
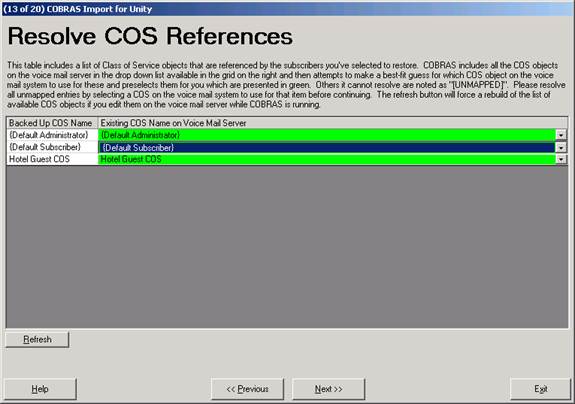
This page shows all the Class of Service (COS) objects referenced by any subscriber you are restoring. Since COBRAS does not backup COS details, all COS references will be listed here to be mapped to a COS on the voice mail server.
If you did not select to restore any subscribers, this page will be empty and you can move on.
If, however, at least one subscriber is being restored then you will see entries on this page. COBRAS will try and match the COS to an existing one on the voice mail server for you based on the alias and display name. Those will be marked in green for you. If it cannot find a match the row will be in white and you will have to use the drop down list to pick a COS to use.
Review all the mappings even if they are automatically setup for you to be sure it’s what you want before pressing Next to move to the next page in the wizard.
Resolve Directory Handler
References
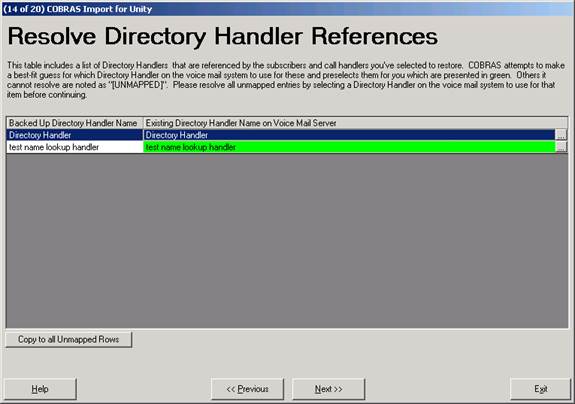
This page shows all directory handlers (name lookup handlers) that are referenced by any subscriber, call handler or routing rule you’ve selected to restore. Directory handlers can be referenced in numerous ways by these objects including user input keys (one key dial rules), after-message actions, after-greeting actions, exit action from the subscriber conversation, targets for after recording etc... Since COBRAS does not backup and restore directory handler details, these references must be resolved to a corresponding directory handler on the target voice mail server.
COBRAS will attempt to automatically map the references for you based on the display name matching exactly and those appear in green. Those it cannot are in white and you will have to press the ”...” button to the right of the grid to select a directory handler on the voice mail server to use. All entries in this table must be mapped before the wizard will let you move on. Be sure to review the list closely even if it is mapped for you to be sure it’s what you want before moving on.
Resolve Interview Handler
References
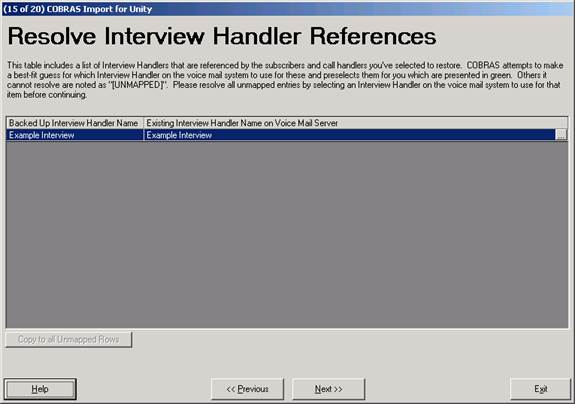
This page shows all interview handlers that you have not selected to restore but are referenced by any subscriber, call handler or routing rule you’ve selected to restore. In other words if you’ve selected to restore all interview handlers in your backup, this page should be empty and you can move on. Interview handlers can be referenced in many ways including as the target of a user input key (one key dial), after-message action, after-greeting action, subscriber exit action etc... The interview handlers on this page are referenced somehow by some object you are selecting to restore and each one will need to be mapped to an interview handler on the target voice mail server.
COBRAS will attempt to automatically map the references for you based on the display name matching exactly and those appear in green. Those it cannot are in white and you will have to press the ”...” button to the right of the grid to select an interview handler on the voice mail server to use. All entries in this table must be mapped before the wizard will let you move on. Be sure to review the list closely even if it is mapped for you to be sure it’s what you want before moving on.
Resolve Call Handler References
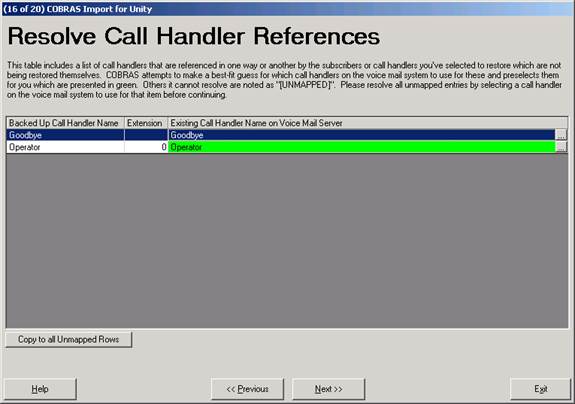
This page shows all call handlers that you have not selected to restore but are referenced by any subscriber, call handler or routing rule you’ve selected to restore. In other words if you’ve selected to restore all call handlers in your backup, this page should be empty and you can move on. Call handlers can be referenced in many ways including as the target of a user input key (one key dial), after-message action, after-greeting action, subscriber exit action etc... The call handlers on this page are referenced somehow by some object you are selecting to restore and each one will need to be mapped to a call handler on the target voice mail server.
COBRAS will attempt to automatically map the references for you based on the display name and extension matching exactly and those appear in green. Those it cannot are in white and you will have to press the ”...” button to the right of the grid to select a call handler on the voice mail server to use. All entries in this table must be mapped before the wizard will let you move on. Be sure to review the list closely even if it is mapped for you to be sure it’s what you want before moving on.
Resolve Subscriber References
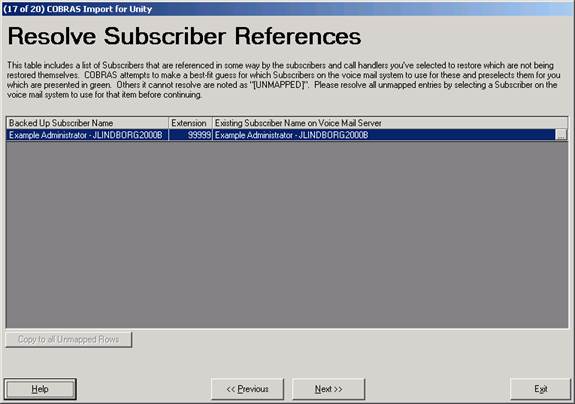
This page shows all subscribers that you have not selected to restore but are referenced by any subscriber, call handler or routing rule you’ve selected to restore. In other words if you’ve selected to restore all subscribers in your backup, this page should be empty and you can move on. Subscribers can be referenced by other objects in a number of ways including the target of a user input key (one key rule), after-message action, after-greeting action, as the owner or message recipient of a call handler etc... The subscribers on this page are referenced somehow by some object you are selecting to restore and each one will need to be mapped to a subscriber on the target voice mail server.
COBRAS will attempt to automatically map the references for you based on the display name, alias and extension matching exactly and those appear in green. Those it cannot are in white and you will have to press the ”...” button to the right of the grid to select a subscriber on the voice mail server to use. All entries in this table must be mapped before the wizard will let you move on. Be sure to review the list closely even if it is mapped for you to be sure it’s what you want before moving on.
Resolve Distribution List
References
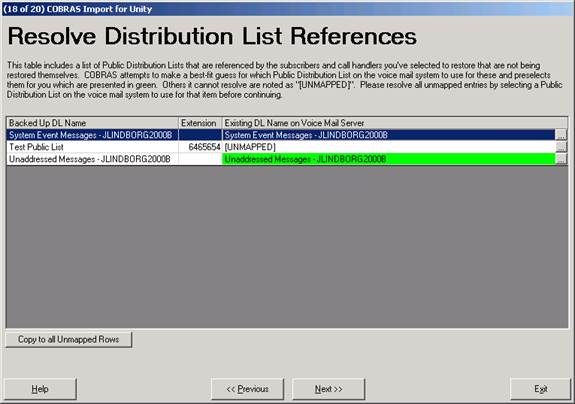
This page shows all distribution lists that you have not selected to restore but are referenced by any call handler or interview handler you’ve selected to restore as its owner or message recipient target. In other words if you’ve selected to restore all distribution lists in your backup or are restoring no call handlers or interview handlers then this page should be empty and you can move on. The distribution lists on this page are referenced somehow by a call handler or interview handler you are selecting to restore and each one will need to be mapped to a distribution list on the target voice mail server.
COBRAS will attempt to automatically map the references for you based on the display name, alias and extension matching exactly and those appear in green. Those it cannot are in white and you will have to press the ”...” button to the right of the grid to select a distribution list on the voice mail server to use. All entries in this table must be mapped before the wizard will let you move on. Be sure to review the list closely even if it is mapped for you to be sure it’s what you want before moving on.
Resolve Notification Template References (only for Connection 9.0 and later)

This page shows all notification templates that are referenced by any HTML notification devices that are associated with one or more subscribers you have selected to restore.
COBRAS will attempt to automatically map the references for you based on the display name matching exactly and those appear in green. Those it cannot are in white and you will have to press the ”...” button to the right of the grid to select a notification template on the voice mail server to use. All entries in this table must be mapped before the wizard will let you move on. Be sure to review the list closely even if it is mapped for you to be sure it’s what you want before moving on.
Insert Restored Routing Rules (with “/RestoreRoutingRules” option only)
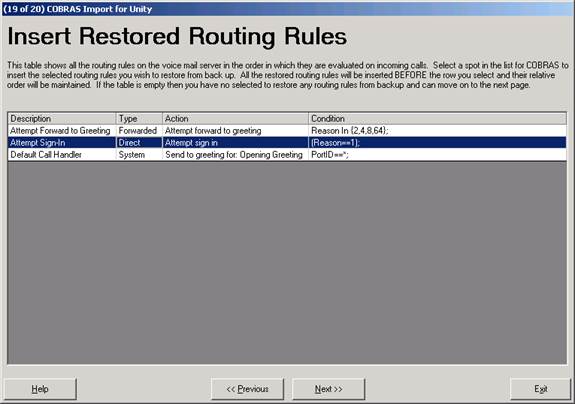
This page shows all the routing rules on the target voice mail server you’re restoring to when you’re restoring to a Unity server. When restoring to a Connection 7.x or later server you will not see this page in the wizard. You need to select the spot where you want to insert all the routing rules you’ve selected to restore.
This concept is a bit tricky, I know.
The list of rules shown in the grid represents an ordered list of rules that Unity processes when a call comes in. The first rule that matches all the criteria of the call (i.e. it’s forwarded from a known subscriber’s extension) executes. Those rules marked as ”System” are applied to both forwarded and direct calls. As such the ”Default Call Handler” rule shown in the grid above is considered a ”backstop” rule in that it will ALWAYS fire and send calls to the opening greeting if no other rule matches the inbound call.
All the routing rules you’ve selected to restore need to be inserted into this list as a contiguous block. You cannot mix and match locations for the rules. The relative order of the rules you are restoring will be preserved – they’ll just be inserted BEFORE the row you have selected on this page. It may be necessary after the restore to go back to your routing rules in the System Administration page and arrange them a little differently relative to the other rules on the system.
If you are selecting to restore routing rules, be sure to only get the rules you absolutely need. COBRAS will allow you to select the default routing rules and restore them but this is almost never a good idea. Only in a few special cases should this be necessary.
Resolve Partition References
(Connection restores only)
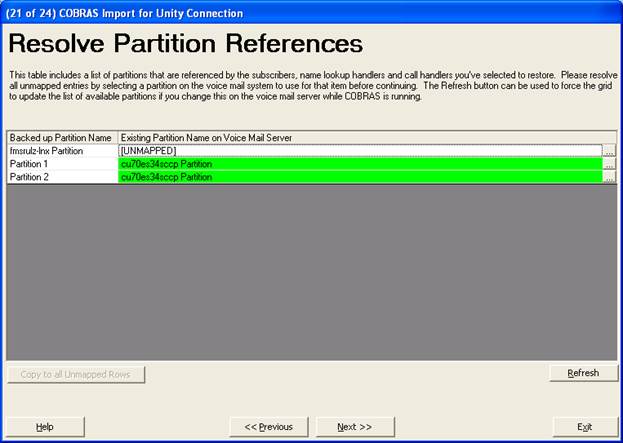
This page shows
all the partitions referenced by all objects selected to be restored that
COBRAS cannot resolve on its own
COBRAS will attempt to automatically map the references for you based on the display name of the partition matching exactly and those appear in green. Those it cannot are in white and you will have to press the ”...” button to the right of the grid to select a partition on the voice mail server to use. All entries in this table must be mapped before the wizard will let you move on. Be sure to review the list closely even if it is mapped for you to be sure it’s what you want before moving on.
NOTE: restores onto Unity servers will not have this page – further restores of a Unity backup to a Connection server will also not show this page as Unity did not support partitions.
Resolve Search Space References
(Connection restores only)

This page shows
all the search spaces referenced by all objects selected to be restored that
COBRAS cannot resolve on its own
COBRAS will attempt to automatically map the references for you based on the display name of the search space matching exactly and those appear in green. Those it cannot are in white and you will have to press the ”...” button to the right of the grid to select a search space on the voice mail server to use. All entries in this table must be mapped before the wizard will let you move on. Be sure to review the list closely even if it is mapped for you to be sure it’s what you want before moving on.
NOTE: restores onto Unity servers will not have this page – further restores of a Unity backup to a Connection server will also not show this page as Unity did not support search spaces.
Select User Setting Overrides
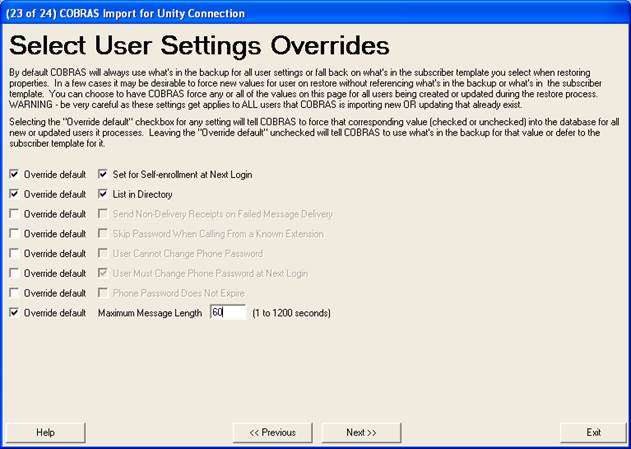
This page lets
you force a few values for subscribers during restore. By default COBRAS will always use what’s in
the backup for users when restoring over an existing user or creating a new
user. If a value doesn’t exist in the
backup (for instance it’s a feature that did not exist in an older version of
Unity) then COBRAS defers to the user template you select during restore for
that value.
In a few cases
it’s desirable to override both the user data in the backup AND the template
and force a value. In particular
settings related to enrollment, passwords and message length. Some administrators want to be able to force
enrollment no matter what’s in the backup or force passwords to change after a migration
or the like.
By default none
of thse values are used. You can select
individual values to override by checking the ”Override default” checkbox which
will tell COBRAS to apply the corresponding value for ALL users it updates or creates
during restore. It’s important to note
that it doesn’t care what value the user has in the backup or whe the template
is set to – it will ALWAYS set the vlaue to true/false (or the number of
seconds for the max message length) in every case.
Use with caution.
Import Object
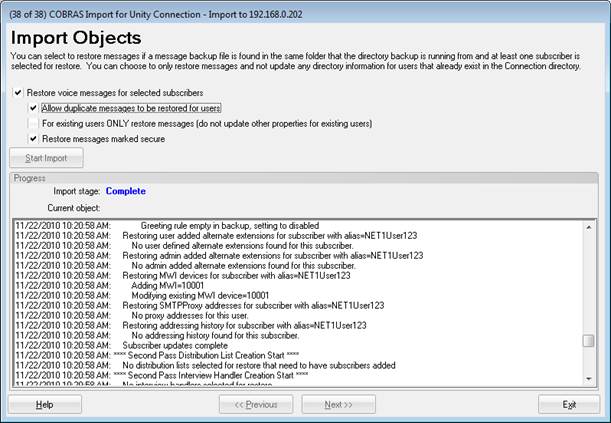
This is the final page of the wizard where you can kick off the actual import.
If you’ve selected to restore any subscribers and there are messages, the option to restore messages will be active. If there are secure messages in the backup you have the option to check that option as well, by default it’s unchecked. If you check the secure message option you will be required to provide the password you entered for secure message backups on the export. Only if those passwords match will you be allowed to continue with secure messages selected.
NOTE: If you’re restoring a Unity backup to either Unity or Connection, COBRAS cannot ensure messages being inserted into subscriber mailboxes are not duplicates so this may result in duplicate voice mail messages ending up in subscriber mailboxes. Connection 7.x backups and later do not have this problem as they contain a unique message Id in the message header used to avoid duplicates. Note that there is an option to restore just specific voice mail messages for a selected subscriber offered by COBRAS as well – see the next section for details on how to use that.
NOTE: You can also select the option to ONLY restore messages for pre existing user if you like. Any user that COBRAS is creating new will be created and edited as normal. However, if the user was already in the voice mail directory before you ran COBRAS import and you’ve selected to “overwrite existing” user and you select this option, then COBRAS will not touch that user in the directory during restore at all – only messages will be inserted into their mailbox at the end of the COBRAS restore.
Once you select the “Start Import” button the import process starts. The status of the import is shown above the log viewer and you can see the progress through the 9 steps of the restore and how many objects are being created/updated for that step. The scrolling text is the same information that ends up in the import log and can be reviewed later if you like.
Terminating the import once it starts can result in a damaged system. Don’t do that unless instructed to do so by TAC.
An Import can be done on a running voice mail server, however, performance will be affected. It’s best to do this off hours to avoid delays in call processing.
NOTE: If you are restoring to Connection 7.x or later and the backup includes one or more secure messages, you will have the option to include secure messages as a separate checkbox on this form (not shown above). This option is not available for restores to Unity installations. If you select to include secure messages you will need to provide the non trivial password you used during backup of those messages. If the password does not match COBRAS will not continue with the import until you provide a valid password or the option is unchecked. See the “A Word About Secure Messages” for more details on secure message support in COBRAS.
NOTE: The “Allow duplicate messages to be restored for users” option allows you to make duplicate restores of messages already in Connection’s message store in special cases where this is necessary. For instance if an HR person wants to restore messages from a user’s mailbox to another mailbox so they can monitor their secure messages, this would be necessary. By default Connection embeds a unique ID in the message header of all messages and will not deliver a message that is already contained in the database using that unique ID. When you check this option COBRAS strips that unique ID out of the header before sending it to Connection so it’ll always be delivered.
Import Options
Under the Options menu you can select “Clean up orphaned WAV files after restore”. This is checked by default. You may wish to uncheck this if you’re doing several imports (for instance of different groups of users) into the system. This can save a substantial amount of time since the orphaned WAV cleanup has to do many large database queries and file checks to complete. On the last set of objects you import be sure to check this option as it will remove unused greeting and voice name stream files that can be left from updates of standing subscribers, call handlers and public distribution lists.
The “Log debug output” should only be checked if requested by TAC – this includes much more detail in the logs including the full text of every stored procedure called. It will greatly increase the log file size during import.
Import “Mapping Memory”
For imports into Connection 7.0 and later systems, COBRAS will “remember” which object mappings you’ve made during the resolution screens in the wizard. If you run a restore using the same MDB file you did before, these mappings will be loaded automatically on the fly – you can, of course, over ride them as you wish during the import process but if you’re doing repeated imports of small groups of users from a large backup this can save you time and make the restore process more uniform over successive imports.
Note that the mappings are saved after the import process is complete. Mappings you make before you then cancel out of the import are not saved.
Also note that the mappings are saved for multiple Connection servers. If you restore users from a single backup database to multiple Connection servers the object mapping memory is saved for each server so when imports are run again on that server with the same backup database your default selections will be preserved.
Requirements/Special Notes
The restore has been tested on Windows 2000 and 2003 server, Windows XP, Windows Vista and Windows 7. Note that with Vista and Windows 7 you will need to run the application with the “as administrator” option so it can create local WAV files on the file system and such.
All COBRAS applications are 32 bit and will require the 32 bit version of the IBM Informix ODBC Drivers to be installed. If you’re running COBRAS Import for Connection on a 64 bit OS such as Vista 64 or Windows 2008 you need to be sure to install the 32 bit database drivers and not the 64 bit version. More details can be found on the IBM Informix ODBC Driver page.
Restore is supported on Unity 4.0(5), 4.1, 4.2, 5.0, 7.0 and 8.0 with Exchange as the back end. No support is planned for import into any version of Unity with Domino as the back end given limitations imposed by IBM on the DUC interface. Export from system connected to Domino is supported, however.
COBRAS does not support backing up and restoring of secure messages for Connection 1.2 – this option is available for Connection 7.0 and later and Unity 5.0 and later backups, restores of secure messages are supported onto Connection 7.x and later only. See the “A Word About Secure Messages” for more details on secure message support in COBRAS.
No import support for Connection 2.0(1) and earlier is planned due to limited off box access options in those versions.
Imports into Connection 7.x and later are only supported for stand alone Connection installs – no support for co-resident (Business Edition) installations.
Unity or Connection must be up and running before the restore will be allowed to execute.
Both the COBRAS backup and restore tools run as lower priority processes and both can be run while Unity or Connection is running. However, even at a lower priority process they will use CPU cycles and take up database processing power that will affect the performance of running systems. It’s always a good idea to do backups and, especially restores during off peak call times.
Directory Synchronization with Unity Restores
All subscribers and public distribution lists are represented in Active Directory for Unity installations. As such, new subscribers that are created locally on a Unity restore are either created as new users in AD or mapped to an existing user in AD already. The logic here is part of the Unity Syncher process and is the same logic employed by tools such as DiRT (Disaster Recovery Tools) during restore.
The COBRAS restore will create new accounts in AD/NT
(Ex2K/EX2K3/EX55) on the fly if necessary or will bind to existing accounts
already in the directory. COBRAS populates SQL with the subscriber
and/or distribution list information from the backup and then kicks off the SQLSyncSvr process for each object one at a time during the
restore process. It is this process that then looks through the directory
to see if each subscriber or distribution list is already represented there or
not. If the user is not found in the directory then a new object is
created in the container selected during Unity installation (i.e. the Users
container in AD is the default). When searching for a user in the
directory with an Exchange back end, the Syncher does
the following lookups in this order
1.
Looks for the user’s directory ID. If
you are restoring into the same directory where the Unity you backed up was
installed, this will match and the user will be updated to be a subscriber on
the new local Unity server.
2.
Looks for the user by their Relative
Distinguished name (RDN).
3.
Looks for the user by their mail
alias. If more than one object is found with the same mail alias, that
subscriber creation fails and the user is skipped – the syncher does not make a “best guess” here as to which one
to use. Remember that the syncher is looking
from the root of the forest down in AD, it is legal (although not a good idea)
to have multiple users in AD with the same mail alias across domains.
If no user is found by the above three searches, then a new
user is created in the default container noted above. If, for instance,
the aliases of the subscribers have changed between the system you backed up on
and the system you are restoring to (i.e. you are migrating from VM only to a
UM installation) you can use the Migrate Subscriber Data tool to move the Unity data off these newly created accounts
onto the desired email account already in the directory. See that tool’s
help and training videos on the link above for details.
Caution! If the partner Exchange server is running Exchange 2003 or
Exchange 2000, Cisco Unity can only create accounts in Active Directory if, when
you ran Permissions Wizard, you chose the option to create users using the
Cisco Unity Administrator. If you did not choose this option when you ran
Permissions Wizard, the COBRAS restore will fail because AD accounts cannot be
created. With Exchange 2007 all users
and DLs must exist in the directory ahead of time since there is no “on the
fly” object creation supported at this time.
Exchange 5.5 and Exchange 2000/2003 (AD) use different
properties for these values. The following table shows what Unity maps
each of the above three properties to for both Exchange 5.5 and AD:
|
|
Exchange 5.5 |
Exchange 2000/2003 (AD) |
|
Directory ID |
DistinguishedName |
ObjectGUID |
|
Relative Distinguished Name (RDN) |
Rdn |
Name |
|
Alias |
UID |
mailNickName |
|
Alias |
|
sAMAccountName |
NOTE: It’s very important to
understand that if the Syncher DOES find a match by
the above 3 criteria, it will bind to that user in the directory regardless of
if it’s already stamped as a subscriber or not. Remember, one function of
this tool is as a disaster recovery mechanism and it’s expected that users in
the directory may still be stamped as being subscribers on a Unity server that
may no longer be around. This is expected behavior.
You can check the SQLSyncSvr logs
found under \commserver\logs to see what happened
during a restore. Search on the alias of the user you’re interested in
and the logs will show the process of looking for the user and then, if no
match is found, the creation of the user in the directory. This can help
answer questions about why new objects were created when you didn’t expect them
to be.
Important Notes About Message Backups and Restores With Unity
Since Unity uses Exchange as the mailstore, the options that COBRAS has for manipulating messages being restored onto Unity are more limited than they are with Connection. Those limitations are noted here.
The message extraction and insertion capabilities in COBRAS is limited to voice messages only from the inbox. It will not backup emails, receipts, faxes or other message types that may be in subscriber’s mailboxes and will also not get anything from the deleted items or sent items folders.
Secure messages are only included if you’ve explicitly selected to export them and provided a non trivial password during export and the same password during restore. By default secure messages are not included. COBRAS employs a highly secure AES 128 bit encryption algorithm which will increase the CPU overhead and time it takes to export messages if many of them are marked secure. NOTE: if you forget the password you entered for secure messages in a backup, those messages are lost to you. There is no way to “decode” the password for you later to extract those messages. Be sure to use a secure password that you can remember. See the “A Word About Secure Messages” for more details on secure message support in COBRAS.
All messages restored with COBRAS to Unity will be marked as unread and the send time will be set to the time you ran the COBRAS import. The MAL interface does not allow for manipulating the send time or read status when restoring messages.
Broadcast messages are not backed up at all for any users. These are treated as special and live outside the user’s mailbox – note that using other tools such as ExMerge will also not get broadcast messages for this reason.
Only information about the sender and the recipient of the message are preserved. If the message had multiple targets those are not added to the “CC” line for the message on restore. This means “reply-all” functionality will not come into play for messages restored with COBRAS onto a Unity system.
COBRAS attaches to the AvCsMgr process for Unity to extract and insert messages for subscribers. It does not need any rights in Exchange to do its job, but you may be required to run COBRAS using the same account associated with the AvCsMgr service. Prior to running a backup where messages are selected, COBRAS attempts to connect to AvCsMgr to make sure it can successfully do a message extraction. If this fails the backup is not started and an error message indicating the problem is presented. If for whatever reason you cannot run COBRAS using the same account that is associated with AvCsMgr then you will not be able to use this tool for message handling. There will be no exceptions to this rule.
As with tools such as ExMerge, COBRAS does not preserve single instance messaging. In other words if a group of 100 subscribers all got a voice message via a distribution list, in Exchange there is only one instance of that physical voice mail file per mail store, which saves space. However, when COBRAS extracts messages from those mailboxes, it will make 100 copies of that exact same voice message file, one for each subscriber’s backup set. This makes it virtually impossible to predict how much space will be required for a voice mail backup operation.
The read status and the sending time of the message are not preserved during the restore. In other words if you select to restore a saved message that was sent a week ago, when restored the message will be marked new and the send time will be the time of the restore. All restored messages, then, will appear as unread and sent at the time of the restore. This may be desirable behavior if you’re restoring selected messages you want to retrieve or it may not be.
COBRAS Export only fetches read and unread voice messages. It does NOT include deleted messages, faxes, receipts or emails in the backup.
NOTE: For Backups and Restores of messages with Exchange, ExMerge from Microsoft is often a good alternative since it gets the entire inbox and not just voice messages. If the aliases of users are not changing, this is a simple process since ExMerge finds users by alias in the mailstore. Microsoft has a number of documents relating to ExMerge usage, a good one to start with can be found here: http://support.microsoft.com/kb/174197. Note, however, that Cisco will not assist you with ExMerge issues – in particular using ExMerge with Exchange 2007 is not currently supported by Microsoft although you will find details on how to make it work.
Important Notes About Message Backups and Restores With Connection
Restoring messages onto a Connection 7.x or later server provides more flexibility than restores onto Unity since Connection has its own message store and COBRAS can take advantage of that. Notably messages restored onto Connection (from either a Unity backup or a Connection backup) will include the correct original time stamp and read status, unlike restores to Unity. Further if you are restoring messages from a Connection 7.0 or later backup then there will be no duplicate messages even if you run the restore several times – Connection stamps each message with a unique ID that COBRAS preserves and if you restore the same mailbox multiple times only one copy of each message will be in that user’s inbox when it’s done.
Note, however, that if you are restoring messages from a Unity backup or a Connection 1.x backup then you will still get multiple copies of messages if you do multiple restores.
By default secure messages are not included in Connection backups, however secure messages can be included in Connection backups in recent versions of COBRAS – you must provide a non trivial password that is used to encrypt secure messages in the backup MDB. COBRAS employs a highly secure AES 128 bit encryption algorithm which will increase the CPU overhead and time it takes to export messages if many of them are marked secure. NOTE: if you forget the password you entered for secure messages in a backup, those messages are lost to you. There is no way to “decode” the password for you later to extract those messages. Be sure to use a secure password that you can remember. See the “A Word About Secure Messages” for more details on secure message support in COBRAS.
As with Unity, dispatch messages are not included in the user’s mailbox but are treated separately. As such no dispatch messages are included in the COBRAS message backups.
COBRAS Export only fetches read and unread voice messages. It does NOT include deleted messages in the backup. So if your users are configured to save deleted messages in the deleted messages folder, COBRAS export does not get those messages.
Message store limits are enforced during restore. COBRAS checks the receive limit on a target user’s mailbox for each message it sends – if the user is over their receive quota or the maximum mailbox size (2 gig) then it will not attempt to restore any more messages to that user’s mailbox and will log a warning to this effect in the output log.
Important Note About Importing Users into Connection with LDAP Integration
The LDAP integration feature (for instance to Active Directory) with Connection 7.0 and later requires that you import users into Connection from the LDAP connection you create FIRST before creating local users. This is not specific to COBRAS – if you create local users via the SA or BAT or any other process or tool you cannot then make them LDAP integrated later. You must import them via the LDAP link you establish and then edit them.
With this in mind, if you are importing user data into Connection 7 or later from a backup (of either Connection or Unity) and you want your users LDAP integrated, import them into Connection via the LDAP link first and then update the user data with a COBRAS Import selecting to overwrite those users on import. COBRAS will only update information for those users and will not harm or change the integration data used by the LDAP synchronization sub system.
COBRAS, of course, uses the name, alias and extension of the user to match up with a corresponding user in the backup. If your LDAP integrated users you imported into Connection do not have matching names, aliases and/or extensions you will need to tell COBRAS which users in the backup should overwrite which users in your Connection directory. You can use the Alias and Extension renaming feature in the COBRAS Data Viewer application to change those properties in the backup via CSV file if you need to which can make this process easier.
How Long Will a Backup Take on My System and How Much Space Will it Take?
Unfortunately there is virtually no accurate way to predict how long a backup or restore is going to take unless I know how many users, how many messages each users has, how big those messages are, how many greetings are recorded, how large they are, how many voice names are recorded, how large they are, the speed of your network, the speed of the system you’re doing the backup on, how much traffic is on the network, the hardware specs of the platform being backed up, how many handlers, subscribers, distribution lists are being backed up, how many members are in those distribution lists, how fast the local queries into the GC are to enumerate the membership information etc… There are far too many variables to make useful estimate ranges.
For testing the export time the best solution is to set aside some time when you can afford it and run a test with your system. The COBRAS logs will note the start and stop times and you can work it out from there. Message backup will obviously add an unknown variant to your backup time given it can fluctuate quite a bit. Public distribution list membership for Unity backups also adds a lot of time since it has to “walk” that membership information in Active Directory. If there are a lot of nested distribution lists this can take quite a wile. If you are not backing those items up your backup times should be reasonably consistent.
Restore times are considerably more difficult to predict, but since restores are normally “one off” events and not regular procedures such as scheduled backups, the need for predictability here is less pressing.
But since absolutely no one is ever satisfied with that answer and there’s no formula I can provide you, I fall back on the only other thing I can here and that’s provide times and sizes for some example backups and restores. These numbers are provided from real world backups in the field or test systems in the lab and may or may not have any relationship with how long your backup will take or how big it will be. They are provided purely for reference purposes.
|
Backup of Unity 4.2(1) 300 subscribers – voice names but no greetings – no messages 30 call handlers – greetings included 11 schedules No distribution lists Single box installation with 2 gig of ram with a 2.2 GHz Pentium 4. |
3 minutes to finish export. Backup DB size about 11 meg. |
|
Restore onto Unity 5.0 of a backup of Unity 4.2(1). Clean installation to start with. 300 subscribers created new – with greetings and voice names, no messages 30 call handlers created new – with greetings and voice names 11 schedules created new. No distribution lists Single box installation with 2 gig of ram with a 2.2 GHz Pentium 4. |
28 minutes to finish import and updates. Directory synchronization took another half an hour roughly. |
|
Restore onto Unity 4.2(1) of a backup of Unity 4.2(1). System had 2,000+ subscribers and several hundred call handlers already on it. 240 subscribers updated, none created new. Greetings and voice names, no messages. 8 call handlers updated, none created new – with greetings and voice names 7 public distribution lists with membership information created new Off box Exchange with 2 gig of ram and a 2.4 GHz Pentium 4. |
36 minutes to finish import. Unknown directory sync lag. |
|
Backup of Unity 5.0 314 subscribers – greetings included – no messages 135 call handlers – greetings included Restore to a Connection 7.0(2) installation. |
16 minutes to finish directory backup. Backup DB size 48 meg |
|
Backup of Connection 7.0(2) 11,040 user – No greetings, but voice names included 6 call handlers 78,143 voice messages |
45 minutes to finish directory backup Backup DB size 38 meg 6 hours for message backup to finish Message DB size 1.26 gig across two MDB files |
Troubleshooting Tips
Whenever you encounter a problem with a COBRAS import, either onto Unity or to Connection, the first thing to do is gather the MDB backup file you are using for import so it can be sent to the engineers to look over. It is not necessary (and not desirable) to send any message backups. The log file from the export that was used to create the MDB file is included in the backup database itself. The MDB file along with the log file created by the import are the two most important items to provide when a problem of any kind is encountered and will always be asked for so be sure to save them off somewhere you can get at them.
Double Check Connection Server Settings
If you are attaching to a remote Connection server for import or export, make sure the remote database proxy service is running. This service does shut itself off after a period of time and does not start itself automatically on a server reboot.
Review the Important Preparation for Connection 7.x and later Imports and Exports section
Disable CSA and all Virus Scanning Applications
For Windows based systems (all Unity versions and Connection 1.2) it’s a good idea to disable CSA and all virus scanning applications if you are having problems running either exports or imports for either local Unity versions or remote Connection 7.x and later servers. CSA and various virus scanning packages often block access to ports necessary to attach to remote servers and file systems and/or create local files and the like. Before escalating a failure be sure to make sure this basic issue is not tripping you up since TAC will usually first start here.
Run with Debug Enabled
Usually the first step in running down a problem is to turn on debug mode. On the first page of the COBRAS import wizards and in the main form of the Export wizards you’ll find an options menu that has an option to enable debug output. This directs the COBRAS tools to dump more information to the output log including full text of all stored procs being called, all queries being made against the remote Connection server and additional entry/exit information. This will greatly increase the log file size, slow the application down a bit and make finding normal items in your log a bit more difficult so it’s not generally a good idea to run with it on unless you are trying to run down a problem.
Trouble with Initial Unity Connection Login
If the initial login to Unity Connection for either import or export fails then there is a problem making the ODBC connection. These are the two most common errors you’ll see:
· “Unspecified System Error = -27001”. This means COBRAS was able to find the server and attach to the ODBC proxy service but the service rejected the credentials you supplied. This can be due to the wrong login name or password for your remote user account or it could be that the account is locked out or that the password settings have the “must change password at next login” value set. The latter is the default value for the password settings on Connection installs and is a common failure reason – be sure you uncheck this.
· “Unspecified System Error = -908”. This means the server name is wrong or the ODBC Proxy service is not responding. The former is often a DNS issue – be sure name resolution is pointing where you think it is. The latter usually means the service is not running properly on the target server or that the port being used (20532) is being blocked between your Windows client you’re running COBRAS on and the target Connection server.
· “Error -11048”. This can sometimes mean that the PATH environment variable in Windows is too long – try moving the INFORMIXDIR/bin reference to the beginning of the PATH variable. Also make sure only one version of the ODBC driver is installed on this client machine.
Message Export/Import for Connection 14.x and later
On connection version 14 and later, Cobra Export will also take backup of Google Workspace mapping data if you have Configured Google workspace on your Connection. Similaraly import will restore the backed up data related to Google workspace mapping with Connection.
You must enable Google Workspace UMS only after successful restore on target server. It will enable message syncing between Google Workspace and Target Unity Connection.
You need to disable Google workspace UMS on source server after thorough testing is done on target server.
Message Export/Import for Connection 12.x and later
In addition to the items noted in the next section for 7.x and higher noted below, Connection 12.0 and later ship with secure IMAP connections turned off by default. For message extraction in 12.0 and later you must:
1. Attach the server to a licensing service. You cannot turn on secure protocols for a server that is not licensed – as such you cannot extract messages via IMAP until you’ve licensed the server.
2. From the Unity Connection CLI logged in as an administrator you need to run the command “utils cuc encryption enable”. Once this is done successfully the secure IMAP connection used by COBRAS and other tools will be enabled.
Message Export For Connection 11.5 SU3 and later
Starting with 11.5 SU3 to use secure IMAP to extract messages during export, you must have installed a $0 security license and turned it on. If not the initial test of IMAP capability at the start of COBRAS Export will fail since Connection will not be listening on port 7993.
If you run “utils cuc encryption enable” from the Unity Connection command line once this license is installed, secure IMAP connections will be allowed.
More details can be found in this document.
Message Import/Export for Connection 7.x and later
The most common problem encountered with COBRAS after initial connection completes has to do with message extraction and/or restore on a Connection 7.x and later system. Couple things to note here:
- Please check and double check that you do not have a virus scanning package installed on the Windows server you are running COBRAS export or Import on. This is by far the most common problem. By default they will block use of port 25 (SMTP) and message restores will fail if that’s the case. Virus scanning packages will often allow a connection to port 25 but will then block subsequent message transfers so the initial checks COBRAS makes up front before starting import may pass even though this is still a problem.
- Make sure there is no firewall either on the Windows server or between the Windows server and the Connection server blocking port 25 (for SMTP access for import) or port 7993 (for secure IMAP used for export).
- Make sure port 443 is open between the client machine and the server you’re backing up or restoring to. This is used for HTTPS for getting/setting greetings and voice names in Connection by both export and import.
- For message extraction in COBRAS export be sure you are using Connection 7.0(2) or later. Also make sure you are connecting to the server using a user _without_ a mailbox.
- Make sure you’ve set the SMTP connectivity for Connection correctly when importing messages. See Step 4 under the “Configuring Connection 7.x For Import” section above for details on this.
- If you have verified that the above do not apply, turn on all SMTP and MTA traces on the Connection server, set the debug output option on the main form of the COBRAS import, run the import for a single user with messages (which will presumably fail) and gather the COBRAS import log and the Connection logs and provide them to the TAC engineer you’re working with.
If you see IMAP
errors during import coming back that contain text that looks like this:
- 538
Encryption required for requested authentication mechanism
- 530
Authentication Required
Then you need to review the SMTP authentication settings in Connection – see step 4 in the Configuring Connection 7.x for Import section above for details.
Message Export for Connection 1.2
The messages are extracted from Connection 1.2 using a Command Line Utility that can be found in the directory where you installed COBRAS under a folder named “CMLExport”. You will find the CMLExport.exe in there which you can run on your own. The output from each run is appended to the COBRAS log but you can still run this tool on your own using the syntax “CMLExport.exe –v –u [alias of subscriber]” – the output from the tool may give you more clues as to what the problem is extracting messages from that particular user.
Remember that receipts and faxes and other non voice mail items in the mailstore will not be extracted. This is expected.
NOTE: The CMLExport has a known issue in that it does not handle aliases that contain a space in them. As a rule aliases (used to construct the SMTP address of a user) can legally have a space but it’s not a very common policy. If your users having problems contain spaces in their alias, the work around here is to remove the space and export again. Currently there is no updated message export provided by Connection 1.2 to address this issue.
WAV Upload or Download with Connection 7.x and later
Note that greetings and voice names for all objects (call handlers, users, interviewers etc…) are fetched and uploaded from/to Connection via HTTP. This is different and completely separate from the message extraction and insertion which happens through IMAP. If you see HTTP errors or stream file upload/download errors this is dealing with greetings and voice name, not messages.
Before COBRAS attempts to run an export or an import against a Connection 7.x or later server it will upload or download a small WAV file as a test to be sure the process will not fail. If the attempt is not successful the import or export will not be allowed to continue and you will be notified that the WAV transfer process is failing.
- Make sure there is no secure proxy server or secure HTTP access between the system you’re running COBRAS on and the server you are backing up or restoring to. COBRAS has to use HTTP POST/GET routines to get wav files for greetings and voice names on and off remote Connection servers. You should be able to HTTP directly to the Connection server in a browser that is not configured for proxy access.
- Make sure that port 443 is open between the client box you’re running COBRAS on and the Connection server you’re doing an export or import against.
- Make sure you’ve installed the unsigned certificate from the Connection server on the client box you’re running COBRAS on. In other words when you open your browser to the Connection system administration pages you should not get unsigned certificate warnings. Either IE or Fire Fox allows you to override the security warning and install the certificate on your system. Be careful, however, because Fire Fox lets you just ignore certificate errors even if the certificate is not properly installed on the local box.
- Check for duplexing inconsistencies (i.e. half and full duplex between the client machine and server). This can result in WAV file uploads or downloads sometimes working and sometimes not or in a lot of retries being necessary before a WAV file gets transferred properly.
- When uploading WAV files COBRAS needs to create temporary WAV files in the root of C:\ and call an external executable to upload these via HTTP Post. Make sure no security application prevents this execution or gets in the way of creation/deletion of files in the root of the C: dirve.
Directory Sync Issues with Import for Unity
The 2nd most common escalation for COBRAS (or DiRT or GSM) has to do with directory synchronization issues with Active Directory. First, it should be noted that COBRAS, like most other Unity tools, does not ever connect directly to Active Directory. COBRAS, like DiRT and GSM, uses the Unity directory synchronization interfaces to talk to the directory on its behalf. As such all rights and access you have configured for Unity are leveraged – the account you’re running COBRAS as makes no difference in this regard.
The vast majority of the escalations turn out to be routine directory rights/access issues that are external to COBRAS. Not to put too fine a point on it – there has never been a single bug in DiRT or COBRAS related to directory synch issues. Not one. I’m not saying it’s not ever possible but I am saying assuming you’re the one that has finally found a COBRAS or DiRT bug related to directory synchronization and that all directory rights and access are perfect on your system is a bit of a long shot. You might want to look just one more time before escalating.
The first place to start here is to gather the SQLSyncSvrxxx.log file created during the restore that can be found in the Unity logs folder. Each time a directory synch is requested a new synch log file is created so you’ll see one for each import you run. This is created by the SQLSyncSvr service that COBRAS calls to deal with the directory synch to AD during new user creation – this log file will show how each object is searched for in the directory and bound to (in the case where it uses an object already in AD) or creates a new object if a match on the Alias/UID/DirectoryID is not found. Any errors should show up in this log and give you a clue as to where to begin. For instance it finds a user with an alias in a organizational unit that the directory service you’re running for the Unity services does not have rights to modify. This is always the first place to start and you will always be asked to gather this log so it’s a good idea to grab it after your import failure and save a copy of it.
A special note about Exchange 2007. Unity cannot create new users with Exchange 2007 and a common COBRAS “error” report is that imports are failing against 2007. This is very often because the aliases in the backup do not match up with an existing user with an Exchange mailbox configured in Active Directory. You must have preexisting users in Exchange 2007 to map to. If the aliases need to be changed in your backup to match you can do this using the COBRAS Data Viewer utility that can be found on the COBRAS download page. The help file has details about how to use a CSV file for changing user alias mappings in the backup database prior to running your import.
TAC Directed Command Line Parameters for Troubleshooting
These command line parameters have been added to help TAC investigate specific problems – you should only run with them enabled at their direction.
COBRAS Import for Connection
NOTE: COBRAS Import for Connection will show a dialog at startup indicating all command line options that were detected and are active when you start the tool. If you don’t see this dialog or you don’t see one of the options you expect on the dialog then you’ve likely mistyped the option – check it and try again.
- “/RestoreRoutingRules”. This will allow routing rules to be selected during restore from Unity backups when importing into Connection. By default imports into Connection do not include routing rules.
- “/PauseAfterEmailSend”. This will cause COBRAS Import to pop a dialog box immediately after sending a voice message to Connection and allow you to examine the EML text file it used to construct the email it sent. Each message will wait for you to click “ok” to continue.
- “/PauseAfterWAVUpload”. This will cause COBRAS Import to pop a dialog box immediately after sending a WAV file via HTTP to the Connection server for a greeting or voice name restore. This gives the TAC engineer a chance to check the local WAV file location, log file output and CLI interface output for the WAV upload command line tool before proceeding to the next WAV file.
- “/SkipVerCheck”. Used to force COBRAS to not check the application version from the backup database and attempt to restore it regardless. Old versions of the backup tool did not include this application version information in the MDB file.
- “/SkipGuiPasswordRestore”. COBRAS Import will skip restoring GUI passwords during import – sites using LDAP authentication for instance may prefer to skip this as it can be a consuming database call in some cases
- “/ForceBriefcase”. Used to override hot mode when running COBRAS import for Connection on a Unity server that’s part of a digital network with other Connection servers.
- “/ForceHotMode”. Used to force hot mode even if the local Unity installation is not currently part of a digital network with Connection. This should only be used for testing purposes.
- “/DisableNotificationDevicesDuringRestore”. With this option on all active notification devices for subscribers are disabled before messages are restored. All devices that were disabled during restore get re enabled after all messages for all users have been sent. The re enabling process takes place even if the import is canceled before message send is complete. This prevents notifications from triggering unnecessarily during the message restore process.
- “/SkipVerCheck”. Allows restores of backups that are of newer versions of Unity Connection onto older versions of Unity Connection. This is provided for cases where there may be errors in the version string in Unity Connection’s database (from SUs or ESes or “friendly” patches for instance) and the backup is in fact NOT newer than the target Connection server.
COBRAS Export for Connection 7.x and Later
- “/LimitedBackup”. This provides an option for having COBRAS export backup only selected subscribers and their related data including messages. This option will not backup distribution lists, call handlers etc… from a system unless directly referenced by one of the subscribers selected for backup. This is not a supported option currently.
- “/UseRootAccess”. This allows for unsupported backups of Connection 2.1(5) servers to provide an alternative migration path to get to later versions of Connection without multiple hardware hops with the use of DRS. This is not QA tested or officially supported by the BU or TAC – however it’s provided as an emergency backup mechanism if it’s necessary. You must obtain root access credentials to your Connection 2.1 server for this to work
- "/UseCUMI". This directs COBRAS to use the HTTP based CUMI API for gathering messages for users instead of the default IMAP interface. CUMI is much slower than IMAP and this should only be used if either IMAP is not working for some reason or you are trying to gather messages from an "unrestricted" installation of Connection which does not support secure IMAP connections which is required for gathering messages for all user mailboxes. See the Getting Messages via CUMI For Connection section for more details
- /StoreGreetingsInZip. For backups with large numbers of greeting files (for users or call handlers) it can sometimes exceed the binary attachment capacity for Microsoft’s Access database – in these cases it can be necessary to store the greeting WAV files in a separate ZIP file that’s stored in the same directory as the Access database output. This is slightly slower and requires you cart two files around but has a higher total capacity.
- /ForceSSL3 - this is an unsupported option for forcing HTTPS
connections to use SSL3 instead of TLS for downloading greetings and voice
names.
- /ForceTLS - this is an unsupported option
for forcing HTTPS connections to use TLS 1.1/1.2 instead of SSL3 for
downloading greetings and voice names.
COBRAS Export for Unity
- “/LimitedBackup”. This provides an option for having COBRAS export backup only selected subscribers and their related data including messages. This option will not backup distribution lists, call handlers etc… from a system unless directly referenced by one of the subscribers selected for backup. This is not a supported option currently.
Obtaining Updates
To check for updates to this tool, visit http://www.ciscounitytools.com/App_COBRAS.htm
© 2012 Cisco Systems, Inc. -- Company Confidential