Cisco Connection Network Analyzer
Connecting
to Unity Connection 7.x or Later
Task
2: Set the Database Proxy Service Shutdown Time
Task
3: Activate the Remote Database Proxy Service
Task
4: Login to the Remote Server
Troubleshooting
Remote Login Issues
Double
Check Connection Server Settings
Disable
CSA and all Virus Scanning Applications
Make
sure the Informix .NET Driver is Installed and the PATH Points to it.
Overview
The Connection Network Analyzer is designed to assist in finding network replication issues/inconsistencies in Unity Connection networks. It’s primary purpose is helping diagnose 10.0(1) and later installs with HTTP networking but it will also work against earlier versions and with older SMTP style networking configurations.
For HTTP based networks it shows the link structure for the nodes in the network and for each node it lists any inconsistencies found in the network replication against all other nodes in the network (if any).
Requirements/Special Notes
This version of Network Analyzer runs on Windows
XP/2000/2003/2008,
You must Install the 32 bit Informix Client SDK version 3.5 or later including the .NET drivers even if you are running on a 64 bit version of your operating system. The Network Analyzer tool is strictly 32 bit. See the Informix Driver Download Page for details.
This version of Network Analyzer only works with Unity Connection 7.0(1) or later, however it's designed for Connection 10.0 with HTTP networks primarily.
You must enable the ODBC proxy service on the Unity Connection server and attach to the database using an account enabled for the remote database access role. See the next section for details on this.
This tool uses Microsoft’s full .NET 4.0 library (the limited “client” version of .NET 4.0 is not sufficient). The installation will check to see if you have that installed and if not will offer you the option to download and install it automatically.
Connecting to Unity Connection 7.x or Later
For installations of 7.0(1) and later you need to use the database proxy service for access to the database from off box for any DB tool including Network Analyzer.
Task 1: Configure a User without a mailbox with the Remote Administrator and System Administrator roles
1. Go to the Cisco Unity Connection Administration web interface for your installation.
2. Since you must have the same login and password for a local account with remote database access rights on every server in the network, you must use a user without a mailbox (which does not replicate around the network and cause conflicts with local accounts).
3. Be sure the web administration password for this user is not configured to require a change at first login on the “Password Policy” page for that user.
4. If necessary, change the web administration password on the “Change Password” page. Note that only the web application password comes into play for remote data access.
5. Finally,
on the “Role” page for the user, add the “Remote
Task 2: Set the Database Proxy Service Shutdown Time
For Unity Connection 10.0 and later this step is not necessary.
Out of the box the database proxy service is not running and if you try to start the service it will shut down right away. First you need to set the “Database Proxy: Service Shutdown Timer” value found in the System Settings -> Advanced -> Connection Administration section of the Cisco Unity Connection Administration page. By default this is 0. You can set it to as high as 999 days if you like. After the number of days configured here the remote database proxy service will shut down. This is useful if you want to do some migration work, for instance, and don’t want to forget to have the service disabled for security reasons.
NOTE: If you restart the server, the remote database proxy service will remain shut off. After a system restart you have to go in and manually turn on the service again (see step 3)
Task 3: Activate the Remote Database Proxy Service
1. Out of the box the service that listens to remote database requests is not active, you must turn it on. To do this, go to the “Cisco Unity Connection Serviceability” web admin page.
2. On the Tools menu, select the “Service Management” page.
3. The “Connection Database Proxy” item under the “Optional Services” section will be marked as “Deactivated” and stopped. Press the “Activate” button and it will be activated and started automatically.
Once you’ve started the proxy service you can connect with any tool that needs off box database access using the user name, web administration password and port “20532”.
NOTE: The service will automatically shut down after the number of days configured in step 2 above or if you restart the server for versions prior to Unity Connection 10.0.
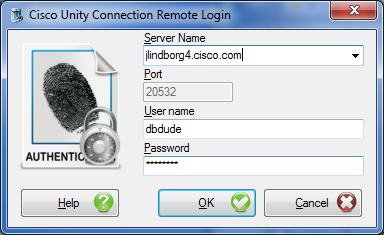
Task 4: Login to the Remote Server
When you first start Network Analyzer, you will see a login dialog box that will be empty except for port 20532 filled in as the default for the port. You must provide the server name or IP address for the “Server” field and provide the login and password for the database connection account. Use the alias and web administration password of the database user created above for the login and password fields.
Network Analyzer will remember your entries including the password (which is stored in a secure hash). Each time you run Network Analyzer it will load the settings of the last connection you made. Every server you’ve successfully connected to in the past will be listed in the drop down list in the order in which you connected to it last – most recent to least recent.
NOTE: The login and password information is stored along with the local Windows login name. Only those servers that have been attached to successfully using the current Windows login will be listed. If you are logging into the same Windows server with different users you will only see servers connected to with that particular Windows login.
NOTE: Providing the wrong password or login will fail quickly and give you a chance to try a different pair. Providing an incorrect server or port, however, results in a 60 second timeout while UDD waits for the Informix driver to return. Unfortunately this cannot be shorted. Type carefully.
Troubleshooting Remote Login Issues
Double Check Connection Server Settings
Make sure the remote database proxy service is running. This service does shut itself off after a period of time and does not start itself automatically on a server reboot.
Make sure the user you are logged in as has the remote administrator role assigned to their account, that their password is not set to reset at the next login and that their account is not currently locked.
Make sure the server name or IP address you are using to connect with is reachable from your Windows client. DNS issues often come up in connection failures.
Disable CSA and all Virus Scanning Applications
It’s a good idea to disable CSA and all virus scanning applications if you are having problems connecting to be sure the ODBC port (20532) is not being blocked. Also check your firewall settings (assuming you are running one).
Make sure the Informix .NET Driver is Installed and the PATH Points to it.
For 32 bit OS installs, the IBM Informix driver is installed in C:\Program Files\IBM\Informix\Client-SDK. Make sure this path exists on your server and has not been removed or renamed.
The system PATH variable will also include a reference to the “\IBM\Informix\Client-SDK\bin” location where the driver is installed. Make sure this path is referenced in the PATH. Also, if the PATH is very long sometimes the Informix driver will not find it, try moving it to the beginning of the PATH statement.
If you had an older version of the IBM Informix Client SDK installed it's a good idea to uninstall all other versions and make sure you have a single instance of the SDK 3.5 or later. Mixing versions of Informix drivers is not a good idea as only one can be active at a time.
Using Network Analyzer
Logging In
After you log into the first Unit Connection server selected at startup you will see the login page for the Network Analyzer that shows all the servers found in the network. The screen will look something like this:
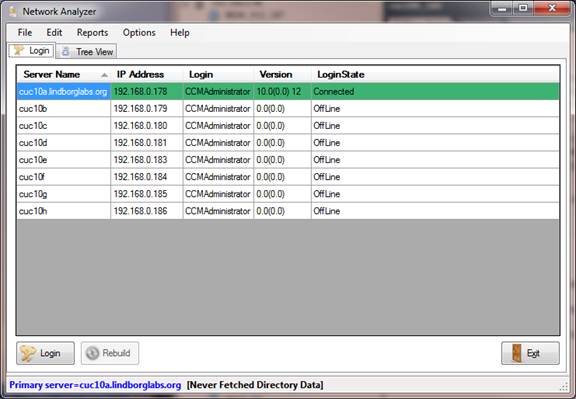
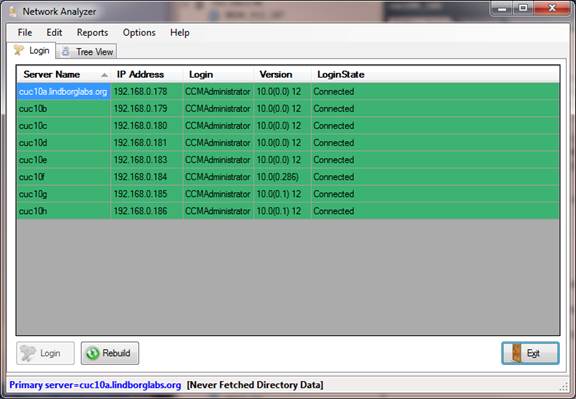
You must log into all these servers via ODBC for the Network Analyzer to work so you must have first configured the same local user without a mailbox with remote database admin rights and started the ODBC proxy service on each. When you press the “Login” button at the bottom of the page it will attempt to log into each server in the list – as the logins are successful the rows in the table turn green. If there is a failure (ODBC proxy not open, login/PW not correct etc…) the row will be highlighted as red. You will not be able to proceed until all the servers in the table are logged in correctly via ODBC – the table will end up looking something like this:
Testing Consistency
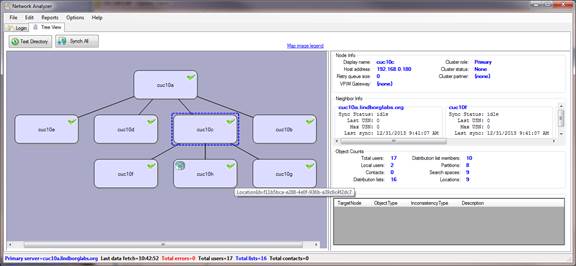
Once all servers have been attached to via ODBC for HTTP networks the tree structure will be shown but no network consistency checks are made – the interface will look something like this:
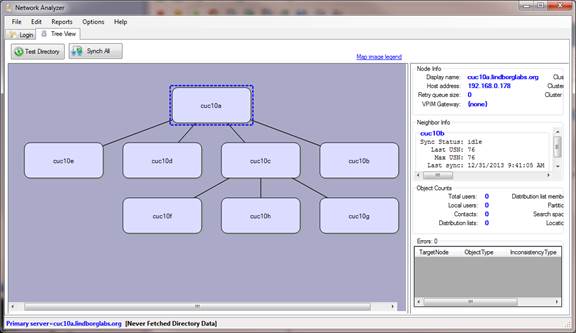
Each node in the graph on the left can be clicked on to select it – the node will be shown with a blue dotted line box around it to indicate it’s selected and information from that node’s perspective of the network is shown on the right.
The information about the node (Unity Connection server or
cluster) is shown in the top right of the form and each of its immediately connected
neighbors are shown in the “Neighbor Info” box directly under it
– each neighbor gets its own section and includes the last time a
directory synch took place between the selected node and the neighbor. Under that is the list of object counts
from the perspective of the selected node.
Finally at the bottom on the right are any network consistency errors
(missing objects, objects out of date, etc…) – this information is
not filled in until you text the directory consistency.
Press the “Test Directory” button to initiate a consistency check. This will execute all the items checked under the “Database consistency checks to make” section under the “Options” menu. For HTTP networks it’s a good idea to check all three options in that menu – for SMTP networks you must remove the “object version” checks since SMTP networks do not have this concept.
Once you press the Test Directory button the picture of the network will include more information about each node – the following example shot shows what the above network looks like after immediately adding a new user to a node but before that user has replicated around the network:
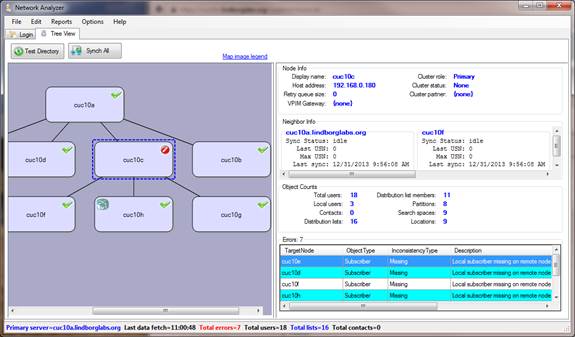
In this case the user was added on “cuc10c” node so that node shows a user that is in its database but is not found on the other nodes in the network. An error will be noted for each server that is missing the user which in this case is all nodes except itself.
Forcing Directory Syncs
This feature only works properly with HTTP based networking setups on Connection 10.0 and later.
In the above scenario you can simply wait and the user will eventually synch around to all other nodes in the network. This can take a while since each node synchs only every 15 minutes and in the above scenario that will require at least two sync cycles to get to all nodes in the network – in some cases it can take 3. If you don’t wish to wait you can right click on the node that you added the user to and select the “Incremental Smart Sync from this node” menu option – this will synch the data from the connected node to all its immediate neighbors and then from each of those neighbors to all its neighbors until all nodes have the updated directory data from that node. This should be fairly quick (under a minute) for a network that is otherwise up to date.
Obtaining Updates
To check for updates to this tool, visit http://www.CiscoUnityTools.com
Revision History
Version 1.0.25 – 5/23/2020
· Added logic to throttle ping requests to no more than 1 every 20 seconds to avoid issues with “timeout” errors coming back from CxN 12.x servers.
Version 1.0.24 – 5/21/2020
· Updated all sub projects to be .NET 4.5
· Updated NuGet packages to be current, notably SQLite
· Added monitor locks around the grid update functions to prevent two threads from updating rows at the same time
Version 1.0.23 – 5/10/2018
· Updated NuGet packages to be current.
· Rolled the target .NET version from 4.0 to 4.5
· Updated setup dependencies and install
Version 1.0.21 – 9/4/2017
·
Added IPAddress fallback functionality if server
name DNS resolution doesn't work - the IP in the vms server table may be stale
but for situations where DNS is not resolving it can be the only option for
connecting cleanly.
Version 1.0.19 – 8/1/2016
· Updating login sequence to make it linear instead of “all at once” model
Version 1.0.16 – 7/7/2016
· Added more debug output for the DNS.ResolveAddress routine to try and catch failures
· Updating logic to resolve the IP address from the server name via DNS to handle multiple entries of different types properly
Version 1.0.14 – 4/16/2014
· Added logic to disable the object version checking menu item if the server version is less than 10.0 or the network type is SMTP.
Version 1.0.13 – 12/31/2013
· Added VPIM location replication queries to the health checks list.
Version 1.0.12 – 1/28/2013
· Added graphic icon to grid tree showing current cluster status.
· Updated graphic keys to use a new “refresh” icon and make room for standard and failover cluster states.
· Updated logic to handle pub going off line and sub taking over – will automatically hook to sub to get data updates.
Version 1.0.11 – 1/20/2013
· Updated for Windows 8 installations
Version 1.0.9 - 12/10/2012
· Added support for updated version check call to CiscoUnityTools.com
· Added more debug output for DB calls
· Optimized neighborhood update DB call structure to get less data less often.
· Dialed down the timers to poll less frequently.
· Updated UI panels to help reduce "flash" during updates.
· Fixed some NULL reference errors related to neighborhood parsing at startup.
Version 1.0.7 – 12/9/2012
· Revamped user interface for object view.
· Added support for cluster awareness.
· Added support for VPIM bridgehead awareness.
· Added option to automatically refresh database details on a selected schedule.
· Added “neighbor details” for selected node – refreshes automatically in the background.
Version 1.0.6 – 12/6/2012
· Added checks for object version number (works with build 10.0.0.29 or later).
· Added option to do incremental sync from selected node to context menu.
· Hid the reindexing and delete-all-global-items options from the context menu.
· Made execution of distribution list optional.
· Moved options from checkboxes on form to under options menu strip.
· Added ODBC keep alive timer to make sure Connection doesn’t close the ODBC connection out from under the tool after a period of inactivity.
· Removed node coloring entirely as a progress indication of anything – it’s not helpful.
Version 1.0.4 – 11/24/2012
· Changed UI scheme – directory status now reflected via an icon and the synch state is color.
· Added contact synch checks.
· Added search space sync checks.
· Added count collection for distribution list members and partitions.
· Added framework for including the object version number comparison checks – although currently that logic is not in Connection.
· Added CSV, JSON and XML reports for synch state into the new Reports menu drop down.
· Added CSV, JSON and XML reports for object count status into the new Reports menu drop down.
· Updated node details text output on tree to show local object count breakdown details.
Version 1.0.2 – 11/11/2012
· Fixed some threading issues stealing cycles from the UI thread.
· Fixed some issues with smart synch sometimes “jumping the fence” during sync “waves”
· Added some additional options to the context menu in the tree view.
· Changed logic to not build tree view till ALL nodes have been logged into to avoid problems.
Version 1.0.1 – 11/7/2012
· First drop of beta tool.
© 2016 Cisco Systems, Inc. -- Company Confidential