Showing
Different Audio Text Trees
Editing
Objects – Tab Content Overview
Show All Available Extensions In Range
Overview
The audio text manager is an application designed to let administrators quickly and easily view, edit and create audio text applications in Unity.
The Audio Text
Manager (ATM) is designed to give you a fast, graphical view of the call flow
patterns configured in the Unity database and allow you to modify that flow
quickly and easily.
Requirements/Special Notes
Requires Unity 4.0(3) or later. Please see www.CiscoUnityTools.com for versions of ATM that work on earlier builds of Unity.
You must run on the Unity server, ATM cannot run off box at this point.
User Interface Basics
The ATM is made up of 3 basic view areas on the screen. The Tree and Grid view tabs on the left and the Information tabs. Each is discussed below.
Tree View Tab
The tree view window on the left of the application is the main call flow navigation interface for ATM.
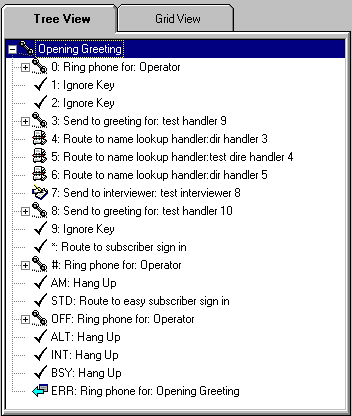
As you click on nodes in the tree, information about that object is shown on the Information tabs (discussed below). Each subscriber and call handler shown in the tree will have 13 child nodes under it representing the 12 one key links (0-9, * and #) and the after message (“AM” above) and after greeting (STD, OFF, ALT, INT, BSY and ERR above) links by which callers can exit that subscriber or call handler. The small plus signs to the left of nodes shown above indicate that node can be expanded to show it’s links. Nodes that cannot be expanded (i.e. the “Ignore Key” and “Example Interview” nodes above) are referred to as “leaf nodes” since they indicate a termination point in the tree. You can optionally remove the after message and after greeting links from the view if you wish using the Options menu.
The “back arrow” icon shown to the left of the “opening greeting” node on key ERR above indicates that the Opening Greeting call handler is represented further up in the tree. This is done to avoid infinite loops where child nodes contain links to parent nodes.
Creating audio text applications can be done by simply editing the information on the tabs on the right which includes the ability to create new call handlers, interview handlers and name lookup handlers on the fly. – changes made there are reflected in the tree on the left automatically. Details for how this is done is covered below.
Grid View Tab
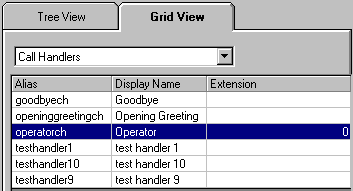
The grid view is a list of all the subscribers, call handlers, interview handlers and directory handlers in the system. You select which type of object you want to view by using the drop down list at the top of the tab. Each table can be sorted by whatever column you wish. You can click on any row in either table to view the details for that object in the information tabs to the right (discussed below). You can also build a new tree in the tree view tab by double clicking or right clicking on any row for either a subscriber of a call handler (this option is not available for interview handlers or directory handlers). This is handy way to find a an object in the system quickly
Object Information Tabs
Shown below in the “Editing Objects – Tab Content Overview” section below
Showing Different Audio Text Trees
By default when you load the ATM utility it shows the Opening Greeting call handler loaded as the root node in the tree view tab. Since the Opening Greeting call handler cannot be deleted this is the only handler I know will be there no matter what. If someone has managed to delete it directly from SQL or the like (really not a good idea since this will break many tools and cause problems with routing rules etc…) the ATM utility will throw up several errors when it loads.
If you want to load a new tree root you have 2 ways you can do this:
- Right click node in tree. If you right click on a call handler or a subscriber anywhere in the tree, the pop up menu that will come up has an option at the top called “Set As New Tree Root”. If you select this the tree will rebuild starting with that handler or subscriber as the root.
- Right
click or double click on a row in the grid view. On the grid view tab you can select
either a subscriber or a call handler by double clicking on it. If you right click on any row in
either grid the pop up menu will offer the option “Set As New Tree Root”. If you select this the tree will
rebuild starting with that handler or subscriber as the root.
Dependency Report Option
Version 5.0.23 of ATM introduced the option to view a dependency report for a selected call handler, interview handler, subscriber or name lookup handler. This simple text based report shows all references to the selected object. This can be useful if you plan to delete the object and you want to make sure to fix up links to it before you remove it.
To access the Dependency report, select the Grid View tab and right click on any call handler, name lookup handler, interviewer or subscriber in the grid. The option “Dependency Report” will be available for you to select. This launches a separate form which displays the report output. You can save the output to a text file or copy it to the clipboard for reference.
NOTE: This feature is only available for Unity 4.0(1) and later systems.
Editing Objects – Tab Content Overview
When you select an object in the tree or in the grid view tables the details of that object are shown in the collection of tabs in the upper left of the application. “Leaf node” objects (i.e. objects that represent an end point in the tree) show a simple text box describing the action. However call handlers, subscribers and interview handlers show detailed information in the tabs and allow you to edit properties on the object directly. Each tab for each of these three objects is show below.
NOTE: Fields with blue text are ones that can be updated, those with black text are “read only” via the ATM utility. However you can open the SA directly to the selected object by clicking the hyperlink shown to the right of the profile tab for each.
Subscribers
Profile Tab
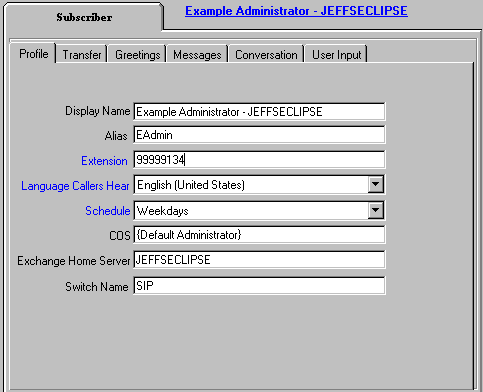
The profile tab shows much of the same information the profile page in the Unity SA shows. The Extension and Schedule properties can be edited directly. Remember that changes to all objects are written through to the database right away.
The extension field must be all numbers, must be at least 1 digits and 30 digits or less.
The language drop down contains a list of all the installed and active TUI languages on the system.
The schedules drop down contains all the schedules defined in the Unity system.
NOTE: You can open the
SA directly to the subscriber loaded by clicking on the blue underlined text of
the object’s name (in this case “Example
Transfer Tab
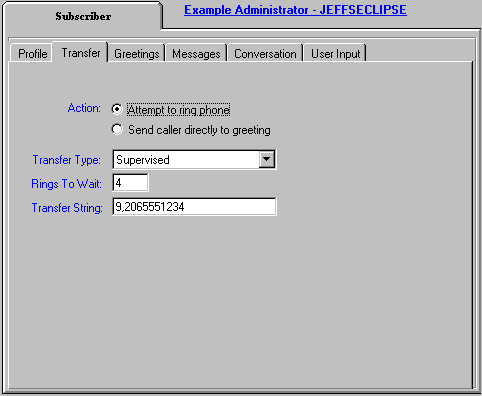
The Transfer tab shows the transfer rule for the subscriber. It differs from the call handler transfer tab in that call handlers have three transfer rules instead of just the one for subscribers.
If you select to send the caller directly to the greeting, this turns off transfer options for this subscriber (i.e. any call being sent to this subscriber will never ring their phone). As such the transfer information is gray and disable when that radio button is selected.
The rings to wait field is only used if the transfer type is “supervised” since release transfers are simply let go by Unity as soon as the number is dialed, regardless of if the destination phone number is busy or not.
The transfer string can consist of digits (0-9), “*”, “#”, and commas only.
Greetings Tab
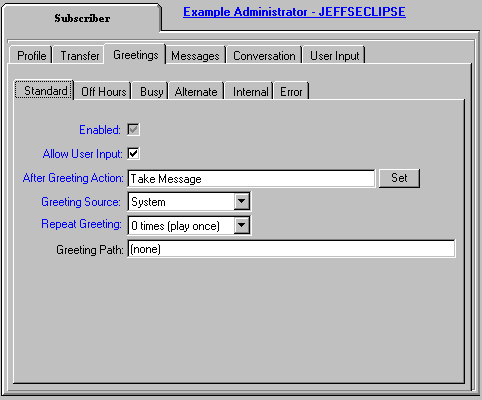
All greetings for the subscriber are shown, including the error greeting which is not visible by default on the SA. The error greeting dictates what Unity does with a call when a caller enters an invalid input while listening to a greeting. By default it plays the system recorded greeting of “I’m sorry I did not hear that entry” and sends the caller back to the opening greeting.
The standard greeting cannot be disabled, it is the “backstop” greeting that will play if all other greetings are disabled or are not appropriate.
If the alternate greeting is active, it always plays no matter what other greetings are active. The Error greeting is the exception to this rule, it will always play when an invalid input is entered.
If you uncheck the “allow user input” box, no user input for one keys or for extension dialing will be allowed. Use this option with caution.
The after greeting action can be set by hitting the “set” button to the right of the field. You will be given the same options you can set in the SA via a pop up dialog.
The greeting source can be:
- System – a system generated greeting which will use the recorded voice name for a subscriber if one exists or their extension number if not. It sounds like “Extension 1189 is busy or does not answer…”
- Recording – uses the custom recording editable in the media master control at the bottom of the screen shot above. To record a greeting for the subscriber you’ll need to open the SA page for them. This can be done by clicking on the underscored blue text for the name of the object to the right of the tab title.
- Blank – this will play a blank greeting and go right to the after greeting action. This is useful for having calls move through several call handlers looking for a phone that will ring in a “loop” of handlers for instance.
The repeat greeting drop down allows you to have the greeting play a number of times before the after greeting action is taken. By default the greeting plays just once and then proceeds to the after greeting action. You can repeat a greeting up to 9 times. This can be useful for situations where you expect the user to select an option presented in the greeting instead of just hanging on the line.
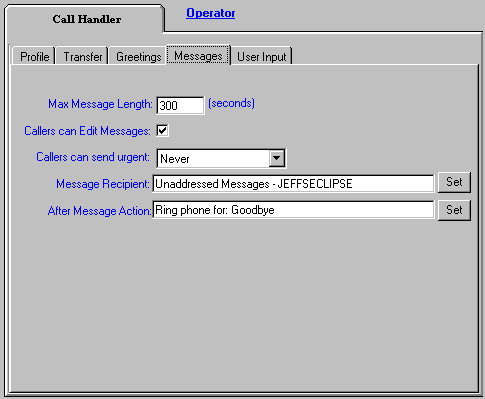
Messages Tab
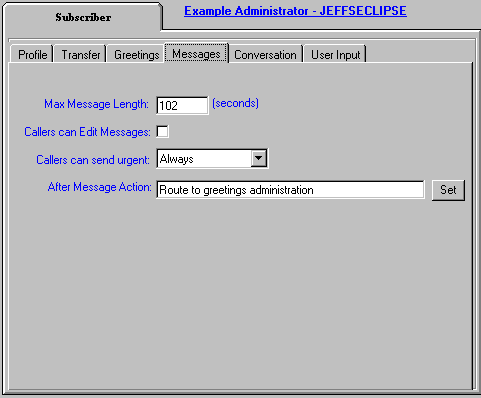
The messages tab allows you to set the maximum message length (up to 3600 seconds or 1 hour).
Callers can edit messages will give the caller the option to rerecord, append to or delete their message after they record it.
Callers can send urgent lets you dictate if callers can decide to mark a message urgent, mark all messages urgent no matter what or never allow urgent messages.
The after message action can be configured by hitting the set button to the right of the edit box. You will be given the same options you can set in the SA via a pop up dialog.
Conversation Tab
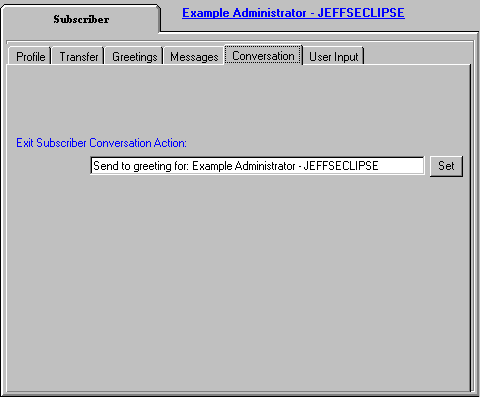
The conversations tab currently only shows the exit destination. This is the action taken when the subscriber leaves their inbox conversation by pressing * from the top level menu.
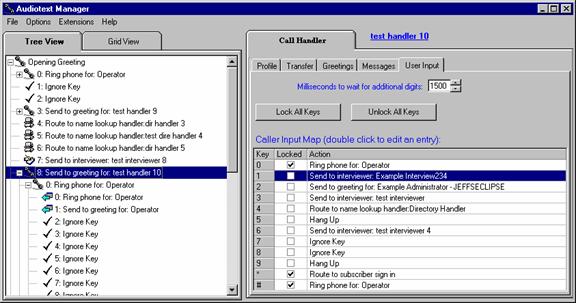
User Input Tab
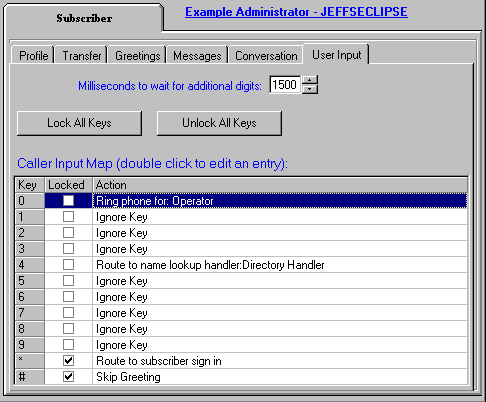
The user input tab lets you select actions for any or all of the user input keys for the subscriber. You can right click or double click on any of the rows in the table to edit a specific key. Any action you can set via the SA will be available to you via the popup menu presented.
Call Handlers
Profile Tab
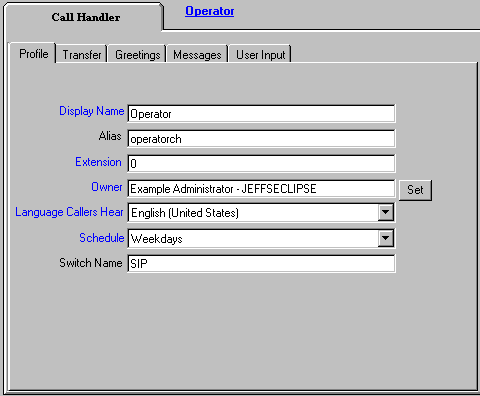
The profile tab shows much of the same information the profile page in the Unity SA shows. Remember that changes to all objects are written through to the database right away.
The display name can be any number of characters or numbers up to 128 characters
The extension field must be all numbers, must be at least 1 digits and 30 digits or less. For call handlers this field is optional and can be empty.
The owner field can be set to a subscriber or a call handler and is adjustable by hitting the set button to the right of the edit box and selecting from a pop up menu.
The language drop down list contains all the installed and active TUI languages on the system.
The schedules drop down contains all the schedules defined in the Unity system.
NOTE: You can open the SA directly to the call handler loaded by clicking on the underscored blue text with the object’s name (in this case “Operator”) to the right of the main tab title.
Transfer Tab
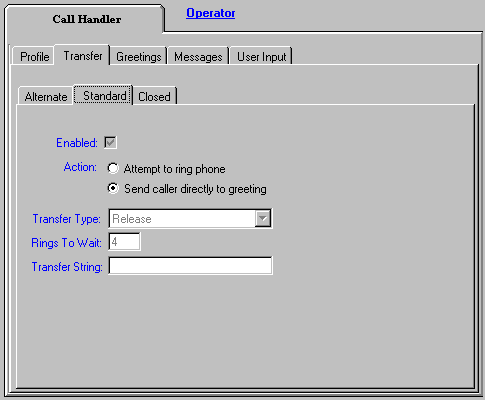
The Transfer tab shows the transfer rule for the subscriber. It differs from the subscriber transfer tab in that call handlers have three transfer rules instead of just the one for subscribers. The standard rule cannot be disabled. If the alternate transfer rule is enabled it will always execute regardless of if the closed/standard rules are active or not.
If you select to send the caller directly to the greeting, this turns off transfer options for this subscriber (i.e. any call being sent to this call handler while that greeting is active will never ring their phone). As such the transfer information is gray and disable when that radio button is selected.
The rings to wait field is only used if the transfer type is “supervised” since release transfers are simply let go by Unity as soon as the number is dialed, regardless of if the destination phone number is busy or not.
The transfer string can consist of digits (0-9), “*”, “#”, and commas only.
Greetings Tab
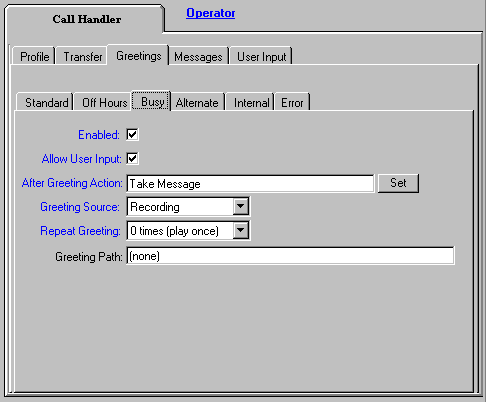
All greetings for the call handler are shown, including the error greeting which is not visible by default on the SA. The error greeting dictates what Unity does with a call when a caller enters an invalid input while listening to a greeting. By default it plays the system recorded greeting of “I’m sorry I did not hear that entry” and sends the caller back to the opening greeting.
The standard greeting cannot be disabled, it is the “backstop” greeting that will play if all other greetings are disabled or are not appropriate.
If the alternate greeting is active, it always plays no matter what other greetings are active. The Error greeting is the exception to this rule, it will always play when an invalid input is entered.
If you uncheck the “allow user input” box, no user input for one keys or for extension dialing will be allowed. Use this option with caution.
The after greeting action can be set by hitting the “set” button to the right of the field. You will be given the same options you can set in the SA via a pop up dialog.
The greeting source can be:
- System – a system generated greeting which will use the recorded voice name for the subscriber if one exists, the voice name of the message recipient (either a subscriber or a call handler) if one exists or the extension number if one exists or, finally, it’ll use the extension number of the owner/recipient if one exists. It sounds like “Extension 1189 is busy or does not answer…”.
- Recording – uses the custom recording. To record a greeting for the call handler you will need to access the SA web interface which can be done by clicking the underscored blue text with the objects name to the right of the main tab title (“Operator” in the screen shot above).
- Blank – this will play a blank greeting and go right to the after greeting action. This is useful for having calls move through several call handlers looking for a phone that will ring in a “loop” of handlers for instance.
The repeat greeting drop down allows you to have the greeting play a number of times before the after greeting action is taken. By default the greeting plays just once and then proceeds to the after greeting action. You can repeat a greeting up to 9 times. This can be useful for situations where you expect the user to select an option presented in the greeting instead of just hanging on the line.
Messages Tab
The messages tab allows you to set the maximum message length (up to 3600 seconds or 1 hour).
Callers can edit messages will give the caller the option to rerecord, append to or delete their message after they record it.
Callers can send urgent lets you dictate if callers can decide to mark a message urgent, mark all messages urgent no matter what or never allow urgent messages.
The message recipient can be set to either a subscriber or a public distribution list. This value can be changed by clicking on the set button to the right of the edit box and selecting from a pop up menu.
The after message action can be configured by hitting the set button to the right of the edit box. You will be given the same options you can set in the SA via a pop up dialog.
User Input Tab
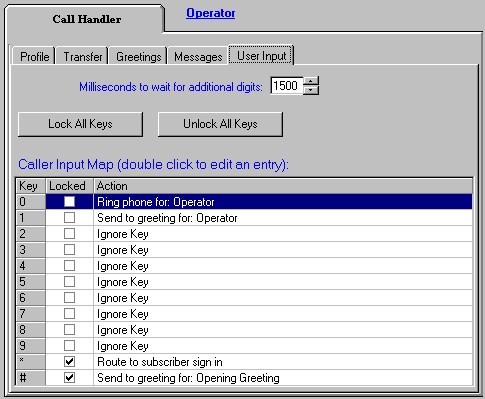
The user input tab lets you select actions for any or all of the user input keys for the call handler. You can right click or double click on any of the rows in the table to edit a specific key. Any action you can set via the SA will be available to you via the popup menu presented.
Interview Handlers
Profile Tab
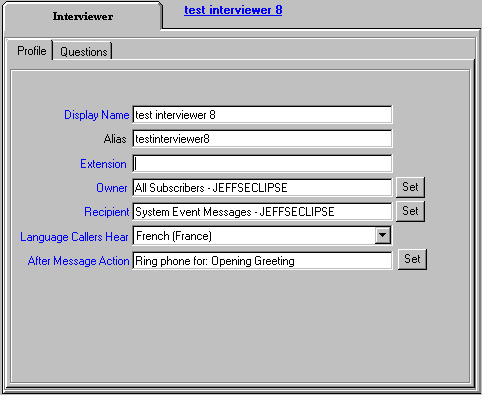
The profile tab shows much of the same information the profile page in the Unity SA shows. Remember that changes to all objects are written through to the database right away.
The display name can be any number of characters or numbers up to 128 characters
The extension field must be all numbers, must be at least 3 digits and 30 digits or less. For call handlers this field is optional and can be empty.
The owner and recipient fields can be set to a subscriber or a public distribution list and are adjustable by hitting the set button to the right of the edit boxes and selecting from a pop up menu.
The language drop down contains a list of all the installed and active TUI languages on the system.
The after message action can be edited by clicking the set button to the right of the edit box and selecting from a drop down list.
NOTE: You can open the SA directly to the interview handler loaded by clicking on the blue underscored text with the object’s name to the right of the main tab title (“Example Interview” in this case).
Questions Tab
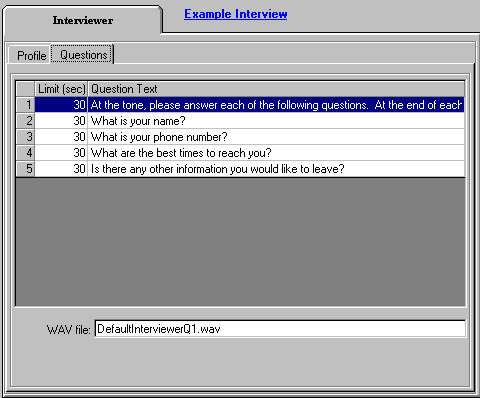
The questions tab
allows you to view the questions that will be presented to the caller in the
interview handler. The questions
will be presented to the caller in the order they appear on the grid. To edit the questions themselves,
you’ll need to access the SA pages which can be done by clicking the blue
underscored text with the object’s name to the right of the main tab
title (“Example Interview” in the screen shot above).
Directory Handlers
Profile Tab

The profile tab lets you change the display name, extension (which is optional), select an owner or choose a new language for the directory handler.
Search Options Tab
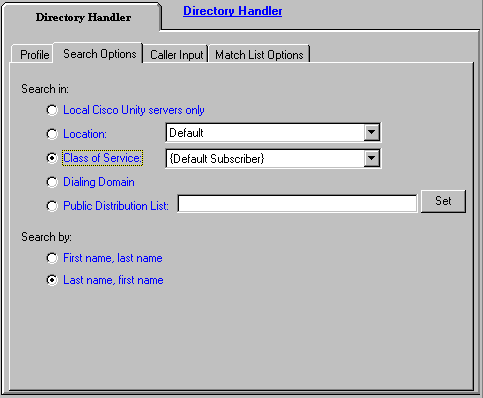
The Search options tab lets you determine which subscribers will be searched when a caller spells the name of a user they are looking for when using the selected directory handler. You can also decide if the spelled name lookups are done by first or last name first.
Caller Input Tab
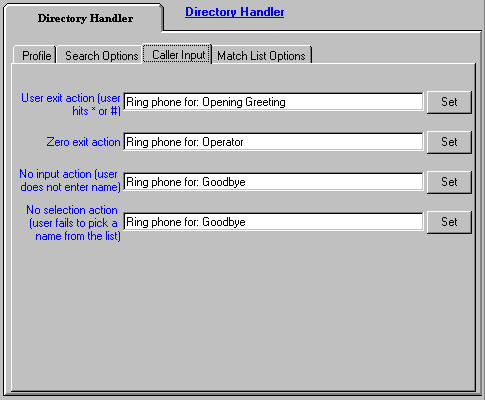
The Caller input tab lets you decide where to send callers when they exit the directory handler. There are four separate destinations that users can go to depending on how they leave the directory handler.
Match List Options Tab
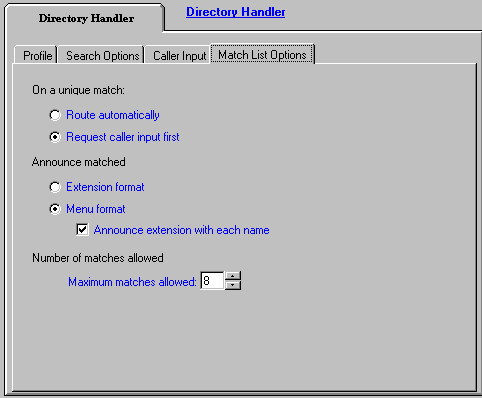
The Match list options tab lets you determine what the list of matching names sounds like to the caller.
Note that the Maximum matches allowed setting indicates when Unity will come back and ask the user to provide more letters to the name they are searching for. By default if there’s more than 8 matches, Unity will ask for more letters. This option is not offered in the SA.
Creating Call Handlers
You can create new call handlers in two ways using ATM:
- On any after message, after greeting, exit or user input key option, you can select “send to call handler” from the popup menu. On the resulting dialog you can either choose an existing call handler or you can select to create a new call handler. If you create a new handler it will be created and then linked into the selected action automatically.
- If you just want to create a call handler based on an existing call handler and not link it in somewhere specific, you can right click on a call handler in the grid view and select the “Create copy” option – this will spawn the create new call handler dialog with that call handler selected as the “copy template” automatically.
Creating Interviewers
You can create new interview handlers in two ways using ATM:
- On any after message, after greeting, exit or user input key option, you can select “send to interview handler” from the popup menu. On the resulting dialog you can either choose an existing interview handler or you can select to create a new interview handler. If you create a new interview handler it will be created and then linked into the selected action automatically.
- If
you just want to create an interview handler based on an existing
interview handler and not link it in somewhere specific, you can right
click on an interview handler in the grid view and select the
“Create copy” option – this will spawn the create new
interview handler dialog with that interview handler selected as the
“copy template” automatically.
Creating Directory Handlers
On any after message, after greeting, exit or user input key option, you can select “send to directory handler” from the popup menu. On the resulting dialog you can either choose an existing directory handler or you can select to create a new directory handler. If you create a new directory handler it will be created and then linked into the selected action automatically.
Creating Subscriber
This version of ATM
does not allow the creation of new subscriber objects in the system.
Extension Functions
In version 4.0.1 two new extension functions were added to the main menu.
Find Extension In Database
This allows you to find any extension in the database which includes all subscribers, call handlers, interview handlers, directory handlers, distribution lists and location objects in the entire database. This also includes both alternate and primary extensions for subscribers as well as subscribers in the dialing domain that may not be homed on the local Unity server you’re running Audio Text Manager on.
Simply enter an extension you’re interested in finding and if a match is found, information about what object(s) match that extension will be listed in the resulting dialog box. If more than one match is found, your database needs to be cleaned up since you have duplicate extensions in the same dialing space.
Show All Available Extensions In Range
Sometimes it’s necessary to create a large number of call handlers and you want to assign them extension numbers but you don’t know which extensions are free to be used without trying each one individually which is time consuming and error prone. This option allows you to simply provide a start and end range and it will provide a list of all unused extensions in that range.
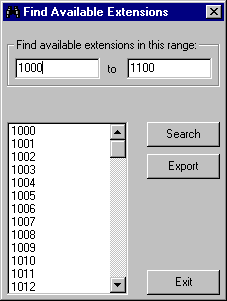
The range must be less than 5000 for the search to start. The resulting list of available extensions can be exported to a text file by pressing the “Export” button and selecting a file name to save it to.
Options
- Show Ignore Key Links In Tree. By default this is checked, if you uncheck it no node in the tree that’s set to “ignore” will show up. This is a way to compress the view a bit if you’re only interested in seeing links that take some action.
- Remove all Leaf Links From Tree. This takes the tree compression a bit further by only showing nodes that go to call handlers or subscribers, all other nodes are not shown.
- Show After Greeting Links in Tree. Selecting this option will result in 6 new nodes being added to each call handler or subscriber in the tree: “STD”, “OFF”, “BSY”, “ALT”, “INT”, “ERR” for Standard, Off Hours, Busy, Alternate, Internal and Error greetings respectively. These are “view only” nodes so you cannot change the after greeting behavior for these nodes by right clicking on them, you have to edit the after greeting behavior (and other greeting options) in the tabs to the right.
- Show After Message Links In Tree. By default the after message link (“AM”) will show up in the tree view. If you don’t want to see this link for whatever reason, uncheck this option.
- Expand All Nodes – This expands all nodes in the tree top to bottom. This is useful if you want to export the tree information to a text file (see below).
- Collapse All Nodes – This compresses the tree so that only the root node and it’s child nodes are showing.
Exporting Audio Text Data
To export the current tree view to a text file for later reference, select the ‘Export tree information to file” option in the file menu. Select a file to save the information to and click OK. The tree shown in the tree view will be dumped to a text file exactly as it is shown on the tree view tab. If all the nodes are expanded, that’s what will show up in the tab. If all the nodes are collapsed, that’s all you’ll see in the text file. Here is an example of the output you’ll see:
Export of Audio Text Tree on: 4/13/2002 8:59:48 PM
Opening Greeting
0: Operator - Ext:0 - (Ring Phone)
0: Operator - Ext:0 - (Ring Phone)
1: Ignore Key
2: Ignore Key
3: Ignore Key
4: Ignore Key
5: Ignore Key
6: Ignore Key
7: Ignore Key
8: Ignore Key
9: Ignore Key
*: Route to Subscriber Sign In
#: Opening Greeting - Ext:(empty) - (Ring Phone)
+AM: Goodbye - Ext:(empty) - (Ring Phone)
1: Ignore Key
+2: Example Subscriber - LLTHINKPAD - Ext:99990 - (Ring Phone)
3: Ignore Key
4: Route to Alpha Directory
…
The “+” symbol to the right of the “2” key there indicates that is a node that was not expanded in the tree view. In general it’s a good idea to expand all the nodes so you get the full picture of what’s in the tree. You can use the “Expand all nodes” item in the options menu to do this automatically.
Logs
Starting with Audio Text Manager 4.0.8, logs are kept for each session of ATM that’s launched. All updates and adds are noted in the log. The logs are stored in the \logs folder off the directory ATM is installed in. Logs older than 10 days will automatically be removed from this directory to be sure the hard drive is not cluttered with too many of them. Each time you open ATM, a new log file is generated. Here’s a sample output from a log where ATM was used to change the “5” one key link for the Opening Greeting call handler and then set the subscriber with the alias “Jlindborg”’s alternate greeting rule to enabled:
================================================================
Running Audio Text Manager version
4.0.8
Session started at: 11/2/2002 2:23:56 PM
User logged in on computer named: BIGBOY in
domain=ANSWERMONKEY as user with alias=
================================================================
DATE_AND_TIME, ACTION, PARENT TABLE NAME, PARENT ALIAS,
TABLE NAME, ALIAS, COLUMN NAME, VALUE
11/2/2002 2:24:10 PM, UPDATE, CallHandler,
openinggreetingch, MenuEntry,
5, Action, 2
11/2/2002 2:24:10 PM, UPDATE, CallHandler,
openinggreetingch, MenuEntry,
5, ConversationName, PHTransfer
11/2/2002 2:24:10 PM, UPDATE, CallHandler,
openinggreetingch, MenuEntry,
5, DestinationObjectIDType, 3
11/2/2002 2:24:10 PM, UPDATE, CallHandler,
openinggreetingch, MenuEntry,
5, DestinationObjectID, {1C98FCB4-3068-4358-92D6-EA397C719AB0}
11/2/2002 2:24:17 PM, UPDATE, CallHandler,
ch_JLindborg, MessagingRule,
Alternate, TimeExpires, (NULL)
================================================================
Session ended at +11/2/2002 2:24:19 PM
The output is a little rough at this point and it requires that you know, for instance, that setting a MessagingRule (greeting)’s TimeExpires field to “NULL” is how you activate a greeting. The Cisco Unity Data Link Explorer (CUDLE) tool has some information about what the tables and columns mean and what values mean in particular fields – this can be of help when reading the logs.
Obtaining Updates
To check for updates to this tool, visit http://www.CiscoUnityTools.com
Revision History
Version 5.0.25/2009
- Updated logic for call handler copy function to manually make unique copies of all greeting stream files off the original handler. CSCtc25131
- Added updated version check logic for the new CiscoUnityTools.com web site design.
Version 5.0.24 – 4/24/2006
- Fixed support for alternate transfer number conversation support in user input keys for subscribers for Unity 4.2(1) and later systems.
- Fixed problem with missing resource string causing invalid error dialog
- Updated about box info
Version 5.0.23 – 12/14/2005
- Added a dependency report option so users can know what references exist in the database for any object. See help section here.
Version 5.0.22 – 11/15/2005
- Added support for multiple switch integration changes for the Unity 4.2 release
Version 5.0.20 – 9/26/2005
- Fixed problem where version check was not pulling the right remote version from CiscoUnityTools.com – CSCsb71056.
- Fixed problem creating new directory handlers – CSCsb63345
Version 5.0.19 – 8/18/2005
- Fixed a problem for Unity 4.1 where links to the SA for objects were no longer working. CSCsb63073
Version 5.0.18 – 2/22/2005
- Fixed a problem with the TimeExpires column for updating after greeting actions in some scenarios.
Version 5.0.17 – 10/8/2004
- Added functionality to have call handlers expose expirable greetings for off hours, internal, busy and alternate greetings.
Version 5.0.16 – 9/1/2004
- Fixed a problem setting after greeting actions for subscribers in some scenarios. CSCef56017
- Fixed a problem where 4.0(3) systems were getting errors updating the after greeting action on call handlers.
Version 5.0.14 – 8/6/2004
- Added support for the new Broadcast Message Administration routable conversation in Unity 4.0(5)
Version 5.0.13 – 6/18/2004
- Fixed problem with scope distribution lists associated with name lookup handlers.
Version 5.0.11 – 5/4/2004
- First release of 5.x code base for this tool
© 2004 Cisco Systems, Inc. -- Company Confidential