Bulk Password Reset
Overview
From time to time you may need to reset passwords for large numbers of subscribers from Unity. For instance installations at schools and universities where there is a large number of users that “turn over” at the end of the year. Resetting passwords from Unity one at a time through the SA is time consuming and tedious. Bulk Password Reset also allows administrators to reset passwords for “archived” mailboxes when migrating to Connection which is not possible via the web based SA.
The Bulk Password Reset tool is a simple wizard that’s designed to make this type of operation as easy and painless as possible. You can choose subscribers based on their Class of Service membership, extension range, switch association, mailstore association, location assignment (for remote users), node ID (for Bridge users) or you can import them from a custom CSV file you create yourself.
Requirements/Special Notes
Bulk Password Reset can only be run on Unity 4.0(5) and later installations.
This tool must be run “on box”, it cannot be installed and run remotely.
You need to be logged in as a member of the local administrators group on the local Unity server to run this tool properly. This will ensure you have all the rights in the SQL database that are necessary.
Using Bulk Password Reset
Bulk Password Reset is a simple 3 panel wizard that walks you through the process of selecting the subscribers you want to reset passwords for from the system and the actual reset process
Opening Page
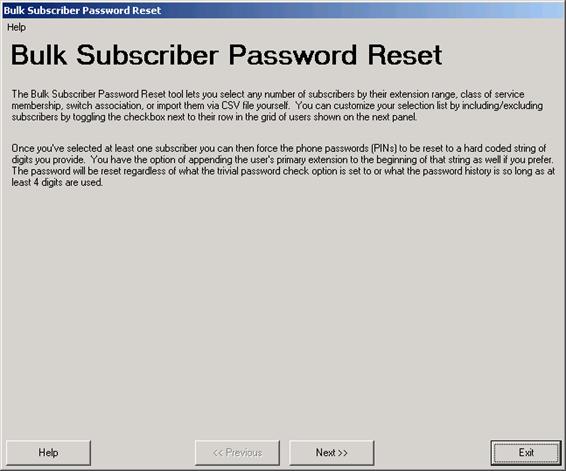
Press
“next” to move on to the next panel in the wizard.
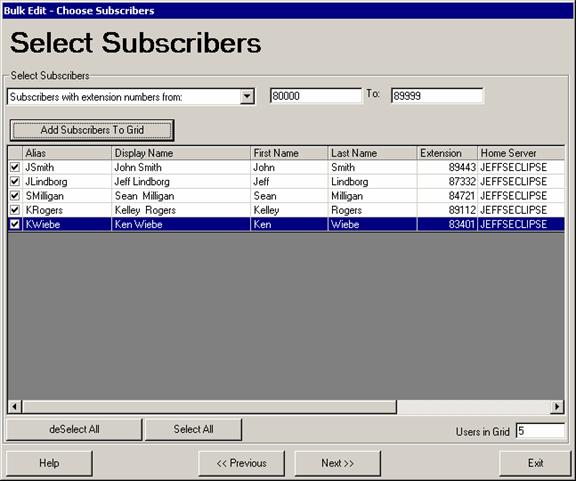
Selecting Subscribers
On this panel you select which subscribers you wish to reset passwords for. You can select subscribers by several mechanisms by using the “Select Subscribers” drop down list, providing a range or selecting an option and pressing the “Add subscribers to Grid” button. This will clear the grid and add only your latest selection to the grid of users. There’s no way to “merge” multiple ranges of users into the grid, if you wish to reset passwords for multiple groups of users based on different criteria, you will need to run the Bulk Password Reset tool multiple times.
There are nine options for adding users to the grid:
·
All subscribers. This includes all valid full subscribers
(not internet, AMIS, Bridge or VPIM subscribers) in the grid. You can then unselect users you
don’t want to remove from the system by unchecking
the box on the left. You can also
select all users or deselect all users using the buttons at the bottom of the
grid. Be
careful not to remove ALL your subscribers here as you need to leave at least
one administrator!
·
Archived mailboxes.
This option is available only for Unity installations that are
configured to synchronize directory information with a Unity Connection 8.x or
later system. If you’ve moved
one or more subscribers from the Unity directory to the Unity Connection
directory using COBRAS “hot mode” moves then the archived mailboxes
left on the Unity system can be selected and removed from Unity’s
database and/or Active Directory using this option.
·
Subscribers with extension numbers from:. This lets you specify a starting and
ending range of extensions to select subscribers by (see screen shot
above). Note that only extensions
of up to 20 digits can be entered here.
Users that may be using extremely long extensions cannot be selected by
extension range.
·
Subscribers
associated with this switch. You can select a switch that users are
associated with in a dual switch integration. All subscribers associated with the
selected switch will be included in the grid.
·
Subscribers
associated with this class of service. You can select a specific
class of service and all users assigned to that
·
Subscribers
homed on this mail server. You can select a specific Exchange
mail server and all subscriber’s that have their mailstores
on that server will be included in the grid.
·
Remote
subscribers associated with this location. For remote users (AMIS,
Bridge, VPIM, SMTP subscribers) you can choose all subscribers associated with
a selected delivery location.
·
Bridge
subscribers associated with
·
Subscribers referenced in this CSV file. This option lets you select a comma-separated
value (CSV) file to find subscribers based on their Exchange aliases. CSV is a
common text file format for moving data from one data store to another. You can
edit CSV files in a text editor or in a spreadsheet application. If you choose to
select subscribers from a CSV file, format your file by using the following
guidelines to ensure that it parses correctly:
–
Separate values by commas. Do not use a tab,
spaces, or a semicolon to separate values in the file.
–
Include a column header titled “alias”
and/or “extension” in the first line. Column headers are not case
sensitive, and can be formatted with spaces on the left, right, or on both
sides. Bulk Password Reset will
search first by extension and then by alias if both columns are provided. If neither column is provided the file
is considered invalid.
For example:
first
name, last name, home server, alias, extension
Alex, Abade, EXServer1, aabade, 8001
Kelly, Bader, EXServer1, kbader, 8517
NOTE: Searches for
users via CSV looks for both full subscribers and ”archived
mailboxes” in a Unity/Connection networking setup. For CSV selection of ”archived
mailboxes”, if you are searching by extension you need to prefix the
extension by ”ARCH_MB”.
So if your archived user had an extension of ”1234” you’d
put ”ARCH_MB1234” in the extension column. Alias column searches work as normal for
archived mailboxes.
Once you have the
grid populated with the subscribers you want, you can “cherry pick”
individual users and select/unselect them using the checkbox column on the far
left of the grid. All
subscribers that have their box checked will have their phone password reset, those that have a cleared box will be skipped. You can clear or check all boxes in the
grid using the “select all” and “deselect all” buttons
in the lower left of the form.
Once you have the
subscribers selected the way you want them, press the “Next” button
and advanced to the next panel in the wizard.
Resetting Passwords
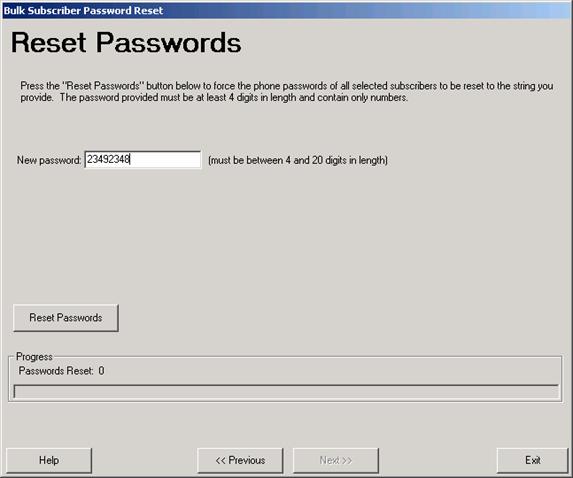
On the last panel of the wizard you have the option of pressing the “Reset Passwords” button, going back in the wizard and changing your options or exiting out. If you hit the Reset Passwords button you will be asked to confirm your decision and then a progress bar will update as the resets progress.
NOTE: The Bulk Password Reset tool does NOT enforce trivial password checks even if they are configured in Unity’s administration interface. To run the tool you must have local admin privileges and it is incumbent on the administrator to use their best judgment for passwords to use here.
Once the reset process is complete an error and reset count will be shown and you will be given the opportunity to review the output log if you like.
Logging
Each time Bulk Password Reset is run it generates a new log in the \logs folder under it’s installation directory. The logs are named “BulkPasswordReset_Log_YYYYMMDD_HH_MM_SS.txt”. The time used in the hour (HH) field is in 24 hour format. Each time Bulk Password Reset is run it’ll delete log files older than 30 days found in that directory.
The log output is pretty basic, simply including the alias and objectID (unique database identifier) of the subscriber being reset and if it was successful or not.
Obtaining Updates
To check for updates to this tool, visit http://www.ciscounitytools.com/
Revision History
Version 1.0.4 – 2/24/2010
- Improved query speed for user selection on very large databases.
Version 1.0.3 – 1/14/2010
- Updated extension range selection logic to handle non number fields added by UCI for Unity 8.
- Adjusted CSV parsing function for selecting users that had been moved to Connection in a UCI configuration.
Version 1.0.1 – 12/15/2009
- First release of tool
© 2010 Cisco Systems, Inc. -- Company Confidential