Bulk Subscriber Reset
Overview
The Bulk Subscriber Reset tool is designed to allow administrators to reset large numbers of subscriber mailboxes back to their default settings without breaking any links or membership information for those users. For instance if you have a set of subscribers that are referenced as owners or message recipient of call handlers and/or are linked to by user input keys off of call handlers and/or are members of specific public distribution lists or the like, resetting their mailboxes using this tool will not break those associations. This tool also removes messages out of the mailboxes on the back end without removing the AD/Mailbox accounts themselves during the reset process. For this reason it is highly recommended that you be logged in as the message store facing account (i.e. the account associated with the AvCsMgr service) for this tool to function properly.

Each subscriber you select, the Bulk Subscriber Reset tool will:
- Remove all messages for that subscriber including their inbox, sent items and deleted items folders. There is no undo option for this and no way to retrieve deleted messages later so proceed with caution.
- Their customized greetings and voice names will be removed and set back to default values based on the subscriber template selected.
- All user input, transfer and greeting options will be reset to defaults based on the subscriber template selected.
- All notification devices will be reset to defaults based on the subscriber template selected.
- Their phone password will be reset to defaults based on the subscriber template selected
- Their alternate extensions will all be removed unless you specify specifically that they be preserved.
The user will be created as new using the subscriber template you select, however, as noted above, their membership in public and private distribution lists as well as associations to call handlers and other objects in the directory will be preserved. This process does not remove or add additional objects to the directory or to the messaging database, it uses the same mailboxes that were assigned to the subscribers being reset.
Requirements/Special Notes
This tool requires Unity 4.0(3) or later and only runs on systems connected to Exchange 5.5, 2000 or 2003 back ends. This tool does not work with Domino as the back end.
You should be logged in as the message store facing account (i.e. the account associated with the AvCsMgr service) for this tool to work properly. The Bulk Subscriber Reset tool must log into every user’s mailbox that you are resetting to clear out messages and it needs full mailstore rights to do this. These rights are already assigned to the message store facing account. While the tool will only warn you and let you run anyway if you are not logged in as the message store facing account, you could have problems removing messages from subscribers’ mailboxes if you do this. NOTE: To receive TAC support on this tool, you will be required to log in as the message store facing account.
The directory synchronization service must be running for this tool to launch. For Exchange 5.5 that’s the AvDsEx55 service, for Exchange 2000/2003 that’s the AvDSAD service.
Using Bulk Subscriber Reset
The Bulk Subscriber Reset application is a simple wizard consisting of 3 basic steps:
Select a template
One the first page of the wizard you need to select a subscriber template to use when resetting mailboxes. All the default settings for subscribers that are reset will revert back to those configured in this template. You can also decide if you wish to preserve the alternate extensions for users when they are reset. By default all alternate extensions assigned to a subscriber are removed when the mailbox is reset.

Select subscribers

On this panel you select which subscribers you wish to have reset. You can select subscribers by several mechanisms by using the “Select Subscribers” drop down list, providing a range or selecting an option and pressing the “Add subscribers to Grid” button. This will clear the grid and add only your latest selection to the grid of users. There’s no way to “merge” multiple ranges of users into the grid, if you wish to delete multiple groups of users based on different criteria, you will need to run the Bulk Subscriber Reset tool multiple times.
There are six options for adding users to the grid:
–
All subscribers. This includes all valid full subscribers
(not internet, AMIS, Bridge or VPIM subscribers) in the grid. You can then unselect users you
don’t want to remove from the system by unchecking the box on the left. You can also select all users or
deselect all users using the buttons at the bottom of the grid.
–
Subscribers with extension numbers from:. This lets you specify a starting and
ending range of extensions to select subscribers by (see screen shot above)
–
Subscribers
associated with this switch. You can select a switch that users are
associated with in a dual switch integration. All subscribers associated with the
selected switch will be included in the grid.
–
Subscribers
associated with this class of service. You can select a specific
class of service and all users assigned to that
–
Subscribers
homed on this mail server. You can select a specific Exchange
mail server and all subscriber’s that have their
mailstores on that server will be included in the grid.
–
Subscribers referenced in this CSV file. This option lets you select a
comma-separated value (CSV) file to find subscribers based on their Exchange
aliases. CSV is a common text file format for moving data from one data store
to another. You can edit CSV files in a text editor or in a spreadsheet
application. If you choose to select subscribers from a CSV file, format your
file by using the following guidelines to ensure that it parses correctly:
1.
Separate values by commas. Do not use a tab,
spaces, or a semicolon to separate values in the file.
2.
Include a column header titled
“alias” in the first line. Column headers are not case sensitive,
and can be formatted with spaces on the left, right, or on both sides.
For example:
first name, last name, home
server, alias
Alex, Abade, EXServer1, aabade
Kelly, Bader, EXServer1, kbader
Once you have the
grid populated with the subscribers you want, you can “cherry pick”
individual users and select/unselect them using the checkbox column on the far
left of the grid. All subscribers
that have their box checked will be reset, those that
have a cleared box will be skipped.
You can clear or check all boxes in the grid using the “select
all” and “deselect all” buttons in the lower left of the
form.
Once you have the
subscribers selected the way you want them, press the “Next” button
and advance to the next panel in the wizard.
Advanced subscriber selection
If you run the Bulk Subscriber Reset tool with the “/advanced” command line option, an additional button will show up on the Select Subscribers panel called “Advanced”. Clicking on it brings up this query window dialog:

You can make any legal TSQL query against the subscriber table you like. When the query is as you want it, press the “import subscribers” button and those users will be moved into the main subscriber select grid.
You should only use this option if you are comfortable with SQL queries and your are familiar with the Unity database. You can refer to the Cisco Unity Data Link Explorer application for help with the data dictionary. It can be downloaded from: http://www.ciscounitytools.com/App_CUDLE.htm
Reset subscribers
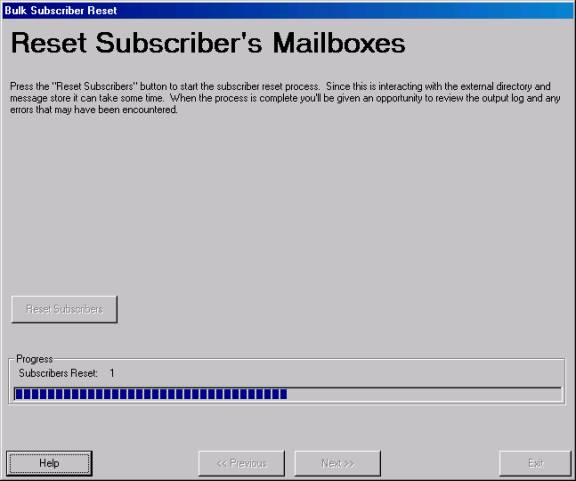
On the last panel you simply select the “Reset Subscribers” button and a bar will indicate progress as the applications walks through and resets all the selected subscriber’s mailboxes.
As noted on the form, this is not going to be a lightning fast process as the application is waiting for synchronization to the directory and mailstores to complete for each user being reset to ensure it completes properly and it removes all messages from the mailbox on the back end which can take some time, especially for large numbers of messages.
Logging
Each time Bulk Subscriber Reset is run it generates a new log in the \logs folder under it’s installation directory. The logs are named “PublicSubscriberReset_Log_YYYYMMDD_HH_MM_SS.txt”. The time used in the hour (HH) field is in 24 hour format. Each time Bulk Subscriber Reset is run it’ll delete log files older than 30 days found in that directory.
Typical output for the log will show each subscriber as they are being reset:
** Resetting Subscriber **
Alias=JLindborg5
ObjectID={BC41E99B-396C-4243-A721-BC51004DA0D9}
Checking for DTMFAccessID uniqueness in dialing domain for this user
User has opted to preserve alternate extensions - saving them off
2 alternate extensiosn
found for user - saving
9001
9002
removing voice name from file system
Deleting d:\CommServer\Stream Files\JLindborg5_SubName_01b6ba06.wav
removing greeting WAV from file
system:Alternate
Busy greeting is not recorded
Error greeting is not recorded
Internal greeting is not recorded
Off Hours greeting is not recorded
removing
greeting WAV from file system:Standard
Removing messages for user with SMTP=JLindborg5@lindborglabs.com
User
has 0
messages in their inbox - deleting
Inbox messages deleted
User
has 0
messages in their sent items folder - deleting
Sent
items messages deleted
User
has 0
messages in their deleted items folder - deleting
deleted items folder messages deleted
user mailbox cleaned
Removing subscriber from SQL
Directory sync complete for removal
Adding subscriber back to SQL with new template settings
User created in SQL
Adding alternate extensions back to user as requested
Updating global subscriber table with new ObjectID values
Subscriber synch with directory started.
Directory sync complete for creation
If there are errors encountered during the reset process, they will be logged with a “(error)” string at the beginning of the line so they can be easily spotted.
Obtaining Updates
This tool will automatically check for updated versions by connecting to www.CiscoUnityTools.com if it can. This is done each time it runs and can be manually initiated under the “help” menu on the main form by selecting “Check for updated version”. If the system you are running on does not have access to the internet you can manually check for updated versions by visiting www.CiscoUnityTools.com.
Revision History
Version 1.0.5 – 10/20/2006
- Updated to accommodate SP changes in the Unity 5.0(1) release
- Fixed problem with voice name not always being removed from subscriber record
- Changed logic to force removal of all greeting and voice name wav files up front instead of allowing the background “StreamToDelete” process to handle it
Version 1.0.4 – 8/25/2004
- Added command line option of “/SkipDLSync” to allow the option of skipping the resynch of all public distribution lists at the end of the reset process. This option was added for internal use only.
Version 1.0.3 – 8/14/2004
- Added option to preserve alternate extensions when resetting a mailbox
- Added additional logging around the removal of the voice name and greetings.
- Added an additional resync for each user to ensure the deleted voice name does not get pulled back in from the directory.
Version 1.0.2 – 7/12/2004
- First ship of tool
© 2006 Cisco Systems, Inc. -- Company Confidential