Cisco Unity Data Link Explorer (CUDLE)
Connecting
To Remote Unity Servers
Viewing
Stored Procedure Definitions
Explore
Unity Configuration Values
Overview
The Unity Database Data Link Explorer (CUDLE) tool is designed to allow users to quickly navigate around a Unity database, find out information about what data in a particular table or column means and jump around between referenced objects in the database easily. It also has the ability to show Unity stored procedures and includes a custom SQL query builder. It is an ideal tool for field techs, tech support folks and development staff attempting to make sense of the UnityDB SQL tables. Since it’s a read only viewer it’s also safe to walk customers through using if necessary.
Use of the viewer is fairly straight forward for the most part, some of the less obvious features are described in the Features section below.
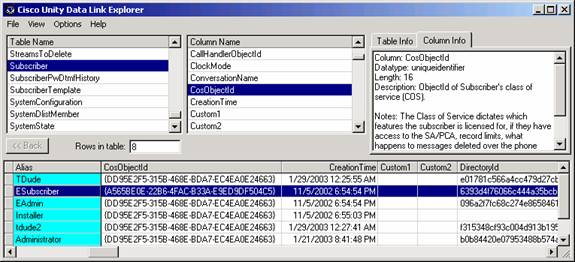
When you first run CUDLE it interrogates the local SQL UnityDB database and populates the “Table Name” list box on the left with all the user defined tables it finds. For each table in the database it gets a list of columns in that table which show up in the Column Name list box in the middle.
As you select a row in the Table Name list on the left it reloads the column information and updates the data in that table shown in the bottom grid. The data grid is loaded such that the column names are presented in alphabetical order running left to right. “Frozen” columns (the “Alias” field in blue in the screen shot above) are excluded from the sort order – see the Features section below for more on freezing columns and rows in the data grid. In addition, information about what that table is used for in the database is shown in the “Table Info” tab text box to the right.
When you select a row in the Column Name table, basic information about the data stored in that column is shown in the “Column Info” text box on the right. In addition the data grid on the bottom will reposition such that the selected column appears as the left most column. This makes it easier to find what you’re looking for quickly instead of hunting through the columns in the Enterprise Manager or the Query Analyzer interfaces provided by SQL.
The data grid itself offers several features to help user sift through the information in the tables quickly. These are covered in the Features section below.
NOTE: You can not only resize the form itself but you can move the middle “bar” up or down to show more of the data table or more of the column/table/description text area as desired. Move the mouse over the horizontal bar above the data table, click and hold the left mouse button and drag up or down.
Requirements/Special Notes
The Database Viewer tool will work with any version of Unity 3.1(1) and later.
The tool needs to be installed and run on the local Unity server only, it cannot connect remotely from off box.
This is a read only tool, there is no command line option or the like to expose editing the values in the database directly at this point.
Features On Main Viewer Form
The data grid shown at the bottom of the form offers several features to help navigate around the database and help find what you’re looking for in the database tables.
Sort and Move columns
Each column header can be sorted by clicking on it with the mouse. The ascending/descending sort order is indicated by a small triangle in the header itself. You can also move a column by clicking and dragging the column header. This can be useful if you want to “freeze” a particular column or row when sifting through a large table of data – see the “Freezing columns and rows” section below.
ObjectID lookups
Most tables reference individual rows in that table using a unique identifier called an ObjectID. For instance every subscriber in the system has a row in the Subscriber table and each subscriber in that table is referenced by the value in the SubscriberObjectID table. Other tables that need to reference a subscriber (for instance as the message recipient of a call handler) do so using this SubscriberObjectID value.
Since these ObjectIDs are just strings of numbers and letters, they aren’t real helpful to users wanting to know which object they reference. The data table automatically does lookups of the ObjectID values for you in a couple of ways:
- If the “Show ObjectID Data In Tooltip Text” option is checked in the Options menu then every time you move your mouse over a column that shows an ObjectID, information about the object will show up in the yellow tooltip text floating over the table. You can see this in the screen shot above – The object type (Subscriber in the case of the example above) is shown with the alias, display name and extension number of the subscriber it references. If the object cannot be found, that will be noted. If you see this you should run dbWalker and check for errors in your database.
- You can also right mouse click on a cell that contains ObjectId data and the same information that shows up in the tooltip text above will be visible in a popup menu. The popup menu, however, is all one line instead of the nicely formatted multiple line presentation of the tooltip text. You can click on the popup menu to go right to the object in question. See the next section for more information on that.
NOTE: The ObjectID column that is a unique identifier for the currently selected table will not show information about the referenced object. In other words if you’re looking at the CallHandler table and you move the mouse over the CallHandlerObjectID column it will not show information about that object since, of course, you’re looking at that very object right now.
Jump and jump back
As noted above, you can right click on a cell in a column showing ObjectID data and a popup menu will come up showing the information about that object in another table in the database. If you click on that popup menu, the tool will automatically load that table and reposition the data grid at the row representing the object in question. For instance if you were looking at a row in the Call Handler table and you wanted to take a quick look at the message recipient for that call handler, you can simply move over to the MessageRecipientObjectID column, right click on that cell and then select the popup menu that results. The message recipient can be either a distribution list or a subscriber, depending on the particular recipient the appropriate table is loaded and that subsriber or distribution list is then set as the currently selected row.
Every time you do such a jump, information about where you were before you jumped is stored. If you want to jump back to where you were simply hit the “back” button in the upper left of the form and you it will load the appropriate table and select the row you were on automatically. In the example above, then, you can jump to the message recipient, look around, and then jump back. CUDLE stores up to 10 positions so you can jump numerous times and “back” your way back to the original position quickly.
NOTE: Your position is only stored when you jump by right clicking on an ObjectID column and selecting the popup menu. If you navigate around by manually selecting tables and columns your position information is not stored anywhere.
Freezing columns and rows
When sifting through large tables of information where there are many columns you may be interested in, it’s sometimes very handy to “freeze” a particular column or row in place while you scroll through the data so you can keep track of which row you’re interested in and/or compare values in various rows to one another.
Freezing Columns
By default CUDLE will automatically freeze the “Alias” column of any table that has an alias. The result is the Alias column’s background is light blue and it will always be on the far right of the data table. As you scroll the columns to the right, all other columns shift over but the Alias column stays put as shown in the following screen shot:

This helps in keeping track of which row you’re interested in as you move the columns around to see what you are interested in. However if this is not to your liking you can turn this automatic freeze option off in the Options menu.
You can extend the number of columns that are frozen by placing your mouse over the column divider between the first frozen column and the first “normal” column. The mouse icon will change to a small picture of a lock. If there are no frozen columns, place the mouse over the divider between the column selector button on the far left and the first data column, the same icon will appear. Once the icon is visible you can press and hold down the left mouse button and move it to the right to encompass as many columns as you want to freeze.
When you change the columns to be frozen it will always reposition the grid to the far left and select the first X columns (where X is the number of columns you selected to be frozen). To select a specific column to be frozen, scroll the grid to the right till you find the column you want (you can also click on the column table and it will reposition the grid for you automatically). Once you see the column you’re interested in, use the right mouse button the click and hold the column header and drag that column over to one of the frozen columns on the left and then release it. This column will now be in the frozen set and will stay there as you move around in the table.
Freezing Rows
When sifting through large numbers of rows in a table, sometimes you’re interested in comparing the values of various columns across 2 or more rows in the table. If they don’t appear next to one another in the table this can be a time consuming process. To help with this you can select to freeze one or more rows in the grid so they always appear as you scroll down through the other rows in the table.
By default no rows are selected for freezing. You can extend the number of rows that are frozen by placing your mouse over the row divider between the column header and the first row of data. The mouse icon will change to a small picture of a lock. Once the icon is visible you can press and hold down the left mouse button and move it down to encompass as many rows as you want to freeze. The following screen shot shows 3 rows frozen.

When you change the rows to be frozen it will always reposition the grid to the top and select the first X rows (where X is the number of rows you selected to be frozen). To select a specific row to be frozen, scroll the grid down till you find the row you want. Once you see the row you’re interested in, use the right mouse button the click and hold the row selector column on the far left of the grid and drag that column up to one of the frozen rows at the top and then release it. This row will now be in the frozen set and will stay there as you move around in the table.
NOTE: If you force a sort of the data by a particular column after selecting rows to freeze, the frozen rows will be changed to reflect the first X rows (where X is the number of rows you selected to freeze) in the grid after the sort is complete. It does not exclude the frozen rows from the sort operation – as such sort your data the way you want it first and then select the rows you want to freeze.
Exporting Table to CSV file
If you would like to save the current table to a CSV file you can right click on the grid itself and select to save the entire contents of the grid or just those rows currently visible in the grid. You can also select F8 to save the entire grid contents or F9 to save just the visible rows or you can select those same options from under the file menu.
If you want to save information about several specific rows that are not next to one another but you don’t want to get the entire grid, one trick is to use the “freeze rows” method noted above to force the rows you care about to all be visible and then to select to save only the rows visible in the grid to a CSV file.
NOTE: For Boolean values (true/false) the CSV file will show “0” for false and “–1” for true
Refreshing the Database
If you or someone else is making changes to the database table you’re looking at, you can force the current data to refresh by selecting View | Refresh or by hitting “F5” on the keyboard. This will load updated data into the grid you’re looking at without moving the row or column you were looking at in the process. This can be handy if you’re testing out another tool that is making changes to the database and you want to watch the updates of particular columns.
Finding ObjectID values
Under the File menu there’s an option called “Find ObjectID” that will allow you to paste in any ObjectID string and it will search all the tables in the database for a matching record for that ObjectID string. If a match is found it will jump to that table and row for you and also “remember” where you were so you can use the “Back” button in the upper right to get back to where you were.
ObjectID strings are properly formed GUIDs in the form of “{B229A04E-CDC6-48FA-AFAC-053B3503FF9C}”. The “{“ characters at the beginning or end are optional but they either need to both be there or both not be there. If the ObjectID string you paste in is not in this format, the search function will exit.
Finding Any Value
Version 1.0.45 of CUDLE added the generic “Find value in current DB tables” option to the file menu. This will search for any string you enter across all tables and all columns for the currently loaded tables. If you have views loaded, those will be search and if you have raw tables loaded, those will be searched. The table and row where a match is found will be shown and you will be given the opportunity to check for another match or stop if you wish.
Options
A couple of options currently appear under the Options menu.
- Use Tables/ Use Views. Starting in version 1.0.21, CUDLE allows you to switch between looking at views and raw tables in Unity 4.0(1) and later. Since development against UnityDB should be using views for queries and stored procedures for adds/updates/deletes it’s important folks have this capability. You can switch between Tables and Views under the Options menu.
- Lock Alias Column To Left. This is on by default and will result in the “Alias” column always being “frozen” to the left of the data grid. This makes it easier to keep track of which row you’re interested in as you scroll across large numbers of columns in a table. Not all tables have “alias” columns, for those tables this option has no effect.
- Lock Unique ID Column To Left. Similar to locking the Alias column to the left, the column used by the selected table as it’s unique identifier is locked to the left of the data table. For instance the CallHandler table would have the CallHandlerObjectID column locked to the left.
- Show ObjectID Data in ToolTip Text. This is also on by default and will result in information about an object in another table referenced by it’s ObjectID value being showing in a floating tooltip text box as you move your mouse over the column. You can get the same data by right clicking on the cell instead so if the floating box is distracting you can turn this option off and simply right click when you’re interested in seeing the data.
- Always On Top. All the windows in CUDLE allow you to lock them as the top most form if you like.
Connecting To Remote Unity Servers
In rare cases it may be desirable to examine the database on a remote Unity server. You can do this by selecting “Attach to remote Unity server” from the file menu. You can then select a domain name in the drop down list and select a server running SQL in that domain. Once you have the server you want, hit “Connect” and if the server is running Unity 3.x, CUDLE will attach to it remotely and show it’s database and stored procedures. If the server is not running Unity, you will get an error message indicating that.
Once you’ve connected to a remote server, the title bar on the main CUDLE form will indicate the domain and server name you’re connected to. Further, the “Unity Registry Tree” option under the View menu will be disabled since you cannot examine a remote registry tree without special rights to do so.
Viewing Stored Procedure Definitions
To see all the stored procedures in the UnityDB select the “View | Stored Procedures” option and a stored procedure form will come up. The stored procedures used by Unity are listed on the left and when you select a particular item it’ll show all the parameters for that stored procedure in the middle column as shown in the screen shot:

You can sort the parameters grid by column by clicking on them. On the right there is some information on the use of the stored procedure and each parameter. Currently this information is mostly empty but in subsequent versions it’ll start to fill out similar to the data dictionary information on the main form.
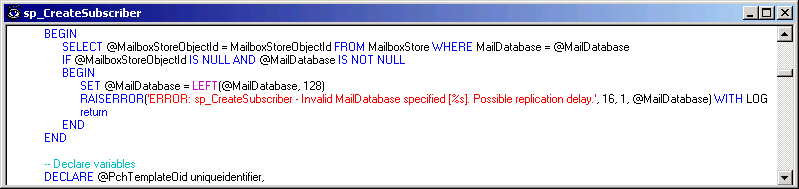
You can also see the source code for the stored procedure if you like by pressing the “View Source” button in the lower right of the form:
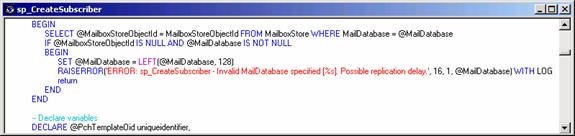
This is a read only view that’s there to help you understand how it works, you cannot edit, save or create stored procedures of your own through this interface.
Construct Custom SQL Queries
CUDLE includes a basic SQL command window similar to the SQL Query Analyzer offers. You can enter any valid SQL string you like and execute it by pressing the “execute” button on the right. CUDLE features dynamic table and column name drop down lists that pop up automatically to help you find the tables and columns you wish to select.
The results of your query will
show up in the grid at the bottom of the form. You can sort this grid by clicking on
the columns if you like. You can
also export the entire contents of the result grid to a CSV file or just those
rows visible or just the contents of the selected cell by right clicking on the
results grid.
You can save queries for later use
using the Favorites option in the menu – the last 20 queries are also
available using the “Query History” button.
NOTE: You can also update the database in this window using UPDATE and DELETE commands just like SQL Query Analyzer so be careful! If you apply an update or a delete you will be told how many rows were affected by the operation. There is no “undo” for changes like this so make sure you know what you’re doing if you are executing updates.
NOTE: For Boolean values (true/false) the CSV file will show “0” for false and “–1” for true
NOTE: You can change the text coloring scheme by right clicking on the query input box and selecting the “Properties” menu item.
Explore Unity Registry Values
CUDLE includes the ability to explore the Unity registry branch, see the keys, values and data in there and include descriptions and defaults for specific values. Under the View menu on the main form select “Unity Registry Values” and the following form will load.
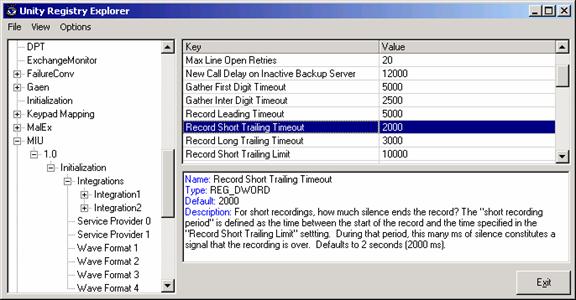
You can navigate around the registry using the tree control on the left and select individual values in the table on the upper right. Information about the selected key shows up in the text box in the lower right. You can resize the regions on this form both vertically and horizontally as necessary. You can also select the “always on top” option under the Options menu if desired.
By right clicking the mouse on the list of keys and values in the upper right you can optionally copy the full key registry path or the key value to the clipboard. Similarly if you right click on the key description text box in the lower right you can copy selected text to the clipboard if you like.
Explore Unity Configuration Values
In Unity 4.0(4) and later systems some of the system configuration data that used to be stored in the registry has moved into SQL. To facility viewing that data easily a view similar to the registry values explorer above was added. If you’re running Unity 4.0(4) or later you’ll see “Unity Configuration Tree” under the View menu off the main tool bar that will bring up the following form:
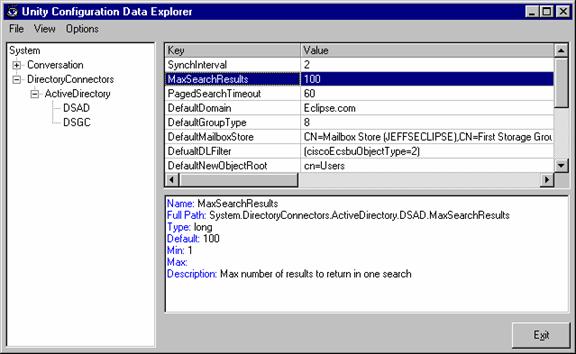
You can navigate around the settings tree on the left and keys in those nodes will show up on the right of the form along with information about what the value is used for, what it’s max/min values are and such.
Obtaining Updates
To check for updates to this tool, visit http://www.CiscoUnityTools.com
Revision History
Version 1.0.47 – 9/29/2009
- Added updated version checking logic for new CiscoUnityTools.com site design.
Version 1.0.46 – 12/27/2006
- Added favorites manager to query builder
- Updated query builder context coloring scheme
- Added “intellisense” type auto resolve for table and column names in query builder
- Added option to copy just a single cell’s contents in results table on query builder
Version 1.0.45 – 12/20/2005
- Added cross table search option to the File menu.
Version 1.0.44 – 4/14/2005
- Updated stored procedure code viewer to use CodeMax text control.
- Added option to execute stored procedure
- Updated setup to Install Shield
Version 1.0.43 – 3/25/2005
- Fixed a problem with remote table access where bogus error dialog was popping up – CSCsa77962.
- Fixed a problem with stored procedures enumerating their properties throwing an error when the list is empty.
Version 1.0.42 – 2/15/2005
- Updated data dictionary for the Unity 4.0(5) release
- Fixed a minor typo in a field description: CSCeg71269.
Version 1.0.40 – 5/10/2004
- Added support for named instances of SQL on the local server
Version 1.0.38 – 4/26/2004
- Added support for viewing the beta Kubrick database under development
Version 1.0.36 – 3/23/2004
- Added logic to save configuration data to the registry and load it at startup
- Updated data dictionary to pull information from the extension added in the 4.0(4) database instead of the local XML data dictionary file.
Version 1.0.35 – 3/3/2004
- Fixed a problem where the “Find by ObjectID” function under the file menu kicked back an error on very large databases. CSCed86380
- Added tree view option for the Unity configuration data in Unity 4.0(4) and later systems.
Version 1.0.33 – 2/10/2004
- Added support for table object ID resolution for Private Distribution lists and subscriber templates.
- Removed the “could not resolve parent table name” from the pop up text – it was a debug string that shouldn’t have been showing.
- Fixed a problem where an error was popping up Rules table when moving the mouse over the ObjectId column in the table causing an invalid query to be made.
- Added support for resolving private distribution list member names properly with a mouse over of the ObjectID column
Version 1.0.31 – 9/11/2003
- Fixed problem with CR/LF characters appearing in the “previous queries” list on the Query Builder page – CSCec14500
Version 1.0.30 – 8/13/2003
- Updated version checking logic for the 4.0(3) release
- Expanded saved queries text to go beyond 1,024 characters.
Version 1.0.28
- Forced color recalculation of stored query when loaded
- Fixed problem with archived query strings being loaded from pop up dialog
Version 1.0.26
- Added history of up to 10 previous query strings to the Query Builder form
- Updated dictionary XML file
Version 1.0.25
- Added filter to stored procedure load to get updated “csp_” prefix for 4.0(3) stored procs
- Updated Dictionary XML file
Version 1.0.24
- Added functionality to check for updated version
- Included color coding for table and view names in the query builder form.
Version 1.0.23
- Forced application to run at low priority.
Version 1.0.22
- Fixed problem with 4.0(3) betas where DTMFAccessId columns have been removed from raw tables.
- Fixed problem with “View Registry” not being available after switching between using views and raw tables
- Reorganized and updated help file
- Forced to run on Unity 3.1(1) and later only. Problems with differences in 3.0(x) versions proved to be too difficult to work around smoothly.
Version 1.0.20
- Added ability to flip back and forth between raw tables and views in the options menu
- Added ability to lock the unique identifier column to the left along with Alias.
- Set flood color for the unique identifier column for the selected table to be blue.
- Added TSQL Reference help to menu in Query Builder
- Updated edit box on Query Builder form to behave properly when delete hit with selected text, copy/past/cut command and the like.
- Added menu to the Query Builder and removed most of the buttons from the form. It was getting a bit cluttered.
Version 1.0.19
- Updated data dictionary and registry XML files with latest info
Version 1.0.18
- Added “Export entire grid to CSV” and “Export visible rows to CSV” options for the grids on the main form via the right click option on the grid itself, using the file menu or using F8. Added similar export function to the Query Builder form but it’s only available via the right click on the grid itself.
- Updated XML files for database, stored procedures and registry settings
Version 1.0.16
- Added F5 “refresh” option to main form – should update database from SQL and leave the table/column selection standing where it is.
- Added copy options on the registry key explorer page such that you can copy the full key path, the key value or some part of the key description to the clipboard using the right mouse button.
- Added “Remote Connection” option under the file menu.
- Fixed a problem with the root “Active Voice” node in the tree control on the registry explorer
Version 1.0.15
- Added “always on top” options to the forms.
- Added “Registry Explorer” functionality
- Included color in the text output for the stored procedures, stored procedure parameters, database and column output and the registry setting descriptions to make them easier to read
Version 1.0.14
- Added a bunch of stored procedure documentation to the data dictionary
- Added ability to view the source of the selected stored procedure complete with color coordination for commands, constants and key words.
Version 1.0.13
- Added keyword and constant color to the Query Builder form. Neato.
- Added stored procedure source view complete with color scheme to the stored procedure views form. Pretty.
- Fixed some keyboard navigation problems on the main form.
- Updated data dictionary.
Version 1.0.12
- Changed stored proc viewer to show readable column names for parameters
- Fixed problem where error reported when a stored proc has no parameters
- Added paste button to query builder form
- Fixed query builder to show “0 records affected” if an updated that had no matches is executed
- Made the column headers for the results table in the query builder always visible and properly resizable.
Version 1.0.10
- Fixed a problem in the stored procedure viewing form with the connection string having a hard coded machine name reference in it.
Version 1.0.9
- Added Unity stored procedure view form under the view menu
- Added SQL Query Builder form under the view menu
Version 1.0.8
- Made several updates to the data dictionary XML file.
Version 1.0.7
- Added row count box and moved “back” button down above grid with it
- Change behavior to clear frozen rows and columns when table is changed
- Change behavior to clear frozen rows when table is sorted by column click
- Fixed problem where “back” button wasn’t disabling properly sometimes
- Added logic to expand frozen rows and columns fields automatically when user drags a row or column up into or next to existing frozen rows or columns
- Fixed problem where “Call Handler Object ID” link in column table would be ignored after jumping back from a call handler
- Fixed problem where right clicking a column and hitting “copy” may get the wrong column’s data
- Updated Data Dictionary XML file
Version 1.0.6
- Added “notes” field to the table description output.
- Added “Find ObjectID” function under file menu
Version 1.0.5
- Fixed problem with path to data dictionary XML file not being updated properly
- Fixed issue where column information not being refreshed properly in some cases
- Removed functionality where the table/column tabs automatically change their view as you navigate through tables. Leave them where the user puts them until changed manually now
Version 1.0.2
- First release of tool