|
Restore Procedure Overview
|   |
|
Restore Procedure Overview
| |
Before restoring from a backup, you must install the same, exact version of Unity you backed up from. We recommend that you also install the same ESes because an ES may include a database schema change. If you backup a system that includes a schema change and try to restore to a system without the schema change, the restore will fail or may result in an unstable system.
You need to install Unity and get it hooked up to the Exchange 55, 2000, 2003, 2007 or Domino server you want to use as the partner back end server. This can be either on (in the case of Exchange) or off box and that Exchange or Domino version you were hooked to on the server you backed up from does not have to match the version on the new box you’re restoring to. See Restoring to an Exchange 2007 Based System section for details specific to restores with Exchange 2007.
The Unity installation must be complete, clean and running before the restore will be allowed to run. DiRT will not “iron out the wrinkles” on a bad or incomplete installation for you. Unity must be running, must have no more than 10 subscribers and must have successfully synchronized with the directory during installation before DiRT will run. If the DiRT restore detects ANY problems with the installation it will abort and not allow the restore to continue. It is an extremely good idea to make sure Unity is taking calls and the SA is working etc… before doing the DiRT restore. The entire DiRT application depends on the system you do the restore on being clean and functional.
Once you have Unity up and running, launch the Unity Disaster Recovery Restore application.
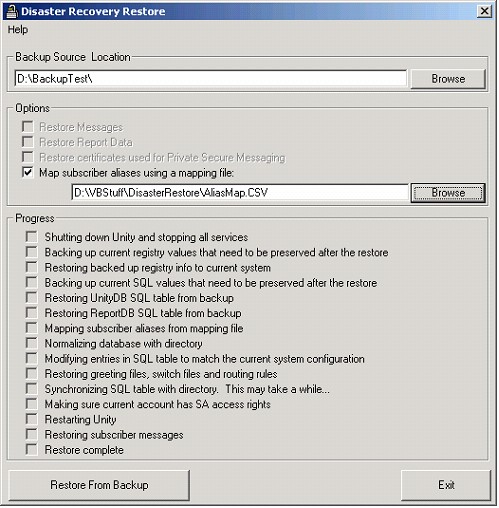
Once the application is up, use the browse button to point to the directory where you had the Disaster Recovery Backup store it’s files. When you select a directory the restore application will ensure the necessary files it needs to perform a restore are all there and that the version backed up matches exactly the version installed on the local server. If an essential file is missing or the versions do not match, an error dialog will come up and the restore button will remain disabled. At this point the Disaster Recovery Restore application will also ensure that the local Unity server is a “clean” install. This means that no new users, call handlers, interviewers etc… have been created or modified. If the system is not clean, the restore utility will throw up an error dialog and not allow you to continue.
If you selected to backup report data, the “Restore Report Data” checkbox will be available to you, if not it will be disabled. It is not necessary to restore report information if you don’t want to. Similarly if you backed up subscriber messages for your Exchange based system, the “Restore Messages” option will be enabled and checked by default, if not it will be disabled. Again, it is not necessary to restore messages if you don’t want to. If you JUST want to restore messages for a particular subscriber or subscribers, see the “Backing Up and Restoring Subscriber Messages” section below.
Once you’ve selected a valid directory with proper backup files with the correct version on it, the restore option is enabled and you may proceed with the restore. You will get several warnings letting you know this is not a reversible process. The progress of the restore is indicated by the checkboxes which are ticked off as tasks are undertaken.
NOTE: The “Synchronizing SQL table with directory” step can take a while. With very large directories this can take 30 minutes or more. Please do not terminate the application during this step as it’ll leave your system in an invalid state. If there is a problem with this step it will eventually time out and log an error indicating what the problem was.
Once the SQL synchronization process is complete Unity will be restarted and the subscriber message restoration process will begin (if selected). Unity will be up and running will subscriber messages are being restored to reduced total downtime, this should not cause problems with Unity’s call processing capability.
Once the restore is complete you will be given an error/warning count and you’ll have the opportunity to review the log. If there are any errors, make sure to review the log carefully. All errors in the log are preceded with the string “(error)” so you can search the text file for these easily.
For Cisco Unity 8.x and later only: If you are using ASR, when the restore is complete, do the following procedure to restore the password for the cuadmin account, or grammars will not be updated, and voice addressing will not work correctly. The password is encrypted and cannot be restored by DiRT.
1. In the Cisco Unity Administrator, go to Voice Recognition > ASR Server.
2. Enter the password for the cuadmin account, then click the Save icon.
3. Restart the Cisco Unity server.
Before restoring, please review the Restore prep and troubleshooting section for test procedures to complete BEFORE doing the restore.