Upgrading
from an earlier version of Message Store Manager
Adding
Subscribers to the Included or Excluded folder
Adding
Subscribers by Distribution List
Adding
Subscribers by Class of Service
Adding
Subscribers by Home Server
Adding
Subscribers by Extensions Range
Adding
subscribers from a CSV file
Moving
Included Subscribers to the Excluded Folder
Subscriber
Message Store Status Dump
Move
Messages from Inbox to Unity Dumpster
Move
Messages from Inbox to Deleted Items Folder
Move
Messages from Unity Dumpster to Deleted Items Folder
Flush
Messages from Deleted Items Folder
Restore
Messages from Deleted Items Folder to Inbox
Flush
Messages from Unity Dumpster Folder to Inbox
Move
Messages Script Properties
Hide
Mailboxes from Address Lists
Activating
a Script to Run on a Schedule
Recording
a New Voice Mail .WAV File
Overview
The Cisco Unity
Message Store Manager (MSM) allows you to perform several routine message store
management tasks with a single tool.
MSM Agents, defined to include a selectable set of subscribers, can
generate message demographic reports, archive messages, delete messages, or set
subscriber properties, all according to configurable schedules.
Requirements/Special Notes
- Requires Unity 3.1.0(1) or greater, running in a Microsoft Exchange 2000, Microsoft Exchange 2003, Microsoft Exchange 2007, or Microsoft Exchange 5.5 environment.
- The user account running MSM must be a local administrator on the Cisco Unity server.
- The user account running MSM must be a Full Exchange Administrator for Microsoft Exchange 2000, Microsoft Exchange 2003, Microsoft Exchange 2007, or and Administrator for Microsoft Exchange 5.5.
- The user account running MSM must have Send-As and Receive-As rights on each Exchange 2000, Exchange 2003 and Exchange 2007 mail store the Message Store Manager is expected to act on. See Checking Mailstore Access.
- Currently VM Mailbox Rule scripts are supported on Microsoft Exchange 2000, Microsoft Exchange 2003 and Microsoft Exchange 2007.
Upgrading from an earlier version of Message Store Manager
If you install a new version of Messages Store Manager in a directory different than the directory in which an earlier version was installed, you will need to copy the data file MSMDATA.XML from the old directory to the new directory to use the settings already configured.
Usage
Agents
The MSM is based on
the idea of an Agent. Each agent
represents a set of Cisco Unity subscribers, and has associated reports and
scripts that are run periodically for all of the agent’s subscribers.

Figure 1
Figure 1 shows the MSM console application with four Agents defined, Directors, Everyone Else, and Managers, and Vice Presidents. Each Agent has four subfolders: Included, Excluded, Reports, and Scripts.
The Included and Excluded folders hold collections of Cisco Unity subscribers.
The Reports folder holds reports that can be run against the agent, and the Scripts folder holds scripts that can be run for the agent.
Adding an Agent
To add an agent, right click the root folder “Message
Store Agents” or choose File from the menu, and choose New
Agent.
Renaming an Agent
To add an agent, highlight the agent you want to rename,
then right click the root folder “Message Store Agents” or choose File
from the menu, and choose Rename Agent.
Deleting an Agent
To add an agent, highlight the agent you want to rename,
right click the root folder “Message Store Agents” or choose File
from the menu, and choose Delete Agent.
Setting Output Properties
The MSM can save log and report files to a folder you
specify. The MSM can also delete
log and report files older than a number of days you specify. To set the folder where logs and reports
should be written, or to change log file and report aging parameters, choose File
from the menu, and choose Set Output Properties.
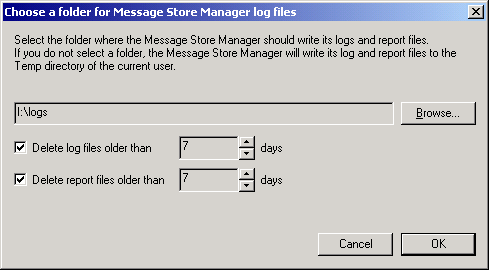
Figure 2
Click Browse to change the folder where log files and reports will be written. If you need a new folder, click ‘New Folder’ to create a new folder after you click Browse. Then right-click on ’New Folder’ object and select ‘Rename’ from the pop-up menu to rename the new folder. If you do not choose a path, the log files and reports will be generated in the default TEMP folder of the current user.
To specify that you would like log files or report files deleted when they reach a certain age, check the appropriate check box and set the number of days the MSM should retain its log and report files.
Note: The MSM will purge log or report files older than the number of days you specify each time the MSM console is started or each time a script is run.
Included and Excluded Folders
The Included and
Excluded folders each hold collections of Cisco Unity subscribers.
The Included folder
holds all subscribers that should be acted upon when any report or script is
run for the agent. Subscribers can
be added to the Included set individually, by distribution list, by class of
service, by extension range, by home server, or by importing a list from a CSV
(comma separated value) text file.
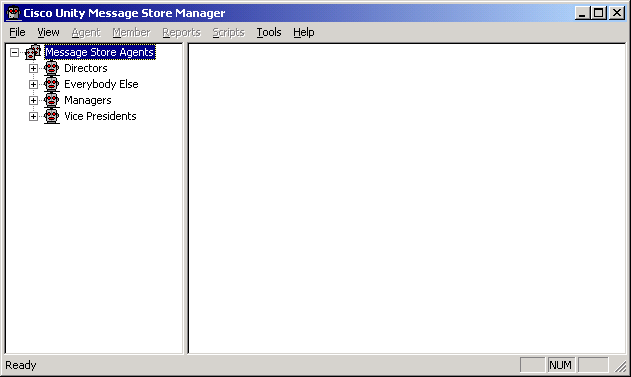
Figure 3
The Excluded folder
includes all subscribers that should NOT be acted upon. Subscribers can be added to the Excluded
set in the same way they can be added to the Included set.

Figure 4
This structure,
using an included and excluded folder, allows you to specify things like
“every subscriber in the All Subscribers group except Eddie
Emerson”. Whenever a script
or report is run for the agent, the list of subscribers considered during the report
or script is the result of subtracting the Excluded subscribers from the
Included subscribers. If you
highlight the agent itself, you will see this resultant list of subscribers
after all distributions lists and classes of service have been “flattened”.
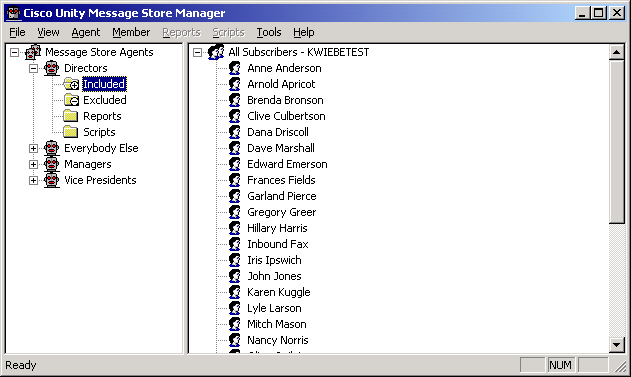
Figure 5
Note that when you
add a distribution list to the included or excluded folder, all of the members
of the distribution list are added, including any sub-groups and their
members. However, ONLY the
top-level distribution list is added explicitly. All of the members of the group are
added implicitly. This means that
if you add members to a distribution list in Unity, the next time you look at
an Agent that includes that distribution list, the newly added subscriber will
be affected. The list of
subscribers in the Agent is dynamically generated each time it is needed, and
will change as membership in distribution lists change. The same is true for class of service
and home mail server. If you choose
to add the {Default Subscriber} class of service to the Included folder of an
Agent, and then add 20 new subscribers using the same class of service in
Unity, the next time the Agent is used, it will include those 20 new
subscribers. The
“flattened” view of the agent is always generated in real time each
time you highlight the Agent. It is
also regenerated each time some action is performed on the Agent, like a script
or report.
Adding Subscribers to the Included or Excluded folder
While Included or
Excluded folder is highlighted, either right-click the folder or choose the
Agent option from the main pull-down menu.
You will see options to add Subscribers, Distribution Lists, Classes of
Service,
Adding
Individual Subscribers
Adding individual
subscribers is simple. Choose Add
Subscribers from the menu and a dialog box appears listing all qualified
subscribers homed on the local Unity server.
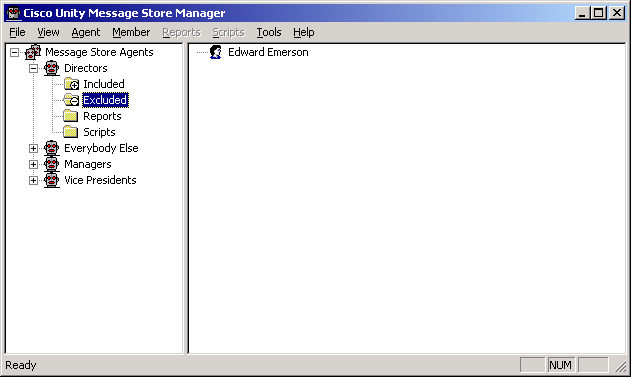
Figure 6
Choose the subscriber or subscribers you want to add to the folder and click OK.
Adding Subscribers by Distribution List
To add subscribers to the Included or Excluded folder by Distribution list, choose Add Distribution List from the menu and a dialog listing all of the public distribution lists on the local Unity server will appear.
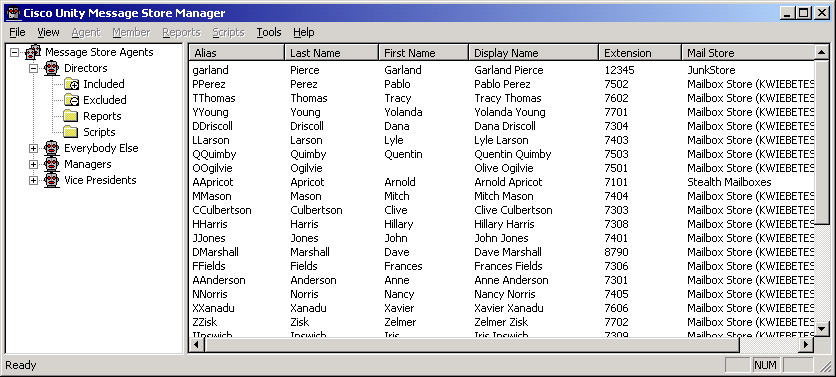
Figure 7
Choose the distribution list or lists you want to add to the folder and click OK.
Adding Subscribers by Class of Service
To add subscribers to the Included or Excluded folder by Class of Service, choose Add Class of Service from the menu and a list and a dialog listing all of the available classes of service will appear.
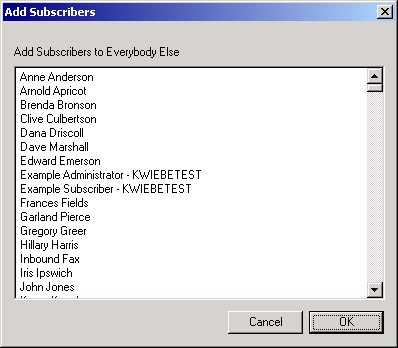
Figure 8
Choose the class or classes of service you want to add to the folder and click OK.
Adding Subscribers by Home Server
To add subscribers to the Included or Excluded folder based on their home mail server, choose Add Home Server from the menu, and a dialog listing all of the available home servers will appear.
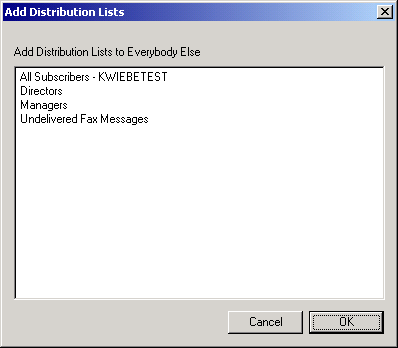
Figure 9
Choose the home server or servers you want to add to the folder and click OK.
Adding Subscribers by Extensions Range
To add subscribers to the Included or Excluded folder by specifying a range of extension numbers, choose Add Extension Range from the menu and a dialog will appear that allows entry of two extensions.
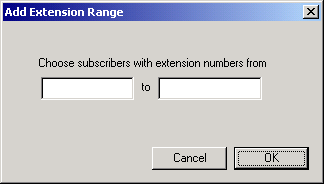
Figure 10
Enter the starting and ending extension numbers for the range of extensions you’d like to include or exclude, and click OK. All subscribers whose extensions fall between these two extensions will be added to the Included or Excluded folder.
Note: Extensions are included in the range of extensions by an alphanumeric comparison, NOT a numeric comparison. So, extension 732000 will be included if the range you specify is 7300 to 7330.
Adding subscribers from a CSV file
To add subscribers to the Included or Excluded folder from a comma separated value file, choose Add from CSV file from the menu, and a dialog prompting for the CSV file will appear.
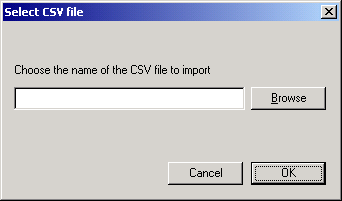
Figure 11
Enter the name of a file or click the Browse button to choose a file. The MSM will attempt to find subscribers in the local Cisco Unity database that match data in the CSV file.
The CSV file itself can identify subscribers either by alias or extension. You may include both values if you wish. The general format of a valid CSV file is:
ALIAS,EXTENSION
“ddunbar”,”7304”
“ggore”,”7307”
The first line of the CSV file must be a line with column names, specifically ALIAS and/or EXTENSION. Other columns may be included, but will be ignored by the MSM.
You may specify a file with only ALIAS or only EXTENSION.
ALIAS
“ddunbar”
“ggore”
or
EXTENSION
”7304”
”7307”
The MSM will attempt to match the values in the ALIAS and/or EXTENSION columns of the CSV file with existing subscribers, adding those subscribers it finds to the Included or Excluded folder.
If the CSV file you are importing contains both alias and extension, subscribers are searched for according to the following logic:
- Find a subscriber whose extension matches the extension in the CSV record
- If no match, find a subscriber whose alias matches the alias in the CSV record
- If no match, no subscriber is added
Moving Included Subscribers to the Excluded Folder
It may be simpler to add subscribers to the Excluded folder
by reviewing the subscribers in the Included folder and choosing to exclude
some. You may highlight a
subscriber, distribution list, class of service, or home server in the Included
folder, then select the Members menu option or right click the selected
member and choosoose Exclude and the
selected member will be added to the same Agent’s Excluded folder.
Note: If you choose to exclude any top-level member
from the Included folder, it will be moved to the Excluded folder. If you choose to exclude any implicitly
included member, such as the member of a distribution list, they will be
excluded, but will still appear under the top-level included member. To view the resulting
“flattened” list of subscribers, select the Agent in the left-hand
pane.
Reports
The Reports folder
holds each report that can be run on the Agent.
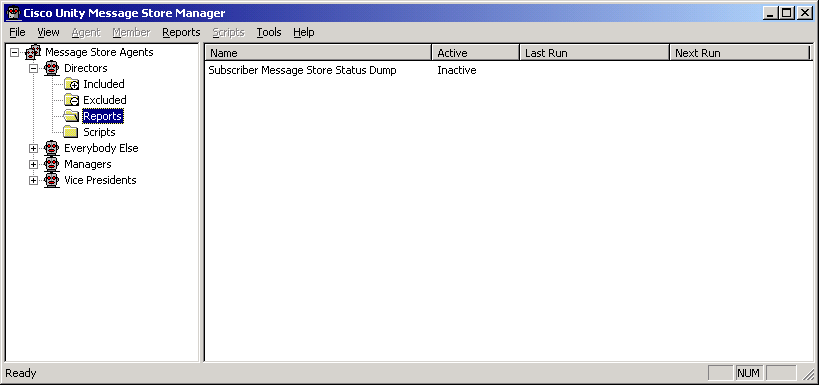
Figure 12
There is currently
only one report that can be run, the Subscriber Message Store Status Dump.
Subscriber Message Store Status Dump
The Subscriber Message
Store Status Dump generates a CSV file with data about each included
subscriber’s mailbox. This
data is extensive and detailed and is intended to for analysis using a tool
like Microsoft Excel or a database management tool.
Reports are dumped
to a file based on the name of the Agent, and the time the report generation
began. For example, the file name
for a report for the “Sales” agent might look like:
Sales_MailboxDump_021002_091437.csv
Report files can be
found in the TEMP folder of the user account used to run the report – by
default the user that runs the MSM Console.
The first line of
the file is a header with column titles for all of the fields in the CSV
file. They are:
|
Column |
Type |
Description |
|
ALIAS |
Text |
Subscriber’s alias |
|
EXTENSION |
Text |
Subscriber’s DTMF access ID, or extension |
|
WARNINGLIMIT |
KB |
Capacity of message box before warnings are generated |
|
SENDLIMIT |
KB |
Capacity of message box before sending messages is prohibited |
|
SENDRECEIVELIMIT |
KB |
Absolute maximum size of message box |
|
SENDLIMITEXCEEDED |
Boolean |
1 if WARNING limit exceeded, 0 otherwise |
|
SENDRECEIVELIMITEXCEEDED |
Boolean |
1 if SENDLIMIT exceeded, 0 otherwise |
|
TOTALCOUNT |
Count |
Count of all messages in message box |
|
TOTALSIZE |
KB |
Size of all messages in message box |
|
TOTALREADCOUNT |
Count |
Count of read/heard messages in message box |
|
TOTALREADSIZE |
KB |
Size of read/heard messages in message box |
|
TOTALUNREADCOUNT |
Count |
Count of unread/unheard messages in message box |
|
TOTALUNREADSIZE |
KB |
Size of unread/unheard messages in message box |
|
VOICECOUNT |
Count |
Count of all voice messages in message box |
|
VOICESIZE |
KB |
Size of all voice messages in message box |
|
VOICEREADCOUNT |
Count |
Count of read/heard voice messages in message box |
|
VOICEREADSIZE |
KB |
Size of read/heard voice messages in message box |
|
VOICEUNREADCOUNT |
Count |
Count of unread/unheard voice messages in message box |
|
VOICEUNREADSIZE |
KB |
Size of unread/unheard voice messages in message box |
|
FAXCOUNT |
Count |
Count of all fax messages in message box |
|
FAXSIZE |
KB |
Size of all fax messages in message box |
|
FAXREADCOUNT |
Count |
Count of read/heard fax messages in message box |
|
FAXREADSIZE |
KB |
Size of read/heard fax messages in message box |
|
FAXUNREADCOUNT |
Count |
Count of unread/unheard fax messages in message box |
|
FAXUNREADSIZE |
KB |
Size of unread/unheard fax messages in message box |
|
RECEIPTCOUNT |
Count |
Count of all receipts in message box |
|
RECEIPTSIZE |
KB |
Size of all receipts in message box |
|
RECEIPTREADCOUNT |
Count |
Count of read/heard receipts in message box |
|
RECEIPTREADSIZE |
KB |
Size of read/heard receipts in message box |
|
RECEIPTUNREADCOUNT |
Count |
Count of unread/unheard receipts in message box |
|
RECEIPTUNREADSIZE |
KB |
Size of unread/unheard receipts in message box |
|
OTHERCOUNT |
Count |
Count of all other messages in message box |
|
OTHERSIZE |
KB |
Size of all other messages in message box |
|
OTHERREADCOUNT |
Count |
Count of read/heard other messages in message box |
|
OTHERREADSIZE |
KB |
Size of read/heard other messages in message box |
|
OTHERUNREADCOUNT |
Count |
Count of unread/unheard other messages in message box |
|
OTHERUNREADSIZE |
KB |
Size of unread/unheard other messages in message box |
|
INBOXCOUNT |
Count |
Count of all messages in Inbox |
|
INBOXSIZE |
KB |
Size of all messages in Inbox |
|
INBOXREADCOUNT |
Count |
Count of read/heard messages in Inbox |
|
INBOXREADSIZE |
KB |
Size of read/heard messages in Inbox |
|
INBOXUNREADCOUNT |
Count |
Count of unread/unheard messages in Inbox |
|
INBOXUNREADSIZE |
KB |
Size of unread/unheard messages in Inbox |
|
DELETEDCOUNT |
Count |
Count of all messages in Deleted Items folder |
|
DELETEDSIZE |
KB |
Size of all messages in Deleted Items folder |
|
DELETEDREADCOUNT |
Count |
Count of read/heard messages in Deleted Items folder |
|
DELETEDREADSIZE |
KB |
Size of read/heard messages in Deleted Items folder |
|
DELETEDUNREADCOUNT |
Count |
Count of unread/unheard messages in Deleted Items folder |
|
DELETEDUNREADSIZE |
KB |
Size of unread/unheard messages in Deleted Items folder |
|
SENTCOUNT |
Count |
Count of all messages in Sent Items folder |
|
SENTSIZE |
KB |
Size of all messages in Sent Items folder |
|
SENTREADCOUNT |
Count |
Count of read/heard messages in Sent Items folder |
|
SENTREADSIZE |
KB |
Size of read/heard messages in Sent Items folder |
|
SENTUNREADCOUNT |
Count |
Count of unread/unheard messages in Sent Items folder |
|
SENTUNREADSIZE |
KB |
Size of unread/unheard messages in Sent Items folder |
|
DUMPSTERCOUNT |
Count |
Count of all messages in Unity Dumpster |
|
DUMPSTERSIZE |
KB |
Size of all messages in Unity Dumpster |
|
DUMPSTERREADCOUNT |
Count |
Count of read/heard messages in Unity Dumpster |
|
DUMPSTERREADSIZE |
KB |
Size of read/heard messages in Unity Dumpster |
|
DUMPSTERUNREADCOUNT |
Count |
Count of unread/unheard messages in Unity Dumpster |
|
DUMPSTERUNREADSIZE |
KB |
Size of unread/unheard messages in Unity Dumpster |
|
VOICE1DAY |
Count |
Number of voice messages arriving today |
|
VOICE2DAY |
Count |
Number of voice messages arriving yesterday |
|
VOICE3DAY |
Count |
Number of voice messages arriving 2 days ago |
|
VOICE4DAY |
Count |
Number of voice messages arriving 3 days ago |
|
VOICE5DAY |
Count |
Number of voice messages arriving 4 days ago |
|
VOICE6DAY |
Count |
Number of voice messages arriving 5 days ago |
|
VOICE7DAY |
Count |
Number of voice messages arriving 6 days ago |
|
VOICE14DAY |
Count |
Number of voice messages arriving 7 to 13 days ago |
|
VOICE21DAY |
Count |
Number of voice messages arriving 14 to 20 days ago |
|
VOICE28DAY |
Count |
Number of voice messages arriving 21 to 27 days ago |
|
VOICEMAXDAY |
Count |
Number of voice messages arriving 28 days ago or longer |
|
FAX1DAY |
Count |
Number of fax messages arriving today |
|
FAX2DAY |
Count |
Number of fax messages arriving yesterday |
|
FAX3DAY |
Count |
Number of fax messages arriving 2 days ago |
|
FAX4DAY |
Count |
Number of fax messages arriving 3 days ago |
|
FAX5DAY |
Count |
Number of fax messages arriving 4 days ago |
|
FAX6DAY |
Count |
Number of fax messages arriving 5 days ago |
|
FAX7DAY |
Count |
Number of fax messages arriving 6 days ago |
|
FAX14DAY |
Count |
Number of fax messages arriving 7 to 13 days ago |
|
FAX21DAY |
Count |
Number of fax messages arriving 14 to 20 days ago |
|
FAX28DAY |
Count |
Number of fax messages arriving 21 to 27 days ago |
|
FAXMAXDAY |
Count |
Number of fax messages arriving 28 days ago or longer |
|
RECEIPT1DAY |
Count |
Number of receipts arriving today |
|
RECEIPT2DAY |
Count |
Number of receipts arriving yesterday |
|
RECEIPT3DAY |
Count |
Number of receipts arriving 2 days ago |
|
RECEIPT4DAY |
Count |
Number of receipts arriving 3 days ago |
|
RECEIPT5DAY |
Count |
Number of receipts arriving 4 days ago |
|
RECEIPT6DAY |
Count |
Number of receipts arriving 5 days ago |
|
RECEIPT7DAY |
Count |
Number of receipts arriving 6 days ago |
|
RECEIPT14DAY |
Count |
Number of receipts arriving 7 to 13 days ago |
|
RECEIPT21DAY |
Count |
Number of receipts arriving 14 to 20 days ago |
|
RECEIPT28DAY |
Count |
Number of receipts arriving 21 to 27 days ago |
|
RECEIPTMAXDAY |
Count |
Number of receipts arriving 28 days ago or longer |
|
OTHER1DAY |
Count |
Number of other messages arriving today |
|
OTHER2DAY |
Count |
Number of other messages arriving yesterday |
|
OTHER3DAY |
Count |
Number of other messages arriving 2 days ago |
|
OTHER4DAY |
Count |
Number of other messages arriving 3 days ago |
|
OTHER5DAY |
Count |
Number of other messages arriving 4 days ago |
|
OTHER6DAY |
Count |
Number of other messages arriving 5 days ago |
|
OTHER7DAY |
Count |
Number of other messages arriving 6 days ago |
|
OTHER14DAY |
Count |
Number of other messages arriving 7 to 13 days ago |
|
OTHER21DAY |
Count |
Number of other messages arriving 14 to 20 days ago |
|
OTHER28DAY |
Count |
Number of other messages arriving 21 to 27 days ago |
|
OTHERMAXDAY |
Count |
Number of other messages arriving 28 days ago or longer |
|
VM Mailbox Rule |
Boolean |
1 if VM mailbox rule exists, 0 otherwise |
NOTE: All of the data in
this report is based on the messages in the mailbox at the time the report is
run. This means that counts of
voice messages that arrived in 2 days ago (VOICE3DAY),
for example, only includes message that are still in the message box. Messages that have been deleted and
don’t exist in any mailbox folder cannot be counted. It is important to be aware of this fact
when analyzing the data.
This data can be sliced
and looked at in many ways. Take
care to understand what each data item really means before drawing conclusions.
Activating a Report
A report can be run according to a schedule you specify. To activate a report, or change its schedule, highlight a report and either right click the highlighted report or choose Reports from the main menu, then choose Activate, and a task scheduler dialog will appear.
The task scheduler dialog will be pre-configured to run the report you have selected. You may change the schedule to your liking. See Microsoft Windows documentation for setting the schedule for a task.
Deactivating a Report
To deactivate a report, highlight a report and either right click the highlighted script or choose Reports from the main menu, then choose Deactivate.
Running a Report One Time
You may choose to run a report once immediately, rather that choose to schedule the report to run as a scheduled task.
To run a report immediately, highlight the report and either right click the highlighted script or choose Reports from the main menu, then choose Run Now. After confirmation, the report will run immediately. There will be no indication that the report is running or when the report finishes. The last run time will not be updated, as it only applies to scheduled reports.
WARNING! If an MSM agent contains subscribers whose
mailboxes are hidden, reports may take significantly longer to complete.
Scripts
The Scripts folder holds each script that can be run on the Agent.
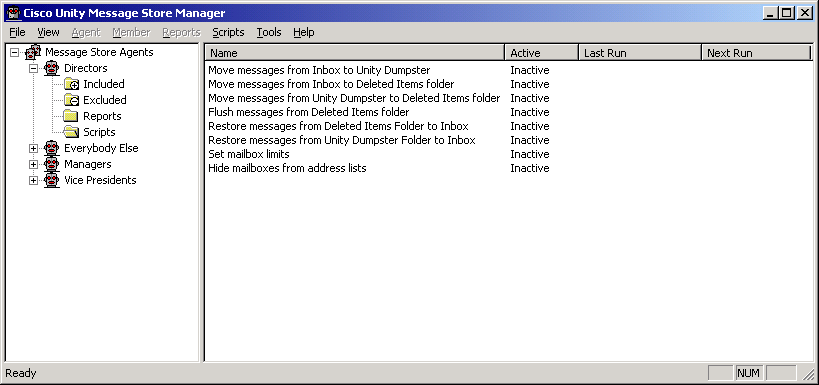
Figure 13
Currently, there are eight scripts that can be run for an agent. These eight scripts fall into two general categories, as detailed below.
|
Script |
Category |
|
Move messages from Inbox to Unity Dumpster |
Move Messages |
|
Move messages from Inbox to Deleted Items Folder |
Move Messages |
|
Move messages from Unity Dumpster to Deleted Items Folder |
Move Messages |
|
Flush messages from Deleted Items Folder |
Move Messages |
|
Restore messages from Deleted Items Folder to Inbox |
Move Messages |
|
Restore messages from Unity Dumpster Folder to Inbox |
Move Messages |
|
Set mailbox limits |
Set Properties |
|
Hide mailboxes from address lists |
Set Properties |
|
Delete VM Mailbox Rule |
Manage VM Mailbox Rules |
Move Messages Scripts
Move Messages scripts move messages from one folder in a subscriber’s mailbox to another.
Each Move Messages script can have several properties applied to it when it runs, and can be scheduled to run at a time you specify. Script properties, combined with script scheduling, allow you to specify a fairly complex set of operations. For example, you could:
- Move urgent and normal priority read messages older than 7 days from the Inbox to the Unity Dumpster folder
- Move low priority read and unread messages older than 3 days from the Inbox to the Deleted Items folder
- Move read messages older than 14 days from the Unity Dumpster folder to the Deleted Items folder
- Flush all messages older than 21 days from the Deleted Items folder.
If you want more complexity than a single agent allows with its move messages scripts, you can define more than one agent with identical memberships and specify different properties for each agent. One agent, for example, might act on voice messages and another on fax messages, or one might process urgent messages while another handles all other messages.
Move Messages from Inbox to Unity Dumpster
Moves messages from each subscriber’s Inbox to a special folder called “Unity Dumpster”. The Unity Dumpster folder will be created by the MSM for each subscriber if it does not already exist as a sub-folder of each subscriber’s Inbox. It can be used as a temporary holding tank for messages that are no longer important enough to keep in the Inbox, but not yet considered so useless as to merit deleting.
Move Messages from Inbox to Deleted Items Folder
Moves messages from the Inbox to the Deleted Items folder for each subscriber in the Agent.
Move Messages from Unity Dumpster to Deleted Items Folder
Moves messages from the Unity Dumpster folder to the Deleted Items folder for each subscriber in the Agent.
Flush Messages from Deleted Items Folder
Deletes, once and for all, messages in each subscriber’s Deleted Items Folder.
Restore Messages from Deleted Items Folder to Inbox
Restores messages that have been placed in the Deleted Items folder, returning them to the Inbox.
Flush Messages from Unity Dumpster Folder to Inbox
Restores messages that have been placed in the Unity Dumpster folder, returning them to the Inbox.
WARNING! If an MSM agent contains subscribers whose
mailboxes are hidden, scripts that move messages may take significantly longer
to complete.
Move Messages Script Properties
Each Move Messages script can act on all messages in a particular folder, or on a subset of messages as defined by the script’s properties. Only messages matching criteria set in the script’s properties will be affected when the script runs. To set script properties, highlight a script and either right click the highlighted script or choose Scripts from the main menu, then choose Properties, and a script properties dialog will appear.
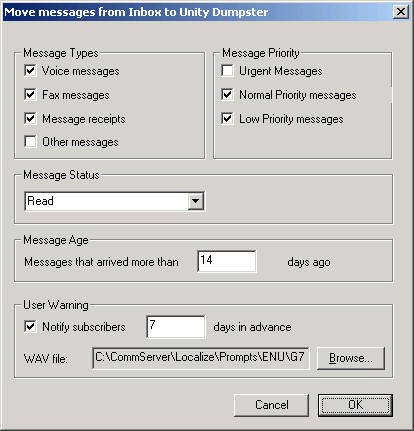
Figure 14
The following properties can be used to filter messages that are to be acted upon by each script. This allows you to carefully control what messages are moved between folders or deleted.
Message Types
You may choose to have a script act upon messages of one or more types.
· Voice messages
· Fax messages
· Receipts
· Other messages
If you do not check any of the boxes for message type, no messages will be affected.
Message Status
You may choose to have a script act on only messages that have been read (heard), only messages that have not been read (heard), or on all messages.
It might, for example, be a good idea to only move messages from the Inbox to the Deleted Items folder if they have been read.
Message Priority
You may choose to have a script act upon messages of one or more priorities.
· Urgent Messages
· Normal Priority Messages
· Low Priority Messages
You may, for example, want to move all low priority read messages in the Inbox to the Deleted Items folder and all normal priority and urgent read messages to the Unity Dumpster folder.
If you do not check any of the boxes for message priority, no messages will be affected.
Message Age
You may choose to have a script act upon messages of a particular age. For example, you may only want to delete messages that arrived more than 14 days ago.
User Warning
For scripts that move messages from a user’s Inbox, you may choose to have a voice message sent to all subscribers in the agent prior to the script taking effect. For other types of scripts, this section of the Script Properties dialog will be deactivated.
If you want to notify subscribers of scripts that will move messages from their inboxes, check the Notify Subscribers checkbox, and specify the number of days in advance you would like the message to be sent. Select a WAV file to include as the content of the message. This WAV file will be sent to every subscriber in the agent as a voice message prior to the script being run.
Please see the section Activating a Script for more information about User Warning tasks.
Note: You are responsible for recording the WAV file yourself. See the section Recording a New Voice Mail .WAV File for help recording WAV files.
Set Properties Scripts
Set Properties scripts set one or more properties for each subscriber represented by an Agent. These properties affect how subscribers’ mailboxes are used or seen.
Set Mailbox Limits
Sets mailbox storage limits in Microsoft Exchange.
Note: Changes made by this script affect both the Exchange mail store and Cisco Unity’s SQL database. Active Directory replication may result in a delay between the completion of this script and any real effect on a subscriber’s mailbox.
Each mailbox in Microsoft Exchange can have storage capacity limits applied to it. Usually, these limits are applied at a mailstore level, and all mailboxes in a mailstore use the default values for the mailstore. You may choose to apply specific limits on all mailboxes represented by an agent.
When you choose to modify script properties for the Set Mailbox Limits script, you will see the dialog shown below.
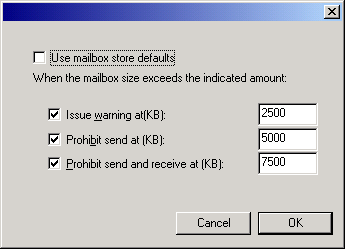
Figure 15
Check the Use mailbox
store defaults checkbox if you want all subscribers’ mailboxes to use
mailstore defaults for their storage capacity.
If you uncheck the Use
mailbox store defaults checkbox, you can specify specific limits for three
different capacity limits:
·
Issue warning
at – the mailbox owner will
be warned that their mailbox is becoming too full if the size of all items in
their mailbox exceeds this limit.
·
Prohibit
send at – the mailbox owner
will not be allowed to send messages if the size of all items in their mailbox
exceeds this limit.
·
Prohibit
send and receive – the
mailbox owner will not be allowed to send or receive messages if the size of
all items in their mailbox exceeds this limit.
All limits are displayed
in kilobytes.
Hide Mailboxes from Address Lists
Hides or exposes mailboxes to address lists.
You may wish for some mailboxes to be hidden from address lists, like address books. This script will configure subscribers to either appear in or be hidden from address lists.
When you choose to modify script properties for the Hide Mailboxes from Address Lists script, you will see the dialog shown below.
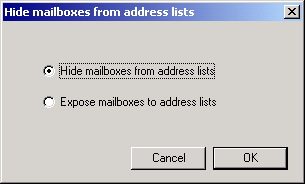
Figure 16
Choose the Hide
mailboxes from address lists option if you do not want subscribers to
appear in address lists.
Choose the Expose
mailboxes to address lists if you do want subscribers to appear in address
lists.
WARNING! If
an MSM agent contains subscribers whose mailboxes are hidden, reports and
scripts that move messages may take significantly longer to complete.
Manage VM Mailbox Rules
Manage VM Mailbox Rules scripts create and delete the VM mailbox rules for each subscriber represented by an Agent. These mailbox rules are for VM-only subscribers and they check the messages received by VM-only subscribers. If the message received is a receipt, a fax or a voicemail without text, then it will be delivered. Otherwise the rule will NDR the entire message (i.e. reject the message with a Non-Delivery Receipt).
Add VM Mailbox Rules
Create the VM mailbox rules for each subscriber represented by an Agent in Microsoft Exchange.
Note: Changes made by this script affect only the Exchange mail store.
Delete VM Mailbox Rules
Delete the VM mailbox rules for each subscriber represented by an Agent in Microsoft Exchange.
Note: Changes made by this script only affect the Exchange mail store.
WARNING! If an MSM agent contains subscribers
whose mailboxes are hidden, reports and scripts that move messages may take
significantly longer to complete. Consider creating separate MSM agents for
subscribers with hidden mailboxes. In this way, you can quickly run the agents
for subscribers with mailboxes that are not hidden, and then schedule the
agent(s) associated with subscribers who have hidden mailboxes to run at a more
convenient time.
Activating a Script to Run on a Schedule
Each script can be run according to a schedule you specify. For VM Mailbox Rules scripts, you should run the scripts whenever there are changes to subscriber accounts such as when new subscribers added, or when subscribers are changed from VM-only to Unified Messaging and vice versa.
To activate a script, or change its schedule, highlight a script and either right click the highlighted script or choose Scripts from the main menu, then choose Activate, and a task scheduler dialog will appear. The task scheduler dialog will be pre-configured to run the script you have selected. You may change the schedule to your liking. See Microsoft Windows documentation for setting the schedule for a task. The last run time indicates when the script last ran.
If you are activating a script for which User Warning has been selected, you will also be presented with a task scheduler dialog box for a second task that runs the user warning script. MSM attempts to configure the schedules for the user warning task so that it will run the appropriate number of days in advance of the primary script. If you have edited the default schedules that MSM has created for the primary script task, you should inspect the schedules for the warning task carefully and ensure the task is scheduled to run at the appropriate times. The more complicated the schedule, the more important it is to check. You must also set the password for the user warning task.
WARNING! Always check the account and password to be used when you activate a script. Without the correct account and password, the script will fail. If the script fails to run, follow the recommendations given by Microsoft in the documentation “How To Troubleshoot Scheduled Tasks in Windows XP” (article ID 308558, available at http://support.microsoft.com/default.aspx?scid=kb;en-us;308558).
Deactivating a Script
To deactivate a script, highlight a script and either right click the highlighted script or choose Scripts from the main menu, then choose Deactivate.
Running a Script Immediately
You may choose to run a script immediately, rather that choose to schedule the script to run as a scheduled task. For example, for VM Mailbox Rules scripts, you may want to run the script immediately after you add subscribers, or after you change subscribers from VM-only to Unified Messaging (and vice versa). To run a script immediately, highlight the script and either right click the highlighted script or choose Scripts from the main menu, then choose Run Now. After confirmation, the script will run immediately. There will be no indication that the script is running or when the script finishes. The last run time will not be updated, as it is when scripts run according to a schedule.
If you are running a script for which User Warning has been selected, the warning message will not be sent if you choose the Run Now option.
Tools
The Tools menu allows you to perform otherwise difficult or time-consuming tasks.
Checking Mailstore Access
The Check Mailstore Access option allows you to check, and, if necessary allow, Send-As and Receive-As access to all of the Exchange 2000 mailstores affected by a given agent.
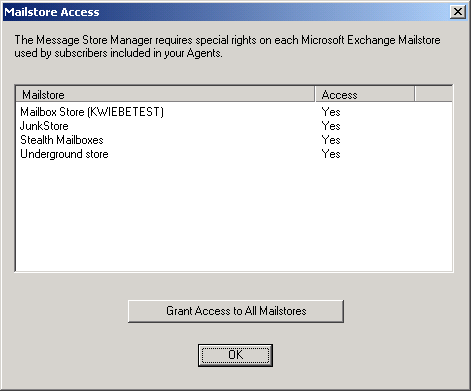
Figure 17
The dialog box presents all of the mailstores that would be affected if you were to run a script or report against a particular agent and shows whether or not access is currently available. If not, you may click the Grant Access to All Mailstores button and the MSM will attempt to gain access.
Recording a New Voice Mail .WAV File
One of the easiest ways to generate custom WAV files is to use the Cisco
Unity SA and record the custom WAV files into the Recorded voice field of a new
call handler. Here is one method
that can be used.
- Launch the SA
and temporarily create a new Call Handler, name the call handler something
unique (maybe MSMWAV) so the WAV file is easy to find in the directory
later.
- Record your
custom WAV file using the MediaMaster Control on the Recorded Voice field and save the changes.
- Launch
Windows Explorer and navigate to the Commserver\Stream Files directory.
- Find the new
recording. If you used a call
handler called MSMWAV, for example, the file will be named
MSMWAV_ChlName_########.wav, where ######## is some hexadecimal number.
- Copy this
file to the MSM directory. If
you downloaded and installed the MSM on an existing Cisco Unity server,
the default location is C:\Program Files\MSM. If the MSM came with your version
of Cisco Unity, the default location is
Commserver\Utilities\MessageStoreManager.)
- Rename the
file to a name that will help you remember what it is for. Be sure to give
the new file the .WAV extension.
Logging and Diagnostics
The MSM generates error diagnostic log files, results files, and report files. Report files are discussed under the Reports topic.
There are really two pieces to the Message Store Manager, the MSM Console and the MSM Worker.
MSMConsole
The first piece, the MSM Console, the visual interface the MSM, generates two files, an error log file and a results file:
MSMConsoleOutput.log
MSMConsoleDiag.log
MSMConsoleOutput.log documents normal activity using the MSM console, such as what members are added to or deleted from an Agent, etc.
MSMConsoleDiag.log captures low-level diagnostics and errors and will only be useful to Cisco Unity engineers for troubleshooting problems.
Both of the MSM Console files are time-stamped each time the MSM Console is started.
MSMWorker
The second piece of the MSM, the MSM Worker, is a silent
application that performs the work of running scripts and reports, as
scheduled. It also generates output
files and diagnostic files, but each time it runs is generated new file names
based on the Agent it is operating on, the activity it is performing, the time,
and the date. For example, for a
mailbox dump report for the “Sales”
agent, the files would be named:
Sales_MailboxDump_021002_090141.msmf.log
Sales_MailboxDump_021002_090141.msmf.xml
Sales_MailboxDump_021002_090141.msmf.html
For script to move messages from the inbox to Unity Dumpster for all subscribers in the “Sales” Agent, the files would be:
Sales_InboxToDumpster_021002_091622.msmf.log
Sales_InboxToDumpster_021002_091622.msmf.xml
Sales_InboxToDumpster_021002_091622.msmf.html
These files contain different information:
.HTML Files
Output files with the extension .HTML are viewable with Internet Explorer, and will contain formatted results from the script’s activity. The figure below shows the output from a Move Messages script. Set Properties scripts will have similar output, but will show what properties have changed, including old and new values of those properties.
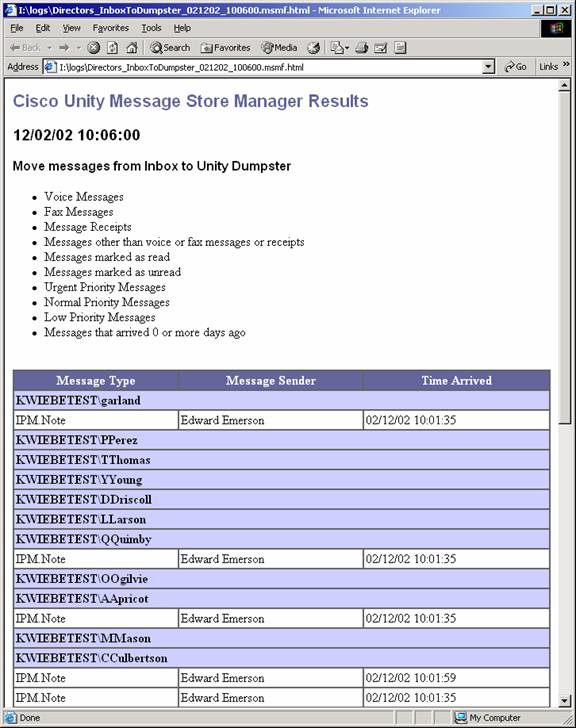
Figure 18
The file contains formatted results describing the script, its properties, and the messages or properties affected for each subscriber.
.XML Files
Output files with the extension .XML contain script results as XML data. If you are familiar with manipulating XML, you can use this file for data analysis purposes.
.LOG Files
Output files with the extension .LOG contain low-level diagnostics and errors and will only be useful to Cisco Unity engineers for troubleshooting problems with the MSM.
Revision History
Version 1.0.0
· Initial version.
Version 1.0.1
· Updated for new functionality
· Added log and report aging
· Added set mailbox limits script
· Added hide mailbox from address lists script
· Added restore messages from deleted items script
· Added restore messags from Unity dumpster script
Version 1.4.0.2
· Added data file registry settings, upgrade information
Version 1.4.0.3
· Disabled Hide Mailbox From Address List script for Microsoft Exchange 5.5
Version 1.4.0.7
· Added update of SQL data during Set Mailbox Limits script.
Version 1.4.0.8
· Fixed display of version in about box.
Version 1.4.0.9
· Fixed hiding subscribers in Exchange 5.5
Version 1.4.0.10
· Added user warning messages to inbox-related scripts
Version 1.4.0.12
· Added receipt age data to mailbox data report
Version 1.4.0.14
· Fixed problem with reports and scripts not running for hidden mailboxes.
Version 1.4.0.15,
· More defect fixes for reports and scripts not and hidden mailboxes.
Version 1.4.0.17,
· Resize about box, remove benign errors, fix script warning days display.
Version 1.4.0.18,
· Add internal support for localized help.
· Rename help files to include ENU identifier.
Version 1.4.0.19,
· Defect Fix: CSCec89905
Version 1.4.0.20,
· Fix scripts hanging due to time-math problem, and add diagnostics
· Defect Fix: CSCed27415
Version 1.4.0.21,
· Added diagnostics
Version 1.4.0.22,
· Added diagnostics
· Fixed logging defect for messages without sender
Version 1.4.0.25,
· Added diagnostics, fixed logoff problem
Version 1.4.0.26,
· Added diagnostics, fixed mailbox hide/unhide timer
Version 1.4.0.27,
· Fix problem with trying to unhide unhidden mailboxes
Version 1.4.0.28,
· Diagnostics, mailbox logoff cleanup
Version 1.4.0.29,
· Make report .csv file readable during report
Version 1.4.0.30,
· Defect fix: CSCef33810
Version 1.4.0.31,
· Added mail server to list of mailstores in mailstore access check dialog
Version 1.4.0.32,
· Fixed errors logged during move messages for hidden mailboxes
Version 1.4.0.33,
· Fixed reference counting error in ScriptMoveMessages
Version 1.4.0.34,
· Update version of CDO.DLL used by Mail Store Manager
Version 1.4.0.35,
· Fix registration of CDO.DLL used by Mail Store Manager
Version 1.4.0.36,
· Replace logon via alias with logon via distinguished name
Version 1.4.0.37, 7/18/2005
· Added Add VM Mailbox Rules script
· Added Delete VM Mailbox Rules script
· Added VM mailbox rule status to mailbox data report
Version 1.4.0.38, 12/14/2005
· Defect Fix: CSCsc02497, CSCsc31522, CSCsb65138, CSCsb74803 , and CSCsb64044
Version 1.4.0.39, 7/30/2008
· Added AD2008 support
Version 1.4.0.40, 3/26/2009
· Defect Fix: CSCsy39969
© 2005 Cisco Systems, Inc. -- Company Confidential