Running
the Cisco Unity Permissions Wizard
Running
Permissions Wizard When Subscribers Are Homed in Domino
Running Permissions
Wizard When Subscribers Are Homed Only in Exchange 5.5
Requirements/Special Notes
![]() Requires Unity 4.0.3(1) or greater.
Requires Unity 4.0.3(1) or greater.
![]() The user account running the Cisco Unity
Permissions Wizard must be a member of the Domain Admins group or have
permissions equivalent to the default permissions for the Domain Admins group.
The user account running the Cisco Unity
Permissions Wizard must be a member of the Domain Admins group or have
permissions equivalent to the default permissions for the Domain Admins group.
Caution! If you try to run Permissions Wizard using an account that has less than the default permissions for a Domain Admin, Permissions Wizard may not be able to set all of the permissions required by the installation account and the services accounts. If Permissions Wizard cannot set all of the required permissions, either the Cisco Unity installation will fail, or Cisco Unity will not run properly after it has been installed.
Running the Cisco Unity Permissions Wizard
Before you run the Cisco Unity installation program, you need to:
![]() Create several domain accounts, and add the
Cisco Unity Administration account to an admins group. For more information,
refer to the Cisco Unity Installation Guide.
Create several domain accounts, and add the
Cisco Unity Administration account to an admins group. For more information,
refer to the Cisco Unity Installation Guide.
![]() Run Cisco Unity Permissions Wizard to assign the
necessary permissions to the accounts.
Run Cisco Unity Permissions Wizard to assign the
necessary permissions to the accounts.
![]() If you are using Exchange 2003, Exchange 2000,
or Exchange 5.5, manually assign Exchange permissions to the accounts. For more
information, see Setting Exchange Permissions.
If you are using Exchange 2003, Exchange 2000,
or Exchange 5.5, manually assign Exchange permissions to the accounts. For more
information, see Setting Exchange Permissions.
Permissions Wizard sets the permissions that Cisco Unity requires for the following accounts:
![]() The account that you will use to install Cisco Unity.
The account that you will use to install Cisco Unity.
![]() For Domino and for Exchange 5.5, the account
that Cisco Unity directory and message store services will log on as.
For Domino and for Exchange 5.5, the account
that Cisco Unity directory and message store services will log on as.
![]() For Exchange 2003 and Exchange 2000, the two
accounts that will Cisco Unity directory and message store services will log on
as.
For Exchange 2003 and Exchange 2000, the two
accounts that will Cisco Unity directory and message store services will log on
as.
Do the appropriate procedure for your message store:
![]() Running
Permissions Wizard When Subscribers Are Homed in Domino
Running
Permissions Wizard When Subscribers Are Homed in Domino
![]() Running
Permissions Wizard When Subscribers Are Homed in Exchange 2003 and/or Exchange
2000
Running
Permissions Wizard When Subscribers Are Homed in Exchange 2003 and/or Exchange
2000
![]() Running
Permissions Wizard When Subscribers Are Homed Only in Exchange 5.5
Running
Permissions Wizard When Subscribers Are Homed Only in Exchange 5.5
If you are setting up failover, run Permissions Wizard on both the primary and secondary servers.
For a comprehensive list of all rights, privileges, and group memberships that are set by the Cisco Unity Permissions Wizard, see Permissions Set By the Cisco Unity Permissions Wizard.
Running Permissions Wizard When Subscribers Are Homed in Domino
Caution! The following procedure grants each account the rights to act as a part of the operating system, to log on as a service, and to log on as a batch job, and does so in the local security policy. If a domain security policy is in effect, confirm that the domain security policy does not deny the accounts these rights.
To run Permissions Wizard
- Log on to the Cisco Unity server by using an account that is a member of the Domain Admins group or that has permissions equivalent to the default permissions for the Domain Admins group.
Caution! If you try to run Permissions Wizard using an account that has less than the default permissions for a Domain Admin, Permissions Wizard may not be able to set all of the permissions required by the installation account and the services accounts. If Permissions Wizard cannot set all of the required permissions, either the Cisco Unity installation will fail, or Cisco Unity will not run properly after it has been installed.
- On Cisco Unity DVD 1 or CD 1, or from the location to which you saved the downloaded Cisco Unity CD 1 image files, browse to the Utilities\PermissionsWizard directory, and run PermissionsWizard.exe.
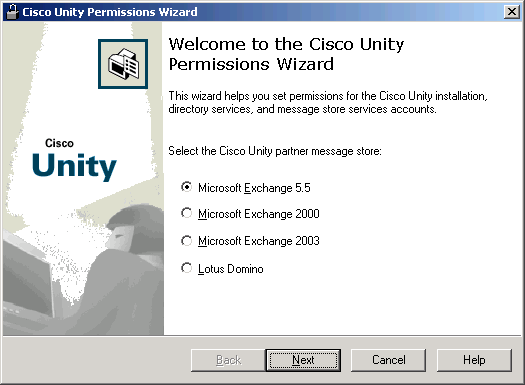
- In the Welcome to the Cisco Unity Permissions Wizard, click Lotus Domino.

- Click Next.
- Click Change and choose the account that you want to use to install Cisco Unity.
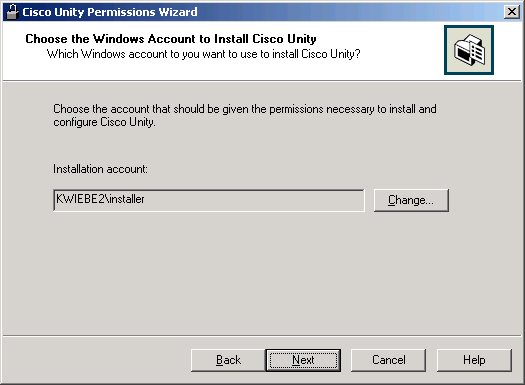
- Click Next.
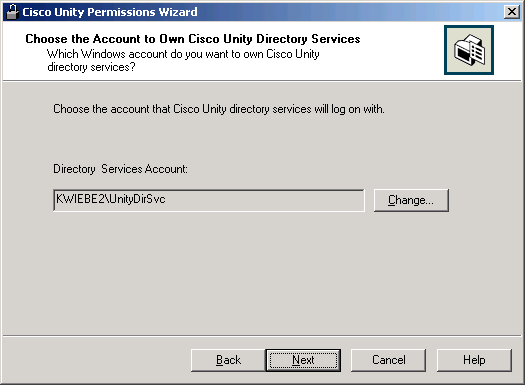
- Click Change and choose the account that you want Cisco Unity directory and message store services to log on as.
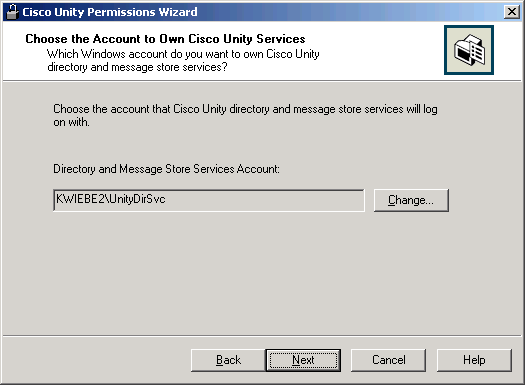
- Click Next.
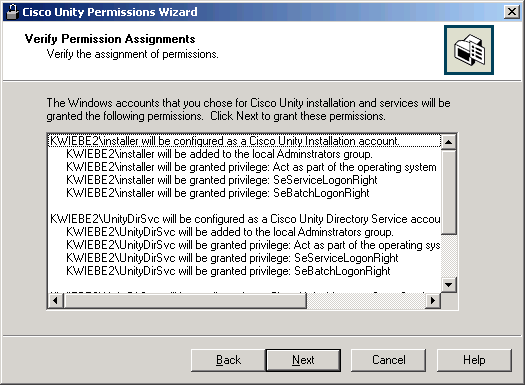
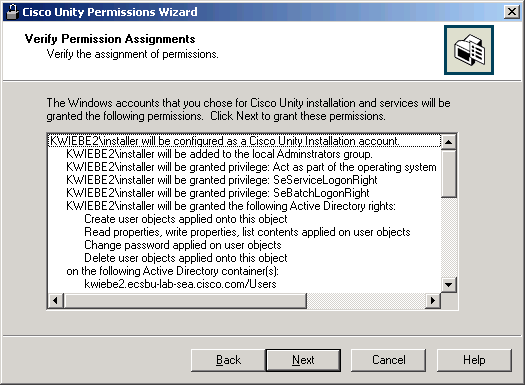
- A summary appears that lists the permissions that will be granted to each account, including membership in groups and user rights.
10.
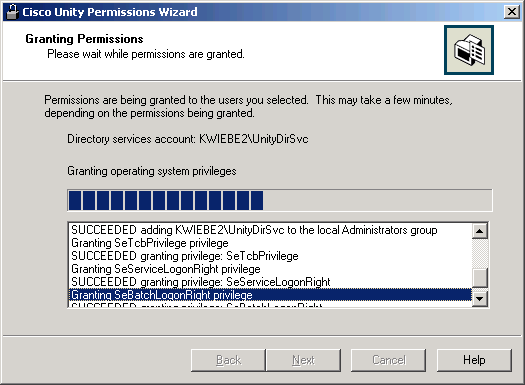
Click Next
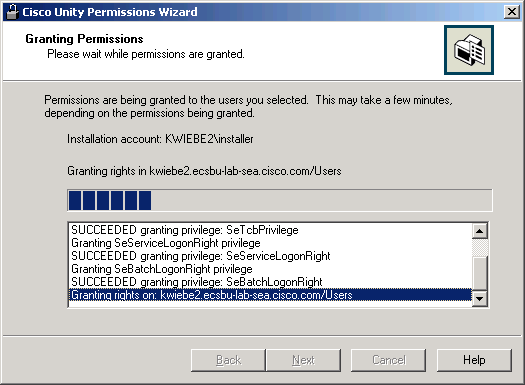
to grant the listed permissions. The Permissions wizard will complete in under
an hour, and possibly in just a few minutes. Note that the Permissions wizard
has, in a few rare cases, taken considerably longer than an hour to complete.
If the wizard takes longer than four hours, we ask that you contact Cisco TAC
and send them the Permissions wizard log file (PWDiag.Log) in the temp
directory. To access the temp directory, start Windows Explorer and enter
%temp% in the Address field.
Caution! If you are running Permissions Wizard using Windows
Terminal Services (WTS), the PWDiag.Log file will be deleted at the end of the
WTS session. If you want to save it, you must copy it to another location
before you end the session.
- If Permissions Wizard failed to grant one or more permissions, an error message appears that lists the number of permissions it was not able to grant. Click OK.

- If Permissions Wizard completes successfully, the following page appears.

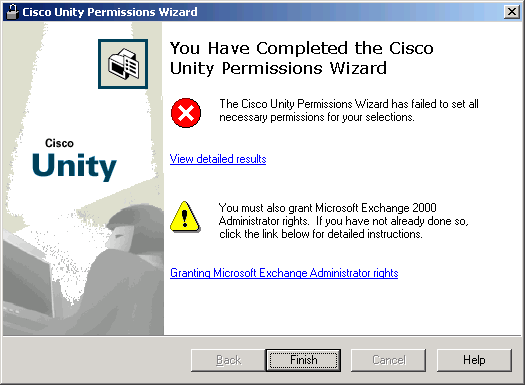
If any permissions are not set successfully, the following page appears.
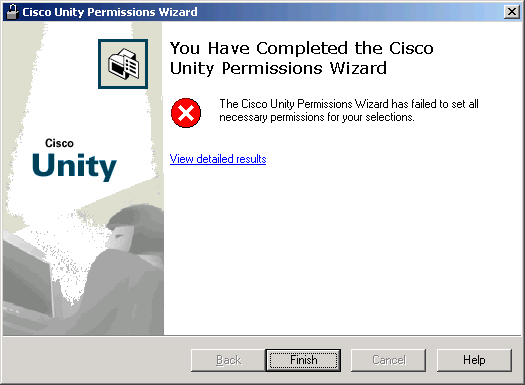
- To display a report listing the operations that succeeded and those that failed, if any, click View Detailed Results. For information on interpreting the results, see Logging and Diagnostics.
- If one or more permissions could not be granted, fix the problems, and run Permissions Wizard again.
Caution! If Permissions Wizard failed to set any permissions, either the Cisco Unity installation will fail, or Cisco Unity will not run properly after it has been installed. You must successfully run Permissions Wizard before you can continue with installing Cisco Unity.
- Click Finish.
- If the account that you logged in with in Step 1 is also the account that you want to use to install Cisco Unity (the account that you selected in Step 6), log out of Windows and log back in so the permissions set by Permissions Wizard will take effect.
Running Permissions Wizard When Subscribers Are Homed in Exchange 2003 and/or Exchange 2000 (With or Without Exchange 5.5)
Before you can run Permissions Wizard, the Active Directory schema must have been extended for Cisco Unity, which you should have done when you set up the message store. For more information, refer to the Cisco Unity Installation Guide.
Caution! Cisco Unity needs to be able to change properties of Active Directory users. Permissions wizard grants the directory services account the right to change user accounts in the containers that you specify. Cisco Unity can only change user accounts in those containers if inheritance is enabled for the containers and for the users themselves.
If you disable inheritance for any containers or groups that include Cisco Unity subscribers, or for any users who are subscribers, Cisco Unity (using the directory services account) will not be able to change properties for the affected users. You will need to either grant permissions to those users explicitly or re-enable inheritance by checking the Allow Inheritable Permissions from Parent to Propagate to This Object check box on the Security tab in the applicable Properties dialog box.
The following procedure grants each account the rights to act as a part of the operating system, to log on as a service, and to log on as a batch job, and does so in the local security policy.
To run Permissions Wizard
- If a domain security policy is in effect, confirm that the domain security policy does not deny the accounts the rights to act as a part of the operating system, to log on as a service, and to log on as a batch job.
- Log on to the Cisco Unity server by using an account that:
![]() Is a member of the Domain Admins group in the
domain in which the Cisco Unity server is being installed, or that has
permissions equivalent to the default permissions for the Domain Admins group.
Is a member of the Domain Admins group in the
domain in which the Cisco Unity server is being installed, or that has
permissions equivalent to the default permissions for the Domain Admins group.
![]() Is either an Exchange Full Administrator or a
member of the Domain Admins group in the domain that contains all of the
domains from which you want to import Cisco Unity subscribers.
Is either an Exchange Full Administrator or a
member of the Domain Admins group in the domain that contains all of the
domains from which you want to import Cisco Unity subscribers.
Caution! If you try to run Permissions Wizard using an account that has less than the default permissions for a Domain Admin, Permissions Wizard may not be able to set all of the permissions required by the installation account and the services accounts. If Permissions Wizard cannot set all of the required permissions, either the Cisco Unity installation will fail, or Cisco Unity will not run properly after it has been installed.
- On Cisco Unity DVD 1 or CD 1, or from the location to which you saved the downloaded Cisco Unity CD 1 image files, browse to the Utilities\PermissionsWizard directory, and run PermissionsWizard.exe.
- In the Welcome to the Cisco Unity Permissions Wizard, click Microsoft Exchange 2000 or Microsoft Exchange 2003.
When you run Cisco Unity Installation and Configuration Assistant, later in the installation, you will choose an Exchange partner server. This is the server where the Cisco Unity system mailbox is created. If Cisco Unity subscribers will be homed in both Exchange 2000 and Exchange 2003, Cisco recommends that you choose Exchange 2003 as the partner message store. If you choose Exchange 2000 now, when you upgrade the Cisco Unity partner Exchange server to Exchange 2003, Cisco Unity subscribers will not have access to messages during the upgrade. You will also need to upgrade to Exchange 2003 System Management Tools on the Cisco Unity server.

- Click Next.
- Click Change and choose the account that you want to use to install Cisco Unity.
- Click Next.
- Click Change and choose the account that you want Cisco Unity directory services to log on as.
- Click Next.
- Click Change and choose the account that you want Cisco Unity message store services to log on as.

- Click Next.
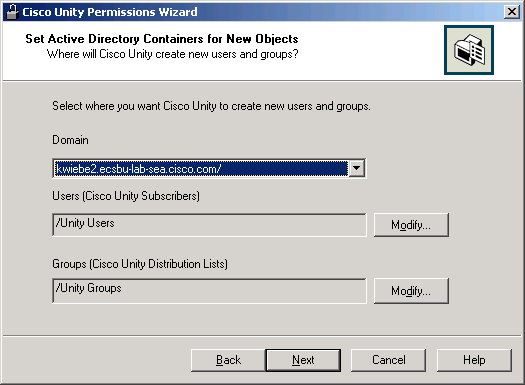
- Cisco Unity needs access to one or more Active Directory organizational units to create users (Cisco Unity subscribers) and groups (Cisco Unity distribution lists). Choose the following:
![]() The domain in which you want new users and
groups to be created.
The domain in which you want new users and
groups to be created.
![]() The organizational unit in which you want users
to be created. This is where Cisco Unity example users will be created during
Cisco Unity installation.
The organizational unit in which you want users
to be created. This is where Cisco Unity example users will be created during
Cisco Unity installation.
![]() The organizational unit in which you want groups
to be created.
The organizational unit in which you want groups
to be created.
- Click Next.
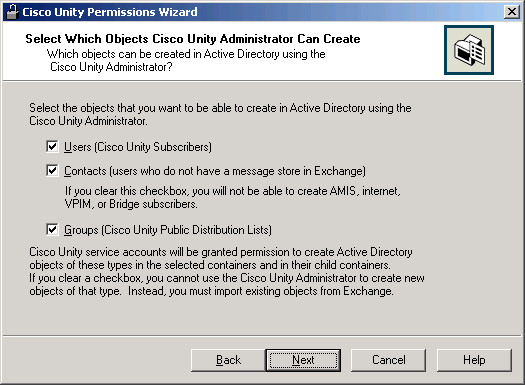
- If you do not want to use the Cisco Unity Administrator to create new Active Directory users, contacts, and groups, you may choose to not grant the Cisco Unity directory services account the necessary rights to create each type of Active Directory object.
If you clear a check box next to an Active Directory object type, you will not be able to create the associated type of Cisco Unity object using the Cisco Unity Administrator. You may only import existing objects into Cisco Unity. For example, if you clear the Users check box, you will not be able to create new Cisco Unity Subscribers using the Cisco Unity Administrator. You will only be able to import existing Active Directory users to make them Cisco Unity subscribers.
- Click Next.
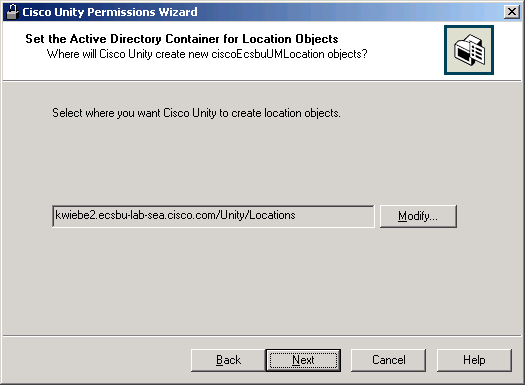
- Choose the organizational unit where you want Cisco Unity location objects to be created.
- Click Next.
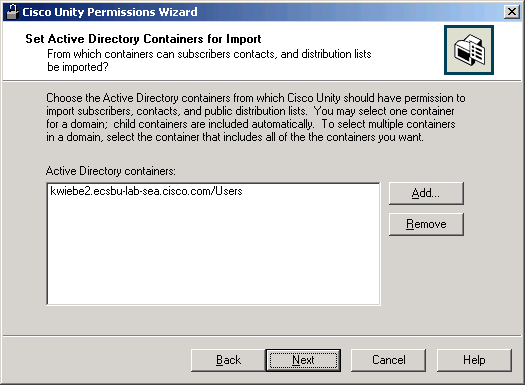
- Choose the Active Directory containers from which you want to import users, contacts, and groups to make them Cisco Unity subscribers and public distribution lists. Note the following:
![]() You must choose a container for the domain that
includes the Cisco Unity server.
You must choose a container for the domain that
includes the Cisco Unity server.
![]() Choose only one container for each domain. If
you will want to import users and groups from more than one container in a
domain, choose a common parent container that includes all of the containers
from which you want to import. If the common parent is the domain itself,
choose the domain.
Choose only one container for each domain. If
you will want to import users and groups from more than one container in a
domain, choose a common parent container that includes all of the containers
from which you want to import. If the common parent is the domain itself,
choose the domain.
Alternatively, if you want to choose multiple containers without choosing the common parent container, you can run Permissions Wizard more than once. Every time you run Permissions Wizard, choose the same options except on this page, where you choose a different container each time.
![]() If you are using Digital Networking to connect
multiple Cisco Unity servers, and if you will be importing users from the same
container for every Cisco Unity server, choose that container. For example, if
CiscoUnityServer1 and CiscoUnityServer2 will both be importing users from
Container1 only, choose Container1.
If you are using Digital Networking to connect
multiple Cisco Unity servers, and if you will be importing users from the same
container for every Cisco Unity server, choose that container. For example, if
CiscoUnityServer1 and CiscoUnityServer2 will both be importing users from
Container1 only, choose Container1.
If you are using Digital Networking and if, for all of the Cisco Unity servers combined, you will be importing users from two or more containers, the Cisco Unity message store services account on each Cisco Unity server must be granted SendAs permission on every container from which users will be imported on every Cisco Unity server in the forest. For example, if CiscoUnityServer1 will import users from Container1 and Container2, and if CiscoUnityServer2 will import users from Container3 and Container4, Cisco Unity message store services account on each Cisco Unity server must have SendAs permission for all four containers. On each Cisco Unity server, do one of the following, or identified subscriber messaging may not work between Cisco Unity servers:
![]() Choose all of the containers from which users
will be imported by choosing a common parent container.
Choose all of the containers from which users
will be imported by choosing a common parent container.
![]() Choose all of the containers from which users
will be imported or by running Permissions Wizard more than once.
Choose all of the containers from which users
will be imported or by running Permissions Wizard more than once.
![]() Use the same Active Directory account for the
Cisco Unity message store services account as on every other Cisco Unity server
in the forest.
Use the same Active Directory account for the
Cisco Unity message store services account as on every other Cisco Unity server
in the forest.
![]() If you are using identified subscriber messaging
for AMIS, Bridge, or VPIM subscribers, and if you will be importing contacts
from the same container for every Cisco Unity server, choose that container.
For example, if CiscoUnityServer1 and CiscoUnityServer2 will both be importing
contacts from Container1 only, choose Container1.
If you are using identified subscriber messaging
for AMIS, Bridge, or VPIM subscribers, and if you will be importing contacts
from the same container for every Cisco Unity server, choose that container.
For example, if CiscoUnityServer1 and CiscoUnityServer2 will both be importing
contacts from Container1 only, choose Container1.
If you are using identified subscriber messaging for AMIS, Bridge, or VPIM subscribers, and if, for all of the Cisco Unity servers combined, you will be importing contacts from two or more containers, the Cisco Unity message store services account on each Cisco Unity server must be granted SendAs permission on every container from which contacts will be imported on every Cisco Unity server in the forest. For example, if CiscoUnityServer1 will import contacts from Container1 and Container2, and if CiscoUnityServer2 will import contacts from Container3 and Container4, Cisco Unity message store services account on each Cisco Unity server must have SendAs permission for all four containers. On each Cisco Unity server, do one of the following, or identified subscriber messaging may not work for AMIS, Bridge, and VPIM subscribers:
![]() Choose all of the containers from which contacts
will be imported by choosing a common parent container.
Choose all of the containers from which contacts
will be imported by choosing a common parent container.
![]() Choose all of the containers from which contacts
will be imported or by running Permissions Wizard more than once.
Choose all of the containers from which contacts
will be imported or by running Permissions Wizard more than once.
![]() Use the same Active Directory account for the
Cisco Unity message store services account as on every other Cisco Unity server
in the forest.
Use the same Active Directory account for the
Cisco Unity message store services account as on every other Cisco Unity server
in the forest.
- Click Next.
- If you want to home Cisco Unity subscribers in every Exchange 2003 and/or Exchange 2000 mailstore, skip to step 21.
If you want to home Cisco Unity subscribers only in some Exchange 2003 and/or Exchange 2000 mailstores, click Choose Mailstores to choose the mailstores to which you want Cisco Unity to have access.
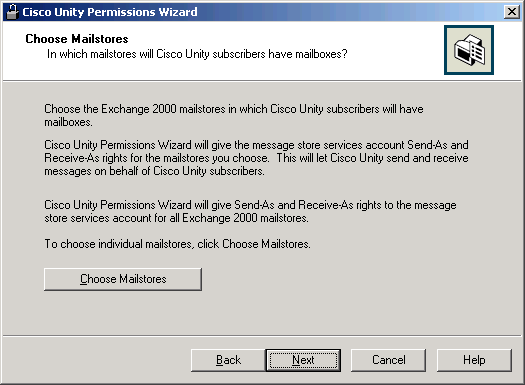
- Check the mailstores to which you want Cisco Unity to have access, and click OK.
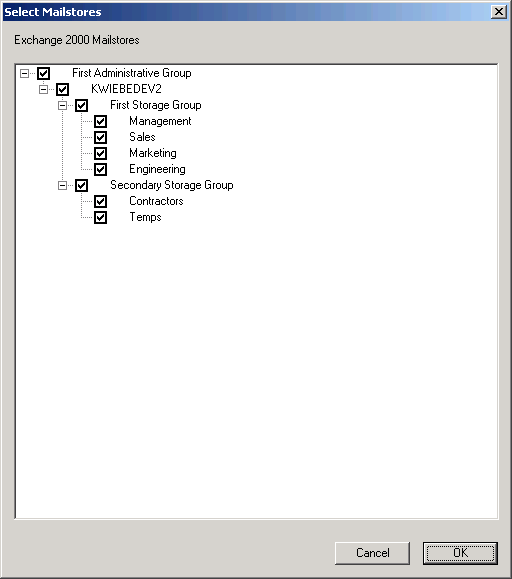
- Click Next.
- If the Cisco Unity server is running Windows Server 2003 with Service Pack 1, DCOM security improvements prevent the Cisco Unity Media Master control from functioning except on the Cisco Unity server. If you do not grant some DCOM rights (and reverse some of the SP 1 security improvements):
![]() Cisco Unity subscribers cannot use the Media
Master to make or play recordings in ViewMail for Microsoft Outlook, in the
Cisco Unity Inbox, or in the Cisco Unity Assistant.
Cisco Unity subscribers cannot use the Media
Master to make or play recordings in ViewMail for Microsoft Outlook, in the
Cisco Unity Inbox, or in the Cisco Unity Assistant.
![]() When administrators log into the Cisco Unity
Administrator from another computer, they cannot use the Media Master.
When administrators log into the Cisco Unity
Administrator from another computer, they cannot use the Media Master.
If you want to be able to use the Media Master control from locations other than the Cisco Unity server, check the Grant DCOM Rights and Enable the Media Master Control check box.
- Click Next.
- A summary appears that lists the permissions that will be granted to each account. The information listed includes membership in groups, user rights, and Active Directory rights.
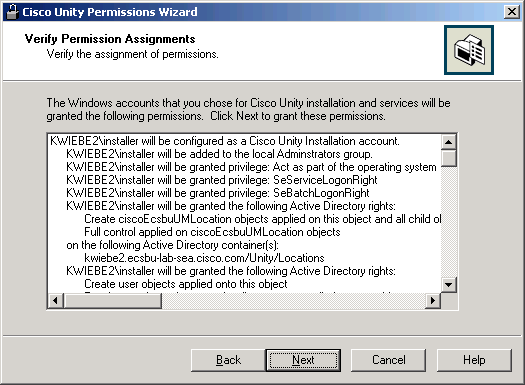
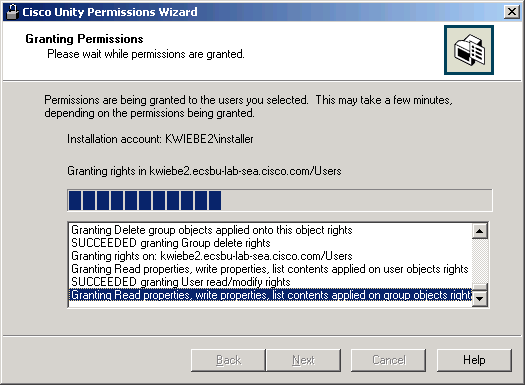
- Click Next to grant the listed permissions. Permissions Wizard may take a few minutes to grant permissions.
- If Permissions Wizard failed to grant one or more permissions, an error message appears that lists the number of permissions it was not able to grant. Click OK.
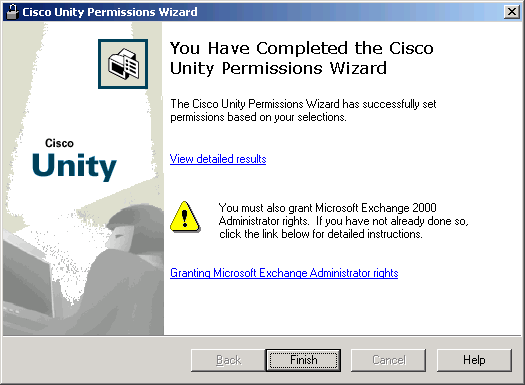
- If Permissions Wizard completes successfully, the following page appears.
If any permissions are not set successfully, the following page appears.
29. To display a report listing the operations that succeeded and those that failed, if any, click View Detailed Results. For information on interpreting the results, see Logging and Diagnostics.
Note: In some cases, individual rights may be combined into a single entry. For example, the rights to read properties, write properties, list contents, read permissions, and modify permissions applied onto Group objects are all included in the single entry “SUCCEEDED granting Group read/modify rights.”

- If one or more permissions could not be granted, fix the problems, and run Permissions Wizard again.
Caution! If Permissions Wizard failed to set any permissions, either the Cisco Unity installation will fail, or Cisco Unity will not run properly after it has been installed. You must successfully run Permissions Wizard before you can continue with installing Cisco Unity.
Caution! An Active Directory right being granted by Permissions Wizard may conflict with an existing right on an Active Directory container. For example, an account may be denied the right to create user objects in one of the containers selected in Permissions Wizard. The log file will explain that a conflict has been found, but Permissions Wizard will not resolve the conflict. You must resolve the conflict and then re-run Permissions Wizard.
- Click Finish.
- If the account that you logged in with in Step 1 is also the account that you want to use to install Cisco Unity (the account that you selected in Step 6), log out of Windows and log back in so the permissions set by Permissions Wizard will take effect.
- Set Exchange-specific permissions. See Setting Exchange Permissions.
Running Permissions Wizard When Subscribers Are Homed Only in Exchange 5.5
Caution! The following procedure grants each account the rights to act as a part of the operating system, to log on as a service, and to log on as a batch job, and does so in the local security policy. If a domain security policy is in effect, confirm that the domain security policy does not deny the accounts these rights.
To run Permissions Wizard
- Log on to the Cisco Unity server by using an account that is a member of the Domain Admins group, or that has permissions equivalent to the default permissions for the Domain Admins group.
Caution! If you try to run Permissions Wizard using an account that has less than the default permissions for a Domain Admin, Permissions Wizard may not be able to set all of the permissions required by the installation account and the services account. If Permissions Wizard cannot set all of the required permissions, either the Cisco Unity installation will fail, or Cisco Unity will not run properly after it has been installed.
- Insert Cisco Unity Disc 1 in the CD-ROM drive.
- Browse to the Utilities\PermissionsWizard directory, and run PermissionsWizard.exe.
- In the Welcome to the Cisco Unity Permissions Wizard, click Microsoft Exchange 5.5.
- Click Next.
- Click Change and choose the account that you want to use to install Cisco Unity.
- Click Next.
- Click Change and choose the account that you want Cisco Unity directory and message store services to log on as.
- Click Next.
- A summary appears that lists the permissions that will be granted to each account, including user rights and membership in groups.
- Click Next to grant the listed permissions. Permissions Wizard may take a few minutes to grant permissions.
- If Permissions Wizard failed to grant one or more permissions, an error message appears that lists the number of permissions it was not able to grant. Click OK.
- If Permissions Wizard completes successfully, the following page appears.

If any permissions are not set successfully, the following page appears.

- To display a report listing the operations that succeeded and those that failed, if any, click View Detailed Results. For information on interpreting the results, see Logging and Diagnostics.
- If one or more permissions could not be granted, fix the problems, and run Permissions Wizard again.
Caution! If Permissions Wizard failed to set any permissions, either the Cisco Unity installation will fail, or Cisco Unity will not run properly after it has been installed. You must successfully run Permissions Wizard before you can continue with installing Cisco Unity.
- Click Finish.
- If the account that you logged in with in Step 1 is also the account that you want to use to install Cisco Unity (the account that you selected in Step 6), log out of Windows and log back in so the permissions set by Permissions Wizard will take effect.
- Set Exchange-specific permissions. See Setting Exchange Permissions.
Logging and Diagnostics
The Cisco Unity Permissions Wizard generates two log files and saves them in the current temp directory. The first file contains summary information and results. The second file contains low-level diagnostics and error messages.
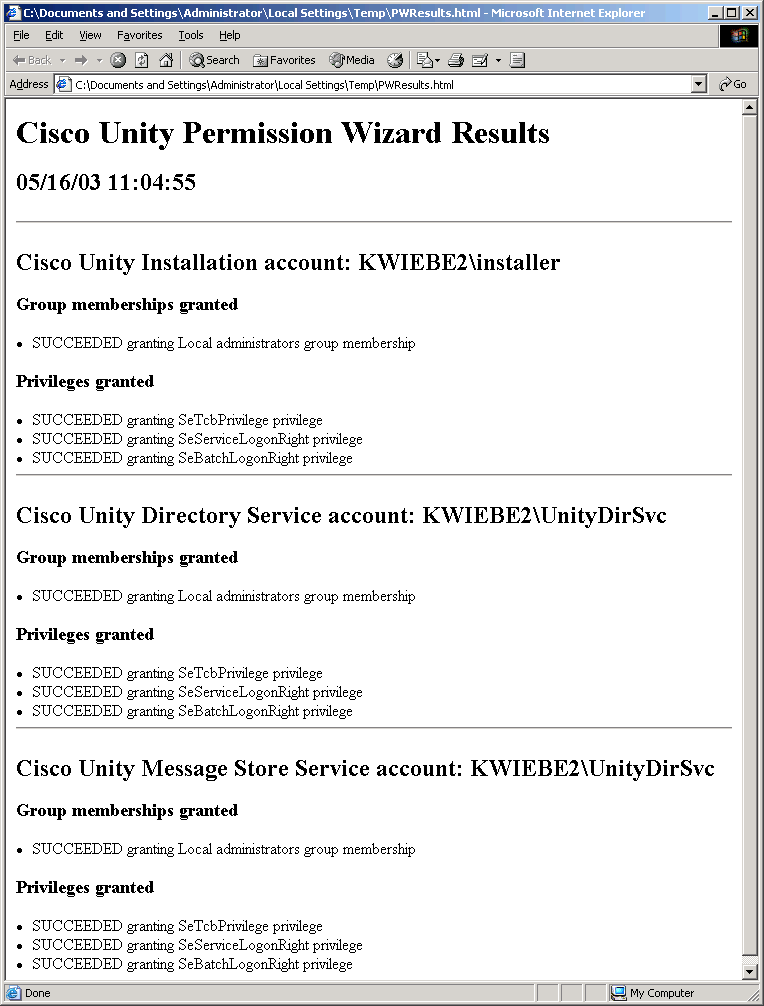
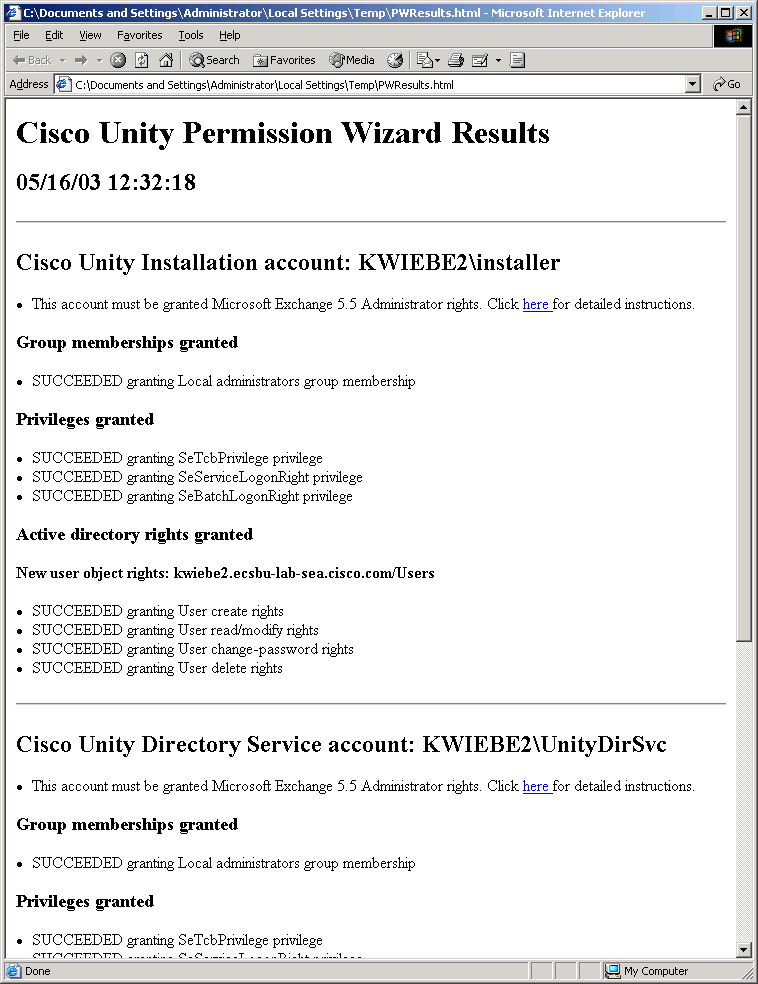
PWResults.html
PWResults.html contains all results from the Cisco Unity Permissions Wizard.
Each operation the Cisco Unity Permissions Wizard attempts will be listed as either SUCCEEDED or FAILED.
In some cases, individual rights may be combined into a single entry. For example, the rights to read properties, write properties, list contents, read permissions, and modify permissions applied onto Group objects are all included in the single entry “SUCCEEDED granting Group read/modify rights.”
It is possible that an Active Directory right being granted will conflict with a pre-existing right on an Active Directory container. For example, the account that Cisco Unity directory services log on as may have been specifically denied the right to create user objects in one of the containers selected in Permissions Wizard. The PWResults.html file will indicate that a conflict has been found with a direct rights denial, but Permissions Wizard will not resolve the conflict. It is your responsibility to resolve conflicts between the rights being granted by Permissions Wizard and others already in effect.
PWDiag.log
PWDiag.log contains everything in PWResults.html, supplemented by low-level engineering diagnostics and error messages that can be used by Cisco engineers to diagnose anomalous behavior.
Revision History
Version 1.0.0
![]() Initial version.
Initial version.
Version 1.2.0.1
Version 2.0.0.1
Version 2.0.0.16
![]() Fixed problem with remembering domain for new
object containers
Fixed problem with remembering domain for new
object containers
![]() Fixed missing report of direct denial conflicts
in html output
Fixed missing report of direct denial conflicts
in html output
![]() Added granting of Send-As and Receive-As rights
to Microsoft Exchange 2000 mailstores
Added granting of Send-As and Receive-As rights
to Microsoft Exchange 2000 mailstores
![]() Added granting of read-access rights to Deleted
Object containers
Added granting of read-access rights to Deleted
Object containers
Version 2.1.0.13,
![]() CSCeb75785
CSCeb75785
Version 2.1.0.14,
![]() Reconcile summary of granted rights with actual
granted rights
Reconcile summary of granted rights with actual
granted rights
Version 2.1.0.15,
![]() Add checks to distinguish Exchange 2000 from
2003
Add checks to distinguish Exchange 2000 from
2003
Version 2.1.0.16,
![]() Changes to support localized help
Changes to support localized help
![]() Defect fix: CSCec86667
Defect fix: CSCec86667
Version 2.1.0.17,
![]() Changes to apply Send-As on contact objects in
new user container
Changes to apply Send-As on contact objects in
new user container
Version 2.1.0.18,
![]() Defect fix: CSCed31963
Defect fix: CSCed31963
Version 2.1.0.19,
![]() Added Send-As rights granted on contact objects
Added Send-As rights granted on contact objects
Version 2.1.0.20,
![]() Fix problem during AdminSDHolder rights
assignment
Fix problem during AdminSDHolder rights
assignment
Version 2.1.0.21,
![]() Allow for localized display of Exchange help
file
Allow for localized display of Exchange help
file
Version 2.1.0.22,
![]() Defect fixes: CSCee17852, CSCed78363
Defect fixes: CSCee17852, CSCed78363
Version 2.1.0.23,
![]() Add timing diags around critical MS code
Add timing diags around critical MS code
Version 2.1.0.24,
![]() Defect Fixes: CSCee77212, CSCee90611
Defect Fixes: CSCee77212, CSCee90611
Version 2.1.0.25,
![]() Defect Fixes: CSCef01633
Defect Fixes: CSCef01633
Version 2.1.0.26,
![]() Add registry disable of AdminSDHolder permission
setting
Add registry disable of AdminSDHolder permission
setting
Version 2.1.0.27,
![]() Change to only write DACL on AD objects
Change to only write DACL on AD objects
Version 2.1.0.28,
![]() Added write property rights on computer objects
Added write property rights on computer objects
Version 2.1.0.29,
![]() Typo fix in diags
Typo fix in diags
Version 2.1.0.30,
![]() Localization updates
Localization updates
Version 2.1.0.31,
![]() Defect fix: CSCsb01328
Defect fix: CSCsb01328
Version 2.1.0.32, 7/15/2005
![]() Support for Windows Server 2003 SP 1 and later
Support for Windows Server 2003 SP 1 and later
© 2004 - 2005 Cisco Systems, Inc. -- Company Confidential