Contents
Adding
The Selected Subscribers
Configure
Distribution List MWI Notification Parameters
Copy
Distribution List Membership to a Remote Connection Server
Configuring
Connection 8.0 and Later for Remote Access
Task
2: Set the Database Proxy Service Shutdown Time
Task
3: Activate the Remote Database Proxy Service
Overview
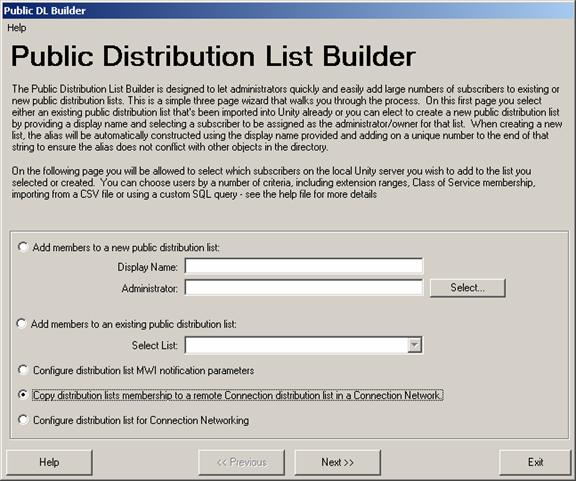
The Public Distribution List Builder (PDLB) is designed to let administrators easily add large numbers of Unity subscribers to existing or new public distribution lists. The PDLB also allows for the creation of new a new distribution list in addition to selecting an existing list to add members to. You can select subscribers to add based on a number of criteria including importing from a CSV file or using custom SQL queries. See below for more on that.
Requirements/Special Notes
This version of Public Distribution List Builder requires Unity 4.0(3) or later.
Public Distribution List Builder must be run on the same server where Unity is installed. You can only add subscribers that are homed on the local Unity server to distribution lists.
The Public Distribution List Builder works with Unity connected to Exchange 5.5, Exchange 2000, 2003 or 2007.
The Public Distribution List Builder does not support any version of Unity connected to Domino.
Using Public DL Builder
The Public Distribution List Builder is a 3 page wizard.
Selecting a Distribution List
The first step in the wizard is to select an existing public distribution list or to create a new one on the fly. In the screen shot below the administrator is selecting to create a new distribution list.

When creating a new list you must provide a display name (up to 40 characters) and choose a subscriber to act as the administrator/owner of the list in the administration interface. The alias of the distribution list is constructed automatically by stripping spaces out of the display name and tacking on a unique number to the end to ensure that it does not conflict with any other distribution list in the directory.
Once you’ve selected the distribution list to add users to, hit “Next” and go to the subscriber selection page.
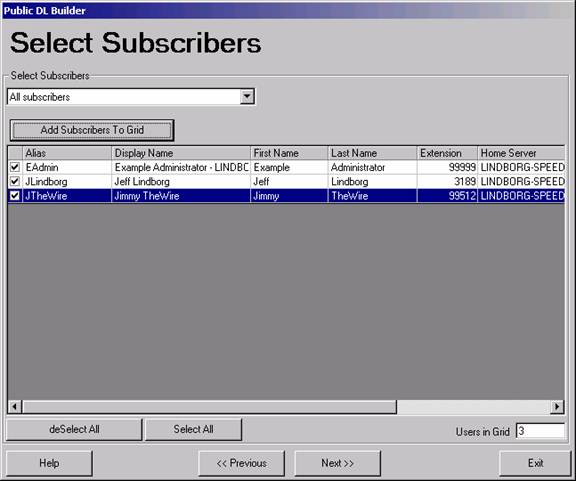
Selecting Subscribers to Add
On the subscriber selection page you can choose any number of subscribers homed on the local Unity server you like.
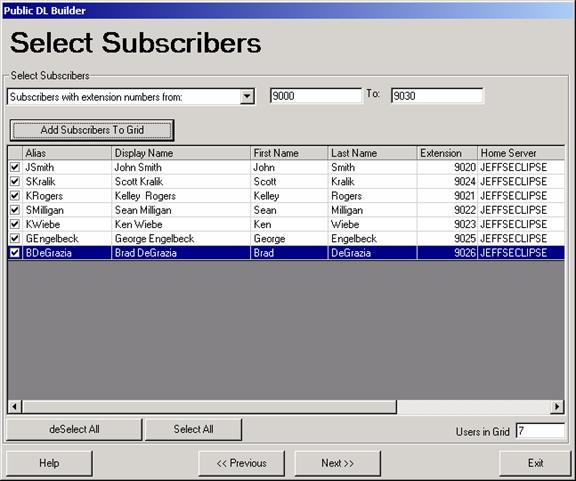
You are allowed to choose users with the following criteria:
- All subscribers on the local Unity server
- All subscribers within an extension range
- All subscribers associated with a Class of Service
- All subscribers associated with a switch – this is useful for a multiple switch integration system.
- All subscribers found in a CSV file (see below)
- Select subscribers using a custom SQL query (see below). This option is reached through the “advanced’ button which is only visible if you run the Public Distribution List Builder application with the “/advanced” command line option. Notice that this button is not visible in the screen shot above.
When you choose to add users to the grid, existing users are removed – you cannot “merge” multiple selections into one grid. If you have an eclectic list of users you’d like to add you’ll either have to do it in multiple passes of the tool, use a custom SQL query (see below) or use a CSV file to define the user and import them that way (see below).
Once you have subscribers listed in the grid you can select and deselect them individually using the checkbox on the far left. You can use the “deselect All” and “Select All” buttons to check or uncheck all users in the grid at once.
Importing from CSV
This option lets you select a comma-separated value (CSV)
file to find subscribers based on their Exchange aliases. CSV is a common text
file format for moving data from one data store to another. You can edit CSV
files in a text editor or in a spreadsheet application. If you choose to select
subscribers from a CSV file, format your file by using the following guidelines
to ensure that it parses correctly:
- Separate
values by commas. Do not use a tab, spaces, or a semicolon to separate
values in the file.
- Include
a column header titled “alias” in the first line. Column
headers are not case sensitive, and can be formatted with spaces on the
left, right, or on both sides.
For example:
first
name, last name, home server, alias
Alex, Abade, EXServer1, aabade
Kelly, Bader, EXServer1, kbader
Advanced Subscriber Selection
If you ran the Public Distribution List Builder with the “/advanced” option, you’ll see an “advanced” button on the subscriber selection form. If you press it an advanced subscriber search query builder form will appear. This is shown in the following screen shot:
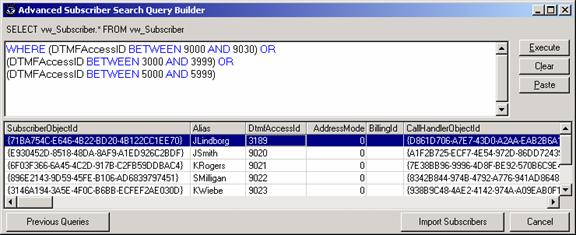
you can enter any valid SQL statement in there – it will be prepended with the “SELECT vw_Subscirber.* from vw_Subscriber” string noted at the top of the form. Once you have the query the way you want it you can select “Import Subscribers” and the grid on the main subscriber selection form will be populated with these users – note that any users you had in the main grid before going to the advanced query builder will be removed.
NOTE: The last 10 queries you’ve executed on the advanced query form are available by pressing the “previous queries” button – a drop down list showing the first number of characters of each of the last 10 queries will be available – if you select one the entire query will be pasted onto the main text box. This is handy if you’re doing a derivation of a similar query several times or want to rerun a query you constructed in the past.
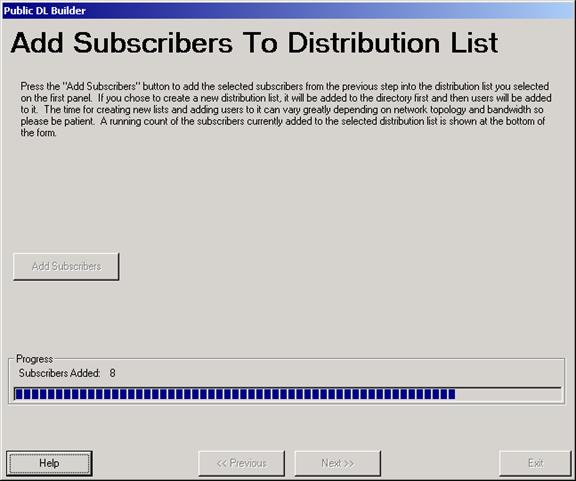
Once you have the users you wish to add selected, press the “Next” button and advance to the “Add Subscribers” page.
Adding The Selected Subscribers
Logging
Each time Public DL Builder is run it generates a new log in the \logs folder under it’s installation directory. The logs are named “PublicDLBuilder_Log_YYYYMMDD_HH_MM_SS.txt”. The time used in the hour (HH) field is in 24 hour format. Each time Public DL Builder is run it’ll delete log files older than 30 days found in that directory.
The log output itself is pretty straight forward. At the top of the log it’ll indicate which distribution list users are being added to similar to this:
**** Users
are being added to an existing DL: All Subscribers - JEFFSECLIPSE ****
SystemDListObjectID
of distribution list being worked with= {3EA7729E-BDAC-46E1-A882-4A5224B4F869}
If the distribution list is being created, that will be indicated as well – in the log above the user elected to add subscribers to an existing distribution list in the system.
For each user being added, they are logged one at a time and synched into the directory as the application goes. If there’s a problem in the directory pushing a user into the distribution list, it’ll be logged for each user so you can run down the problem a little more easily. The following log chunk is of a user (BdeGrazia) who is successfully added to the distribution list and a user (Eadmin) who is already a member of the distribution list and, as such, is skipped:
** Adding
Subscriber to DL **
Alias=BDeGrazia
ObjectID={4891FB0D-1078-49CB-9988-7D721D76CAEB}
Directory sync complete for
subscriber add
** Adding
Subscriber to DL **
Alias=EAdmin
ObjectID={1813653A-2E98-41BE-8F65-9DE0B499EF56}
This user is already a
member of the selected distribution list, skipping add...
All errors in the log are preceded with “(error)” in the log and are left justified so you can spot them easily. A total count for the number of errors encountered is provided at the end of the add process and you are given an opportunity to view the log directly from there.
Configure Distribution List MWI Notification Parameters
If you are running Unity 4.0(4) or later or 4.0(3) with Engineering Special #39 installed, you will see a 3rd radio button on the opening page of the Public Distribution List builder entitled “Configure distribution list MWI notification parameters”. This option is designed for sites that have very large distribution lists and wants to “throttle” MWIs that go out to all its members when a message is left for it. This helps spread out the MWI notices that go out to its members such that the switch is not over loaded with MWI requests and that Unity is not over loaded with too many callers dialing in to check messages all at once.
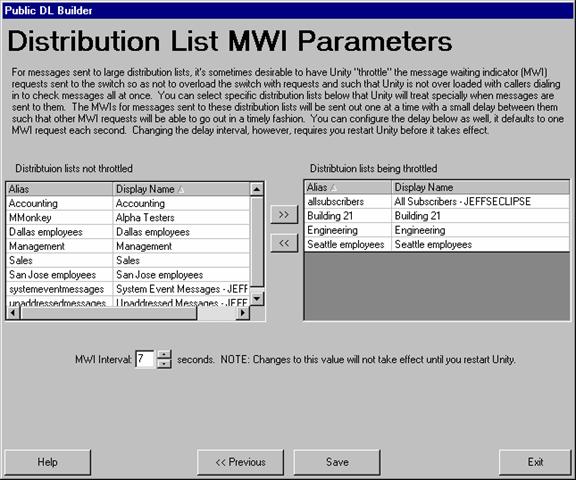
All the public distribution lists that have been imported into Unity or created in Unity will show up in this dialog. You can move lists back and forth from the “not throttled” and the “throttled” list using the arrow buttons in the middle of the form. Messages sent to the lists in the “throttled” group will have their MWI requests sent out to each member of the list one at a time with the MWI interval delay inserted between them. Changing the list configuration will take effect immediately, however changing the MWI interval time will require a Unity restart before it takes effect.
Copy Distribution List Membership to a Remote Connection Server
With the release of Unity 8 and Connection 8 it’s possible to have a digital network configured between Unity and Connection that shares directory information. If you run the Public Distribution List Builder on a Unity 8.x or later server that’s configured to share directory information with a Connection 8.x or later network then the option to copy distribution list membership from a local Unity distribution list to a remote Connection distribution list will be made available.
This option is available if the Unity server you are running it on can connect to a remote Connection 8.0 or later server – it is not required that the two be digitally networked, however the tool is designed to take advantage of the digital network data. If the systems are not networked then the subscriber alias is used when searching for a match for a user on the remote Connection server when trying to resolve user references.
NOTE: The tool works best if you are running it from the Unity bridgehead (also called ‘gateway’) server that’s communicating with the Connection network. User resolution during the membership copy will work best from the bridgehead. If you are not running on the bridgehead a warning will pop up letting you know this but you can still proceed anyway and PDL Builder will do its best to resolve membership data without the additional data found on the bridgehead server.
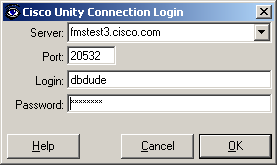
When you select next the first thing you need to do is provide a login and password for the remote Connection server you want to attach to. See the Configuring Connection 8.0 and Later for Remote Access section below for details on this.
Once you’ve successfully logged into the remote Connection server you will be presented with a list of all local public distribution lists on the Unity network (in other words all distribution lists in Active Directory and are tagged to be used by Unity).
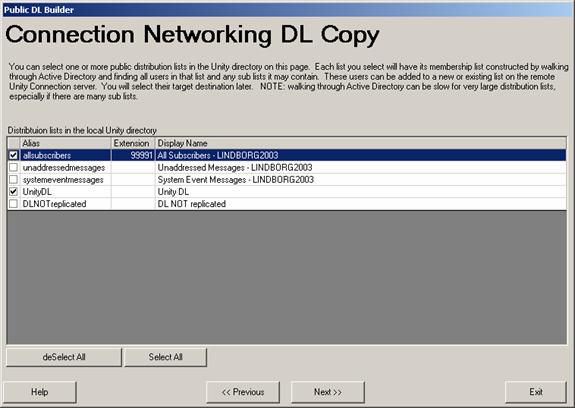
This page will present ALL lists regardless if they are set to replicate to the remote Connection directory or not (this is optional in the digital networking setup). Each list you select on this page will have it’s membership information extracted from AD and those members will be added to a new or existing distribution list on the target Connection server that you choose. Each list you select here must have a corresponding new or existing list on Connection selected as a target. You cannot “merge” membership data from multiple lists into one target list on a single run of the Public Distribution List Builder. If you wish to do this you will have to run the Public Distribution List Builder multiple times.
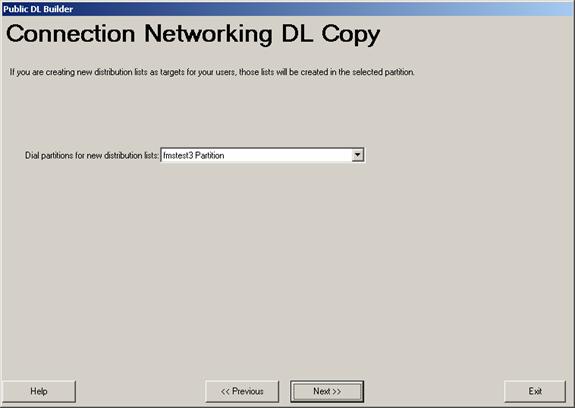
Next you will need to pick the Connection dial partition to use when creating new distribution lists. You may select to copy membership data into only existing distribution lists and this value won’t be used but you must select a default here anyway.
Finally you must select where to copy membership data to for each Unity list you selected to extract user data from.
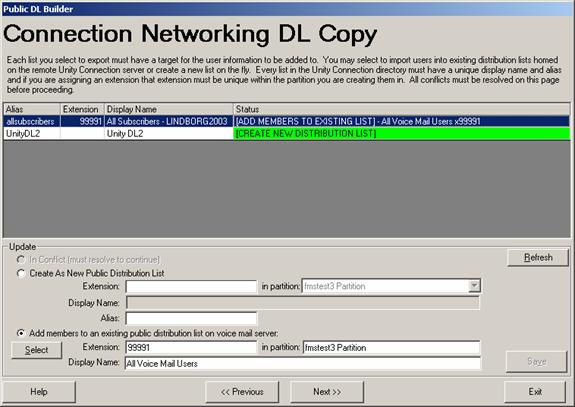
You may choose to create new lists or use the “select” button to choose an existing list on the Connection server instead. Again, a target distribution list can only be used once on this page – you cannot “merge” multiple lists into one in a single run of the Public Distribution List.
NOTE: All
distribution lists created as new on the Connection server during this process
are set to NOT replicate and to allow contacts. By default it’s assumed you
don’t want public distribution lists you’re creating during this
process to replicate over to Unity.
If this is desirable you will need to change the setting on the
distribution lists on Connection after the copy process is complete.
NOTE: All distribution lists must have a unique display name and alias on the target Connection server. If you are copying membership data from a list that is replicating in the directory sync between Unity and Connection there will already be a special “holder” list with that name in the directory – as such you will have to change the name for each list (above the “2” is tacked onto the name and alias of the list to make it unique). You’ll want to take this into account when moving lists membership data over so you can stick to a reasonable naming convention.
All conflicts for every list must be resolved by choosing an existing list to use or creating a new list with a unique name, alias and extension (optional) before you can proceed in the wizard.
The last page of the wizard presents the option to start the copy process and will show progress as the tool works.
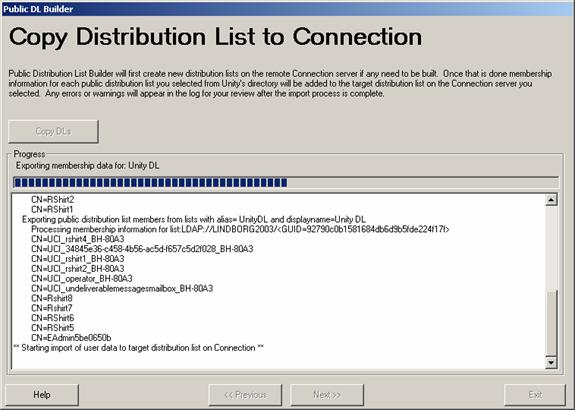
The tool goes through the following steps:
- Any new lists that need to be created are added to the Connection directory.
- Each list selected for copy is “walked” in Active Directory. All user data is extracted from the list and any sub lists (and sub sub lists etc…) and stored in a local Access database. This can take some time if the list is large and/or contains many nested distribution lists.
- Membership that was extracted in step two is then used to add members to the target list selected as a repository for user data on the Connection side. If a user cannot be found in the directory a note is added to the log output. If the Unity and Unity Connection server are digitally networked the subscriber’s digital network ID is used for resolving references on the remote Connection server. If they are not networked then the subscriber’s alias is used instead.
When the copy process is complete the log file is presented for review – it’s a good idea to look at any errors and warnings in the logs – each user that cannot be found in the Connection directory that was in the Unity distribution list definition is noted as a warning. This is not always a problem – lists in Active Directory can contain users that are not Unity subscribers for instance.
The log file and the Access Database created by the tool are stored in separate backup folders under the “DLMemberBackups” folder where the Public Distribution List Builder tool is installed.
Configuring Connection 8.0 and Later for Remote Access
If you are using the option to copy distribution list membership to a remote Connection server, you will need to configure the Connection server you wish to attach to such that you can log into it and access the database remotely.
Connection 7 and later comes “out of the box” configured to not allow remote connections to the database for security reasons. To be able to use this feature you must create a user with the rights to attach to the database remotely and activate the remote data service Do the following tasks.
NOTE: Remote data access configuration is also necessary for running tools such as the Database Explorer (CUDLI), User Data Dump (CUDD) and other diagnostic or reporting tools
Task 1: Install ODBC driver for Informix.
You can download the Informix ODBC driver from its home page here:
http://www.ciscounitytools.com/Applications/CxN/InformixODBC/InformixODBC.html
You will need to have this installed on any Windows client that you wish to run any tools requiring remote access to Unity Connection 7.x or later.
Task 2: Configure a User without a mailbox with the Remote Administrator and System Administrator roles
1. Go to the Cisco Unity Connection Administration web interface for your installation.
2. You can leverage a user with or without a mailbox for off box data access purposes, but it’s strongly suggested that you create a new user without a mailbox that is used solely for the purpose of remote administration tasks for security reasons. This is also required if you want to export messages from a Connection 7.0(2) or later server – a user with a mailbox may not be allowed to extract messages from other mailboxes, whereas a user without a mailbox should have no problem.
3. Be sure the web administration password for this user is not configured to require a change at first login on the “Password Policy” page for that user.
4. If necessary, change the web administration password on the “Change Password” page. Note that only the web application password comes into play for remote data access.
5. Finally,
on the “Role” page for the user, add the “Remote
Task 3: Set the Database Proxy Service Shutdown Time
Out of the box the database proxy service is not running and if you try to start the service it will shut down right away. First you need to set the “Database Proxy: Service Shutdown Timer” value found in the System Settings -> Advanced -> Connection Administration section of the Cisco Unity Connection Administration page. By default this is 0. You can set it to as high as 999 days if you like. After the number of days configured here the remote database proxy service will shut down. This is useful if you want to do some migration work, for instance, and don’t want to forget to have the service disabled for security reasons.
NOTE: If you restart the server, the remote database proxy service will remain shut off. After a system restart you have to go in and manually turn on the service again (see step 3)
Task 4: Activate the Remote Database Proxy Service
1. Out of the box the service that listens to remote database requests is not active, you must turn it on. To do this, go to the “Cisco Unity Connection Serviceability” web admin page.
2. On the Tools menu, select the “Service Management” page.
3. The “Connection Database Proxy” item under the “Optional Services” section will be marked as “Deactivated” and stopped. Press the “Activate” button and it will be activated and started automatically.
Once you’ve started the proxy service you can connect with any tool that needs off box database access using the user name, web administration password and port “20532”.
NOTE: The service will automatically shut down after the number of days configured in step 2 above or if you restart the server.
Obtaining Updates
To check for updates to this tool, visit http://www.ciscounitytools.com/
Revision History
Version 4.0.26 – 1/15/2010
- Updated extension range selection logic to handle non numeric characters added for UCI in Unity 8.
- Updated help file.
- Updated Informix database connection to force en_utf8 for both DB and CLIENT locales.
- Changed remote display name logic when copying distribution lists to fetch UTF8 decoded strings
- Changed default behavior to create new lists on Connection during the copy process to NOT replicate back over to Unity.
- Added check with warning if you are running a distribution list membership copy from Unity to Connection and you are not on the Unity bridgehead. The operation is still allowed but the user is warned anyway.
Version 4.0.21 – 1/5/2010
- Added support for UCI distribution list membership copy functionality for the Unity and Unity Connection 8.x releases.
Version 4.0.20 – 10/12/2009
- Added Unity 8.0 option to enable DLs for Cisco Unity Connection Networking
- Fixed MWI throttle page parsing issue. CSCta97859
- Improved sort order of Distribution Lists and Class of Services
Version 4.0.19 – 9/29/2009
- Updated version check routine for new CiscoUnityTools.com site design.
Version 4.0.18 – 10/24/2007
- Removed restriction on CSV file parsing on “full” subscribers only – now allows for AMIS, VPIM, Bridge and SMTP subscribers as well.
Version 4.0.17 – 7/28/2007
- Fixed a problem selecting subscribers by extension number range for very large extension numbers.
Version 4.0.16 – 5/9/2007
- Added support for importing subscribers by CSV using their extension numbers as well as aliases.
- Fixed a problem with progress dialog redraw during and immediately after CSV import process
Version 4.0.15 – 8/28/1006
- Fixed problem with apostrophes in alias for CSV file imports – CSCsf20945
- Improved error handling for problems encountered during CSV parsing
- Updated localization DLLs for French, German and Japanese strings
- Updated about/copyright information
Version 4.0.14 – 12/21/2005
- Added support for new switch configuration scheme in 4.2(1).
Version 4.0.13 – 6/4/2004
- Fixed some Japanese localization font control issues.
Version 4.0.12 – 5/17/2004
- Changed the MWI throttle page to strip off the right of the @ symbol in the full SMTP address string for storage in the registry. CSCee55294
Version 4.0.11 – 4/19/2004
- Added support for localized help files for the Unity 4.0(4) release.
- Updated resource strings for the 4.0(4) release
Version 4.0.9 – 3/18/2004
- Changed the “throttle MWI” page to use grids with alias and display names for lists instead of simple list boxes showing only the alias. For multiple Unity server sites this was necessary.
Version 4.0.8 – 3/8/2004
- Added progress indicator for adding subscribers to the selection grid.
- Updated distribution list update logic to use new stored procedures to speed the sync process up.
- Fixed a problem handling distribution lists that have NULL SMTP Addresses.
Version 4.0.5 – 2/25/2004
- Added new MWI “throttling” options interface for 4.0(3) SR1 and later installations.
Version 4.0.2 – 10/27/2003
- First ship of tool
© 2009 Cisco Systems, Inc. -- Company Confidential