Unity Uninstall
Option to skip removing subscriber
information from mail users in directory
Removing Location Objects Manually
Removing TSP and WAV drivers
manually
To determine the current setting for the Dialogic quiet parameter
To remove Dialogic software – Windows NT 4.0
To remove Dialogic software – Windows 2000
To remove Voice Technologies Group software
Overview
The Unity Uninstall Utility will remove all Unity related files, registry settings and most directory items in Exchange/Active Directory from you system. You will need to manually remove 3 accounts and 3 distribution lists from your system after uninstalling before your system is clean. After that, you should be able to install a clean version of Unity after doing that and rebooting your server.
Requirements/Special Notes
This tool does NOT remove Dialogic, NMS or Cisco TSPs or WAV drivers. Before running the Unity Uninstall utility you should Manually remove these items. See "Removing TSP and WAV drivers manually" below for more details on that process. It also does not remove Active Fax if installed. See “Removing Active Fax manually” below for more on that process.
If you are uninstalling a Unity server that is part of a failover configuration, see the “Uninstalling with Failover” section below.
This version of Uninstall will remove objects from the directory that were added by setup for Unity 4.0(3) and later. For versions of Unity earlier than that it will leave all objects in the directory and provides a list of objects that need to be removed manually for a complete uninstall. See the Removal Details section below for more.
Installation and Execution
To install and run
the Uninstall utility you must be logged in as the account that installed
Unity. Access to the directory for removing objects will not be possible
if you're logged in as another administrator account. Simply run Setup.exe, no reboot is
necessary.
When you run the
Uninstal Utility you will be warned several times before being allowed to
actually proceed. You can NOT undo this operation. Once the uninstall
starts your Unity system will be inoperable and a reinstall will be
required. Proceed with caution.
Be sure to follow
the instructions at the end of the install. You will need to manually remove a few
accounts and distribution lists by hand (these will be listed for you at the
end of the uninstall) and sometimes the Unity install
directory does not get fully removed and you need to remove it manually after a
reboot (you’ll be warned of this at the end of the uninstall as well).
Removal Details
The Uninstall
utility takes the following steps:
- All Unity
subscribers associated with the Unity server the tool is run on have their
Unity specific data removed from them. This doesn't have any affect
on their normal mail user properties in Exchange, only the Unity specific
extensions are removed. High level items that are not Unity specific
such as the recorded voice name are left in tact. Only Subscribers
associated with the local Unity server will have their Unity specific
properties removed so if you have multiple Unity servers installed into
the same Exchange site, the uninstall should not affect users associated
with the other systems.
- The example
administrator, example subscriber and Unity messaging system accounts
created by the Unity setup are removed from the directory for Unity 4.0(3)
and later. For earlier
versions of Unity the accounts that need to be removed are presented on a
dialog box at the end of the uninstall process.
- All location
objects associated with the local Unity server are removed from the
directory entirely for Unity 4.0(3) and later. For earlier versions of Unity a
dialog box is presented at the end of the uninstall detailing with
location objects should be removed.
- The public
distribution lists that were added to the system by the Unity setup are
removed from the directory entirely for Unity 4.0(3) and later. For earlier versions of Unity a
dialog box is presented at the end of the uninstall detailing which
distribution lists should be removed.
- The Unity
database information is removed from SQL. This includes all call handlers,
COS definitions, interview handlers, restriction tables etc…
- All Unity
specific services are stopped and then removed from the Service Control
Manager.
- All Unity
related registry settings are removed.
- The
Commserver directory and all it's subdirectories
are removed from the hard drive.
If some process has a handle open to a file under this directory
the entire directory tree may not be removed – if this happens a
warning dialog is displayed at the end of the uninstall process that tells
you to manually remove the directory after a reboot.
- The Unity
program group is removed.
- The links to
the SA, Status monitor and the “part 2 setup” link are removed
from the desktop.
- The Tray
status application is removed from the startup group.
- All the
Unity specific web information for the SA, AA and Status Monitor sites is
removed from the wwwroot directory.
- Several
Unity specific DLLs are removed from the WinNT\System32 directory.
NOTE: The automatic removal of accounts and
distribution lists noted above only happens for Unity 4.0(3) and later. For versions of Unity prior to that,
when the uninstall completes you need to delete the following accounts by hand,
either in Active Directory or in Exchange 5.5 depending on what your back end
is:
- Example
- Example Subscriber
- Unity_<machine name>
- UAMIS (if the AMIS feature is
installed)
- “All Subscribers”
distribution list
- “System Event Messages”
distribution list
- “Unaddressed Messages” distribution
list
NOTE: The Unity folder is not removed by the Uninstall
utility. It’s not necessary
to remove it, but if you feel the need follow the instructions in the
“removing location objects manually” below.
As noted above, the
Uninstall utility does not remove any TSP or WAV drivers that may be
installed. You will want to remove Dialogic, NMS and/or Cisco TSP and WAV
drivers manually before running the Uninstall utility. Since some of the Dialogic driver
information is stored under the \commserver directory if you don’t’
do this before you Uninstall Unity it can be a real headache to remove properly
later. Warning dialogs with this
information are presented to the user at the beginning of the uninstall
process.
Uninstalling With Failover
If you are uninstalling a Unity server that is the primary box in a failover configuration you first need to disconnect the servers from each other and terminate SQL replication between the boxes. The details for handling this are covered in the Failover guide in the “Uninstalling Failover on a Cisco Unity System” chapter. This document can be found online at:
http://www.cisco.com/univercd/cc/td/doc/product/voice/c_unity/unity31/fail/fail31/fog_300.htm
If you run the uninstallation tool without first doing this, the failover will fail and you will have to clean up your system manually. If the Uninstall sees that the local system is the primary server in a failover configuration, it will warn you of that fact and give you the opportunity to exit the uninstall process and complete these steps.
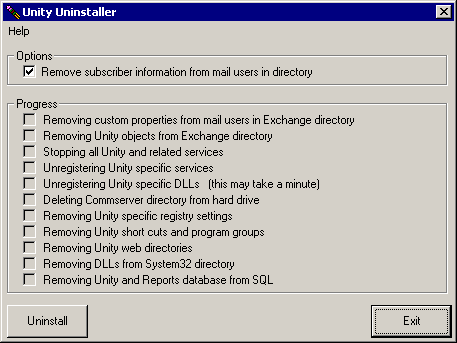
Option to skip removing subscriber information from mail users in directory
If
you’re uninstalling a fail over server or you’ve manually removed
the “Unity” folder from Exchange or reinstalled Exchange or for
whatever reason want the uninstall utility to skip removing all Exchange
objects and subscriber information, uncheck the “Remove subscriber
information from mail users in directory” checkbox in the
“options” section. This
will cause the installer to skip steps 1 and 2 under the Removal Details
section above.
This
can be handy if you’ve reinstalled Exchange but forgot to remove Unity
first and you want to clean up all the Unity specific files on your hard drive
and in the registry before installing a new version of Unity. This is required if you’re
uninstalling a fail over server since you don’t want to remove the
subscriber data in that case or the primary server will be render useless.
Removing Location Objects Manually
While
it’s not necessary to do so, you can remove the location objects
manually. NOTE: Just to be clear, it is NOT
necessary to remove the Unity folder or delete the location objects to install
Unity clean on the system. If,
however, you want to remove the folder added by Unity, you may do so. For Unity 4.0(3) and later the local
location objects are deleted from the directory automatically, for versions of
Unity prior to that they are left in the directory.
WARNING: If there are other Unity servers installed in
the directory, Do NOT remove any location objects, just leave them there. You run the risk of removing the wrong
location object (one associated with another Unity server) which will render
the other Unity server(s) inoperable.
For Exchange 5.5
You
must open the Exchange
NOTE:
It’s not generally a good idea to open the Exchange administrator in raw
mode all the time… sooner or later you’ll accidentally delete
something you shouldn’t. Raw
mode is very dangerous and will let you wax your entire Exchange site in one
shot if you’re not careful.
Proceed with extreme caution.
For Exchange 2000
Open
the “Active Directory Users and Computers” applet. Under the “View” menu,
select the “Advanced Features” option,
this will force the “Unity” folder to be visible under the domain
name in the left panel. Select the
“Unity” folder and delete it.
Again, make absolutely sure there are no other
Unity servers installed in the directory or you will render them inoperable,
proceed with extreme caution.
Removing TSP and
WAV drivers manually
Cisco
The AvCiscoTSP and
WAV drivers will be automatically removed by the Uninstall utility.
Dialogic
To determine the current setting for the Dialogic quiet parameter
When the Dialogic quiet parameter has been set to a value other
than the default, the setting will be lost when you remove the Dialogic
software. Write down the current value of the quiet parameter so you can
restore that value after you reinstall the software.
·
Shut down Unity if it is running.
·
On the Windows Start menu, click Programs > Dialogic System
Software > Dialogic Configuration Manager to start the DCM. The
tree-structured list contains an entry for each Dialogic board installed in the
server.
·
On the Service menu, click “Stop service.”
·
Double-click any voice board in the tree list. The Properties
dialog box for the board appears.
·
Click the Misc tab.
·
Under “Parameter,” note and write down the value of
“ParameterFile.”
·
Click “OK.”
To remove Dialogic software – Windows NT 4.0
·
Shut down Unity if it is running.
·
On the Windows Start menu, click Programs > Dialogic System
Software > Dialogic Configuration Manager–DCM.
·
On the Service menu, click “Stop service.”
·
Close the DCM.
·
On the Windows Start menu, click Settings > Control Panel.
·
Double-click “Telephony.” The Dialing Properties
dialog box appears.
·
Click the Telephony Drivers tab.
·
Click “Dialogic generation 2 service provider for
NT.” If you are using D/160SC
voice boards and VoiceBridge 2000 feature-set boards, this option will say
“DSE Service provider.”
·
Click “Remove.”
·
Click “Close” to close the Dialing Properties dialog
box.
·
In Control Panel, double-click “Multimedia.” The
Multimedia Properties dialog box appears.
·
Click the Devices tab. Expand “Audio devices.”
·
Click “Audio for Dialogic WAVE Driver 1.x” or
“Audio for dlgwave.dll.”
·
Click “Remove.”
·
When prompted to restart, click “Don’t restart
now.”
·
Click “OK” to close the Multimedia Properties dialog
box.
·
Close Control Panel.
·
On the Windows Start menu, click Programs > Dialogic Sys-tem
Software > Uninstall. Follow the on-screen instructions for the Dialogic software
uninstall.
·
When the dialog box asks whether you want to delete shared files,
click “No to all.”.
·
Do not restart when it asks.
·
If you are using D/160SC voice boards and VoiceBridge 2000
feature-set boards skip to the next procedure, “To remove Voice
Technologies Group software.”
·
There is no need to reboot here… once you’re done
uninstalling the Dialogic software, proceed with running the Unity Uninstall
utility.
To remove Dialogic software – Windows 2000
·
Shut down Unity if it is running.
·
On the Windows Start menu, click Programs > Dialogic System
Software > Dialogic Configuration Manager–DCM.
·
On the Service menu, click “Stop service.”
·
Close the DCM.
·
On the Windows Start menu, click Settings > Control Panel.
·
Double-click "Phone & Modem." The Phone And Modem
Options dialog box appears
·
Click the Advanced tab.
·
Click “Dialogic generation 2 service provider for
NT.” If you are using D/160SC
voice boards and VoiceBridge 2000 feature-set boards, this option will say
“DSE Service provider.”
·
Click “Remove.”
·
Click “Close” to close the Dialing Properties dialog
box.
·
In Control Panel, double-click "Sounds and Multimedia."
The Sounds and Multimedia Properties dialog box appears.
·
Click the Hardware tab, under Devices double click on "Legacy
Audio Drivers". The Legacy
Audio Drivers Properties dialog box appears.
·
Click the Properties tab. Expand "Audio devices”
·
Click “Audio for Dialogic WAVE Driver 1.x” or
“Audio for dlgwave.dll.”
·
Click “Remove.”
·
When prompted to restart, click “Don’t restart
now.”
·
Click “OK” to close the Sounds and Multimedia
Properties dialog box
·
Close Control Panel.
·
On the Windows Start menu, click Programs > Dialogic System
Software > Uninstall. Follow the on-screen instructions for the Dialogic
software uninstall.
·
When the dialog box asks whether you want to delete shared files,
click “No to all.”.
·
Do not restart when it asks.
·
If you are using D/160SC voice boards and VoiceBridge 2000
feature-set boards skip to the next procedure, “To remove Voice
Technologies Group software.”
·
There is no need to reboot here… once you’re done
uninstalling the Dialogic software, proceed with running the Unity Uninstall
utility.
Do the following procedure if the Unity server contains Dialogic
D/160SC voice boards and Voice Technologies Group Voice-Bridge 2000 feature-set
boards.
To remove Voice
Technologies Group software
·
On the Windows Start menu, click Settings > Control Panel >
Add/Remove Programs.
·
Remove “VoiceBridge 2000."
·
When the dialog box asks whether you want to delete shared files,
click “No to all.”
- Close the Add/Remove
Programs dialog box.
NMS
·
Shut down Unity if it is running.
·
On the Windows Start menu, click Settings > Control Panel.
·
Double-click “Telephony.” The Dialing Properties
dialog box appears.
·
Click the Telephony Drivers tab.
·
Click “Natural MicroSystems service provider.”
·
Click “Remove.”
·
Click “OK” to close the Dialing Properties dialog box.
·
In Control Panel, double-click “Multimedia.” The
Multimedia Properties dialog box appears.
·
Click the Devices tab.
·
Expand “Audio devices.”
·
Click “Audio for Natural MicroSystems telephony
hardware.”
·
Click “Remove.”.Click “OK” to close the
Multimedia Properties dialog box.
·
When prompted to restart, click “Don’t restart
now.”
·
In Control Panel, double-click “Add/remove programs.”
·
Click the Install/Uninstall tab.
·
Select “Natural MicroSystems Natural Access.”
·
Click “Add/Remove.”
·
When all NMS components have been uninstalled, delete the NMS directory from the
hard drive. By default it’s
in the root of C:\
·
Proceeded with running the Unity Uninstall program.
Choosing a Language Interface
This tool comes with built in support for several languages including US English, French, German and Japanese. By default it will display the language the Windows operating system is set for. If that language is not supported it will default to US English.
To manually force the tool to show a different language than the default, you can select the Help | About menu option and click the “Change Language” hyperlink on the About box. The languages installed will be presented in a drop down list and the display will update into that language immediately when you select it.
NOTE: If you select Japanese as a display language and you are not running on a version of Windows that has the Japanese code page installed, the display will show all “?” characters. This is expected.
Obtaining Updates
To check for updates to this tool, visit http://www.ciscounitytools.com
Revision History
4.0.34 – 1/4/2010
- CSCte01124 - IIS directories not removed on Unity uninstall.
4.0.33 – 8/3/2009
- CSCso99496 - Unity Uninstall fails to delete default objects & remove sub properties.
4.0.32 – 7/23/2009
- CSCta67329 - Unity Uninstall needs updated for switch from backup jobs to tasks in CU8.
- CSCta67408 - Unity Uninstall leaves some services installed.
- CSCsz05290 - Uninstall fails to remove the UnityDb.
- Remove Unity Connection Inter-op feeder virtual directories from IIS for 8.0.
4.0.31 – 4/3/2009
- Remove VMWS Virtual directories and VMWS application pools from IIS for 8.0(1).
4.0.30 – 2/15/2008
- Added CuDohMgr service to the shut down and removal list for the 7.0(1) release.
4.0.29 – 4/23/2007
- CSCsi56173 - Remove orphen CuVrt service registry keys.
- CSCsi09672 - delete EAdmin account without problem.
4.0.28 – 2/2/2007
- Added CuMDBStoreMonitor service to the shut down and removal list for the 5.0(1) release.
4.0.27 – 12/26/2006
- Included the removal of AvWM*.dll files from the System32 folder. CSCsh23957.
4.0.26 – 10/5/2006
- Added CsVpimConnector service to the shut down and removal process for the 5.0(1) release.
4.0.25 – 9/15/2006
- Added CuMessageAginSvr service to the shut down and removal list for the Unity 5.0(1) release.
- Added CuVrt service to the shut down and removal list for Unity 5.0(1).
4.0.23 – 4/14/2006
- Changed default for removing subscriber properties from directory objects to false and introduced “quiz” for users to go through before allowing it to be turned on.
- Updated about box info.
4.0.22 – 12/19/2005
- Removing uninstall of Crystal Reports – leaving it there does not affect a new install of Unity and makes fresh installs much easier.
4.0.21 – 10/12/2005
- Added support for uninstalling the Crystal Reports run time setup for the 4.2 product.
4.0.20 – 7/26/2005
- Fixed minor UI problem in output logs. CSCsb22284
4.0.19 - 4/18/2005
- Added a safety check to be sure removing the registry branch doesn’t get “stuck” when a process adds back keys into the branch during removal.
- Updated uninstall for upcoming 4.0(5) release
- Added check to make sure Unity is not installed in the root of a drive instead of a folder: CSCsa61630.
- Converted installation package over to Install Shield
4.0.17 – 11/22/2004
- Added logic to unload and remove the CsBMsgConnector service which was added as part of the 4.0(5) development effort.
4.0.16 – 7/1/2004
- Added logic to explicitly unregister all the phrase server DLLs for all languages that may be installed on the local server
Version 4.0.15 – 4/30/2004
- Added support for localized help files in Unity 4.0(4)
- Fixed problem with service removal for Windows 2003
- Added logic to shut down the HTTPFilter service for when SSL is installed.
- Stop SQL and SQL Server Agent services to release holds on a couple Unity DLLs
- Added logic to stop the TAPISrv service before removing the commserver directory to release holds on some AV DLLs.
- Added logic to remove Commserver directory after boot automatically using “runOnce” registry key
Version 4.0.9 – 3/19/2004
- Added logic to uninstall the Remote Serviceability Kit if it’s on the local system
- Changed the directory removal logic to note each sub directory under commserver being removed such that it’s easier to track down the cause of a failure to remove the main Commserver directory.
Version 4.0.5 – 3/8/2004
- Included distinguished name of distribution lists that are being removed from system in the output log.
Version 4.0.4 – 2/27/2004
- Added removal of unitySIPStack.dll from the \system32 directory.
Version 4.0.2 – 2/17/2004
- Added removal of objects from directory during uninstall without using the DOH.
- Included stopping and removing the TDSProxyService for the 4.0(4) release
Version 3.0.79 – 12/23/2003
- Updated to include stopping and removing the IP Fax service if it’s installed and running
Version 3.0.78 – 8/1/2003
- Updated version checking logic for 4.0(3) release
Version 3.0.77
- Added
- Added Bellhop service for shut down and removal
- Added CUPID service for shut down and removal
- Fixed automatic version check function to handle internet access problems better.
Version 3.0.76
- Arranged to run the Java uninstall script to remove the client group items such that it runs before the WWW and IIS services are shut down so it completes properly.
- Fixed problem where AvNotifierMgr service was not being removed in Unity 4.0(3) and later.
- Added ability to check for updated versions
Version 3.0.74
- Fixed problem where Active Voice registry branch was not always removed entirely: CSCea51515.
Version 3.0.73
- Added more details to the “remove these objects” dialog that comes up at the end of the uninstall. It includes the actual alias, display name and mail alias of the objects that need to be removed from the directory.
Version 3.0.72
- Updated with localization files for Unity 4.0(2) release
Version 3.0.71
- Fixed problem where CUICA shortcuts were not being removed from the desktop and startup program groups properly.
- Fixed problem where Tools Depot shortcut was not being removed from the desktop properly
- Now removes the Message Store Configuration Wizard from the add-remove programs applet.
- Fixed problem with TSP uninstall timing out.
- Now uses the uninstall.js script to remove all the PCA web residue including from the “Add remove programs” applet. CSCea13815.
Version 3.0.70
- Fixed bug where the Domino directory monitor service was not being removed from the SCM panel. CSCdz72269
Version 3.0.69
- Updated to skip the removal of desktop icons entirely if the local system is running on a Japanese OS. The paths to the desktop locations where these are stored are not being returned correctly and at present there doesn’t appear to be a work around. Those icons will need to be removed manually if desired, however they do not need to be deleted to allow for a clean installation of Unity on that box. This addresses CSCdz49265
Version 3.0.68
- Fixed some problems with the Japanese localization
Version 3.0.67
- Added removal of CUICA.tmp and CUCA.tmp folders off of C drive during install for 4.x
- Added removal of CUICA shortcut on desktop for 4.x
- Added some more diag output to the SubscriberKiller routine.
Version 3.0.66
- Fixed
problem where the backup devices were not being properly removed due to an
Version 3.0.65
- Added specific check to see if the local system is a primary server in a failover configuration. If it is a large warning dialog pops up tell you that there are steps that need to be completed before you can continue.
- Changed exe name to UnityUnistall3xandUp.exe to avoid confusion. Many folks were asking if it could uninstall 4.x as well and it can. There is a separate 2.x uninstall version and we needed to make sure we kept that distinction in place.
- Changed default program group to “Unity” instead of making it’s own group.
- Updated help file
Version 3.0.64
- Updated localization files
- Updated help
Version 3.0.63
- Added shut down and removal of SQLChangeWriter service.
- Added timer logic around the removal of the SkinnyTSP since it times out on occasion.
Version 3.0.61
- Added call to “uninstall.js” Java script for Unity 4.0
Version 3.0.60
- Added logic to shut down and remove TomCat service for Unity 4.x system uninstalls
Version 3.0.59
- Improved logic for handling files that cannot be deleted since they are currently in use. Some DLLs remain loaded even after shutting down all services and in those cases where the delete fails, the file is renamed to *.old and noted in the log file
Version 3.0.58
- Made adjustments for the 3.1(3) SR 1 release where the Unity shutdown takes a really long time if you leave the message store monitor service running before you tell the gateway to shut down.
Version 3.0.55
- Updated to include shutting down the new AvMsgStoreMonitorSvr service added for the 3.1(5) release.
Version 3.0.54
- Removed Tools Depot link from the desktop
- Made Net Stop commands during initial shutdown normal windows such that users can see which process is being stopped. Had a few sites that setup additional dependencies in their services that tripped this process up and by doing this they can clearly see a message indicating they need to act before the uninstall can proceed.
- Added information to help file about failover uninstall (CSCdx57250)
Version 3.0.53
- Added SkinnySetup.exe to the uninstall routine. This removes the TSP information if installed on the system.
Version 3.0.52
- Updated to support localization into French, Japanese and German versions.
Version 3.0.50
- Changed the KILL method of shutting down Unity over to a series of Net Stop commands so the occasional issue with AvCsMgr not responding to KILL wont be an issue
- Added logic to manually unregister all DLLs under the commserver\Components and commserver\OrderedComs directories
- Updated to remove shares created by the failover configuration
- Added prep logic for localized version in the updated about box.
Version 3.0.41
- Cleaned up help file into new format
- Renamed “UnityUninstall30” to “UnityUninstall3x” so folks wouldn’t stress about if it works with 3.1 or not.
- Fixed to remove AvTrapConnectionHolder and AvTrapConnectionHolderSvr.exe from System32 if present (CSCdw26926)
- Fixed to remove fail over and synchronization services if present (CSCdw53826)
- Fixed to remove AvAdMon service in all cases (CSCdw26870)
Version - 3.0.38
- Included removal of schedule backup jobs for UnityDB
- Added command line option to skip desktop icons and program group by request ("/SkipDesktop")
- Included removal of "reports" share on hard drive since it causes errors in the event log if you don't remove it.
- Fixed problem where virtual directories in IIS were not removed, but the files in them were.
- Added check to see if the IVC service is stopped before removing services. This was causing a problem in the field
- Added removal of Selsius audio driver references from the registry since these showed up as errors in the event log if they weren't cleaned up.
Version - 3.0.29
- Added instructions to help file for removing Dialogic files from Win2K vs NT 4.0
- Included UAMIS account in removal instructions
- Fixed problem with file registration on setup
Version - 3.0.24
- Updated to work with Unity 3.0
- Added “/SkipDesktop” command line option to skip over removing the desktop icons.
Version - 1.1.205
- Fixed problem where AllSubscribers and UnaddressMessages DLs were being removed when there were other Unity servers still installed in the site.
- Fixed problem where no errors were reported even though several were in the output log
· Fixed problem where Unity 2.3.4 and 2.3.6 installs were throwing errors when removing public distribution lists
Version - 1.1.198
- Fixed problem with "/SkipDOH" option attempting to open the output log twice, resulting in a run time error.
Version - 1.1.195
- Force Unity to shutdown prior to removing users. This solved a problem with the notifier getting cranky when removingusers out from under it.
- Allowed user to continue with Uninstall even if Uninstall can't bind to Exchange using LDAP port. The only thing I can't do in this condition is to remove the Unity folder itself from Exchange. Included instructions on how to remove that folder manually in the help file.
- Fixed cosmetic issue with the size of the "floating form" used by SubscriberKiller... text was getting chopped off.
- Included calls to the DoEvents routine such that the form can paint and respond to mouse events while uninstalling.
- Added more diagnostic information in and around the bind to Exchange via LDAP port.
Version - 1.1.160
- Change interact with user when we can't bind to Unity properly. If the system is Win2K a different error message pops up and no longer barks at the user to install ADSI (which is, of course, on every Win2K system).
- Fixed problem with bogus error being reported when tryign to shut down a service that is already off line.
- Included command line option for skipping the DOH removal. /SKIPDOH will jump all the way around the SubscriberKiller call and will not attempt to bind to Exchange and/or remove the Unity folder.
© 2007 Cisco Systems, Inc. -- Company Confidential