Unity Bellhop
View Guest
Information Remotely
General Hospitality Setup
Information
Reduce Mailbox Retention Time in Exchange
You’ll Need More Subscriber Licenses
Overview
The Cisco Unity Bellhop Administration tool is the application that helps with installing and configuring the Cisco Unity Bellhop service that talks to a remote Percipia PTCE server. The Bellhop service communicates with the PTCE server to manage voice mail accounts based on front desk activity for hotel guest check in, check out, room move and room swap actions. Every minute (adjustable) the Bellhop service checks for updated activity on the PTCE server and takes appropriate action in the Unity subscriber database.
NOTE: You’ll find the “Hospitality and Property Management System Integration” chapter in the Unity Administration Guide for Unity 4.0(3) and later. This help file has some more up to date details than is available in that document. We recommend you read both before deploying.
The admin utility must be run before doing anything with the hospitality package. It creates the hotel guest template and class of service as well as configures necessary items such as the logging location and archive times. It also allows you to get a quick view of the hotel guests currently checked in or out, reset guest passwords, “uncheckout” guests and also provides a real time view of the diagnostic output. See the following sections for more info.

When you first run the Bellhop Administration tool it will install and register a new service on the local Unity server called “Cisco Unity Bellhop”. It will be installed but will not be started automatically since to successfully start you must provide a server name or IP address of the remote PTCE server to connect to. Once you have setup the server information and configured the defaults the way you want, press “Save” and then you can go to the Windows Service Control Manager (SCM) and start the service. It’s also a good idea to force the service to start automatically while you’re there.
The only value you have to provide is the server name or IP address of the remote PTCE server, however you may also choose to change some of the default values found on the main form.
- Name or IP of Percipia Server. Enter the server name or IP address of the remote Percipia PTCE server to communicate with and press “connect” to test the connection. If we are able to connect and open the appropriate database tables on that server you will get a success message. If this fails you will need to contact Percipia for assistance in configuring that server appropriately.
- Path to logs. This is the path where all logging for the Cisco Unity Bellhop server and the Cisco Unity Bellhop Administration tools will be stored. The logs are automatically aged and deleted as they get older than the specified number of days (14 by default).
- Log retention time (days). How many days the logs for the Cisco Unity Bellhop service and the Cisco Unity Bellhop administration tool are left on the system. By default this is 14 days. It’s not recommended you go any fewer than that since access to these logs will be important for troubleshooting any problems on the system.
- Mailbox archive time (days). When a hotel guest checks out their mailbox is archived in the system for up to 28 days. When the archive days are exceeded, their mailbox and all messages are removed from the system entirely. By default this value is 3 days. WARNING: Some states require messages for guests be retained for at least 3 days – you can set the archive time to 0 days (i.e. mailboxes are deleted immediately) but we do NOT recommend this. If a user is accidentally checked out all their messages will be removed immediately and cannot be retrieved.
- Synchronization cycle time (minutes). This value indicates how often we will check the PTCE server for updates. Every minute is the default and it’s not recommended that you change this value unless instructed to do so by TAC.
- Subscriber template for new guests. When the administration tool is run it will create a new subscriber template and class of service for hotel guests to use. This “Hotel Guest Template” will be the default selected here but you can choose any template you like. It’s not recommended that you create guests with other templates, however, unless you have a specific reason to do so.
- Check for archived guests to remove. The Bellhop service only checks to see if there are archived guest mailboxes to remove during the times specified here. It’s recommended that you let this service run only during “off peak” time as removing mailboxes can require system resources that may slow Unity’s response time when under load. By default the time range is restricted from 1am to 4am. In most cases you can restrict this to as little as an hour a day without worrying about it not completing its tasks.
- Check for log cleanup activity. The Bellhop service only checks to see if there are log files to be removed during the times specified here. It’s recommended that you only do this during off peak times if possible. This activity finishes fairly quickly and limiting it to an hour or less should not present problems. By default this range is restricted from 2am to 4am.
- Always use the guest room number as their voice mail password. The Bellhop service can get a phone password for new guests from the Percipia system or, if that is not passed in, it will use the default phone password on the subscriber template selected for new hotel guests (see above). However if the administrator checks this option, the phone passwords for new hotel guests will always be forced to be the same as their room number.
- Skip Password when guest is calling from room phone. This option is enabled only for Unity 4.2(1) and later systems, earlier versions of Unity do not support this option. This allows users to call into their voicemail box without having to enter a password if they dial directly from their room phone. If, however, they are checking messages from another phone or from off site, they will be required to provide their password.
- Add voice mail message for new guests. If
you check this option you need to select a WAV file on the local server
hard drive that can be used as a voice mail message that is included in
all new guest mailboxes. This
can be used to send a “hotel greeting” to new guests letting
them know about hotel services or the like. This message will turn on their MWI
light on the phone in their room.
It’s recommended that you record this message using TRAP
(Telephone Record and Playback) from the SA and save the file somewhere to
the hard drive. NOTE:
If you use this functionality you must assign the CiscoUnityBellhop
service to the same account that’s assigned to the AvCsMgr
service. This is not the
default behavior of the Bellhop installation so you must do this manually
in the Service Control Manager.
- Log debug information. If this is checked additional information will be written out to the Cisco Unity Bellhop logs that can be helpful in running down problems with the system. It’s not recommended that you check this option unless you’ve been asked to do so by a TAC engineer.
NOTE: When you make a change to a value you must press the “save” button for those values to be written through and picked up by the Bellhop service. The Bellhop service reads these new settings each time it checks the PTCE server for updates (every minute by default).
Requirements/Special Notes
- The Bellhop service must be installed on the local Unity server.
- Unity version 4.0(3) and later only.
- Exchange 2000 or 2003 only. Exchange 5.5, Mixed 5.5/2000/3 and Domino are not supported.
View Service Activity
Select “Service Activity Window” from the View menu and the following window will appear:
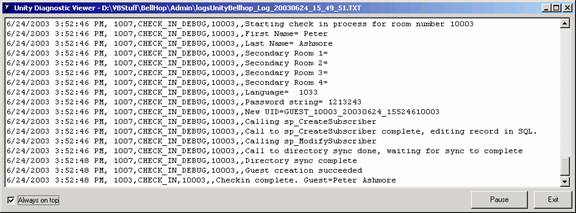
This window is used for watching “live” activity from the service and for diagnostic purposes. All check in, check out, room move, room swap, pause, stop, startup, log and archived subscriber deletes will be logged here. If the show diagnostic option is enabled then additional information about each of those activities will be shown.
The text in the window will update “on the fly” every few seconds with information about what’s happening with the Bellhop service. You can force it to always stay on top by selecting the “Always on top” checkbox. If you press “pause” it will freeze the output for you to look at and you can then press “Resume” and output will begin streaming to the window again.
View Guest Information
Select “Guest Information” from the View menu and the following window will appear:
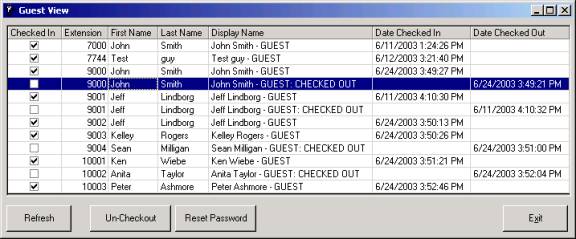
This form shows all the guests that are currently checked in or checked out (archived) in the system. You can sort by any column in the table by clicking on it. The date the guest was checked in (if they are currently active) or checked out (if they are archived) is visible on the right most two columns.
If a guest is checked out accidentally you can come to this form, select the checked out guest and then press the “un-checkout” button. You will be asked to confirm and then it will restore that room and make it active. If there’s an existing checked in guest for that room you will be asked to confirm a second time and then that room will be checked out first. It’s important to note that messages and hotel guest settings for both checked in and checked out rooms are never lost.
If a guest forgets their password you can select them in the table and pres “Reset Password”. You will be prompted to enter a new 3 to 10 digit phone password which will then be applied. You can change the password of both checked in and checked out guests since checked out guests can log into their mailbox over the phone via the checked out guest access conversation via the front desk.
NOTE: If you would like front desk staff to be able to see the Guest Information form here but don’t want them to see any of the rest of the Bellhop Administration interface, you can run the Bellhop Administration tool with the “/GuestView” command line option and this is the only form they will be able to see. This can be done off the Unity server as well, see the next section for more on that.
View Guest Information
Remotely
You can allow the front desk staff to view the guest information dialog noted above from off the Unity server if they are logged into a domain that has access to the Unity server’s domain and the staff member’s account is given read/write access to the UnityDB database on the Unity server. Only the guest view information is available from off box and only the “Reset Password” functionality is available. You cannot “Un-checkout” a guest from off the Unity server, this button will only be available if run from the local server.
You can install the Bellhop
NOTE: When you run the administrator from on the Unity server, you must include the /GuestView command line option if you wish front desk staff to see only the guest view dialog. When running from off the server this mode is forced automatically without the command line option.
The first time you run the Bellhop
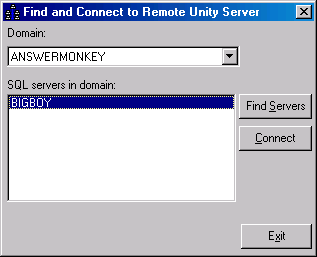
NOTE: If you are going across domains, the “find
servers” and “connect” buttons can take a minute or two to
complete. Be patient.
Once you select the server, press the “Connect” button and it will test to be sure the account can connect to the server and it is running Unity. Once you get a success dialog you can press the “Exit” button and you will see the Guest View dialog noted in the previous section. The “Un-Checkout” button will always be disabled when running off box, however. Only the passwords can be reset remotely.
On subsequent runs of the
View Reports
If you select “Reports” from the View menu you’ll see the Bellhop Reports form as shown here:
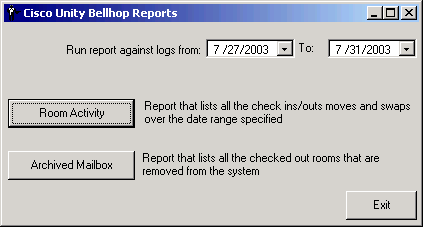
There are currently two simple reports available that both generate basic CSV file output.
- The Room Activity report will show all check in, check out, room move and room swap activity across the range of dates specified.
- The archived mailbox report will show all the checked out rooms that have been deleted from the system once they have aged past the number of days specified by the administrator (minimum of 3). See above for more details on how to change that setting.
View Admin Log File
The administration tool itself generates a log file when it’s opened and when actions such as “uncheckout” and “reset password” are used (see above for more on those functions). You can view the current log file or open the log directory and look at past log files using the “view current admin log file” and “view admin logging folder” options under the View menu.
View Raw PTCE Database
If you select the “View Raw PTCE Database” option from the view menu you’ll see a form that looks similar to this:
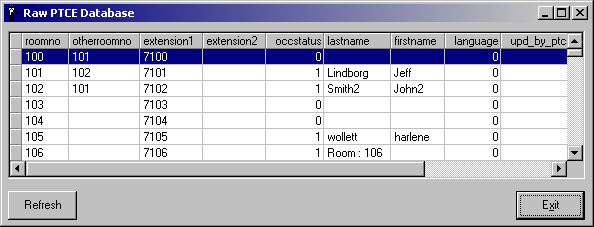
This form is used for diagnostic purposes for troubleshooting communication problems between the Unity and PTCE servers. You cannot edit any of the values on the remote PTCE server from this interface, it’s a read only view.
Choosing a Language Interface
This tool comes with built in support for several languages including US English, French, German and Japanese. By default it will display the language the Windows operating system is set for. If that language is not supported it will default to US English.
To manually force the tool to show a different language than the default, you can select the Help | About menu option and click the “Change Language” hyperlink on the About box. The languages installed will be presented in a drop down list and the display will update into that language immediately when you select it.
NOTE: If you select Japanese as a display language and you are not running on a version of Windows that has the Japanese code page installed, the display will show all “?” characters. This is expected.
General Hospitality Setup Information
There are a couple of items that need to be taken into consideration when you are using Unity in a hospitality environment with the Percipia property management system.
Reduce Mailbox Retention Time in Exchange
Hotel guests are typically added and removed at a much faster pace than typical voice mail subscriber. As such their mailboxes end up getting deleted every few days as opposed to every few years of a typical employee at a company. In a large hotel it’s possible to have hundreds of rooms changing over every few days which will result in many hundreds of archived mailboxes in the system which can chew up hard drive space and affect performance.
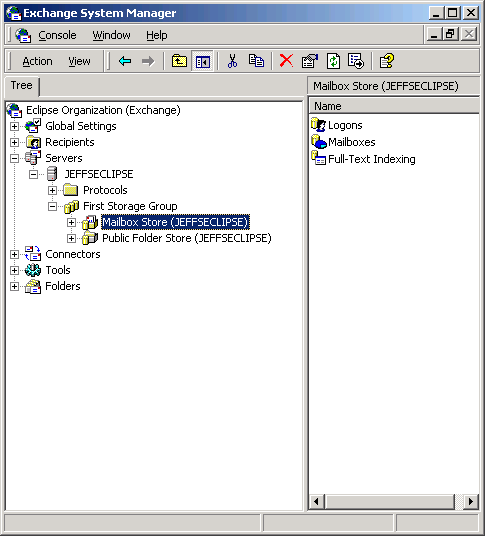
By default, Exchange 2000/3 keeps mailboxes around for deleted accounts for 30 days after you remove the account. In a hotel setting this is not ideal so we recommend you change this behavior. To do this, open the Exchange System Manager and expand the “Servers” branch down to the mailbox store(s) your Unity server is connected to:
On each mailbox store that hotel guests will be housed on, right click and select “Properties”. This will launch the Mailbox Store properties dialog show below:
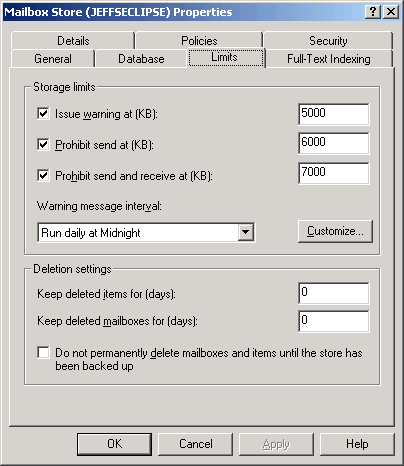
On the “Limits” tab you can set the “Keep delete items for (days)” and the “Keep deleted mailboxes for (days):” to “0”. A small value such as 1 or 2 is also fine if you would prefer but the default of 30 for the deleted mailbox retention time is far too long for a typical hotel environment.
You’ll Need More Subscriber Licenses
When hotel guests are checked out, their subscriber accounts are not removed for at least 3 days. This retention time can be increased to as much as 28 days if desired. However, these archived Unity subscribers are still using a full subscriber license. There is still access to their mailbox store from over the phone and they are using an Exchange mailbox resource so the licensing must still take them into account. As such you need to be sure you have enough subscriber licenses to cover the load.
For instance if you have a hotel with 100 rooms and all 100 guests check out and then another 100 new guest check in, you are using 200 subscriber licenses. If the next night all 100 guests leave and another 100 check in, you are now using 300 licenses because the original 100 guests that were checked out are not removed from the system for 3 days. Granted, this is a pretty unrealistic scenario but you get the idea.
You cannot reduce the subscriber mailbox retention time to less than 3 days for legal reasons. So please plan accordingly.
Obtaining Updates
To check for updates to this tool, visit http://www.ciscounitytools.com
Revision History
Version 1.0.36 – 8/29/2008
- Updated Bellhop Service to version 1.0.25
- Fixed a problem with the hotel guest delete routine in Unity versions 5.0 and later.
Version 1.0.35 – 6/29/2006
- Fixed problem showing proper log sweep and archived mailbox sweep start and stop times after they’ve been changed.
- Updated defaults for sweep times to be later in the morning out of the box.
- Changed logic for archived mailbox sweeps to be more resilient to external changes to the directory and database.
- Added more logging around the archived and delete mailbox logic.
Version 1.0.34 – 5/22/2006
- Added support for the “Skip password when guest is calling from room phone” option.
- Fixed a problem where bogus error messages were logged relating to the notification service details.
- Updated Bellhop Service to version 1.0.23
- Updated about box and copyright info.
Version 1.0.33 – 4/4/2005
- Fixed a problem in the SetUpdatedbyVMSFlag function where the message waiting count was not being updated properly. This caused a bogus error in the logs as well as missing the MWI flags on the PMS system.
Version 1.0.32 – 3/29/2005
- Fixed a problem where if you checked a guest out, then unchecked them out, then moved them, the MWI lamp extension was invalid. CSCsa78355
Version 1.0.31 – 3/24/2005
- Updated Bellhop service to version 1.0.20
- Updated PMS functions to accommodate stored procedure changes made in the Unity 4.0(5) release. CSCsa77469
- Fixed a potential “looping” issue with recordset updates for the VMS table – CSCeh01276.
Version 1.0.30 – 12/10/2004
- Removed hard restriction on 3 day archive time – allows archives to go to 0 if desired.
Version 1.0.29 – 11/22/2004
- Added Bellhop.OCX version 1.0.16
- Fixed a problem where if diagnostics were left on the log file was not cycling every 24 hours and cleaning up old log files left around based on the log retention time. CSCeg38392
- Fixed a problem where the “otherroomno” record number was being used instead of the target room number’s primary extension. CSCeg38990.
- Fixed a problem Bellhop was not waiting for the MSSQLSERVER service to be up before attempting recordset connection. CSCeg39006.
Version 1.0.28 – 11/16/2004
- Added Bellhop.OCX version 1.0.15
- Fixed some logic issues with room swaps.
- Relaxed the errors for moves to/from illegal rooms such that the synch process does not abort, but an error is logged and the process moves ahead.
Version 1.0.27 – 9/14/2004
- Changed the off box logic such that if you’re running off the Unity server it forces the “guest view” mode only, it’s not required to use the /guestview command line option for this any longer unless you’re on the Unity server itself.
Version 1.0.26 – 8/10/2004
- Added Bellhop version 1.0.14
- Fixed a problem where the service was not being allowed to create local log files in some scenarios.
- Fixed a problem with the adminsitration’s “guest view” page throwing unnecessary errors when room names were not formatted properly.
- Fixed a problem with the registry settings read on service startup that was causing an unnecessary error when the registry branch was not created.
Version 1.0.24 – 7/26/2004
- Fixed a problem in the guest view page that caused “invalid use of NULL” errors to pop up if the first/last name were blank for a guest.
Version 1.0.23 – 6/28/2004
- Added new feature for optionally adding a voice mail message to the mailbox of new hotel guests.
- Updated help file with details on reducing the Exchange deleted mailbox retention time.
- Upgraded default guest greeting with professional prompt – included both G711 and G729a versions in the install
- Added ability to do guest password resets from off the Unity server if desired
Version 1.0.18 – 6/4/2004
- Added new “GuestView” command line option to limit the administration application to only the guest view form.
- Added support for manual greeting over ride on guest creation – this defaults to “the guest you are trying to reach is unavailable” now.
- Added new option to always use the guest room number as the password.
Version 1.0.16 – 5/17/2004
- Fixed a font problem with the Japanese localization strings
Version 1.0.15 – 2/17/2004
- Added support for new core interfaces in Unity 4.0(4)
- Using new interfaces for core, fixed MWI synch problems on room moves and swaps. CSCec04900
Version 1.0.13 – 12/18/2003
- Fixed problem with allowing blank passwords for newly created guests.
- Fixed problem with room move in the service OCX with the check for duplicate extensions in the dialing domain.
Version 1.0.12 – 12/15/2003
- Added myODBC driver installation package to setup. Checks for installation of myODBC when admin tool is launched and will start the installation automatically now.
- Fixed a problem with the ServiceInterface.TLB file not being registered automatically during installation – this caused the service to not start properly.
- Updated service OCX to remove a hard coded reference to an testing server IP address in one of the routines causing an error to be reported on every database sweep.
Version 1.0.11 – 8/14/2003
- Initial release
© 2003 Cisco Systems, Inc. -- Company Confidential