COBRAS Hot Mode Connection to Connection
COBRAS Hot
Mode Connection to Connection
COBRAS Hot Mode for Connection to Connection Overview
COBRAS Hot Mode
High Level Process
Connecting to Source Connection Server for Migration
Setting up
Connection 8 or Later to Accept Remote Attachments
Troubleshooting
Remote Connection Failures
Setting up
Connection 8 or Later to Allow Imports of Messages
How Long Will a Migration Take on My System and How
Much Space Will it Take?
Trouble with
initial COBRAS login to Connection
Disable CSA and
all Virus Scanning Applications
WAV Upload or
Download with Connection 8.x and later
TAC Directed
Command Line Parameters for Troubleshooting
COBRAS Hot Mode for Connection to Connection Overview
Hot Mode is a special mode that the Consolidated Object Backup and Restore Application Suite (COBRAS) runs in when moving users between two Connection 8.5 and later servers that are configured in a digital network with one another. This help file is specific to that mode – for other COBRAS scenarios you should refer to the standard “Briefcase mode” COBRAS Help file instead.
A detailed list of what’s included and not included in
COBRAS migration can be found in the Data Backed Up and Restored section below.
The primary
difference between Hot Mode for Connection to Connection migrations and a
briefcase mode export/import of data is that users with mailboxes are MOVED
from the source Connection server to the Target Connection server – they are
not copied like other objects are. Their
mailstore and all their messages are moved and the user is now homed on the
target Connection server and removed from the source Connection server.
NOTE: Unrestricted versions of Connection (those that lack high encryption capabilities) cannot allow hot mode migrations. Message exports leverage super user IMAP access which works only over TLS/SSL which is not supported on unrestricted versions of Connection. Messages can only be extracted remotely from restricted (standard) versions of Unity Connection and so hot mode moves are only supported on restricted versions.
NOTE: Connection 8.5.1 ES16 or later is required
on all servers in a network for hot mode moves to work properly. COBRAS will check the Connection server
versions you attach directly to but cannot check the rest of the servers in the
network – make sure all servers in a networked configuration are at that
version or later or replication of moved user data may fail.
COBRAS Hot Mode High Level Process
More detailed information about the backup and restore options and steps are provided later in the help file but this is a very high level view of the COBRAS process.
Install COBRAS Import for Connection any Windows server that has access to both Connection servers in question.
Only Unity Connection 8.5 servers and later in a digital network with one another are supported for this.
This has been tested on Windows 2003, 2008 (32 or 64 bit), Windows XP and Windows 7 (32 or 64 bit).
Log into the source Connection server
After running the COBRAS Import you must first attach to the source Connection server. This is the server that you will copy handlers and schedules and move users FROM. When you first attach to the source Connection server COBRAS will check to see if that server is in a digital network with any other 8.5 or later servers. If so you will have the option of either running in standard briefcase mode by selecting an Access database backup file created by COBRAS Export or attaching to the target Connection server you wish to copy/move objects to.
Once you’ve connected to the target Connection server and hit “next” on the main page, COBRAS does several connectivity tests to both the source and target Connection servers to make sure it has access to do everything it needs to up front. If not you will be told what the problem is and will need to address it before moving on.
Choose which subscribers to move and which handlers and schedules to copy
You may choose to move any number of users you wish (including none) and to copy as many call handlers, interview handlers, directory handlers and schedules as you like. You must pick at least one object to copy or move however.
NOTE: Moving users is going to be a fairly slow process as COBRAS does each user and all their messages one at a time instead of in batch as is done in briefcase mode. This tool is NOT designed for moving entire servers at once. If you are moving more than 50 users at a time you should probably consider doing forklift migrations with briefcase mode. IT’s highly recommended you keep the number of users you move at any one time to 50 or less as a rule, although nothing stops you from doing more. Just be aware this will take some time and that time cannot be easily estimated since it varies by message store content and other factors.
Do Backup of Selected Objects
COBRAS Import does a special backup that includes just the data about those objects you selected to copy or move and objects that they reference. This does mean COBRAS has to do some dependency checking for each object you selected to move or copy which, again, takes a little time. You cannot control options for this backup, they are hard wired and not optional.
Restore handlers, schedules and move users
Most of the Hot Mode process is involved in the remaining parts of the import wizard. The number of pages in the wizard varies depending on what you decided to move or copy and what kinds of conflicts there may be in the target system. At most the Connection import wizard can have up to 30 pages, however in most scenarios you will see far fewer than that in practice.
Wizard Part 1 (pages
2 through 9)
Select
which users to move, handlers and schedules to copy.
You can choose all or only some of the different objects on the source Connection server. It’s legal to, say, move only a single subscriber object and nothing else. Or you can copy an entire set of call handlers that comprise an audiotext application to replicate them to the target Connection server.
NOTE: When selecting users to move from the source Connection server, COBRAS checks to see if they are represented on the target Connection server as a digital network global user. If not this means that user has not yet replicated over to the target server and COBRAS will not allow you to move that user. If this is the case you will either need to wait for replication to complete or diagnose what is wrong with the digital networking configuration before proceeding.
Wizard Part 2
A special
backup is done to get information about the object(s) you selected to copy or
move from the source Connection server.
Wizard Part 3 (pages
10 through 18)
Resolve
conflicts encountered moving or copying any of the objects you selected during
part 1.
If there are any conflicts with display names, extensions or aliases for any of the objects you selected to move or copy with existing objects in the target Connection voice mail database, you must resolve them here. You have the option of changing the names or extensions on the spot to ensure they are created as new objects, or you can choose to overwrite an existing object in the voice mail database instead. Moving users, however, requires you write over their existing contact information created by the digital networking operation – this is not adjustable. You can only choose which dial partition the user will end up in on the target Connection server and nothing else.
Wizard Part 4 (pages
19 through 29)
Resolve
link references for any of the objects you choose to move or copy in part 1.
For every object you selected to move or copy in part 1 you need to tell COBRAS what to do with any links it can’t resolve. Each object type has numerous types of “links”. For instance, a call handler can have a message recipient that’s a public distribution list. If that list is not known to COBRAS, you need to tell COBRAS which distribution list to use from the target Connection voice mail’s database instead. There are also links from user input keys, after-message destinations, exit destinations from subscriber’s inbox conversation etc… All links need to be resolved by choosing a replacement object for that link. This can be a little more work for the administrator running COBRAS but produces a much more accurate and faithful representation of the source Connection server’s behavior when you’re done. COBRAS has logic built in to take its “best guess” for which object you may want to use as a replacement to make this as easy as possible for you, but you do want to review its choices carefully before executing the import.
NOTE: When moving users you must also select replacement users from the source Connection server to act as substitutes for references to the users you are moving to the target Connection server. These substitutions are only used for “routing” references – for instance if a one key rule is set to point to one of the users you are moving from the source to the target Connection server then the replacement user you selected will be pointed at instead. For message recipients and distribution list memberships, the user you are moving will still get messages sent to those objects as you’d expect.
Version Support
For Hot Mode moves COBRAS requires Connection 8.5 or later running connected to a Unity Connection via networking also running 8.5 or later. For older versions and/or systems that are not networked together you need to use COBRAS in Briefcase Mode – review the standard help file for details there.
NOTE: Unrestricted versions of Connection (those that lack high encryption capabilities) cannot allow hot mode migrations. Message exports leverage super user IMAP access which works only over TLS/SSL which is not supported on unrestricted versions of Connection. Messages can only be extracted remotely from restricted (standard) versions of Unity Connection and so hot mode moves are only supported on restricted versions.
NOTE: Connection 8.5.1 ES16 or later is required
on all servers in a network for hot mode moves to work properly. COBRAS will check the Connection server
versions you attach directly to but cannot check the rest of the servers in the
network – make sure all servers in a networked configuration are at that
version or later or replication of moved user data may fail.
Data Copied or Moved
At the top level, COBRAS gets all data about system call handlers, full users with mailboxes, schedules, directory handlers and interview handlers and allows them to be copied (handlers, schedules) or moved (users) complete with relationships between them if they exist to the remote Connection server you attach to.
COBRAS gets as much data as it can and restores as much data as possible. If COBRAS has data in the backup it will use it – the template is only used to fill in what it doesn’t have.
Data not backed up
Connection data not backed up in Hot Mode
- Public Distribution Lists. In Hot Mode public distribution lists are not touched. COBRAS in briefcase mode can backup public distribution list and membership data which you can do separately if you need to move which Connection server is managing a public distribution list.
- Routing Rules. Hot Mode does not include Unity routing rules.
- Disabled Greeting rules. To preserve space in the backup, greeting rules that are disabled (not active) are not backed up. During restore missing greetings are forced to disabled to preserve the same functionality as the system that was backed up.
- Disabled MWIs. If MWIs are not configured to operate on Unity then they are not included in the backup and the subscriber template settings for MWI are used when that subscriber is restored.
- Password history, hack
count or lock status.
- Secure message settings. These are different across versions and sometimes apply only to private vs. all messages and it’s impossible to move across versions cleanly. All secure message settings are pulled from the template during subscriber creation or left alone on an over write.
- Alternative authentication settings (enhanced security). In particular, use of enhanced security options such as RSA are not included. If a user is configured for such an option, it is not included in their backup data and a new creation on the target restore server will simply use whatever is in the template and an over write of an existing user will leave whatever settings are on that account alone.
- IMAP mailbox connection information. Any information about a user’s connection to remote (foreign) mailstores via IMAP is not included in the backup. The IMAP mailstore connections are linked up during the import wizard however you must first create the external service for the IMAP connections on the target Connection server.
- SMS delivery device information. This is done via an external service configuration which COBRAS cannot preserve. The SMS server links for users’ notification devices are resolved in the wizard, however you must first create the SMS services on the target Connection server.
- Fax Server connection information. This is done via an external service configuration with COBRAS cannot preserve. User’s fax assignments are linked up in the wizard but you must first create the fax services on the target Connection server.
- Calendaring Service information. This is done via an external service configuration with COBRAS cannot preserve. User’s calendar service assignments are linked up in the wizard but you must first create the calendar service (via Exchange or Meeting Place) on the target Connection server.
- Visual Message Locator (aka “Phone Apps”) setting. The message locator conversation feature is included in the backup and restore but the visual message locator requires setup on the phone side and will need to be configured after user import, they are left alone on overwrites.
- Cisco PCA settings. No details about the PCA options for a subscriber such as the refresh options, number of items shown, preferred home page etc… This includes any connection to the subscriber’s personal address book in Outlook.
Alternate Extensions
Alternate extensions are always backed up, however, during a restore they are considered secondary. In particular when determining which objects are in conflict based on what you decide to restore, the alternate extensions of subscribers you’ve selected to include are not evaluated. During the restore an attempt is always made to add the alternate extensions in when the subscriber is created, but if there is a conflict they are skipped and a warning is written to the log output. However, this does _not_ fail the creation or modification routine for the subscriber – COBRAS import will continue to move ahead. Be sure to check the log output for “(warning)” strings to check for this type of issue when restoring users to an existing system.
Language Support
COBRAS does an up-front check to see if all languages in the source system are present on the target system however it will still allow the migration to proceed regardless after issuing a warning. It’s STRONGLY recommended that you have the same languages installed on the target as the source. It will restore the language settings for subscribers, call handlers and routing rules as they were backed up. If the target system does not have those languages installed, Connection will fall back to the default phone conversation language. This will not cause errors but may result in unexpected behavior. It’s up to the administrator to make sure the target system has the same languages as the source server installed.
Messages
When COBRAS is moving a user with a mailbox from a source to the target server it will always move messages as part of that – this is not optional. Only if all messages from the source are moved to the target will COBRAS consider the move successful, otherwise it’s considered a failed move and that user is “rolled back” and the migration process stops.
NOTE, however, that COBRAS does NOT move deleted messages. Even if you have Connection configured to save deleted messages in the deleted items folder, these messages are not copied to the new server when you move them. If this is a problem for you have users restore those messages as new prior to moving them.
Note About Mailbox limits. In hot mode COBRAS will update the user’s mailstore limit to be either those on the default target server or will use those from the source server that you’re moving them from IF the source server’s limits are larger. This is done to ensure that messages moved from the source to the target will fit on the new server. The new limits applied to these users will be noted in the post migration report as an information message so you are aware this has happened and you can take action if you wish to “trim down” their mailstore limits after migration.
Connecting to Source Connection Server for Migration
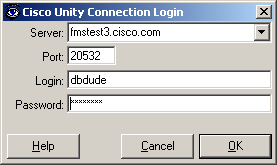
When you install and run COBRAS Import for Connection, the first thing you will be asked to do when you launch it is to connect to a remote Connection server. This will be the source Connection server where you will be moving/copying FROM in the migration. This requires a remote administration account be configured and the remote database proxy service activated and started on the source Connection server. For Connection to Connection migrations of users you must also have IMAP and SMTP access configured since these are required for moving messages and that is not optional when moving users.
When you first start COBRAS Import for Connection, you will see a login dialog box that will be empty except for port 20532 filled in as the port (this is not configurable). You must provide the server name or IP address for the “Server” field and provide the login and password for the database connection account. Use the alias and web administration password of the database user created for the login and password fields (see below for details).
COBRAS will remember your entries including the password (which is stored in a secure hash). Each time you run COBRAS it will load the settings of the last connection you made (or attempted to make). Every server you’ve successfully connected to in the past will be listed in the drop down list in the order in which you connected to it last – most recent to least recent.
NOTE: The login and password information is stored along with the local Windows login name. Only those servers that have been attached to successfully using the current Windows login will be listed. If you are logging into the same Windows server with different users you will only see servers connected to with that particular Windows login.
NOTE: Some login errors will fail quickly and give you a chance to try a different pair. Other types of failures however, results in a 60 second timeout while COBRAS waits for the Informix ODBC driver to return. Unfortunately this cannot be shortened. Type carefully.
NOTE: Attaching to a remote Connection server over a WAN or VPN link to do a large import is not recommended. It is best to use a LAN connection if at all possible. Issues with WAV file uploads and large remote database operations can cause timeout errors when going over a VPN or slow WAN link.
Setting up Connection 8 or Later to Accept Remote Attachments
FIRST! Make sure you’ve installed the Informix ODBC drivers on the Unity server you’re running on. You can get them on the Informix ODBC Driver Download page.
Connection 8.0(1) and later comes “out of the box” configured to not allow remote connections to the database for security reasons. To be able to run a migration import into Connection requires you create a user with the rights to attach to the database remotely, activate the remote data service. You will need to do this for both the source and target Connection servers to be able to do migrations between them. To do this, follow the following steps.
NOTE: Remote data access configuration is also necessary for running tools such as the Database Explorer (CUDLI), User Data Dump (CUDD) and other diagnostic or reporting tools
Task
1: Configure a User without a mailbox with the Remote
Administrator and System Administrator roles
1. Go to the Cisco Unity Connection Administration web interface for your installation.
2. Since Connection to Connection hot mode always moves messages, you must use a user without a mailbox for authentication since this is required for full message server access from off box.
3. Be sure the web administration password for this user is not configured to require a change at first login on the “Password Policy” page for that user.
4. If necessary, change the web administration password on the “Change Password” page. Note that only the web application password comes into play for remote data access.
5. Finally, on the “Role” page for the user, add the “Remote Administrator” and the “System Administrator” roles to the “Assigned Roles” list and save. You can assign any or all other roles as well but for the purposes of remote access to the database and making updates to users those two are necessary.
Task
2: Set the Database Proxy Service Shutdown Time
For Unity Connection 10.0 and later
this step is not necessary – there is no longer a shutdown timer for the ODBC
proxy.
Out of the box the database proxy service is not running and if you try to start the service it will shut down right away. First you need to set the “Database Proxy: Service Shutdown Timer” value found in the System Settings -> Advanced -> Connection Administration section of the Cisco Unity Connection Administration page. By default this is 0. You can set it to as high as 999 days if you like. After the number of days configured here the remote database proxy service will shut down. This is useful if you want to do some migration work, for instance, and don’t want to forget to have the service disabled for security reasons.
NOTE: If you restart the server, the remote database proxy service will remain shut off. After a system restart you have to go in and manually turn on the service again (see step 3)
Task
3: Activate the Remote Database Proxy Service
1. Out of the box the service that listens to remote database requests is not active, you must turn it on. To do this, go to the “Cisco Unity Connection Serviceability” web admin page.
2. On the Tools menu, select the “Service Management” page.
3. The “Connection Database Proxy” item under the “Optional Services” section will be marked as “Deactivated” and stopped. Press the “Activate” button and it will be activated and started automatically.
Once you’ve started the proxy service you can connect with any tool that needs off box database access using the user name and web administration password.
NOTE: The service will automatically shut down after the number of days configured in step 2 above or if you restart the server.
Troubleshooting Remote Connection Failures
- The most common issue with remote connection failures is the database proxy service has been stopped for one reason or another. This service will not start automatically after a Connection server restart and is shut down automatically after a configured number of days. There have also been several defects along the way that cause it to simply stop on its own. If you cannot log into the remote system and you are certain you’ve configured the remote user correctly and are using the right login/PW then double check the status of the remote database proxy service. It is often a good idea to stop and start it again – make sure it comes up in a running state (i.e. not “pending”). There is no harm in stopping and starting this service, it’s only role is providing off box tools with direct database access.
- Make sure nothing is blocking access to the port being used to create the ODBC connection. In Connection 7.x and later this should always be port 20532.
- Make sure the Informix ODBC driver is installed. Note that if you’re on a 64 bit operating system this still must be the 32 bit ODBC driver since COBRAS (as all Connection tools at this time) are 32 bit applications. The ODBC driver download page has two versions of the 32 bit driver that have been tested – if you’ve downloaded your own copy from IBM this may be an issue.
Setting up Connection 8 or Later to Allow Imports of Messages
You will need to set this up on the target Connection server for user migrations to work between two Connection servers. It’s not necessary to set this up on the source Connection server, however it will do no harm if you do.
1. Go to the “SMTP Configuration” section of the “System Settings” in the Cisco Unity Connection Administration web page.
2. On the “Server” page check the “Allow Connections from Untrusted IP Addresses”
3. Uncheck the “Require Authentication from Untrusted IP Addresses”
4. Select “Disabled” for the “Transport Layer Security from Untrusted IP Addresses” and save your changes.
The Unity Connection SMTP Server configuration page
should look like this at the bottom:

NOTE: Once you are done migrating users you should go uncheck the “allow Connections From Untrusted IP Addresses” option on this page.
COBRAS Hot Mode Migration
The import process is where all the detail work for administrators comes into play. Depending on what you want to do, you will need to fill out information on many of the 30 panels in the COBRAS Import wizard. This may seem a bit daunting but for a typical configuration much of what you need to configure is either simple or already preconfigured for you. However, please be very cautious and check all the values before moving on.
The short version is that COBRAS needs to preserve all the many relationships between objects being restored and, in cases where that cannot be achieved you must tell COBRAS what to do with relationships that are no longer valid.
COBRAS is different than previous tools in that it lists the objects that are referenced which it cannot find and asks that you provide a corresponding object to replace that reference with. For instance if you have a call handler that is owned by John Smith and you are copying just that call handler, COBRAS will ask you to select a subscriber on your target Connection voice mail server to “stand in” for John Smith. ALL references to John Smith (i.e. one key rules, owner, message recipient etc…) will be replaced by the subscriber you select. You MUST select a subscriber to replace John Smith, you cannot run through and pick a different owner, different recipient, change one key rules to not point at John Smith etc… This is a different model than used in the past with tools like Global Subscriber Manager and the like, but for functions like merging many objects into an existing installation this works much better and cleaner and provides a better all around solution even though on the surface it may look more complex.
This new model means you can select some or all subscribers to move and/or call handlers and/or schedules and/or interview handlers for copy. It’s completely legal to copy a single system schedule and nothing else. COBRAS is smart enough to only require you to resolve conflicts or dependencies based on what you select to restore.
Migration Process
I realize 30 pages seems alarmingly long, but don’t panic. It’s not nearly as bad as it sounds.
NOTE: You will only see pages you have something to review or configure on. So if there are no missing call handler references, for instance, you won’t see that page in the wizard. As such in a typical restore you’ll see fewer than all the pages of the wizard – this is by design.
The easiest way to get a feel for what’s involved is to just go through the wizard one page at a time.
Main Form
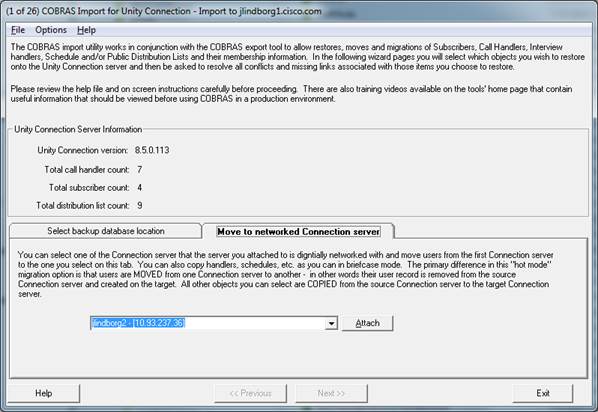
The first panel is what you’d expect – if the source Connection server you first attached to is part of a digital network with other Connection servers then you’ll see the “Move to networked Connection server” tab as shown in the shot above. This allows you to pick one of the Connection servers seen as part of the digital network to act as your target Connection server for moving users to and/or copying handlers and schedules to.
Once you select “Attach” you will see a second login dialog for attaching to the target Connection server – provide the login name and password of a user with remote administration rights just like you did for the source Connection server login. If you login successfully then all other connection options are disabled and only the “Next” button is allowed. If you change your mind and wish to connect to a different target server or use briefcase mode instead you will need to exit out of the application to do so.
NOTE: Once you hit the “Next” button in hot mode, COBRAS will check connectivity between the source and target Connection servers and ensure COBRAS can upload/download WAV files and messages to/from these servers. If any of those checks fail you will not be allowed to continue and you’ll get a message indicating what failed so you can address it before attempting another migration.
There are two items in the Options menu:
- Log debug output. This will result in the log file generated by COBRAS import and export during the migration to contain additional diagnostic information including the full text of every database call issued to Connection. It will greatly increase the log file size and slow the import down a little. This is off by default and you should leave it off unless asked to enable it by TAC.
- Use Saved object mappings. This does not come into play for hot mode – this is relevant to briefcase mode imports when you import from the same backup more than one time. Each hot mode migration is a separate operation so this has no effect one way or the other.
Select Subscribers to Move
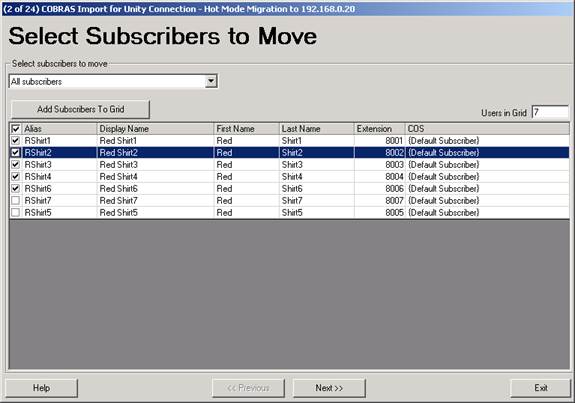
This page allows you to select subscribers you wish to move from the source Connection server to the target Connection server. All messages (including deleted) in the user’s mailbox will be moved to the target server – this is not optional. The user will be deleted on the source server and digital networking placeholder objects will be updated on the source server. If any part of the user creation, update or message move process fails, the migration is aborted and COBRAS will exit – you will need to review the logs to address the issue.
There are seven options for selecting subscribers from the backup file:
- All Subscribers
- Subscriber with primary extensions in a range
- Subscribers associated with a switch (phone system)
- Subscribers included in a CSV file. The CSV file needs to contain the column names “ALIAS” and/or “EXTENSION” in the first line of the file. Values must be comma separated and you can have as many other columns named anything else you wish, the data will simply be ignored. If both ALIAS and EXTENSION are present the Extension is searched for first followed by the Alias.
- Subscribers assigned to a Class of Service
- Subscribers with a sub string in their display name. Multiple sub strings separated by a “;” are allowed here.
- Subscribers with a sub string in their Class of Service display name. Multiple sub strings separated by a “;” are allowed here.
The last two items may be a bit different – however, if you’re moving from a system that has several “sub groups” (or “tenants”) defined and have used unique strings to identify these users and objects, this can be a quick short hand way to pick these users out of your backup.
Select Call Handlers to Copy
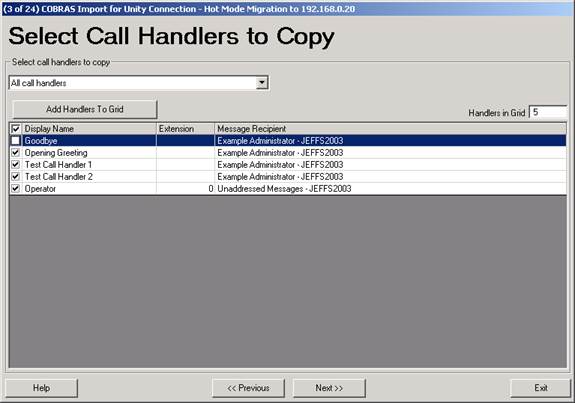
This page is the call handler selection page. Again, you are not required to select any call handlers here if you don’t wish to copy any handler data. All selected call handlers will either be created as new or over write existing call handlers on the target Connection voice mail server depending on your answers later in the Import Wizard.
There are 7 options for choosing call handlers from the backup database:
- All Call Handlers
- Call handlers with an extension in a specified range
- Call handlers assigned to a specific switch (phone system) integration
- Call handlers with a selected subscriber as the message recipient
- Call handlers with a selected public distribution list as the message recipient
- Call handlers found in a CSV file. The file must contain comma separated data and the field name of “ALIAS” and/or “EXTENSION” in the first line. All other columns found will be ignored but one or both of those columns must be found for the search to proceed.
- Call handlers with a sub string in the display name. Multiple sub strings separated by a “;” are allowed here.
Select Interview Handlers to Copy
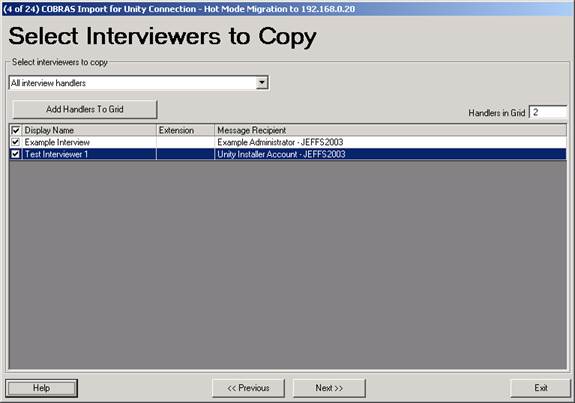
This page allows you to select which interview handlers to copy from the source Connection server to the target Connection server, if any. It’s not necessary to choose any interview handlers if you don’t wish to.
There are 6 options for selecting interview handlers for restore from the backup file:
- All interview handlers
- Interview handlers with an extension in a range.
- Interview handlers found in a CSV file. The file must contain comma separated data and the field name of “ALIAS” and/or “EXTENSION” in the first line. All other columns found will be ignored but one or both of those columns must be found for the search to proceed.
- Interview handlers with a sub string in their display name. Multiple sub strings separated by a “;” are allowed here.
- Interview handlers with a specific subscriber listed as the message recipient
- Interview handlers with a specific public distribution list as the message recipient.
Select Directory Handlers to Copy
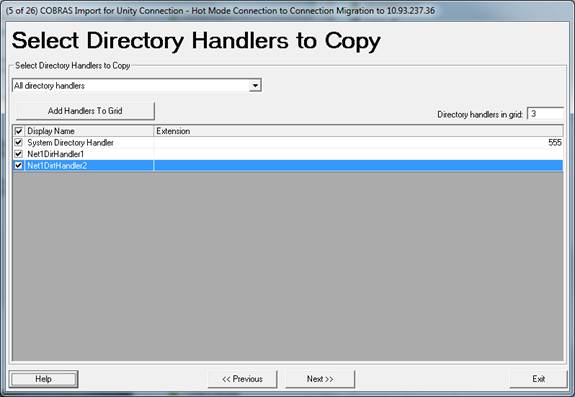
This page allows you to select which directory handlers to copy from the source Connection server to the target Connection server, if any. It’s not necessary to choose any interview handlers if you don’t wish to.
There are 3 options for selecting interview handlers for restore from the backup file:
- All directory handlers
- Directory handlers with an extension in a range.
- Directory handlers with a sub string in their display name. Multiple sub strings separated by a “;” are allowed here.
Select Schedules to Copy
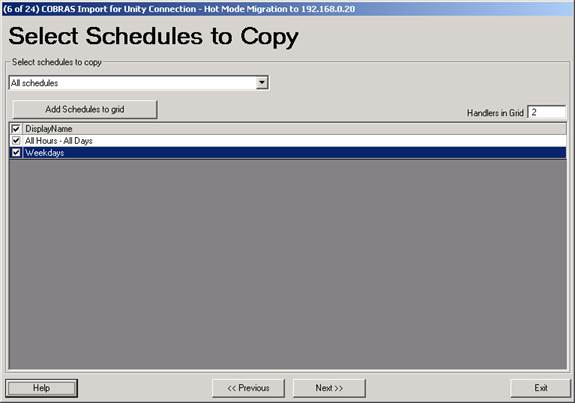
This page allows you to select which system schedules you’d
like to copy from the source Connection server to the target Connection
server. There are two options for selecting schedules to restore:
- All Schedules
- Schedules with a sub string in their display name. Multiple sub strings separated by a “;” are allowed here.
Building Migration Database
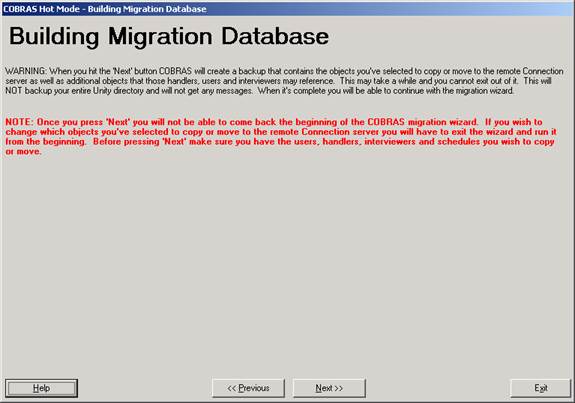
At this point the COBRAS migration tool needs to perform a selected backup of data from the source Connection server installation before it can continue. Once you hit “Next” COBRAS will do a backup – you have no control over the options selected here, it runs showing you progress information but will not let you adjust options or stop it.
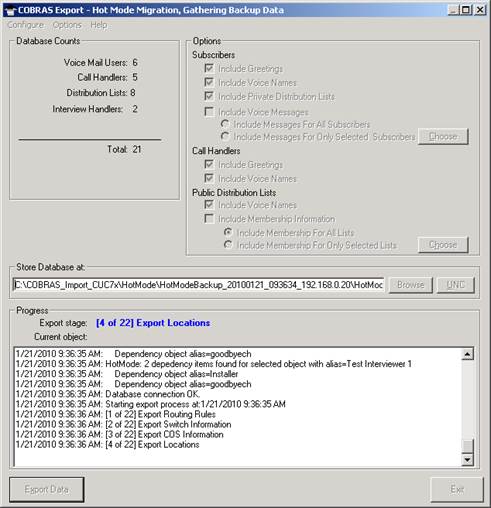
Once the backup is complete you can continue with the COBRAS Import wizard. You cannot backup and change any options at this point. If you wish to select different objects to include you will need to exit the wizard and start over from the beginning.
Select Templates to Use during Migration
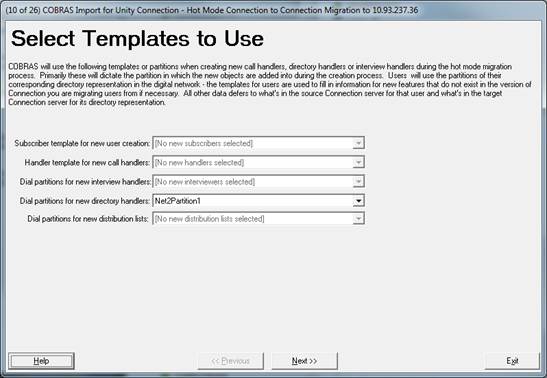
This page allows you to select templates or partitions for new object creation. Only items for which you’ve selected at least one object to move or copy will be enabled.
The template or partition is used when creating new objects only, not for updating existing objects. You select this here such that extension conflicts done later in the wizard are specific to the partitions that you will be adding new objects to.
Resolve Call Handler Conflicts
The next several pages allow you to decide if you’re going to have objects you selected to copy or move created as new, unique objects in the target voice mail server or have them over write (replace) objects that are already there.
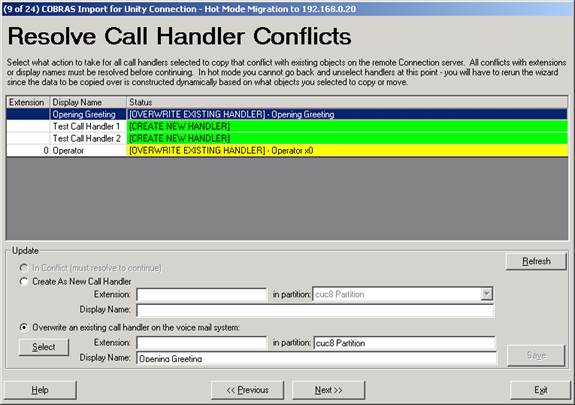
This page shows all the call handlers you selected to restore earlier in the wizard. Each call handler will be in one of three states in the grid:
- CREATE NEW HANDLER. These rows are green and indicate that the display name and extension of the call handler on this row are all unique and that COBRAS will create a new call handler on the target voice mail server. If you want this handler to replace an existing one on the voice mail server you can select the ”Overwrite an existing call handler on the voice mail system” radio button at the bottom and then press the ”Select” button to get a search dialog to find a call handler you wish to overwrite. ALL DATA for the selected call handler will be replaced with the backed up call handler data except for the name and extension. Choose carefully. Once you do this and press the ”Save” button, the row will change to OVERWRITE EXISTING HANDLER and turn yellow.
You can select a different partition to create the handler in – the partition shown will default to that found in the call handler template you selected earlier.
- OVERWRITE EXISTING HANDLER. These rows are yellow and indicate that the alias/display name and extension all matched an existing call handler on the system. COBRAS will default to assuming you want to over write the corresponding call handler on the target voice mail system. You can change this selecting the ”Create as new call handler” radio button and then editing the extension and/or display name values in the ”Update” box at the bottom and pressing the ”Save” button. If the display name and extension are unique the row will change to CREATE NEW HANDLER and turn green. If they are not unique you will get a dialog box telling you which object it’s conflicting with.
NOTE: When overwriting an existing call handler, the display name, alias and extension will not be changed on the existing call handler. All other data from the backup will be applied to the handler.
- CONFLICT. This means either the display name or the extension, but not both, matches an existing call handler so COBRAS can’t assume which one you want to overwrite if any. The name of the call handler or other object it’s in conflict with is noted in the row. You must choose a radio button at the bottom of the page to determine if you want to create this as a new call handler by changing the display name or extension or choosing a call handler on the voice mail server to overwrite and then pressing ”save”. You cannot move to the next dialog until there are no handlers marked as CONFLICT.
Resolve Subscriber Conflicts
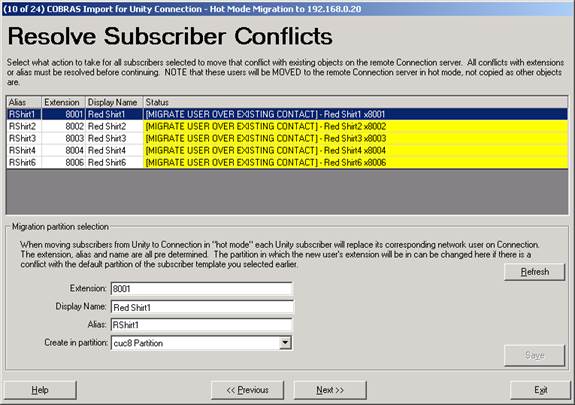
This page shows all the subscribers you selected to move earlier in the wizard. Each subscriber will be in one of two states in the grid:
- OVERWRITE EXISTING CONTACT. These rows are yellow and indicate that the alias, display name and extension all matched an existing Unity contact created by the directory sync between the system. For Hot Mode migrations this is the only viable option, you cannot create users as new or choose to overwrite different contacts for instance.
- CONFLICT. This means the extension or alias (or both) for the user being copied over conflicts an existing subscriber so COBRAS can’t upgrade that user to a full subscriber without creating a conflict. Most often this is related to an extension conflict. One way to solve this is to select a different partition in the “Create in partition” drop down.
NOTE: In hot mode migrations the only option you have here is to overwriting an existing contact – you cannot create users as new.
Resolve Interview Handler Conflicts
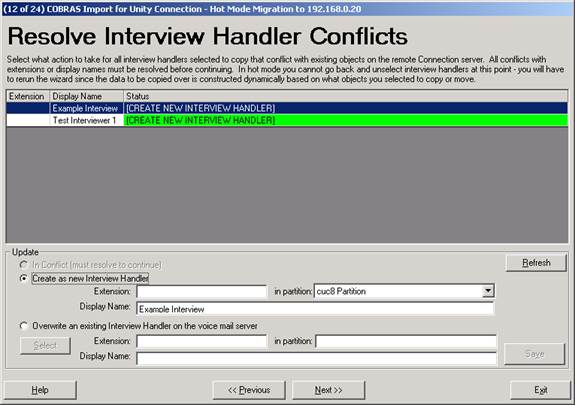
This page shows all the interview handlers you selected to copy earlier in the wizard. Each interview handler will be in one of three states in the grid:
- CREATE NEW INTERVIEW HANDLER. These rows are green and indicate that the display name and extension of the interview handler on this row are all unique and that COBRAS will create a new interview handler on the target voice mail server. If you want to instead overwrite an existing interview handler, select ”Overwrite an existing Interview Handler on the voice mail server” at the bottom of the form and use the ”Select” button to choose an interview handler.
You can select a different partition to create the interviewer in – the partition shown will default to the partition you selected for new interviewers earlier.
- OVERWRITE EXISTING INTERVIEW HANDLER. These rows are yellow and indicate that the display name and extension both matched an existing interview handler on the system. COBRAS will default to assuming you want to overwrite that interview handler on the target voice mail system. You can change this selecting the ”Create as new interview handler” radio button and then editing the extension and/or display name values in the ”Update” box at the bottom and pressing the ”Save” button. If the display name and extension are unique the row will change to CREATE NEW INTERVIEW HANDLER and turn green. If they are not unique you will get a dialog box telling you which object it’s conflicting with.
NOTE: When overwriting an existing interview handler, the display name and extension will not be changed on the existing interview handler. All other data from the backup will be applied to the interviewer.
- CONFLICT. This means either the display name or extension, but not both, matches an existing interview handler so COBRAS can’t assume which one you want to update if any. The name of the interview handler or other object it’s in conflict with is noted in the row. You must choose a radio button at the bottom of the page to determine if you want to create this as a new interview handler by changing the display name or extension or choosing an interview handler on the voice mail server to overwrite and then pressing ”save”. You cannot move to the next dialog until there are no interview handlers marked as CONFLICT.
Resolve Directory Handler Conflicts
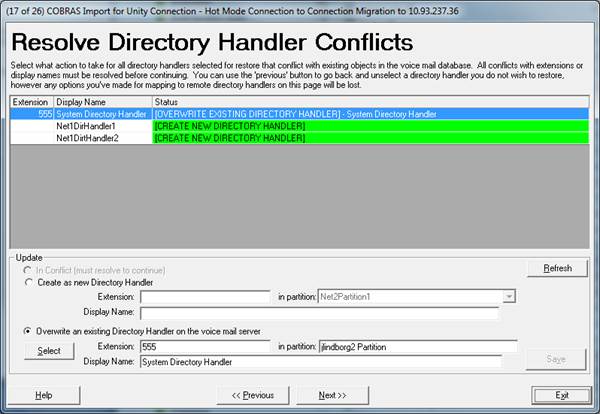
This page shows all the directory handlers you selected to copy earlier in the wizard. Each directory handler will be in one of three states in the grid:
- CREATE NEW DIRECTORY HANDLER. These rows are green and indicate that the display name and extension of the directory handler on this row are all unique and that COBRAS will create a new directory handler on the target voice mail server. If you want to instead overwrite an existing directory handler, select ”Overwrite an existing directory Handler on the voice mail server” at the bottom of the form and use the ”Select” button to choose an directory handler.
You can select a different partition to create the directory handler in – the partition shown will default to the partition you selected for new directory handlers earlier.
- OVERWRITE EXISTING DIRECTORY HANDLER. These rows are yellow and indicate that the display name and extension both matched an existing directory handler on the system. COBRAS will default to assuming you want to overwrite that directory handler on the target voice mail system. You can change this selecting the ”Create as new directory handler” radio button and then editing the extension and/or display name values in the ”Update” box at the bottom and pressing the ”Save” button. If the display name and extension are unique the row will change to CREATE NEW DIRECTORY HANDLER and turn green. If they are not unique you will get a dialog box telling you which object it’s conflicting with.
NOTE: When overwriting an existing directory handler, the display name and extension will not be changed on the existing directory handler. All other data from the backup will be applied to the directory handler.
- CONFLICT. This means either the display name or extension, but not both, matches an existing directory handler so COBRAS can’t assume which one you want to update if any. The name of the directory handler or other object it’s in conflict with is noted in the row. You must choose a radio button at the bottom of the page to determine if you want to create this as a new directory handler by changing the display name or extension or choosing an directory handler on the voice mail server to overwrite and then pressing ”save”. You cannot move to the next dialog until there are no directory handlers marked as CONFLICT.
Resolve Schedule Conflicts
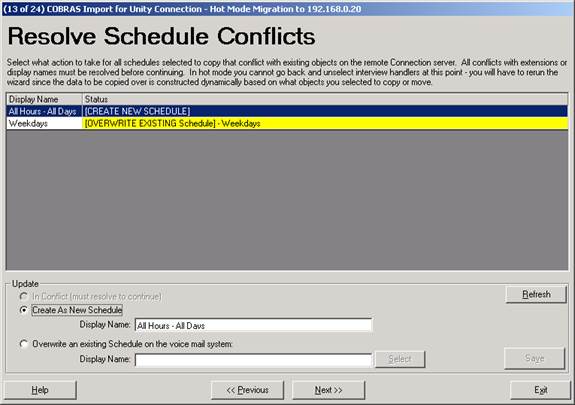
This page shows all the schedules you selected to copy from earlier of the wizard. Each schedule will be in one of two states in the grid:
- CREATE NEW SCHEDULE. These rows are green and indicate that the display name of the schedule on this row is unique and that COBRAS will create a schedule on the target voice mail server. If you want to instead overwrite an existing schedule, select ”Overwrite an existing Schedule on the voice mail system” at the bottom of the form and use the ”Select” button to choose a schedule. Only the schedule details will be updated, the name won’t be changed.
NOTE: If you choose to change the display name of a schedule using the ”Create as schedule” radio button and then saving, those changes are saved into the backup files. In other words if you change a schedule from ”Test Schedule 1” to ”Test Schedule 2” to avoid a conflict and save it, the next time you do a restore with this backup set, that schedule will still be setup as ”Test Schedule 2”. If this is undesirable behavior for you, make sure to do your restore using a copy of your backup database.
- OVERWRITE EXISTING SCHEDULE. These rows are yellow and indicate that the display name matched an existing schedule on the system. COBRAS will default to assuming you want to update the corresponding schedule on the target voice mail system. You can change this by selecting the ”Create as new schedule” radio button and then editing the display name in the ”Update” box at the bottom and pressing the ”Save” button. If the display name is unique the row will change to CREATE NEW DISTRIBUTION LIST and turn green. If they are not unique you will get a dialog box telling you which schedule it’s conflicting with.
Resolve Schedule References
The remaining wizard pages involve telling COBRAS what to do with references that it cannot resolve on its own. There are many references from call handlers and subscribers to other objects – some 30 separate possible links exist that have to be resolved. COBRAS consolidates these into lists of object types all together. COBRAS does not tell you HOW these objects are referenced, only that some reference to them is made by some object you’re restoring.
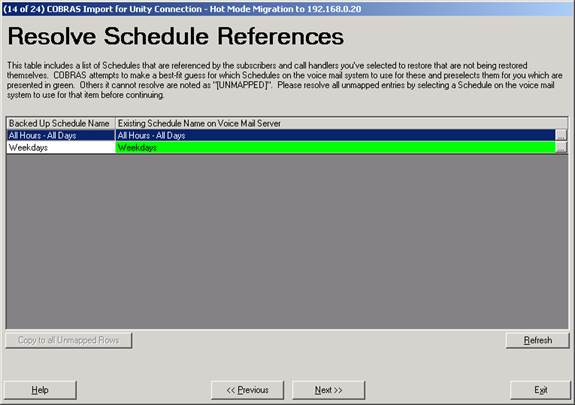
This page shows all the system schedules that you are not copying but that are referenced by a handler or subscriber that you’ve selected to move or copy. In other words if you select to copy all schedules from your backup, there should be nothing on this page. However, if you did not copy one or more schedules from your source Connection server for some reason, you will need to map those references to a schedule on the target Connection server. COBRAS will map them for you if the schedule name matches exactly but if it can’t, the schedule will be listed as “UNMAPPED” and you will have to select a schedule yourself. Click the “…” button to the right of the grid and you can search all schedules on the voice mail server. The wizard will not let you move on until all UNMAPPED rows have references.
Mapping a schedule reference will not change any properties on that schedule at all. It simply means any time COBRAS is rebuilding a call handler or subscriber and the backed up schedule name is referenced, the mapped schedule you selected will be used.
Resolve Switch References
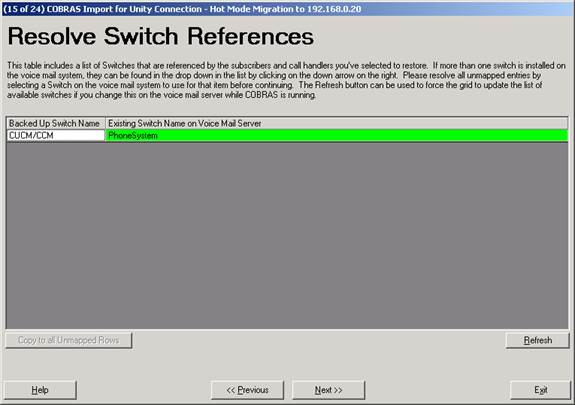
This page shows all the switch (phone system) references made by any of the call handlers or subscribers you’ve selected to copy or move. Since switch data is not included in the COBRAS backup, all switch references will be shown here regardless. If, however, you are not copying any handlers or moving any subscribers then this page will be empty and you can move on.
If there is only one switch installed on the target Connection server then all references will automatically map to that and there is nothing you need to do on this page.
If, however, there is more than one switch integration configured on the target Connection server, you will have to use the drop down list to select one of those for each switch reference. It’s rare there are more than one or two switches configured for a typical system, however, so this should be pretty quick.
Resolve Class of Service References
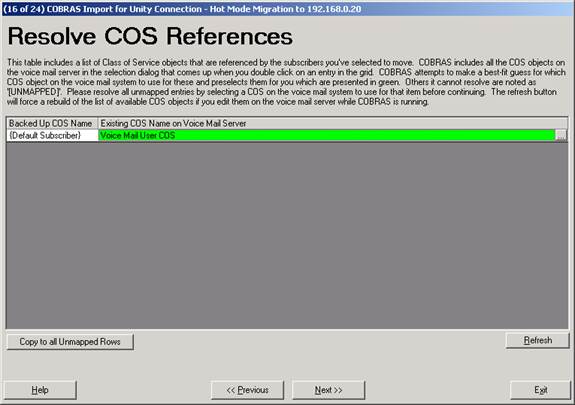
This page shows all the Class of Service (COS) objects referenced by any subscriber you are moving. Since COBRAS does not backup COS details, all COS references will be listed here to be mapped to a COS on the target Connection server.
If you did not select to move any subscribers, this page will be empty and you can move on.
If, however, at least one subscriber is being moved then you will see entries on this page. COBRAS will try and match the COS to an existing one on the target Connection server for you based on the display name. Those will be marked in green for you. If it cannot find a match the row will be in white and you will have to use the drop down list to pick a COS to use.
Review all the mappings even if they are automatically setup for you to be sure it’s what you want before pressing Next to move to the next page in the wizard.
Resolve Directory Handler
References
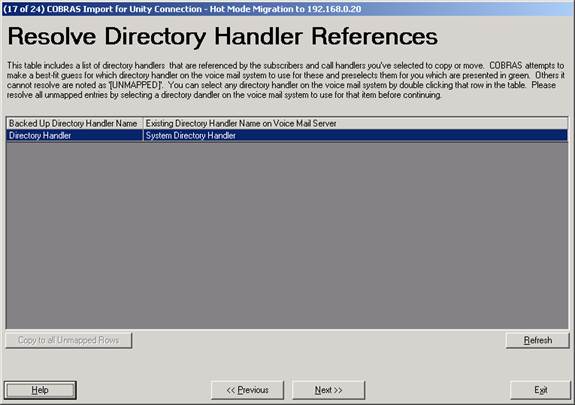
This page shows all directory handlers that you have not selected to copy but are referenced by any subscriber or handler you’ve selected to move or copy. In other words if you’ve selected to copy all directory handlers from the source Connection server to the target Connection server, this page should be empty and you can move on. Directory handlers can be referenced in many ways including as the target of a user input key (one key dial), after-message action, after-greeting action, subscriber exit action etc... The directory handlers on this page are referenced somehow by some object you are selecting to copy or move and each one will need to be mapped to an directory handler on the target Connection server.
COBRAS will attempt to automatically map the references for you based on the display name matching exactly and those appear in green. Those it cannot are in white and you will have to press the ”...” button to the right of the grid to select a directory handler on the voice mail server to use. All entries in this table must be mapped before the wizard will let you move on. Be sure to review the list closely even if it is mapped for you to be sure it’s what you want before moving on.
Resolve Interview Handler
References
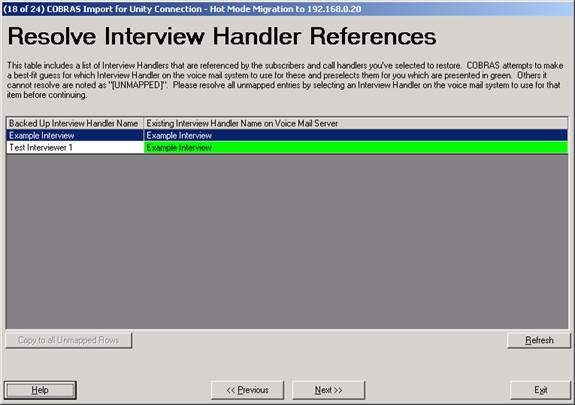
This page shows all interview handlers that you have not selected to copy but are referenced by any subscriber or call handler you’ve selected to move or copy. In other words if you’ve selected to copy all interview handlers from the source Connection server to the target Connection server, this page should be empty and you can move on. Interview handlers can be referenced in many ways including as the target of a user input key (one key dial), after-message action, after-greeting action, subscriber exit action etc... The interview handlers on this page are referenced somehow by some object you are selecting to copy or move and each one will need to be mapped to an interview handler on the target Connection server.
COBRAS will attempt to automatically map the references for you based on the display name matching exactly and those appear in green. Those it cannot are in white and you will have to press the ”...” button to the right of the grid to select an interview handler on the voice mail server to use. All entries in this table must be mapped before the wizard will let you move on. Be sure to review the list closely even if it is mapped for you to be sure it’s what you want before moving on.
Resolve Call Handler References
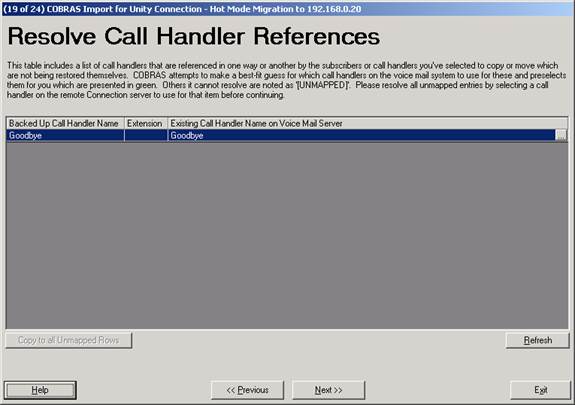
This page shows all call handlers that you have not selected to copy but are referenced by any subscriber or handler you’ve selected to move or copy. In other words if you’ve selected to copy all call handlers from the source Connection server to the target Connection server, this page should be empty and you can move on. Call handlers can be referenced in many ways including as the target of a user input key (one key dial), after-message action, after-greeting action, subscriber exit action etc... The call handlers on this page are referenced somehow by some object you are selecting to restore and each one will need to be mapped to a call handler on the target voice mail server.
COBRAS will attempt to automatically map the references for you based on the display name and extension matching exactly and those appear in green. Those it cannot are in white and you will have to press the ”...” button to the right of the grid to select a call handler on the voice mail server to use. All entries in this table must be mapped before the wizard will let you move on. Be sure to review the list closely even if it is mapped for you to be sure it’s what you want before moving on.
Resolve Subscriber References
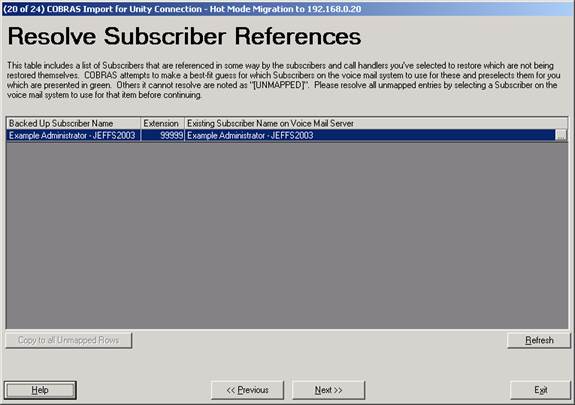
This page shows all subscribers that you have not selected to move but are referenced by any subscriber or handler you’ve selected to copy or move. In other words if you’ve selected to move all subscribers from the source to the target Connection server (not the recommended way to use COBRAS Hot Mode), this page should be empty and you can move on. Subscribers can be referenced by other objects in a number of ways including the target of a user input key (one key rule), after-message action, after-greeting action, as the owner or message recipient of a call handler etc... The subscribers on this page are referenced somehow by some object you are selecting to copy or move and each one will need to be mapped to a subscriber on the target Connection server.
COBRAS will attempt to automatically map the references for you based on the display name, alias and extension matching exactly and those appear in green. Those it cannot are in white and you will have to press the ”...” button to the right of the grid to select a subscriber on the voice mail server to use. All entries in this table must be mapped before the wizard will let you move on. Be sure to review the list closely even if it is mapped for you to be sure it’s what you want before moving on.
Resolve Distribution List
References
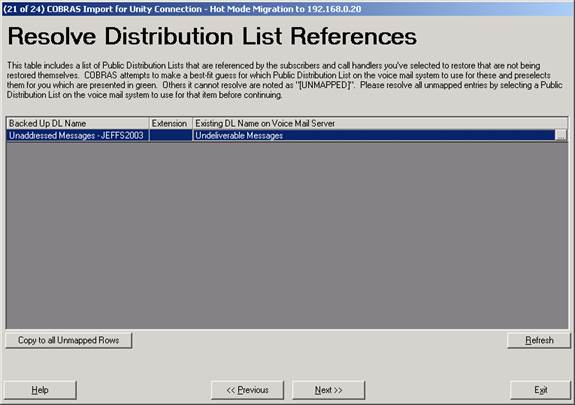
This page shows all distribution lists that are referenced by any handler or interview handler you’ve selected to copy as its owner or message recipient target. The distribution lists on this page are referenced somehow by a call handler or interview handler you are selecting to copy and each one will need to be mapped to a distribution list on the target Connection server.
COBRAS will attempt to automatically map the references for you based on the display name, alias and extension matching exactly and those appear in green. Those it cannot are in white and you will have to press the ”...” button to the right of the grid to select a distribution list on the voice mail server to use. All entries in this table must be mapped before the wizard will let you move on. Be sure to review the list closely even if it is mapped for you to be sure it’s what you want before moving on.
Resolve Notification Template References (only for Connection 9.0 and later)
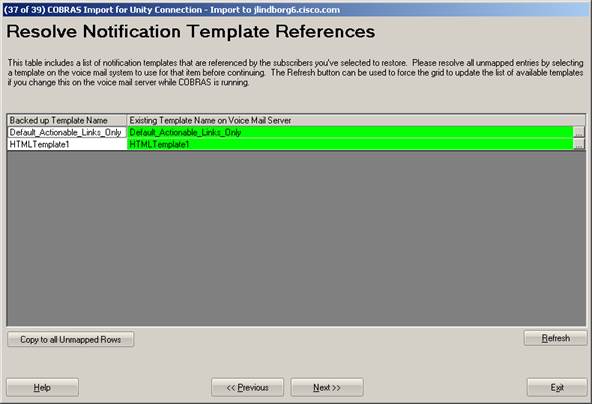
This page shows all notification templates that are referenced by any HTML notification devices that are associated with one or more subscribers you have selected to restore.
COBRAS will attempt to automatically map the references for you based on the display name matching exactly and those appear in green. Those it cannot are in white and you will have to press the ”...” button to the right of the grid to select a notification template on the voice mail server to use. All entries in this table must be mapped before the wizard will let you move on. Be sure to review the list closely even if it is mapped for you to be sure it’s what you want before moving on.
Copy or Move Objects
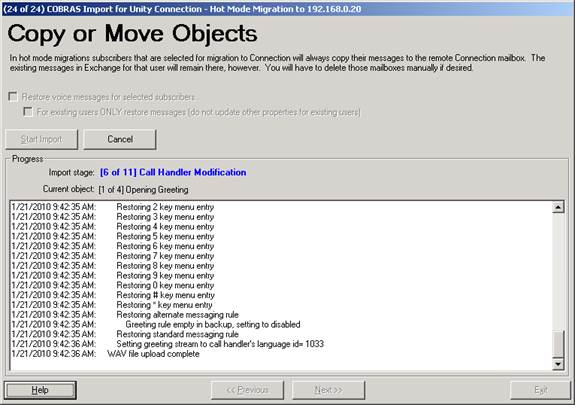
This is the final page of the wizard where you can kick off the actual copy and/or move operations.
Once you select the ”Start Import” button the copy and/or move process starts. The status of the migration is shown above the log viewer and you can see the progress through all the steps of the restore and how many objects are being created/updated for that step. The scrolling text is the same information that ends up in the log file and can be reviewed later if you like.
Terminating the migration once it starts can result in a damaged system. Don’t do that unless instructed to do so by TAC.
A migration can be done against two running Connection while both are in use, however performance will be affected. It’s best to do this off hours to avoid delays in call processing.
The User Migration Process
When COBRAS moves users from the source Connection server to the target Connection server it follows these steps one at a time for each user:
1. Create a new user with a mailbox on the target Connection server. This will use the same extension, name, alias etc… as the user you are moving. It will “replace” the global user that is in the database currently on the target Connection server that “points” to the user on the source Connection server you are moving. The only difference is it will live in a different partition. The partition is determined by the user template you select for new user creation in the wizard.
2. Create a global user on the source Connection server that “points” to the new user you just created on the target Connection server. This is used to route messages to the new user you just created. At this point any messages left for this user on the source server get routed to the new user mailbox on the target server instead of the mailbox on the source server we are in the process of moving.
3. Update the user properties for the new user you created on the target connection server. This includes voice names, greetings, notification devices etc…
4. Move messages from the mailbox of the user on the source Connection server to the mailbox of the new user on the target Connection server. This is done one message at a time and moves all messages – including those marked read. Note that COBRAS does NOT move deleted messages that happen to be in the deleted items folder if you have that option configured.
5. Delete the global user on the target Connection server that points to the user on the source Connection server we are moving.
6. Delete the user with a mailbox on the source Connection server. The move is now complete.
If there is a failure at steps 1 through 4 then the migration process is aborted, the new user and/or global user created are deleted and the system should go back to where it was prior to attempting to move the user. Common issues are running out of mailstore space during the message move or a licensing violation during the user creation process (i.e. running out of user licenses). Either way, the migration process exits entirely and you will need to review the log file to see what happened, address the issue(s) at hand and try again.
If the process gets to step 5 and there’s a failure deleting the global user or the old mailbox, these failures are logged but the migration process continues. You will want to review the problems reported in the log file after migration and decide what to do from there.
NOTE: Moving messages from the user’s mailbox on the source server to the target for many users will likely result in a larger mailstore impact on the target Connection server. The reason for this is the loss of “single instance messaging”. When a message is sent to multiple users on the same mailstore only a single copy of that media is stored and “links” are put into user’s mailboxes for each one. However when you move messages to a remote mailstore this is lost and multiple copies of the same message will be in each user’s inbox on the target. Keep this in mind when planning on moves. It’s best to stick to small groups of users at a time and to keep a reasonably tight mailstore aging policy in place to avoid bloated mailboxes during moves.
Requirements/Special Notes
All COBRAS applications are 32 bit and will require the 32 bit version of the IBM Informix ODBC Drivers to be installed even if you are running on a 64 bit operating system. You can get the latest ODBC driver on the IBM Informix ODBC Driver page.
Both the source and the target Connection servers must be up and running before the migration will be allowed to execute. Replication must be working and all users being moved must have replicated between the source and target servers.
COBRAS runs as a lower priority process and can be run while both Connection servers are running and taking calls. However, even at a lower priority process it will use CPU cycles and take up database processing power that will affect the performance of running systems. It’s always a good idea to do migrations during off peak call times.
How Long Will a Migration Take on My System and How Much Space Will it Take?
Unfortunately there is virtually no accurate way to predict how long a migration is going to take unless I know how many users, how many messages for each user, how many greetings are recorded, how large they are, how many voice names are recorded, how large they are, the speed of your network, the speed of the system you’re doing the backup on, how much traffic is on the network, the hardware specs of the platform being backed up, how many handlers, subscribers, interviewers and schedules are being moved or copied etc… There are far too many variables to make useful estimate ranges.
The short version is the Hot Mode migration is designed to move small groups of users in sets between Connection servers over a period of time. As such the backup and move time should be reasonable. If you’re moving a thousand users at a shot you are not using the tool as it was designed and you should probably consider doing a “flash cut” using COBRAS Briefcase mode instead.
The best I can do is provide a few examples we’ve done in our labs to give you a very (very) rough idea of what to expect. Your mileage may (and very likely will) vary quite a bit depending on variables noted above. All timings are from two Connection 8.5 networked systems doing a “hot mode” user migration. The import times are rough since it includes the time it takes to walk through the import wizard which may vary quite a bit.
|
Two MCS 7845 servers 2000 users being moved 100 call handlers |
Export: 1 hour, 12 minutes Import: 1 hour, 40 minutes |
|
Two MCS 7845 servers 500 users being moved 100 call handlers |
Export: 20 minutes Import: 25 minutes |
|
Two MCS
7825 servers 1000 users
migrated 500 call
handlers |
Export: 51
minutes Import: 1
hour, 50 minutes |
Please note that COBRAS hot mode was NOT designed to be moving 1000+ users at a time. This is a worst case scenario run by our testing group. If you are moving that many users you should consider using briefcase mode instead.
Troubleshooting Tips
Whenever you encounter a problem with a COBRAS import, the first thing to do is gather the MDB file and log files found in the “HotMode” folder under the directory where you installed COBRAS Import is found. Each migration you do will have it’s own folder under here with the date/time on it that contains log files and the MDB file created that will be useful in troubleshooting any issues you are experiencing (assuming the import got that far).
Trouble with initial COBRAS login to Connection
If the initial login to Connection for either import or export fails then there is a problem making the ODBC connection. These are the two most common errors you’ll see:
· “Unspecified System Error = -27001”. This means COBRAS was able to find the server and attach to the ODBC proxy service but the service rejected the credentials you supplied. This can be due to the wrong login name or password for your remote user account or it could be that the account is locked out or that the password settings have the “must change password at next login” value set. The latter is the default value for the password settings on Connection installs and is a common failure reason – be sure you uncheck this.
· “Unspecified System Error = -908”. This means the server name is wrong or the ODBC Proxy service is not responding. The former is often a DNS issue – be sure name resolution is pointing where you think it is. The latter usually means the service is not running properly on the target server or that the port being used (20532) is being blocked between your Windows client you’re running COBRAS on and the target Connection server.
· “Error -11048”. This can sometimes mean that the PATH environment variable in Windows is too long – try moving the INFORMIXDIR/bin reference to the beginning of the PATH variable. Also make sure only one version of the ODBC driver is installed on this client machine
Disable CSA and all Virus Scanning Applications
For Windows based systems (all Unity versions) it’s a good idea to disable CSA and all virus scanning applications if you are having problems running the migration. CSA and various virus scanning packages often block access to ports necessary to attach to remote servers and file systems and/or create local files and the like. Before escalating a failure be sure to make sure this basic issue is not tripping you up since TAC will usually first start here.
Run with Debug Enabled
Usually the first step in running down a problem is to turn on debug mode. On the first page of the COBRAS import wizard you’ll find an options menu that has an option to enable debug output. This directs the COBRAS tools to dump more information to the output log including full text of all stored procs being called, all queries being made against the remote Connection server and additional entry/exit information. This will greatly increase the log file size, slow the application down a bit and make finding normal items in your log a bit more difficult so it’s not generally a good idea to run with it on unless you are trying to run down a problem.
WAV Upload or Download with Connection 8.x and later
Note that greetings and voice names for all objects (call handlers, users, interviewers etc…) are fetched and uploaded to Connection via HTTP. If you see HTTP errors or stream file upload/download errors this is dealing with greetings and voice name.
Before COBRAS attempts to run the migration against a Connection 8.x or later server it will upload or download a small WAV file as a test to be sure the process will not fail. If the attempt is not successful the migration will not be allowed to continue and you will be notified that the WAV transfer process is failing.
- Make sure there is no secure proxy server or secure HTTP access between the system you’re running COBRAS on and the Connection server you are migrating to. COBRAS has to use HTTP POST/GET routines to get wav files for greetings and voice names on and off remote Connection servers. You should be able to HTTP directly to the Connection server in a browser that is not configured for proxy access.
- Make sure that port 443 is open between the Unity server you’re running COBRAS on and the Connection server you’re doing the migration to.
- Make sure you’ve installed the unsigned certificate from the Connection server on the Unity server you’re running COBRAS on. In other words when you open your browser to the Connection system administration pages you should not get unsigned certificate warnings. Either IE or Fire Fox allows you to override the security warning and install the certificate on your system. Be careful, however, because Fire Fox lets you just ignore certificate errors even if the certificate is not properly installed on the local box.
- Check for duplexing inconsistencies (i.e. half and full duplex between the client machine and server). This can result in WAV file uploads or downloads sometimes working and sometimes not or in a lot of retries being necessary before a WAV file gets transferred properly.
- If you’re running in VMWare make sure you’ve set the default MTU sizes for all Connection installations from the default 1500 to 1472.
- When uploading WAV files COBRAS needs to create temporary WAV files in the root of C:\ and call an external executable to upload these via HTTP Post. Make sure no security application such as CSA prevents this execution or gets in the way of creation/deletion of files in the root of the C: dirve.
The most common problem encountered with COBRAS after initial connection completes has to do with message extraction and/or restore on a Connection 7.x and later system. Couple things to note here:
- Please check and double check that you do not have a virus scanning package installed on the Windows server you are running COBRAS export or Import on. This is by far the most common problem. By default they will block use of port 25 (SMTP) and message restores will fail if that’s the case. Virus scanning packages will often allow a connection to port 25 but will then block subsequent message transfers so the initial checks COBRAS makes up front before starting import may pass even though this is still a problem.
- Make sure there is no firewall either on the Windows server or between the Windows server and the Connection server blocking port 25 (for import) or port 7993 (used for secure IMAP access for export).
- Make sure port 443 is open between the client machine and the server you’re backing up or restoring to. Used for HTTPS which is used to get greetings and voice names on and off the Connection server.
- For message extraction in COBRAS export be sure you are using Connection 7.0(2) or later. Also make sure you are connecting to the server using a user _without_ a mailbox.
- Make sure you’ve set the SMTP connectivity for Connection correctly when importing messages. See Step 4 under the “Configuring Connection 7.x For Import” section above for details on this.
- If you have verified that the above do not apply, turn on all SMTP and MTA traces on the Connection server, set the debug output option on the main form of the COBRAS import, run the import for a single user with messages (which will presumably fail) and gather the COBRAS import log and the Connection logs and provide them to the TAC engineer you’re working with.
If you see IMAP
errors during import coming back that contain text that looks like this:
- 538
Encryption required for requested authentication mechanism
- 530
Authentication Required
Then you need to review the SMTP authentication settings in Connection – see step 4 in the Configuring Connection 7.x for Import section above for details.
TAC Directed Command Line Parameters for Troubleshooting
These command line parameters have been added to help TAC investigate specific problems – you should only run with them enabled at their direction.
COBRAS Import for Connection
- “/PauseAfterEmailSend”. This will cause COBRAS Import to pop a dialog box immediately after sending a voice message to Connection and allow you to examine the EML text file it used to construct the email it sent. Each message will wait for you to click “ok” to continue.
- “/skipvercheck”. Used to force COBRAS to not check the application version from the backup database and attempt to restore it regardless. Old versions of the backup tool did not include this application version information in the MDB file.
- “/ForceBriefcase”. Used to override hot mode when running COBRAS import for Connection on a Unity server that’s part of a digital network with other Connection servers.
- “/ForceHotMode”. Used to force hot mode even if the local Unity installation is not currently part of a digital network with Connection. This should only be used for testing purposes.
- “/DisableNotificationDevicesDuringRestore”. With this option on all active notification devices for subscribers are disabled before messages are restored. All devices that were disabled during restore get re enabled after all messages for all users have been sent. The re enabling process takes place even if the import is canceled before message send is complete. This prevents notifications from triggering unnecessarily during the message restore process.
- “/ShareLoginInfo”. All Connection server login/password details are shared across all users of COBRAS Import instead of being separated based on Windows login name. This can be useful if you have a single server used for all COBRAS activity and you want to “pre populate” Connection server login details for everyone ahead of time.
- “/SpeedDialogs”. All dialogs that have data to be confirmed but contain no conflicts or unmapped data will be skipped. WARNING! This mode is not advised and should be used only by sites that absolutely know they can trust the default resolution of COBRAS object resolution lookup logic. You should test extensively before employing this.
- /DefaultReplacementUserAlias=”useralias”. The user with this alias (if found) will
be pre populated as the replacement user when deleting subscribers on the
source Connection server during hot mode migrations.
Obtaining Updates
To check for updates to this tool, visit http://www.ciscounitytools.com/App_COBRAS.htm
© 2011 Cisco Systems, Inc. -- Company Confidential